Finding the best 12 free jewelry box plans involves selecting designs that range from simple pine boxes to elaborate multi-drawer armoires tailored to your specific storage needs. If your growing jewelry collection is currently tangled, dusty, or hidden in mismatched containers, you likely find it impossible to locate the perfect piece when you are in a hurry. Standard store-bought boxes often lack the specialized compartments required for watches or long necklaces, and luxury retail options can often cost more than the jewelry they hold. By learning how do you make a jewelry box using these free professional guides, you can create a custom, high-quality storage solution that perfectly protects your most valuable assets.
How do you make a jewelry box from scratch?
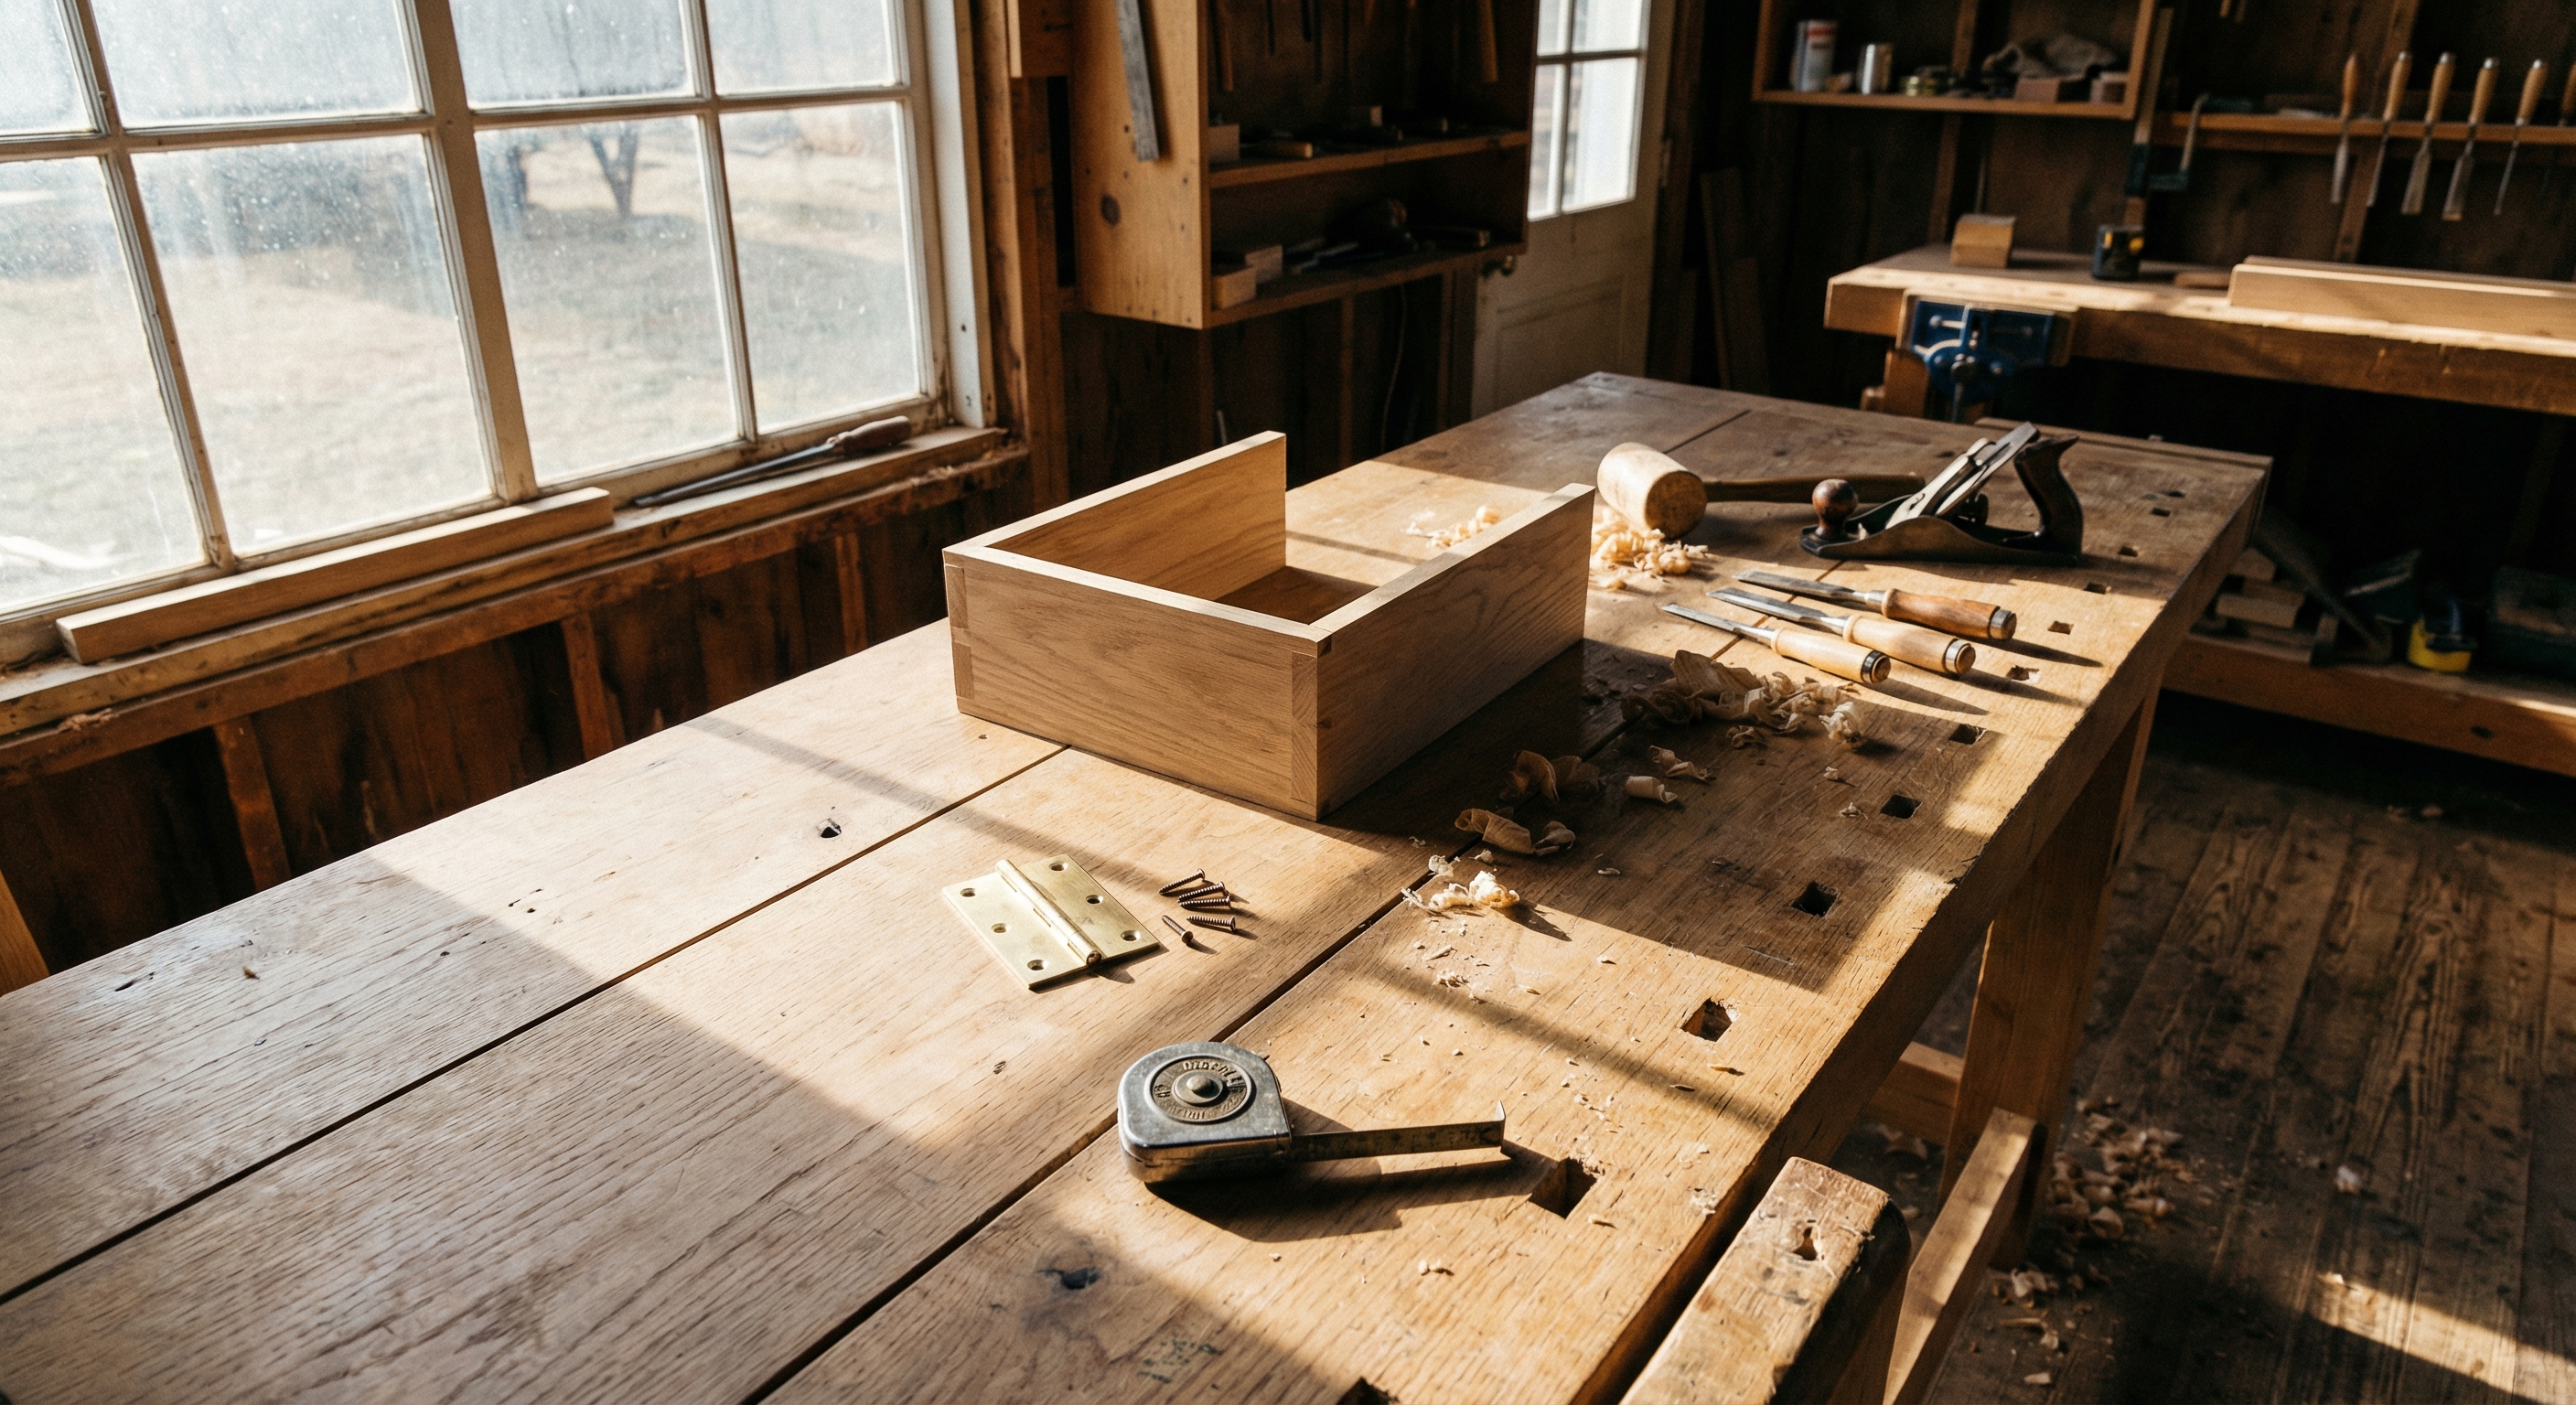
You make a jewelry box from scratch by selecting a design plan, cutting wood to specific dimensions, and assembling the panels with precise joinery and hardware. Understanding how do you make a jewelry box requires a focus on both structural integrity and the aesthetic finish of the exterior. You should start with a clean workspace and a clear cutting list to ensure every piece fits perfectly.
Essential Woodworking Tools for Beginners
To get started, you will need a few fundamental tools like a miter saw, a drill, and quality wood glue. Here is the deal: you don’t need a massive workshop to achieve professional results if you follow a structured plan.
- Miter saw for clean cross-cuts
- Wood glue and clamps
- Sandpaper (various grits)
- Measuring tape and square
Step-by-Step Construction Overview
The process typically begins with the base and side walls before moving to the lid assembly. You must ensure the corners are perfectly square to avoid a wobbly finished product.
Key Takeaway: Success in DIY jewelry box construction relies on precise measurements and having the right assembly tools ready before you begin.
| Plan Type | Difficulty | Estimated Time | Best For | |
|---|---|---|---|---|
| Basic Box | Beginner | 3-5 Hours | Daily Accessories |
Careful planning during the early stages of construction significantly reduces material waste and assembly errors.
Which wood types work best for DIY jewelry boxes?

Hardwoods like Walnut, Cherry, and Oak are the superior choices for jewelry boxes because they offer durability and beautiful natural grain patterns. When considering how do you make a jewelry box, the density of the wood determines how well it will hold fine hardware like small brass hinges. Softwoods like Pine are easier to cut but may require more finishing work to look premium.
Hardwood vs. Softwood Comparison
Hardwoods provide a weight and “thud” of quality that softwoods simply cannot replicate for luxury items. Better yet, these woods age beautifully, developing a rich patina over several years of use.
- Walnut: Deep, dark, and sophisticated.
- Oak: Classic, strong, and highly durable.
- Cherry: Warm tones that darken with light.
Selecting Grain Patterns for Aesthetics
You should look for “figure” in the wood grain to add a unique visual element to your box lid. Choosing consecutive boards ensures that the grain wraps around the corners for a seamless look.
Key Takeaway: Selecting the right wood species is the foundation of a box that feels like a family heirloom rather than a temporary container.
| Material | Durability | Finish Type | Cost Level | |
|---|---|---|---|---|
| Hardwood | High | Oil/Wax | Premium |
The choice of wood directly impacts the long-term structural stability and perceived value of the final piece.
What are the easiest beginner jewelry box plans?
The easiest beginner plans involve simple rectangular construction with “butt joints” that require minimal power tools and assembly time. Learning how do you make a jewelry box via these simplified guides allows you to build confidence before attempting complex drawers or secret latches. Most of these plans can be completed over a single weekend with basic hardware store materials.
The Standard Entry-Level Plan
This design focuses on a single-compartment box with a hinged lid and a felt-lined interior. It’s the perfect way to practice your sanding and finishing techniques without the stress of intricate joinery.
- Minimal tool requirements
- Fast assembly time
- Low material costs
- Easy to customize
Simplified Construction Guides
Many free PDF guides provide a comprehensive cutting list that tells you exactly which boards to buy at the store. Here is the deal: following a pre-made list prevents the common “three trips to the hardware store” scenario.
Key Takeaway: Beginner-friendly plans focus on the fundamentals of assembly and finishing, making them ideal for your first woodworking project.
| Plan Name | Tool Requirement | Total Pieces | Complexity | |
|---|---|---|---|---|
| Easy Box | Basic | 6 Panels | 1/10 |
Starting with a simplified plan ensures a high success rate and encourages you to take on more advanced designs later.
How do you design a custom secret compartment box?
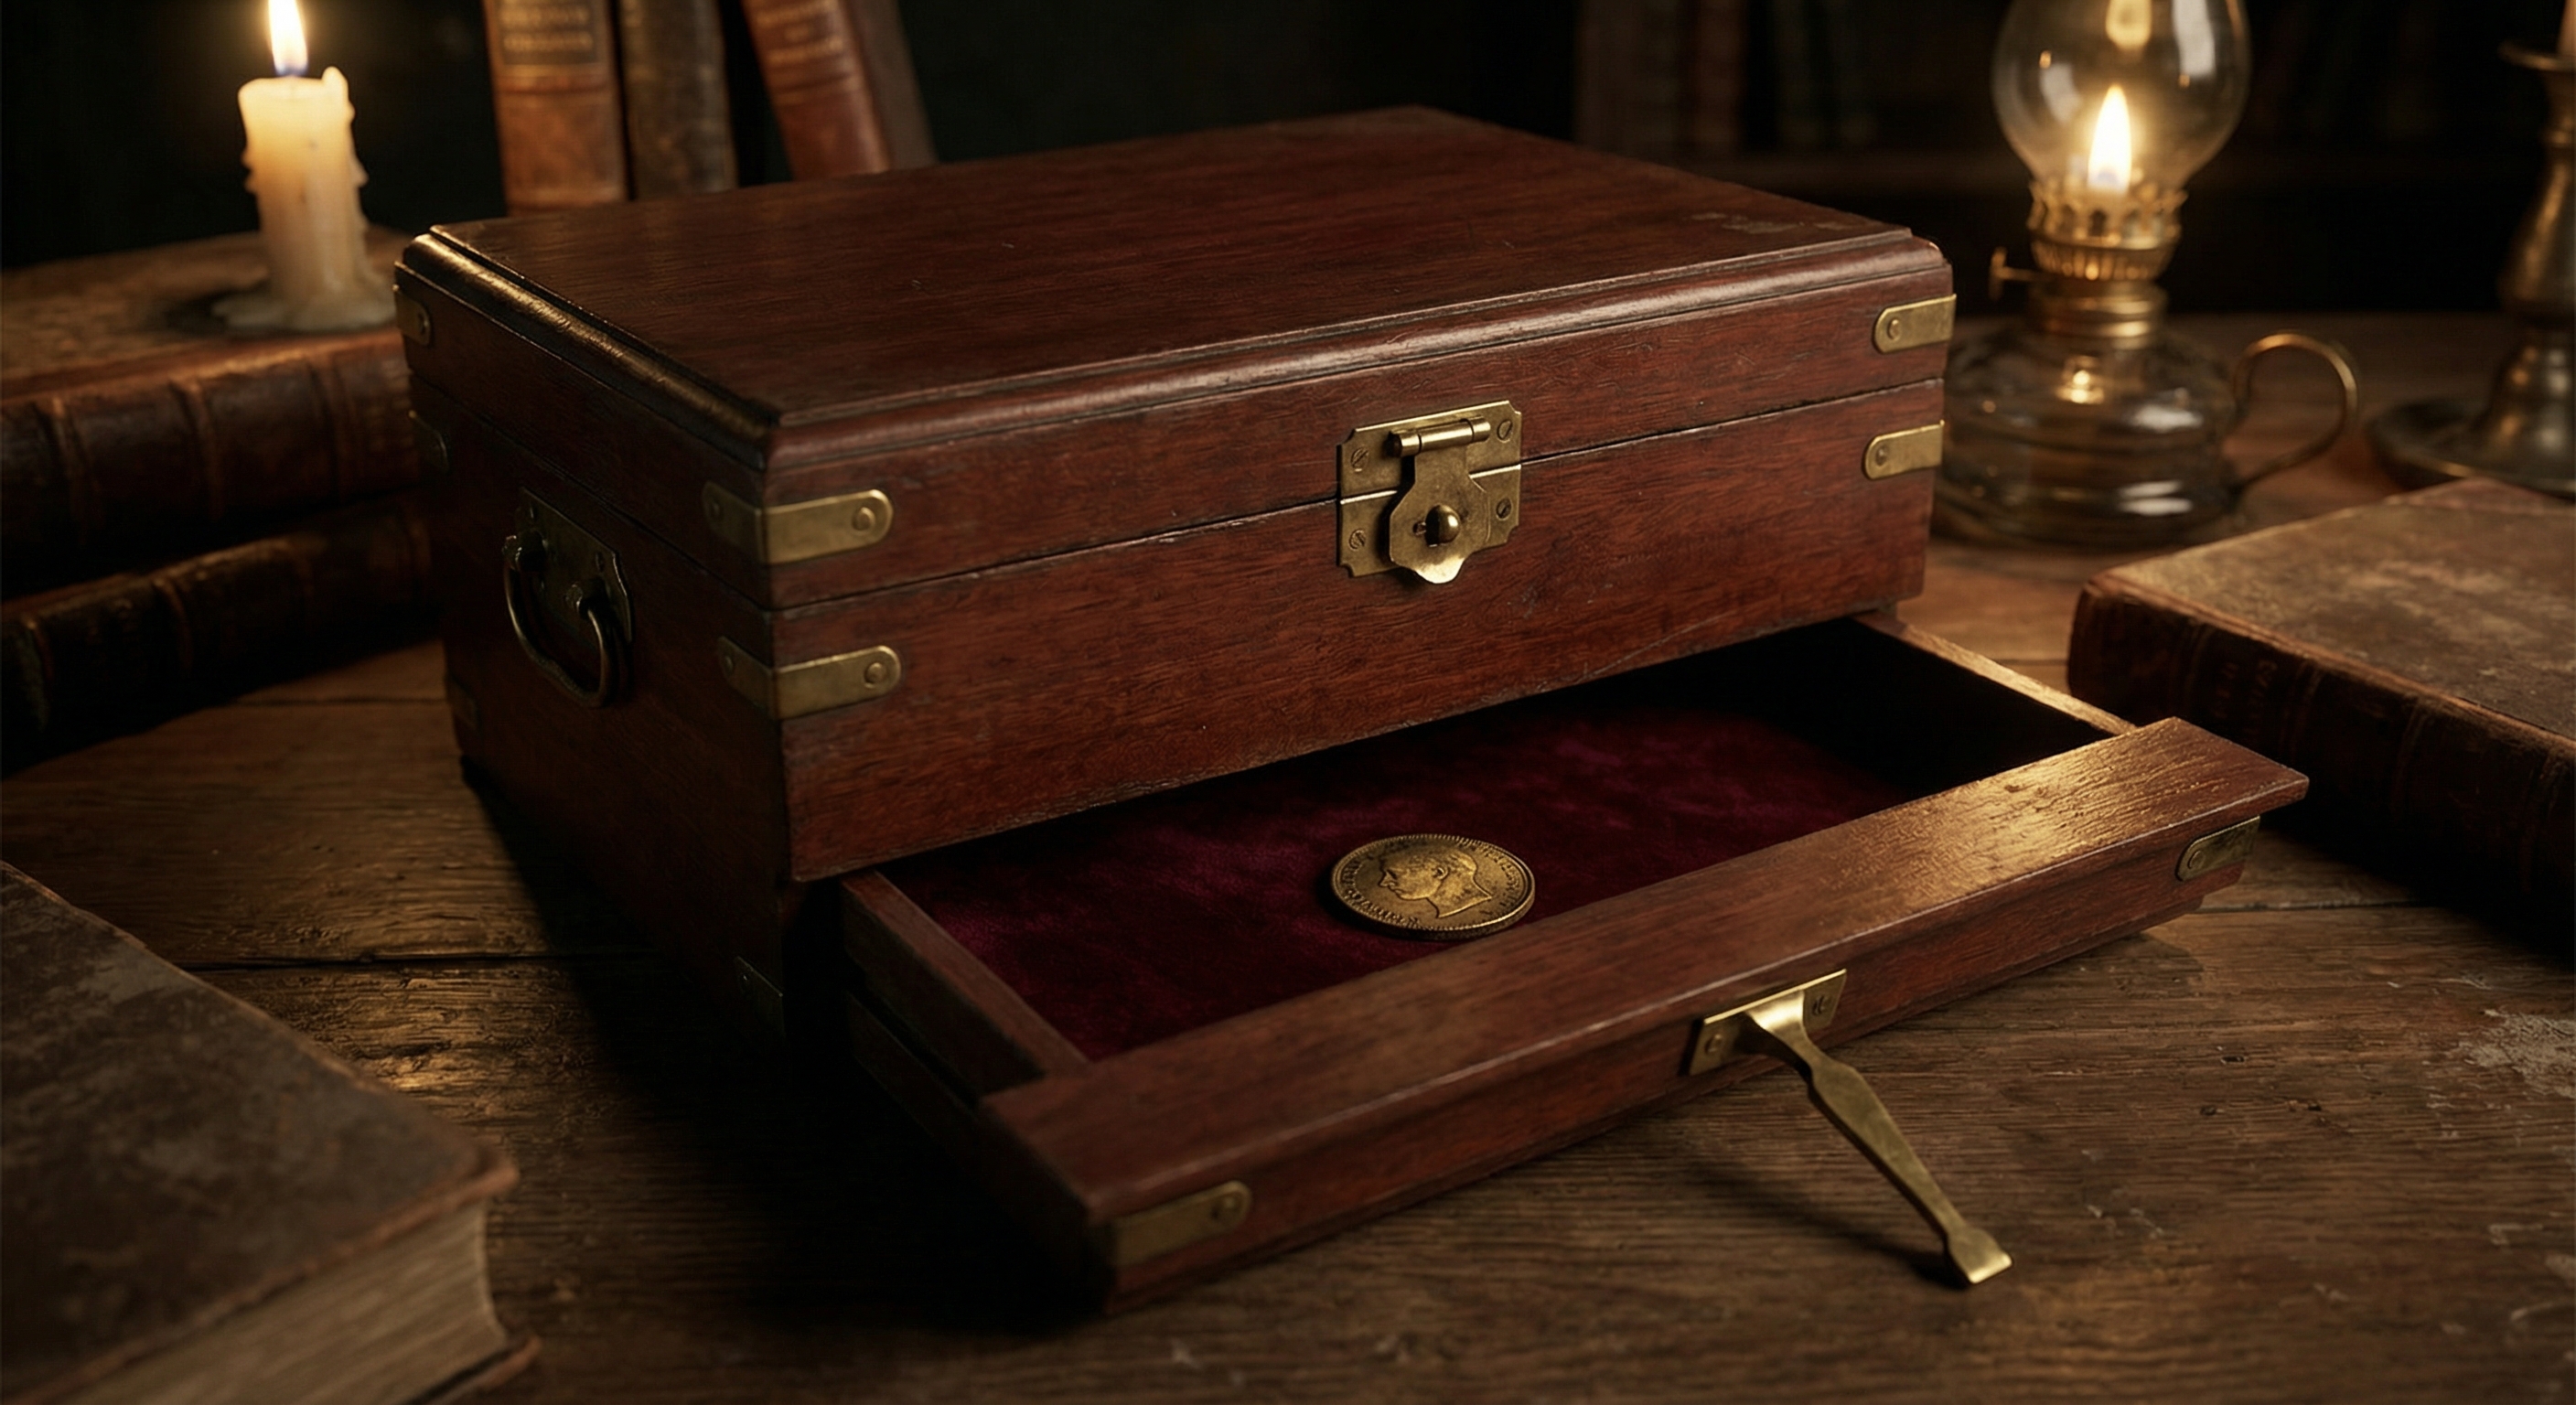
A custom secret compartment box is designed by incorporating false bottoms or hidden drawers that utilize mechanical latches or magnetic triggers. When you explore how do you make a jewelry box with security in mind, you must ensure the exterior looks completely normal to hide the hidden space. These designs often use the height of the base to conceal a thin, sliding tray.
Building Hidden Cases
The key to a successful hidden compartment is a tight fit that leaves no visible gaps for prying eyes. Better yet, you can use magnetic catches that only release when a specific “key” item is placed on top.
- False bottom inserts
- Side-sliding panels
- Magnetic locking pins
- Concealed hinges
Mechanical Latches and Triggers
Integrating a spring-loaded drawer can add a high-tech feel to a traditional wooden box. You need to be precise with your internal measurements to ensure the mechanism operates smoothly every time.
Key Takeaway: Security through design allows you to protect your most valuable items without the need for a bulky, visible safe.
| Feature | Security Level | Tech Used | Visibility | |
|---|---|---|---|---|
| Hidden Tray | High | Magnets | None |
Secret compartments add a layer of functional mystery and enhanced protection to standard jewelry storage solutions.
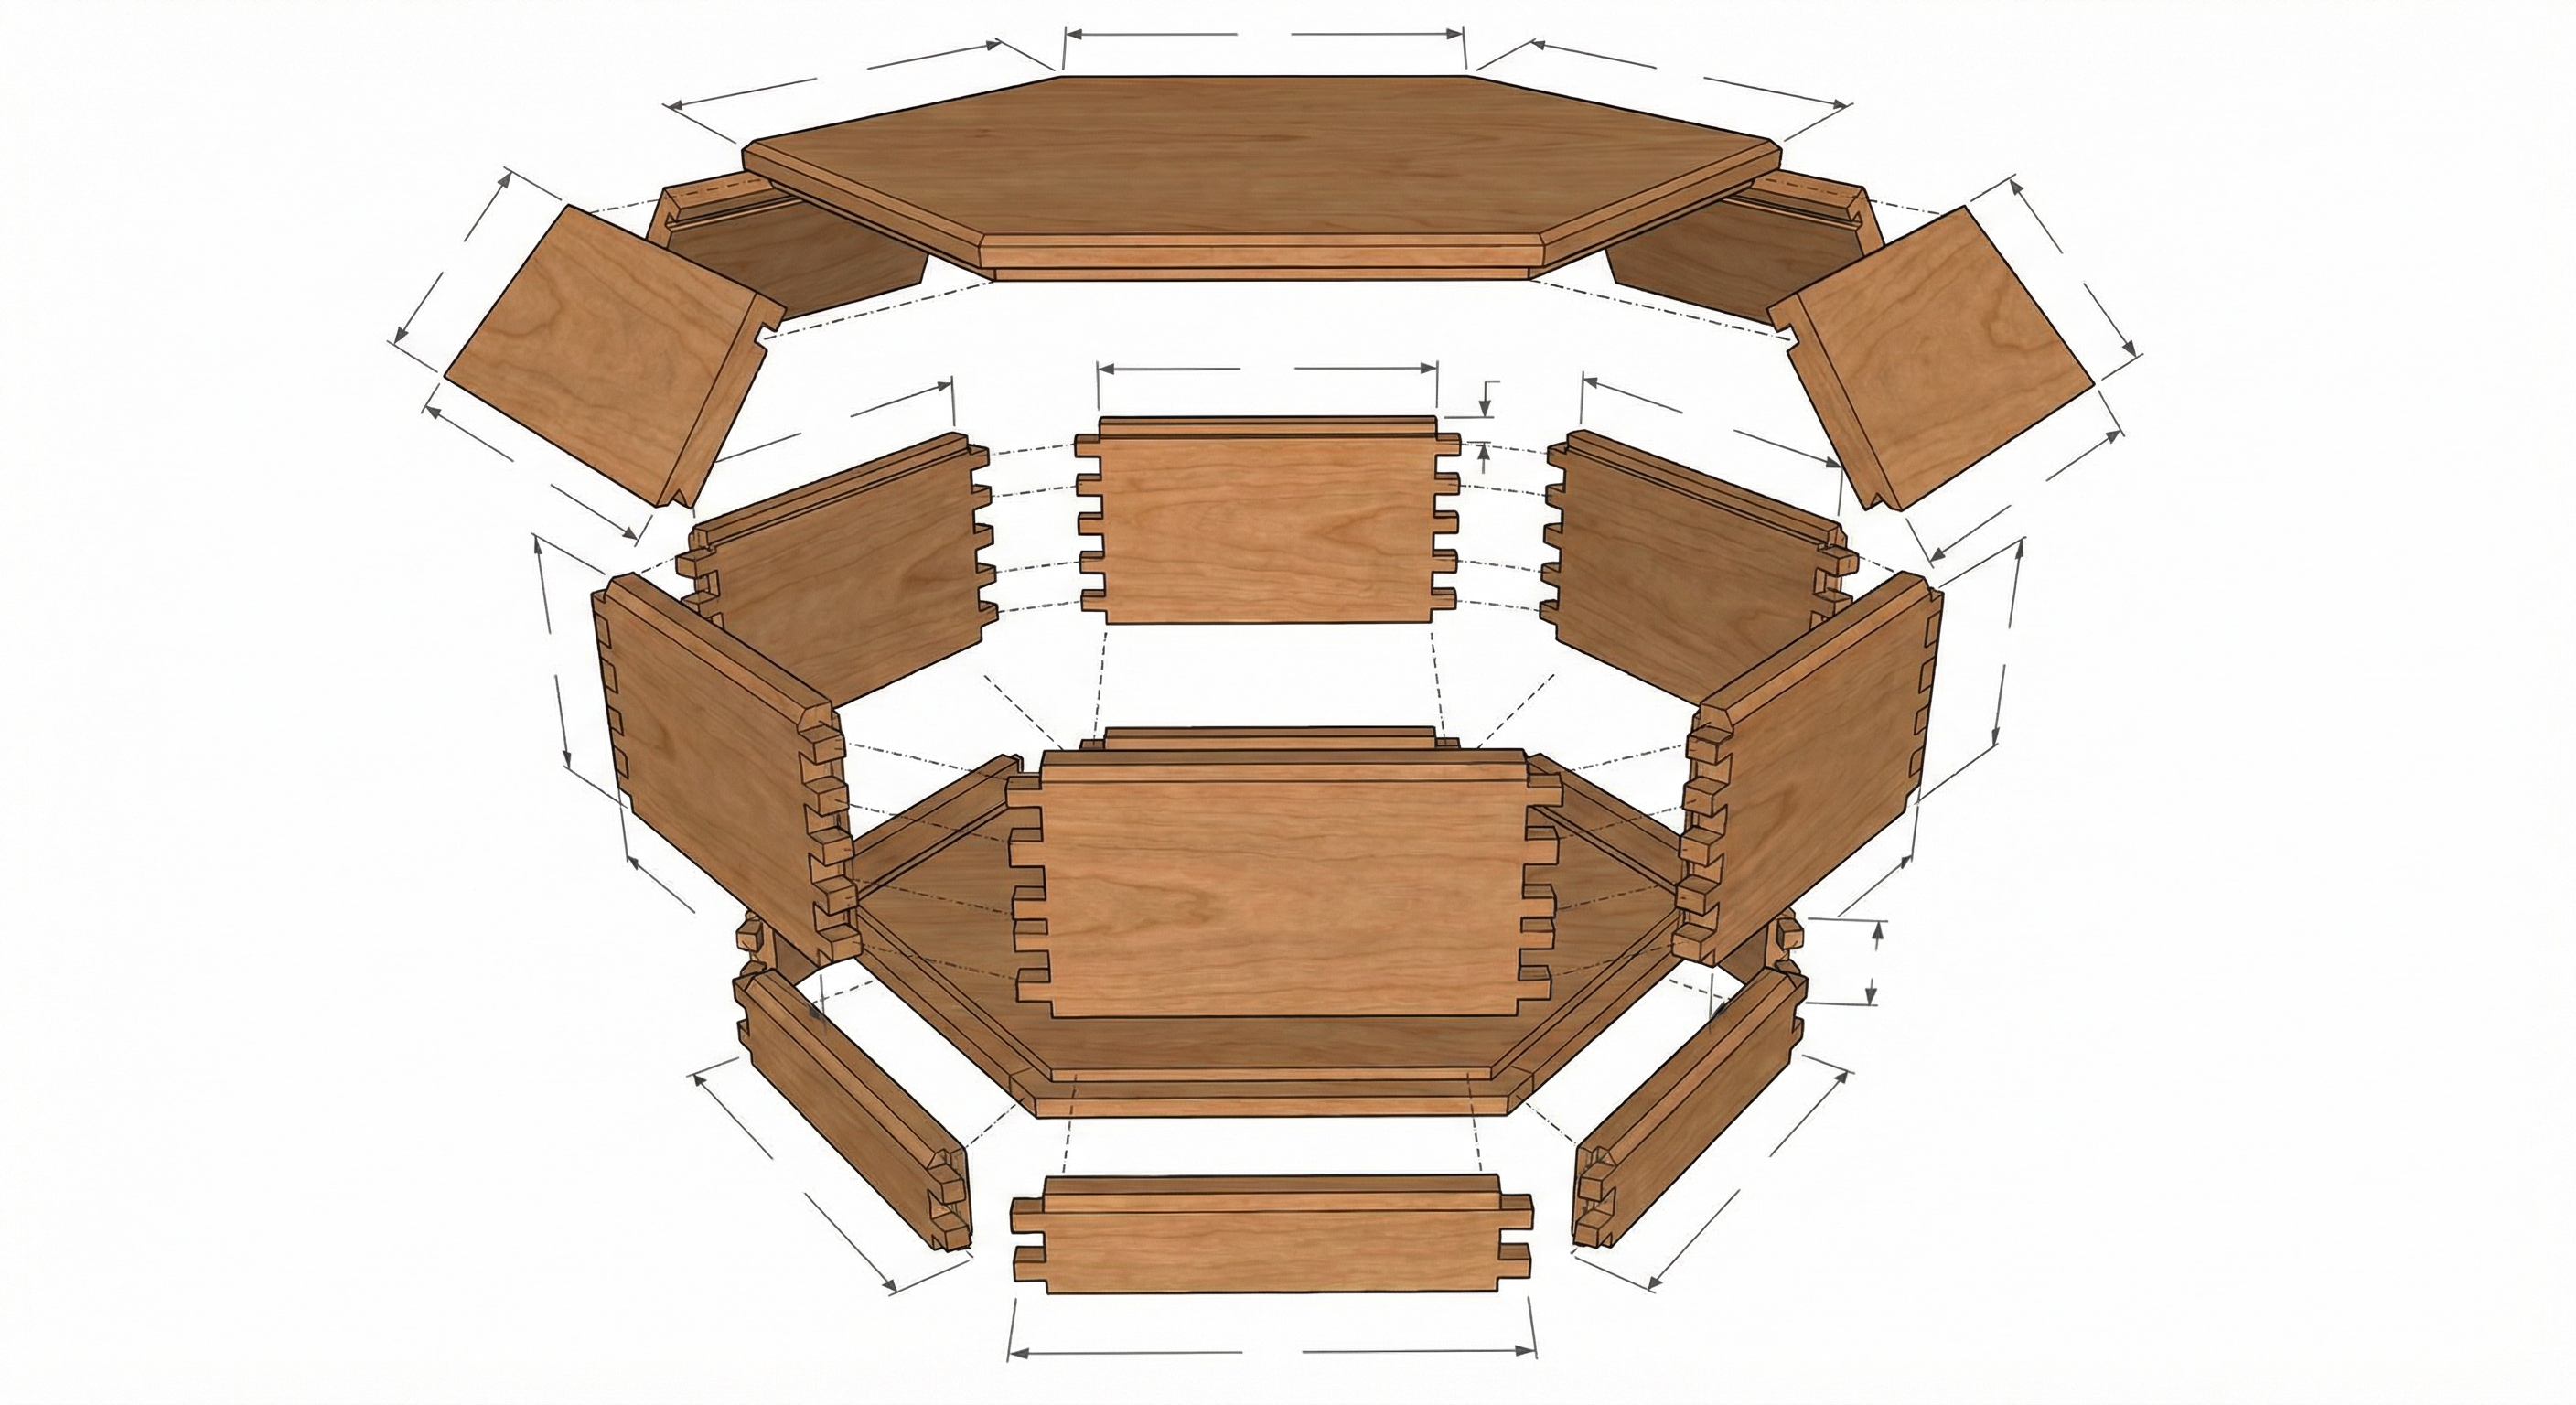
Where can you find plans for large jewelry cabinets?
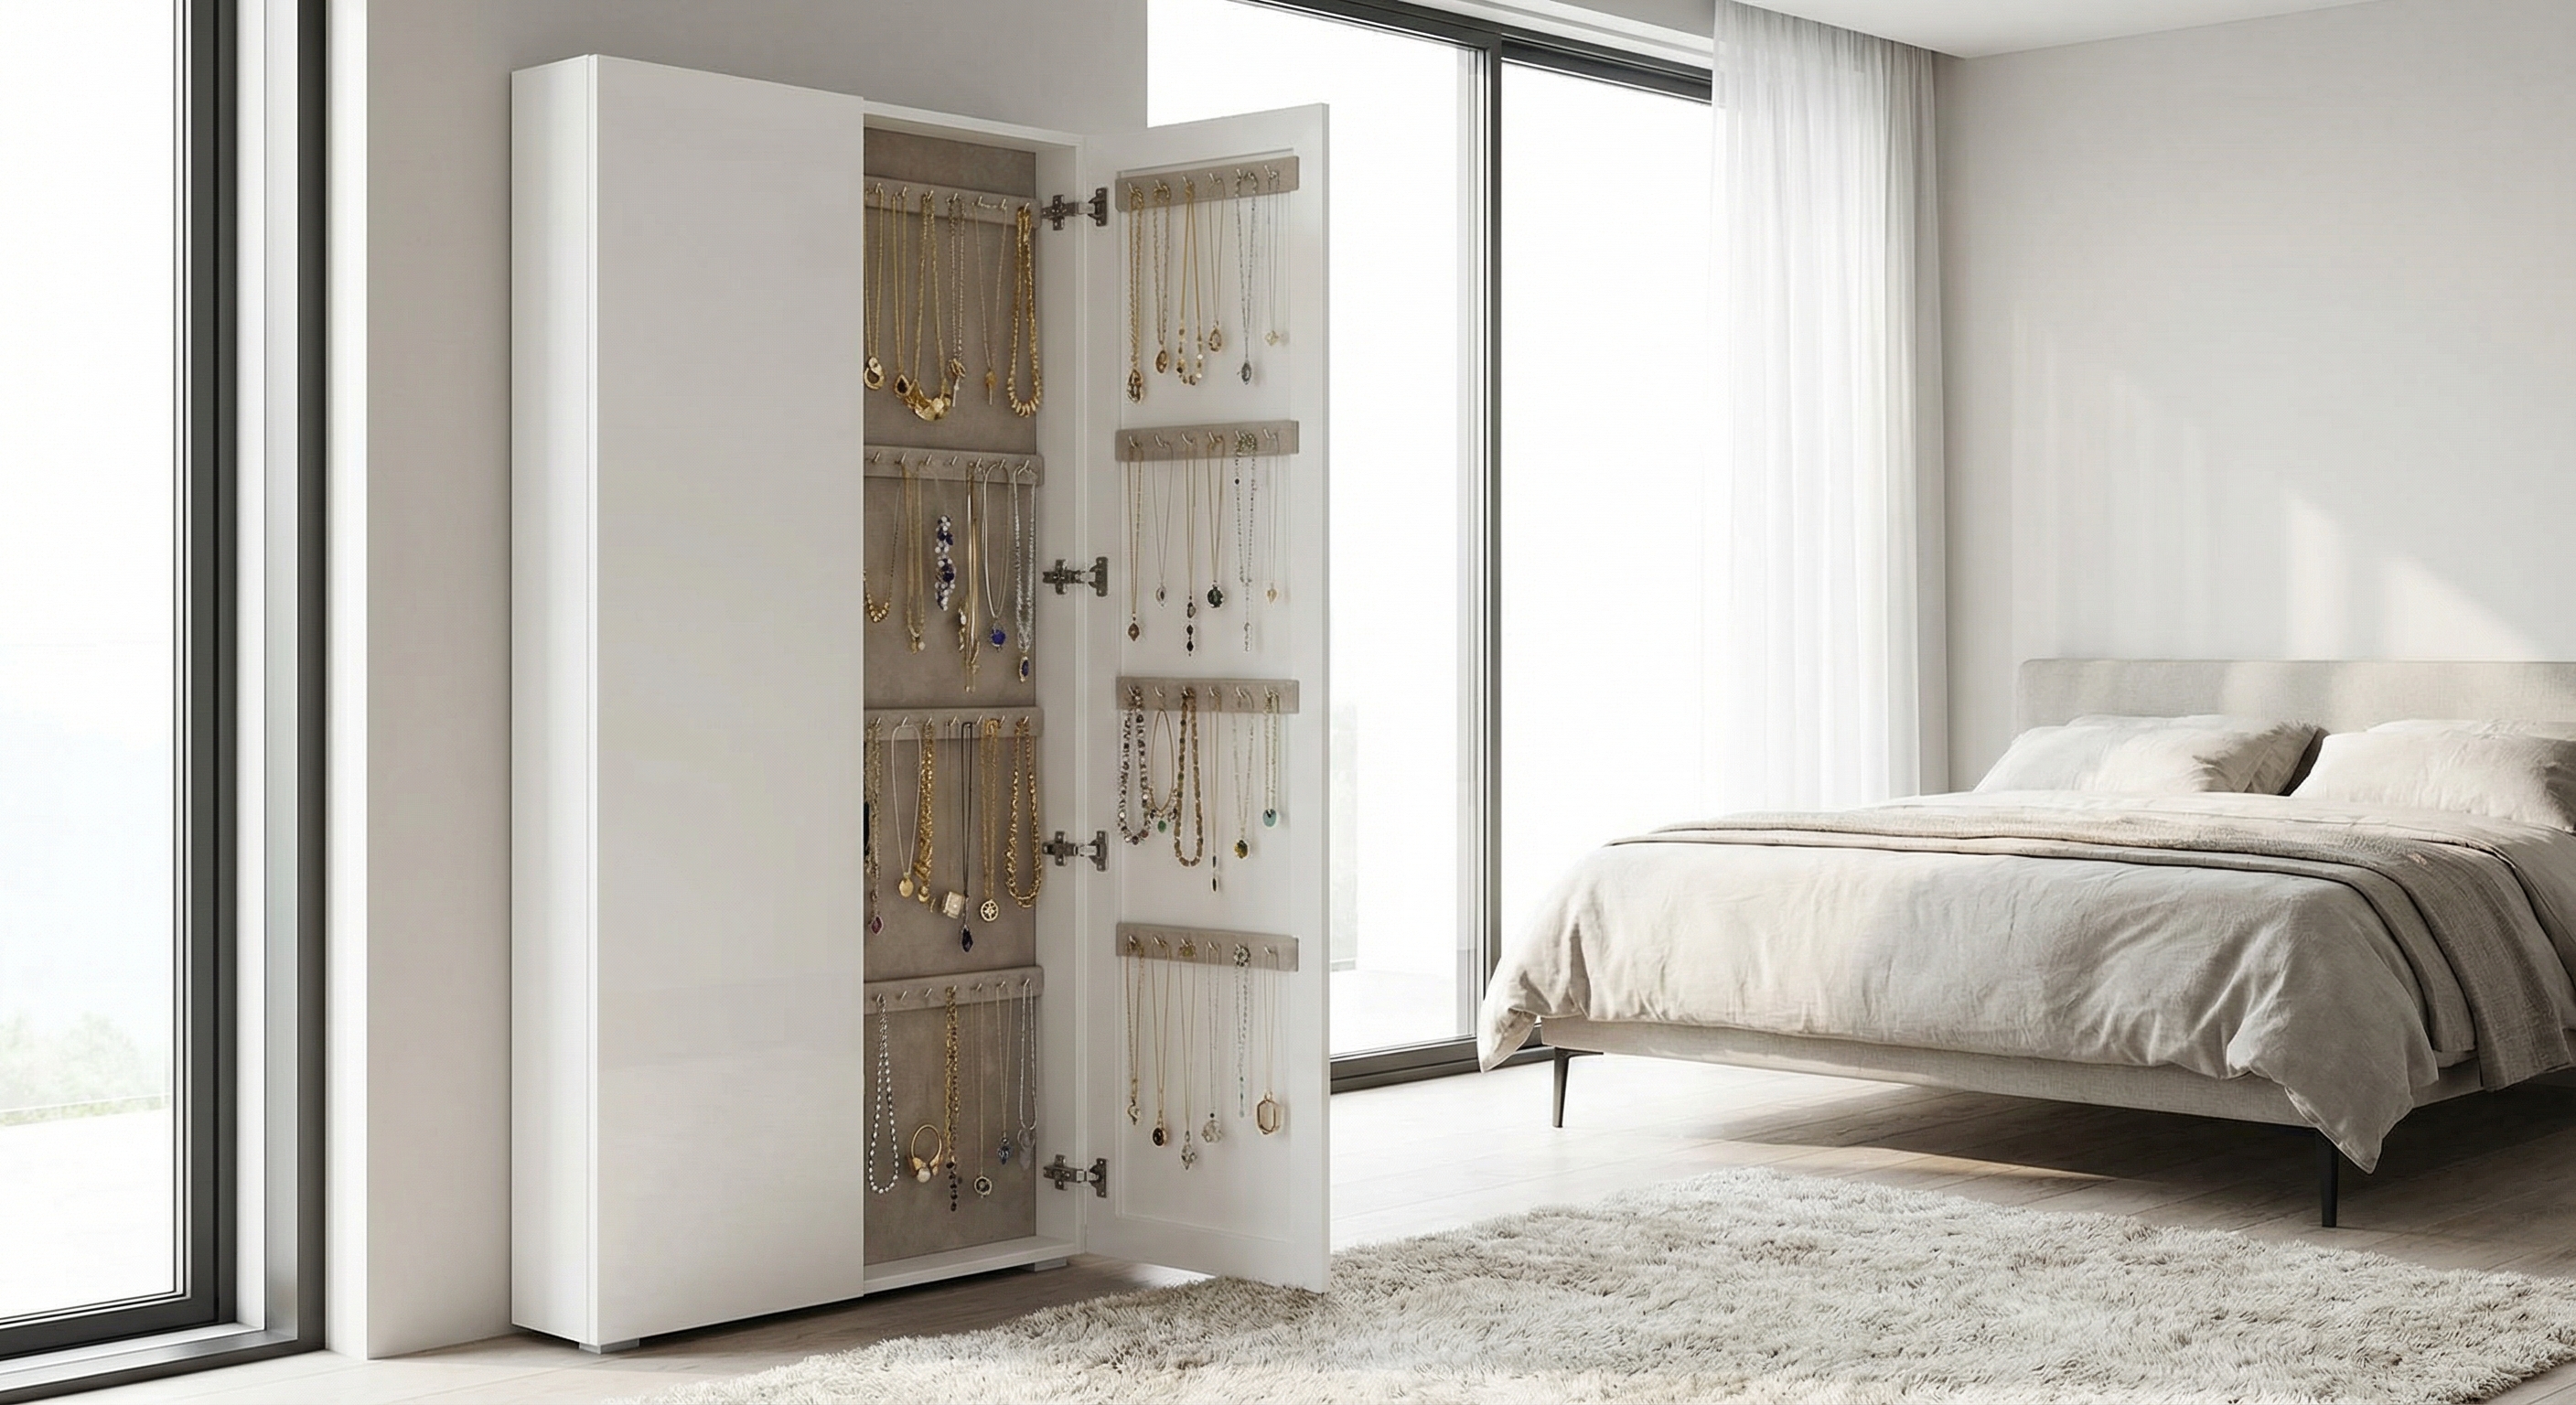
Large jewelry cabinet plans are available on professional woodworking blogs and free design repositories that specialize in furniture-grade armoires. Discovering how do you make a jewelry box on this scale requires an understanding of door hinges and vertical stability. These larger units are ideal for extensive collections that include long necklaces and multiple watches.
The 6-Drawer Vertical Armoire
This plan provides a floor-standing or wall-mounted solution with dedicated drawers for different jewelry categories. Here is the deal: a cabinet allows you to see your entire collection at eye level, saving you time every morning.
- Multiple velvet-lined drawers
- Integrated vanity mirror
- Ring roll sections
- Pull-out necklace racks
Integrating Side Racks for Necklaces
The sides of these cabinets often swing out to reveal hooks specifically designed to prevent necklace tangling. This vertical storage utilizes space efficiently while keeping delicate chains protected from knots.
Key Takeaway: Large-scale cabinets are the ultimate organizational tool for serious collectors who need to categorize hundreds of individual pieces.
| Cabinet Style | Dimensions | Storage Units | Mounting | |
|---|---|---|---|---|
| Full Armoire | 48″ Height | 6+ Drawers | Floor |
Investing the time to build a full cabinet provides a centralized and luxurious hub for your entire accessory collection.
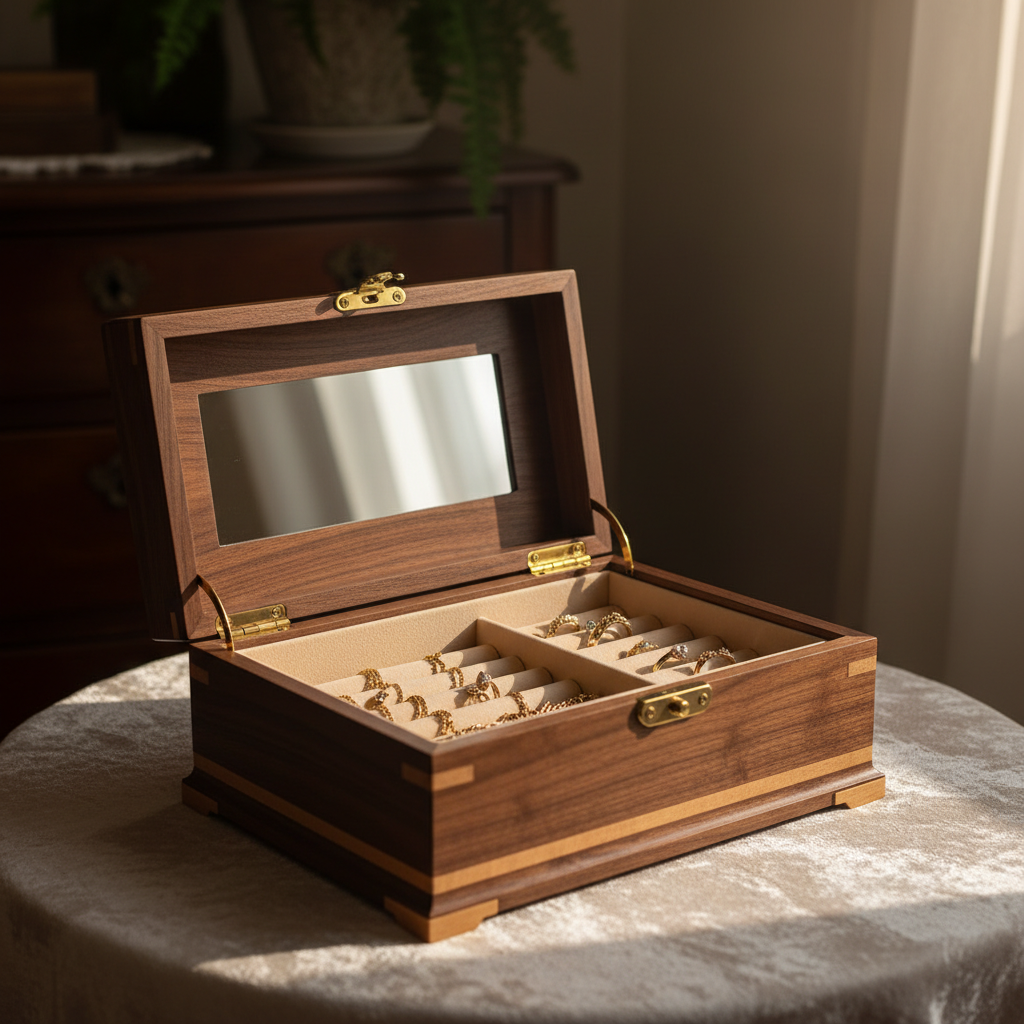
How do you create a luxury velvet lining inside?

You create a luxury velvet lining by carefully measuring the internal panels and adhering high-quality fabric using specialized spray adhesives or adhesive-backed felt. When researching how do you make a jewelry box interior, the lining is the most important element for protecting gemstones from scratches. A professional finish requires tucking the edges perfectly into the corners.
Applying Adhesive-Backed Fabrics
Adhesive-backed velvet is often the easiest path for DIYers because it eliminates the mess of wet glues. Better yet, these materials provide a uniform thickness that makes the internal assembly look factory-made.
- Measure twice, cut once
- Use a bone folder for corners
- Remove dust before sticking
- Trim excess with a sharp blade
Creating Ring Rolls and Custom Dividers
Ring rolls are made by wrapping foam cylinders in velvet and wedging them tightly into a designated section. You can customize the size of these rolls to fit your specific ring collection.
Key Takeaway: The interior lining is what transforms a wooden box into a specialized jewelry protector that prevents tarnish and damage.
| Lining Material | Texture | Protection | Ease of Use | |
|---|---|---|---|---|
| Silk Velvet | Ultra-Soft | Maximum | Intermediate |
A high-quality lining not only protects your jewelry but also provides a satisfying tactile experience during daily use.
Can you repurpose existing boxes for jewelry storage?
Yes, you can repurpose plain craft store boxes or vintage containers by adding internal dividers, new hardware, and a fresh coat of premium paint. Understanding how do you make a jewelry box from a pre-made base is an excellent shortcut for those without heavy woodworking tools. This method focuses more on the decorative arts and organizational layout rather than raw construction.
Converting Craft Store Boxes
A simple unfinished pine box can be sanded and stained to look like expensive mahogany in just a few hours. Here is the deal: the secret to a professional look is replacing the cheap stock hinges with heavy brass versions.
- Sand with 220-grit paper
- Apply wood conditioner
- Use high-quality enamel paint
- Add a protective clear coat
Adding Modern Hardware and Pulls
Leather pulls or sleek metal handles can instantly modernize an older box design. You should choose hardware that matches your room’s decor to make the piece feel integrated into your space.
Key Takeaway: Repurposing allows you to create high-end organizational tools quickly and affordably using existing structures as your canvas.
| Conversion Type | Primary Task | Time Saved | Focus | |
|---|---|---|---|---|
| Upcycling | Painting | 70% | Aesthetics |
Transforming existing containers is the most sustainable and cost-effective way to expand your jewelry storage capacity.
What techniques add a professional finish to DIY boxes?
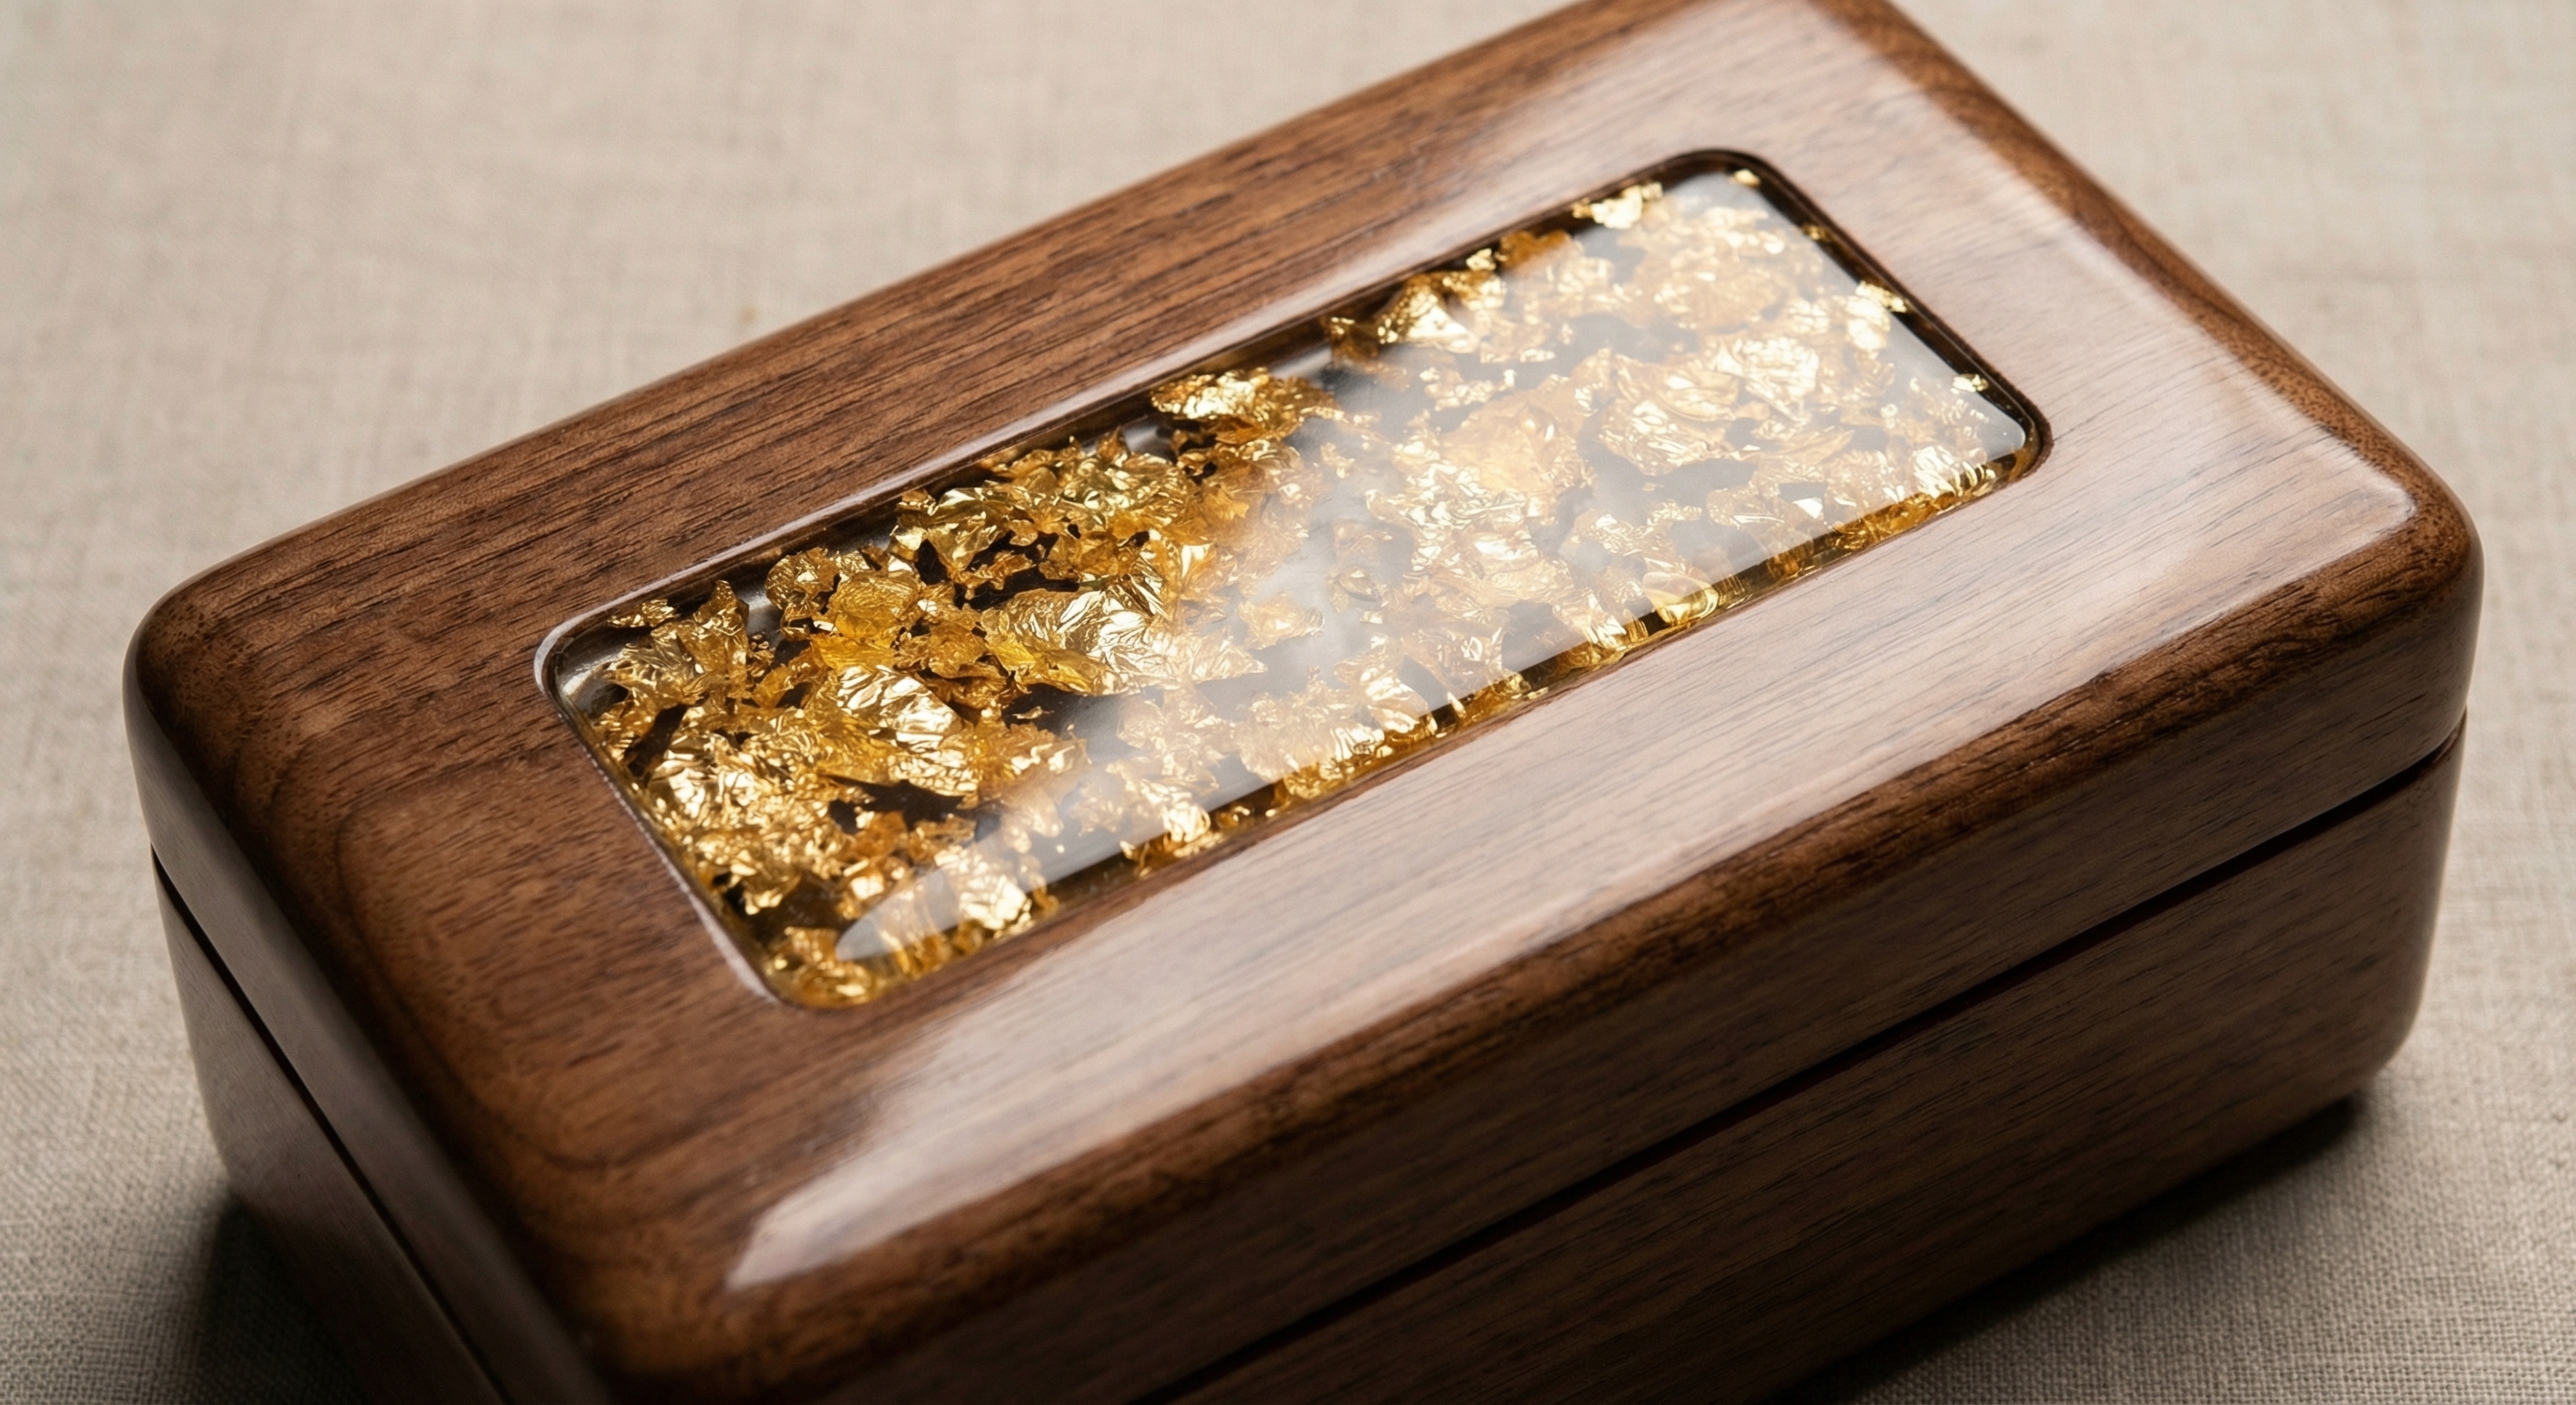
Professional finishes are achieved through advanced techniques like epoxy resin inlays, high-gloss lacquering, or careful paint distressing for a vintage look. When learning how do you make a jewelry box stand out, the “finishing” stage usually takes as much time as the construction itself. These methods elevate the box from a simple utility item to a piece of art.
Working with Epoxy and Resin Inlays
Epoxy allows you to fill natural cracks in wood with colored resin or even suspended gold leaf for a striking visual effect. Better yet, it creates a perfectly flat and durable surface that is resistant to moisture and scratches.
- Mix resin ratios precisely
- Use a torch to pop bubbles
- Sand up to 3000 grit for shine
- Buff with polishing compound
Distressing Paint for a Vintage Aesthetic
If you prefer a classic look, applying multiple layers of paint and lightly sanding the edges creates a “shabby chic” appeal. This technique hides minor woodworking imperfections while adding character to the piece.
Key Takeaway: The finish of your box is the first thing people notice, so investing in high-quality topcoats is essential for a professional result.
| Finish Method | Visual Style | Durability | Skill Level | |
|---|---|---|---|---|
| Resin Inlay | Modern/Luxury | Extreme | Advanced |
Mastering finishing techniques ensures that your handmade projects rival the quality of high-end boutique products.
How do you organize boxes for specific jewelry types?
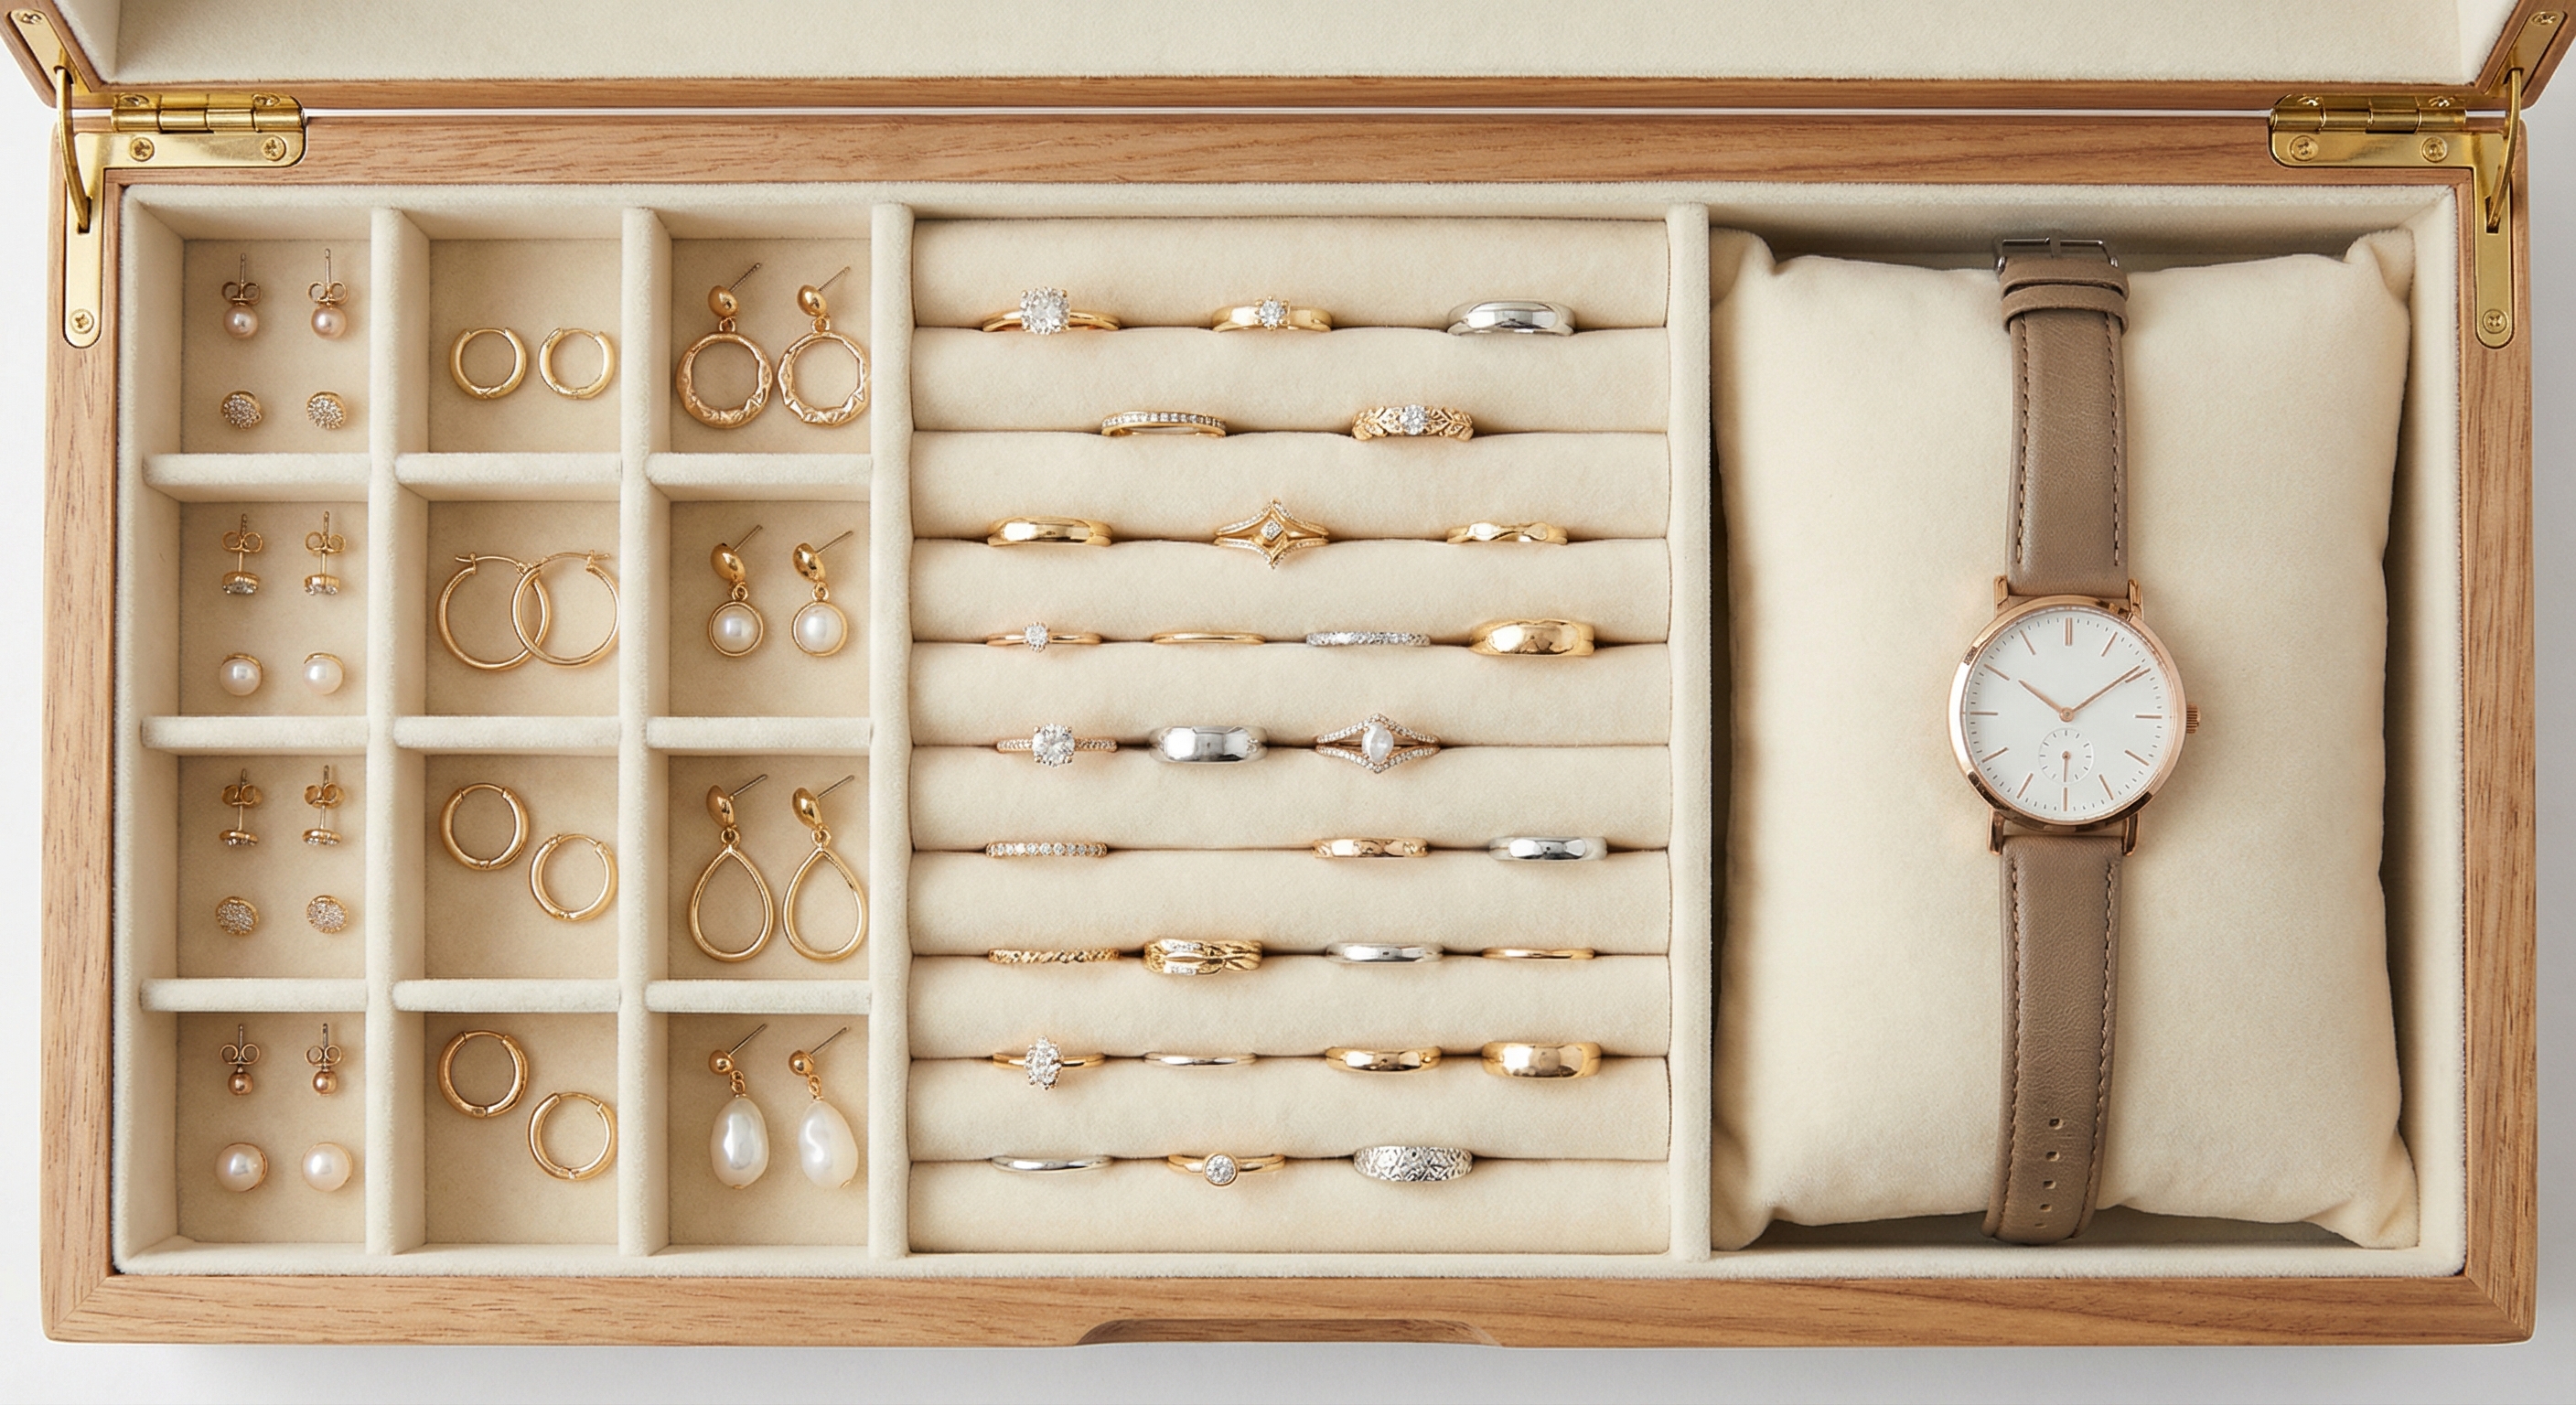
Organizing a box for specific jewelry types involves creating dedicated zones for rings, earrings, necklaces, and watches to prevent overlapping and damage. When you master how do you make a jewelry box with internal logic, you ensure that every item is visible and accessible. Specialized trays with varying compartment sizes are the key to this level of order.
Specialized Trays for Earrings and Rings
Earrings are best kept in small grid-like compartments, while rings require padded rolls to stay upright. Here is the deal: organizing by frequency of use allows you to place your daily favorites in the top tray for quick access.
- 1″ x 1″ squares for earrings
- Padded rolls for rings
- Deep slots for bracelets
- Watch pillows for wristwear
3D Floating Displays with PE Film
For modern collections, using PE film frames inside your box can keep items suspended in mid-air. This protects delicate pieces from tarnish while providing a stunning visual presentation when the box is opened.
Key Takeaway: A well-organized interior is the primary function of a jewelry box, turning a simple container into a sophisticated management system.
| Jewelry Type | Storage Method | Benefit | Space Used | |
|---|---|---|---|---|
| Necklaces | Hooks/Racks | No Tangling | Vertical |
Logical organization reduces the time spent searching for accessories and extends the life of your jewelry.
How do you scale DIY projects for wholesale branding?
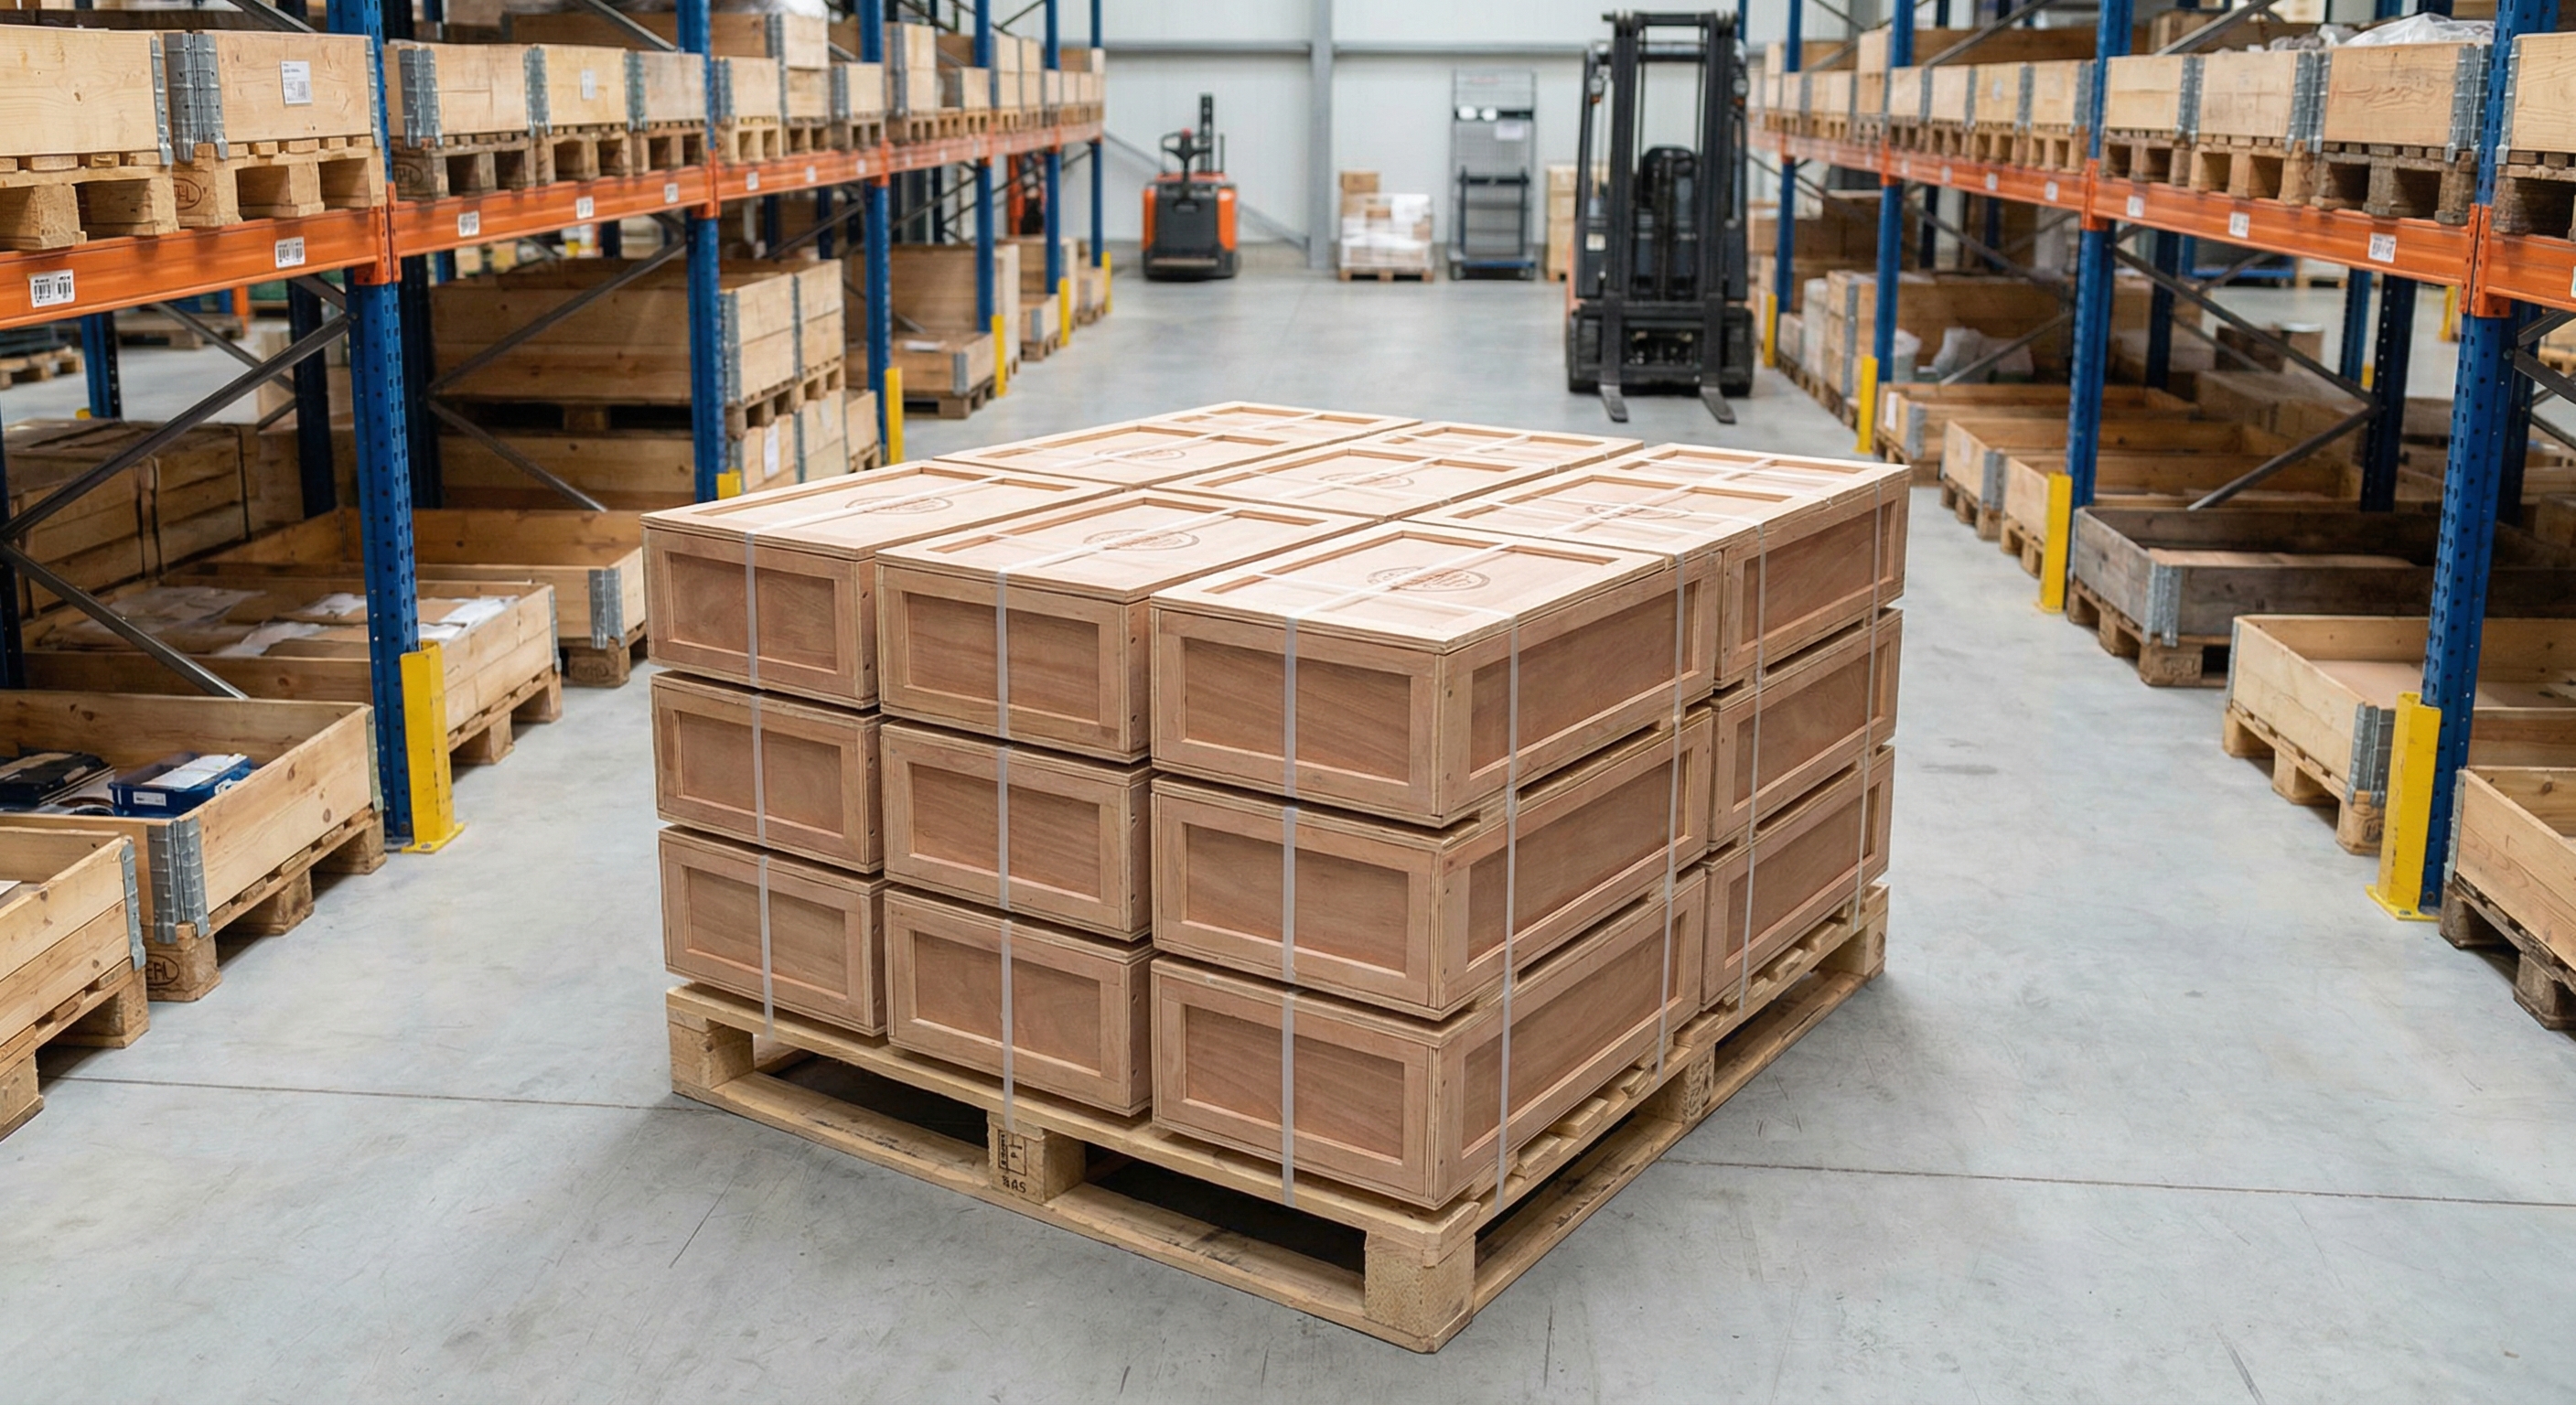
Scaling DIY projects for wholesale involves transitioning from manual hand-cutting to small-batch production using jigs or professional manufacturing partners. While you may know how do you make a jewelry box by hand, producing 500 units requires a more systematic approach to material sourcing and assembly. Standardizing your designs is the first step toward creating a recognizable brand.
Transitioning to Small Batch Production
Using templates and jigs allows you to replicate the same cuts across dozens of boards with perfect accuracy. Better yet, bulk purchasing your wood and velvet reduces your cost per unit, allowing for higher profit margins.
- Create master templates
- Batch-process all components
- Standardize hardware choices
- Implement a QC checklist
Sourcing Components from Professional Factories
Sometimes, the most efficient way to scale is to design the box yourself and have the base structure manufactured in a factory. This allows you to focus on the final custom finishes and branding while maintaining high volume.
Key Takeaway: Scaling requires a shift in mindset from “crafting” to “manufacturing” to ensure consistency across every unit produced.
| Stage | Production Volume | Focus | Method | |
|---|---|---|---|---|
| Scaling | 100+ Units | Consistency | Jig-based |
Moving from individual projects to small-batch production is the key to turning a woodworking hobby into a viable business.
Elevate Your Collection Today
Whether you are a hobbyist looking for a weekend project or a brand owner ready to scale, these 12 free plans provide the foundation you need. At YiXin Packaging, we believe that the right box does more than store jewelry—it defines the entire experience of ownership. We are dedicated to providing industry-leading insights into protective materials and luxury finishes. If you are ready to move from DIY plans to professional-grade custom manufacturing, please contact us to discuss your vision and get a free quote within 24 hours.
FAQ
Can I build a jewelry box without a table saw?Yes, you can. You can use pre-cut “hobby wood” from hardware stores or use a hand saw with a miter box to achieve accurate cuts.
What is the best glue for velvet lining?Spray adhesive is superior. It provides an even coating that prevents the fabric from bubbling or shifting during the application process.
Can I make these boxes tarnish-resistant?Absolutely. By including anti-tarnish fabric or specialized silica packets within the lining, you can protect silver and gold from atmospheric corrosion.
What is the best wood for a beginner?Pine or Poplar is best. These woods are inexpensive and soft, making them very forgiving while you learn basic cutting and assembly skills.
How do I make my DIY box look professional?Focus on sanding. Moving through grits up to 400 and applying a high-quality polyurethane coat will remove the “homemade” look and add a factory shine.