You measure jewelry box dimensions by accurately calculating the internal length, width, and height of the container to ensure your precious inventory remains secure and centered. Discovering that your high-value inventory does not fit into your custom-ordered packaging after months of production is a catastrophic failure for any retail brand. This error results in wasted capital, delayed launches, and compromised product safety during transit. By mastering the technical standards of professional measurement, you can source an exquisite jewelry box dimensions solution that mirrors the quality of your brand and protects your bottom line.
Why is accurate jewelry box sizing critical for brands?
Defining the precise jewelry box dimensions ring box for your collection is the first step in ensuring physical protection and aesthetic harmony. When the internal volume is too large, gemstones and metal settings are subjected to friction and impact during the shipping process. This leads to costly returns and a degraded brand reputation among your most discerning wholesale clients.
Does sizing impact the perceived value of your items?
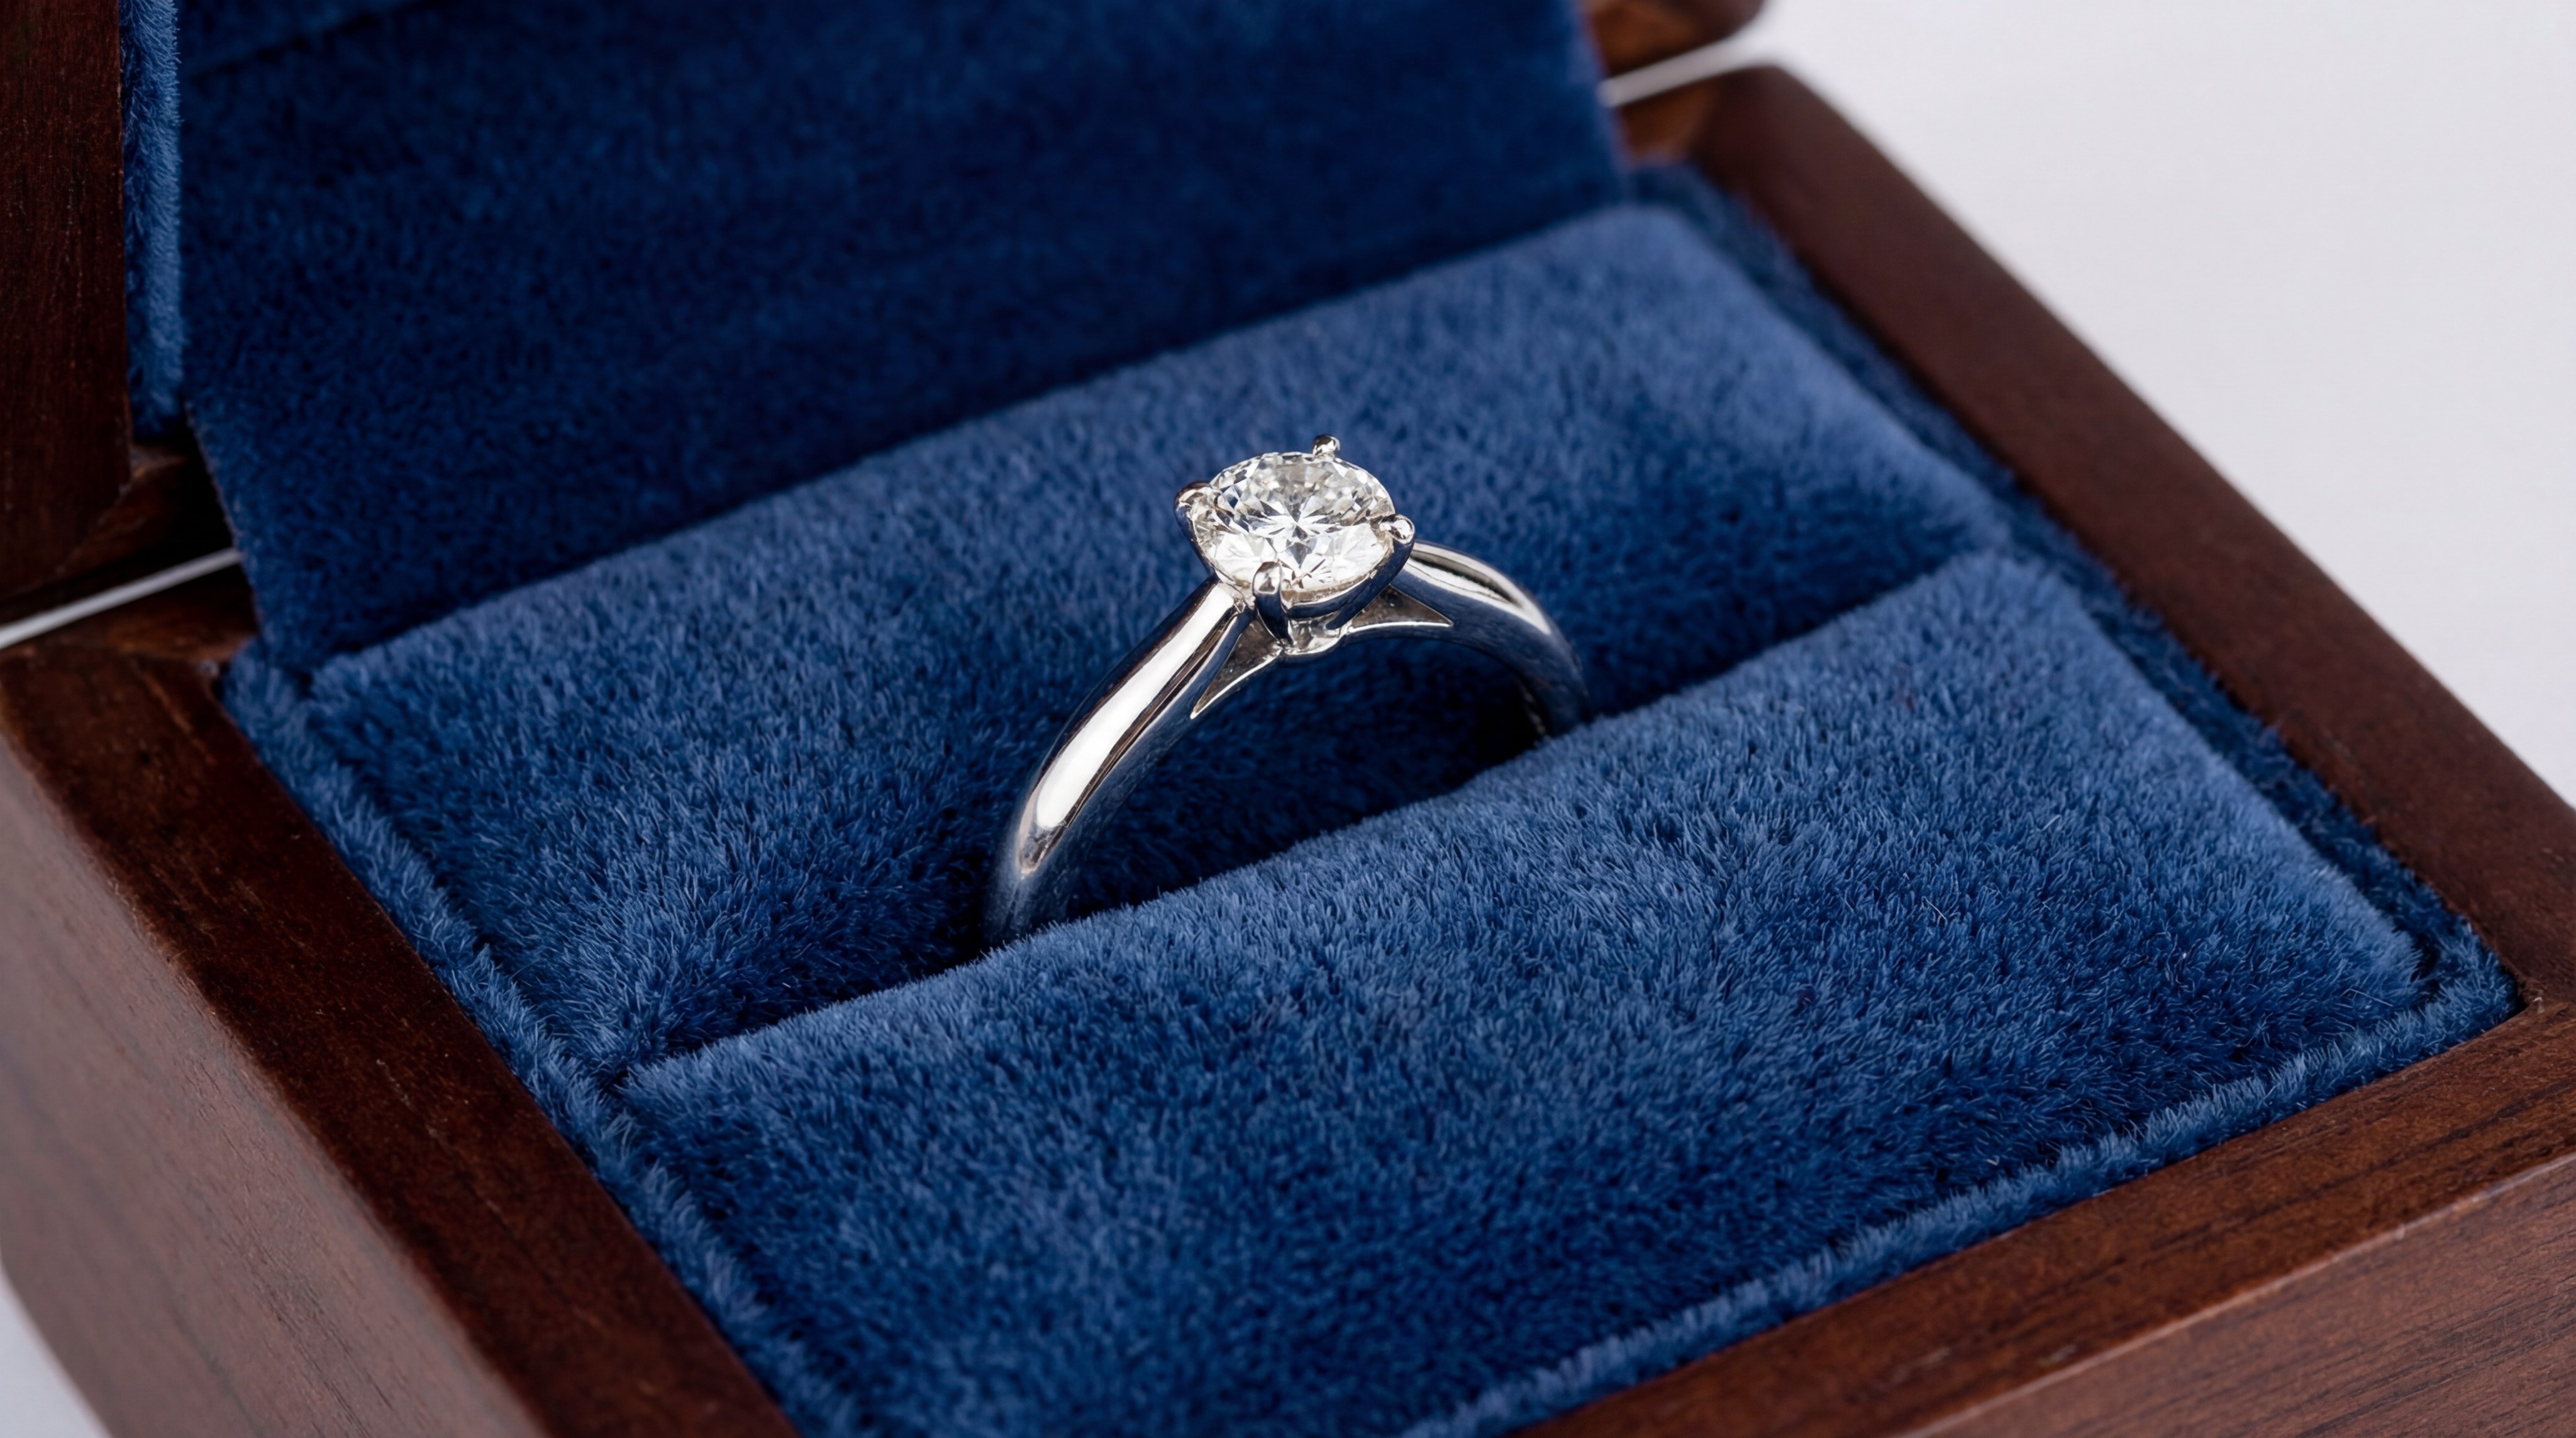
Professional presentation relies on the “optical center” of the jewelry piece being perfectly aligned within the box frame. If the dimensions are slightly off, the item appears misplaced, suggesting a lack of attention to detail that can alienate luxury buyers.
- Visual balance within the frame.
- Proper tension for ring slots.
- Sufficient depth for high-profile settings.
- Centered placement for marketing photography.
Look: A perfectly sized box serves as a silent ambassador for your brand’s commitment to excellence and precision engineering.
How does protection correlate with internal volume?
Minimizing the “void space” within a jewelry box reduces the kinetic energy transferred to the item when a package is dropped or jarred. This structural integrity is essential for maintaining the alignment of delicate prongs and the security of pave-set diamonds.
- Reduction of internal item movement.
- Buffer zones against external compression.
- Support for heavy metal components.
- Moisture barrier effectiveness in sealed boxes.
Here is the kicker: Calculated dimensions are your primary defense mechanism against the 23% of transit damages caused by improper packaging fits.
Key Takeaway: Precise sizing is the intersection of asset protection and luxury brand positioning that ensures long-term customer satisfaction.
| Factor | Impact of Precise Sizing | Risk of Improper Sizing | |
|---|---|---|---|
| Asset Safety | 99.9% protection from surface scratches. | High probability of loose settings or chips. | |
| Brand Prestige | Enhances the unboxing “wow” factor. | Creates a cheap, generic impression. | |
| Logistics | Reduces returns due to damaged inventory. | Increases operational costs and overhead. |
The relationship between internal volume and product safety is the most significant metric for luxury retail success.
Which tools provide the best results for measuring?
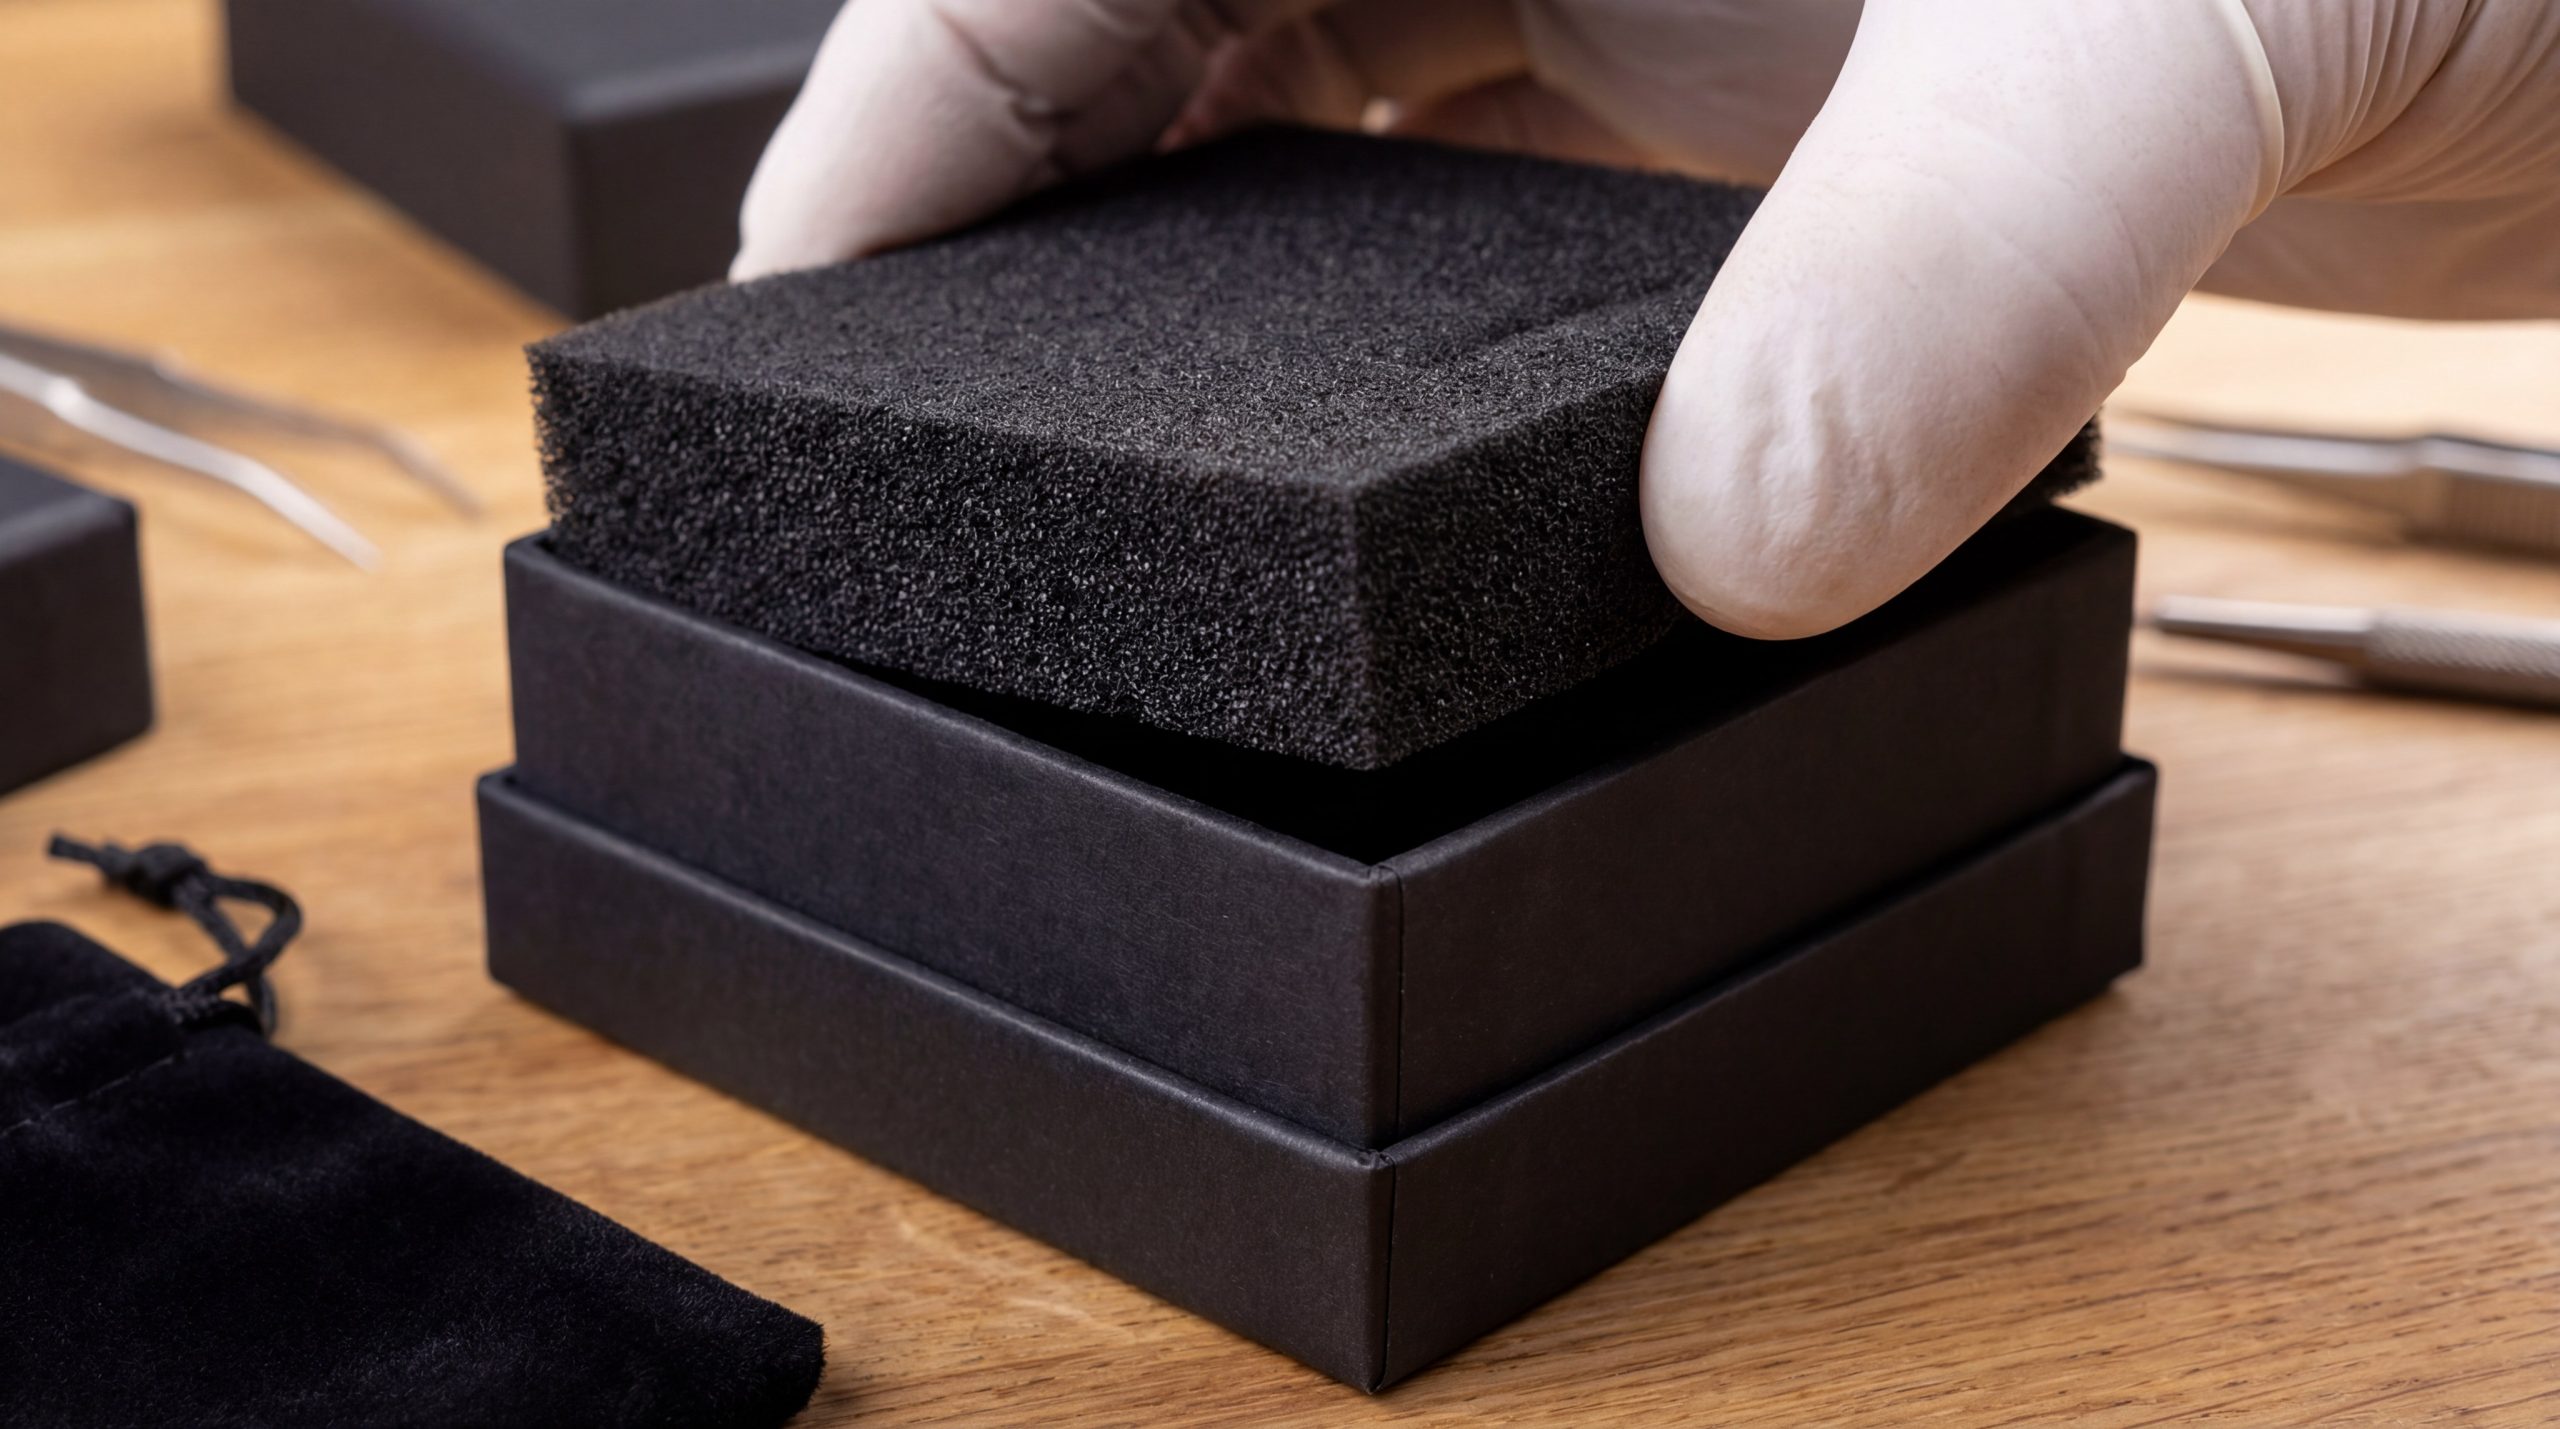
Obtaining accurate jewelry box dimensions requires professional-grade instruments rather than flexible tapes or household rulers. You should utilize rigid tools that do not flex, as even a 1mm discrepancy can lead to a failure in the structural fit of a custom foam insert. Professional measurement starts with a stable environment where you can evaluate the jewelry piece and the container simultaneously.
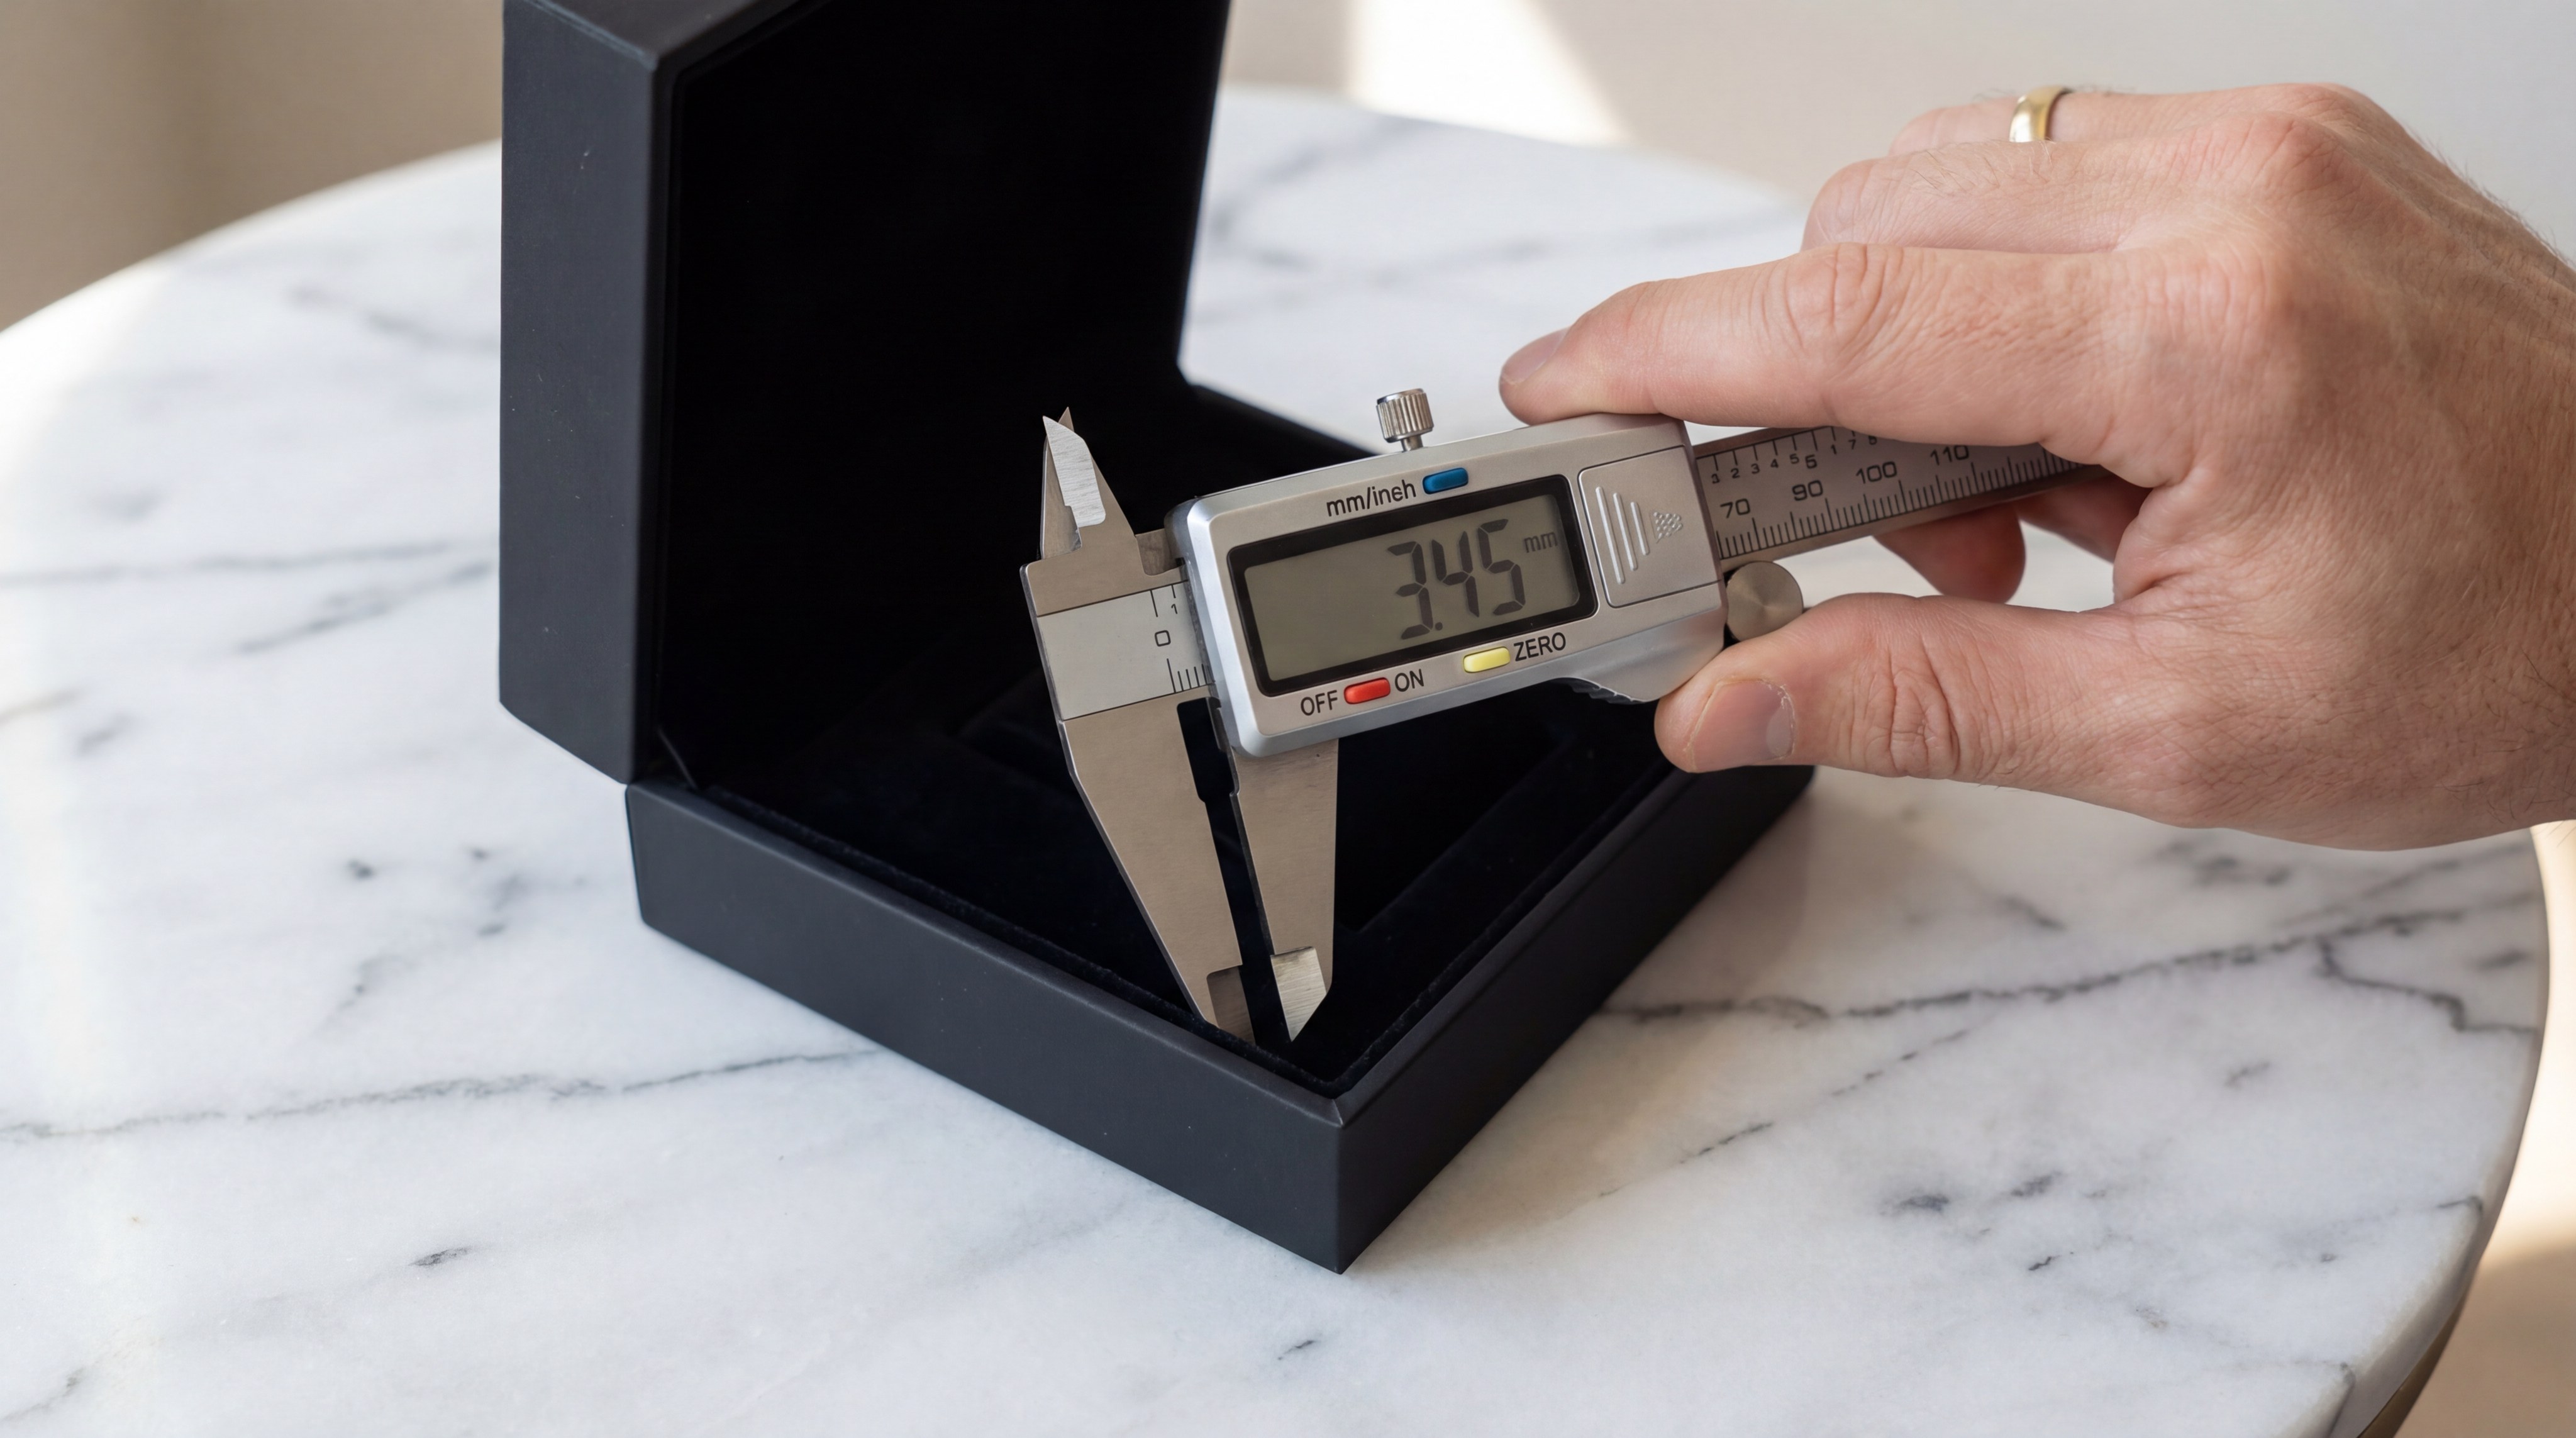
Why is a digital caliper essential for professionals?
Digital calipers allow you to measure internal wall thickness and depth with sub-millimeter precision, which is vital for high-end production runs. This tool removes the guesswork from reading manual scales and provides a digital output that is easy to record for manufacturing specs.
- High precision to 0.01mm.
- Capability for internal and external measurements.
- Ease of measuring small, tight corners.
- Consistent pressure during measurement.
The truth is: Standard rulers often fail to capture the subtle taper of a molded box wall, leading to inaccurate interior calculations.
Is a flat work surface mandatory for height checks?
Measuring on a soft or uneven surface can cause your box to tilt, which naturally skews your vertical depth readings and height assessments. You must place both the tool and the packaging on a hard, level stone or wooden surface to ensure the ruler is perpendicular.
- Elimination of angle-related errors.
- Consistency across multiple samples.
- Stable base for jewelry placement.
- Improved lighting for reading small increments.
Make no mistake: The stability of your measuring environment is just as important as the quality of the instrument you are holding in your hand.
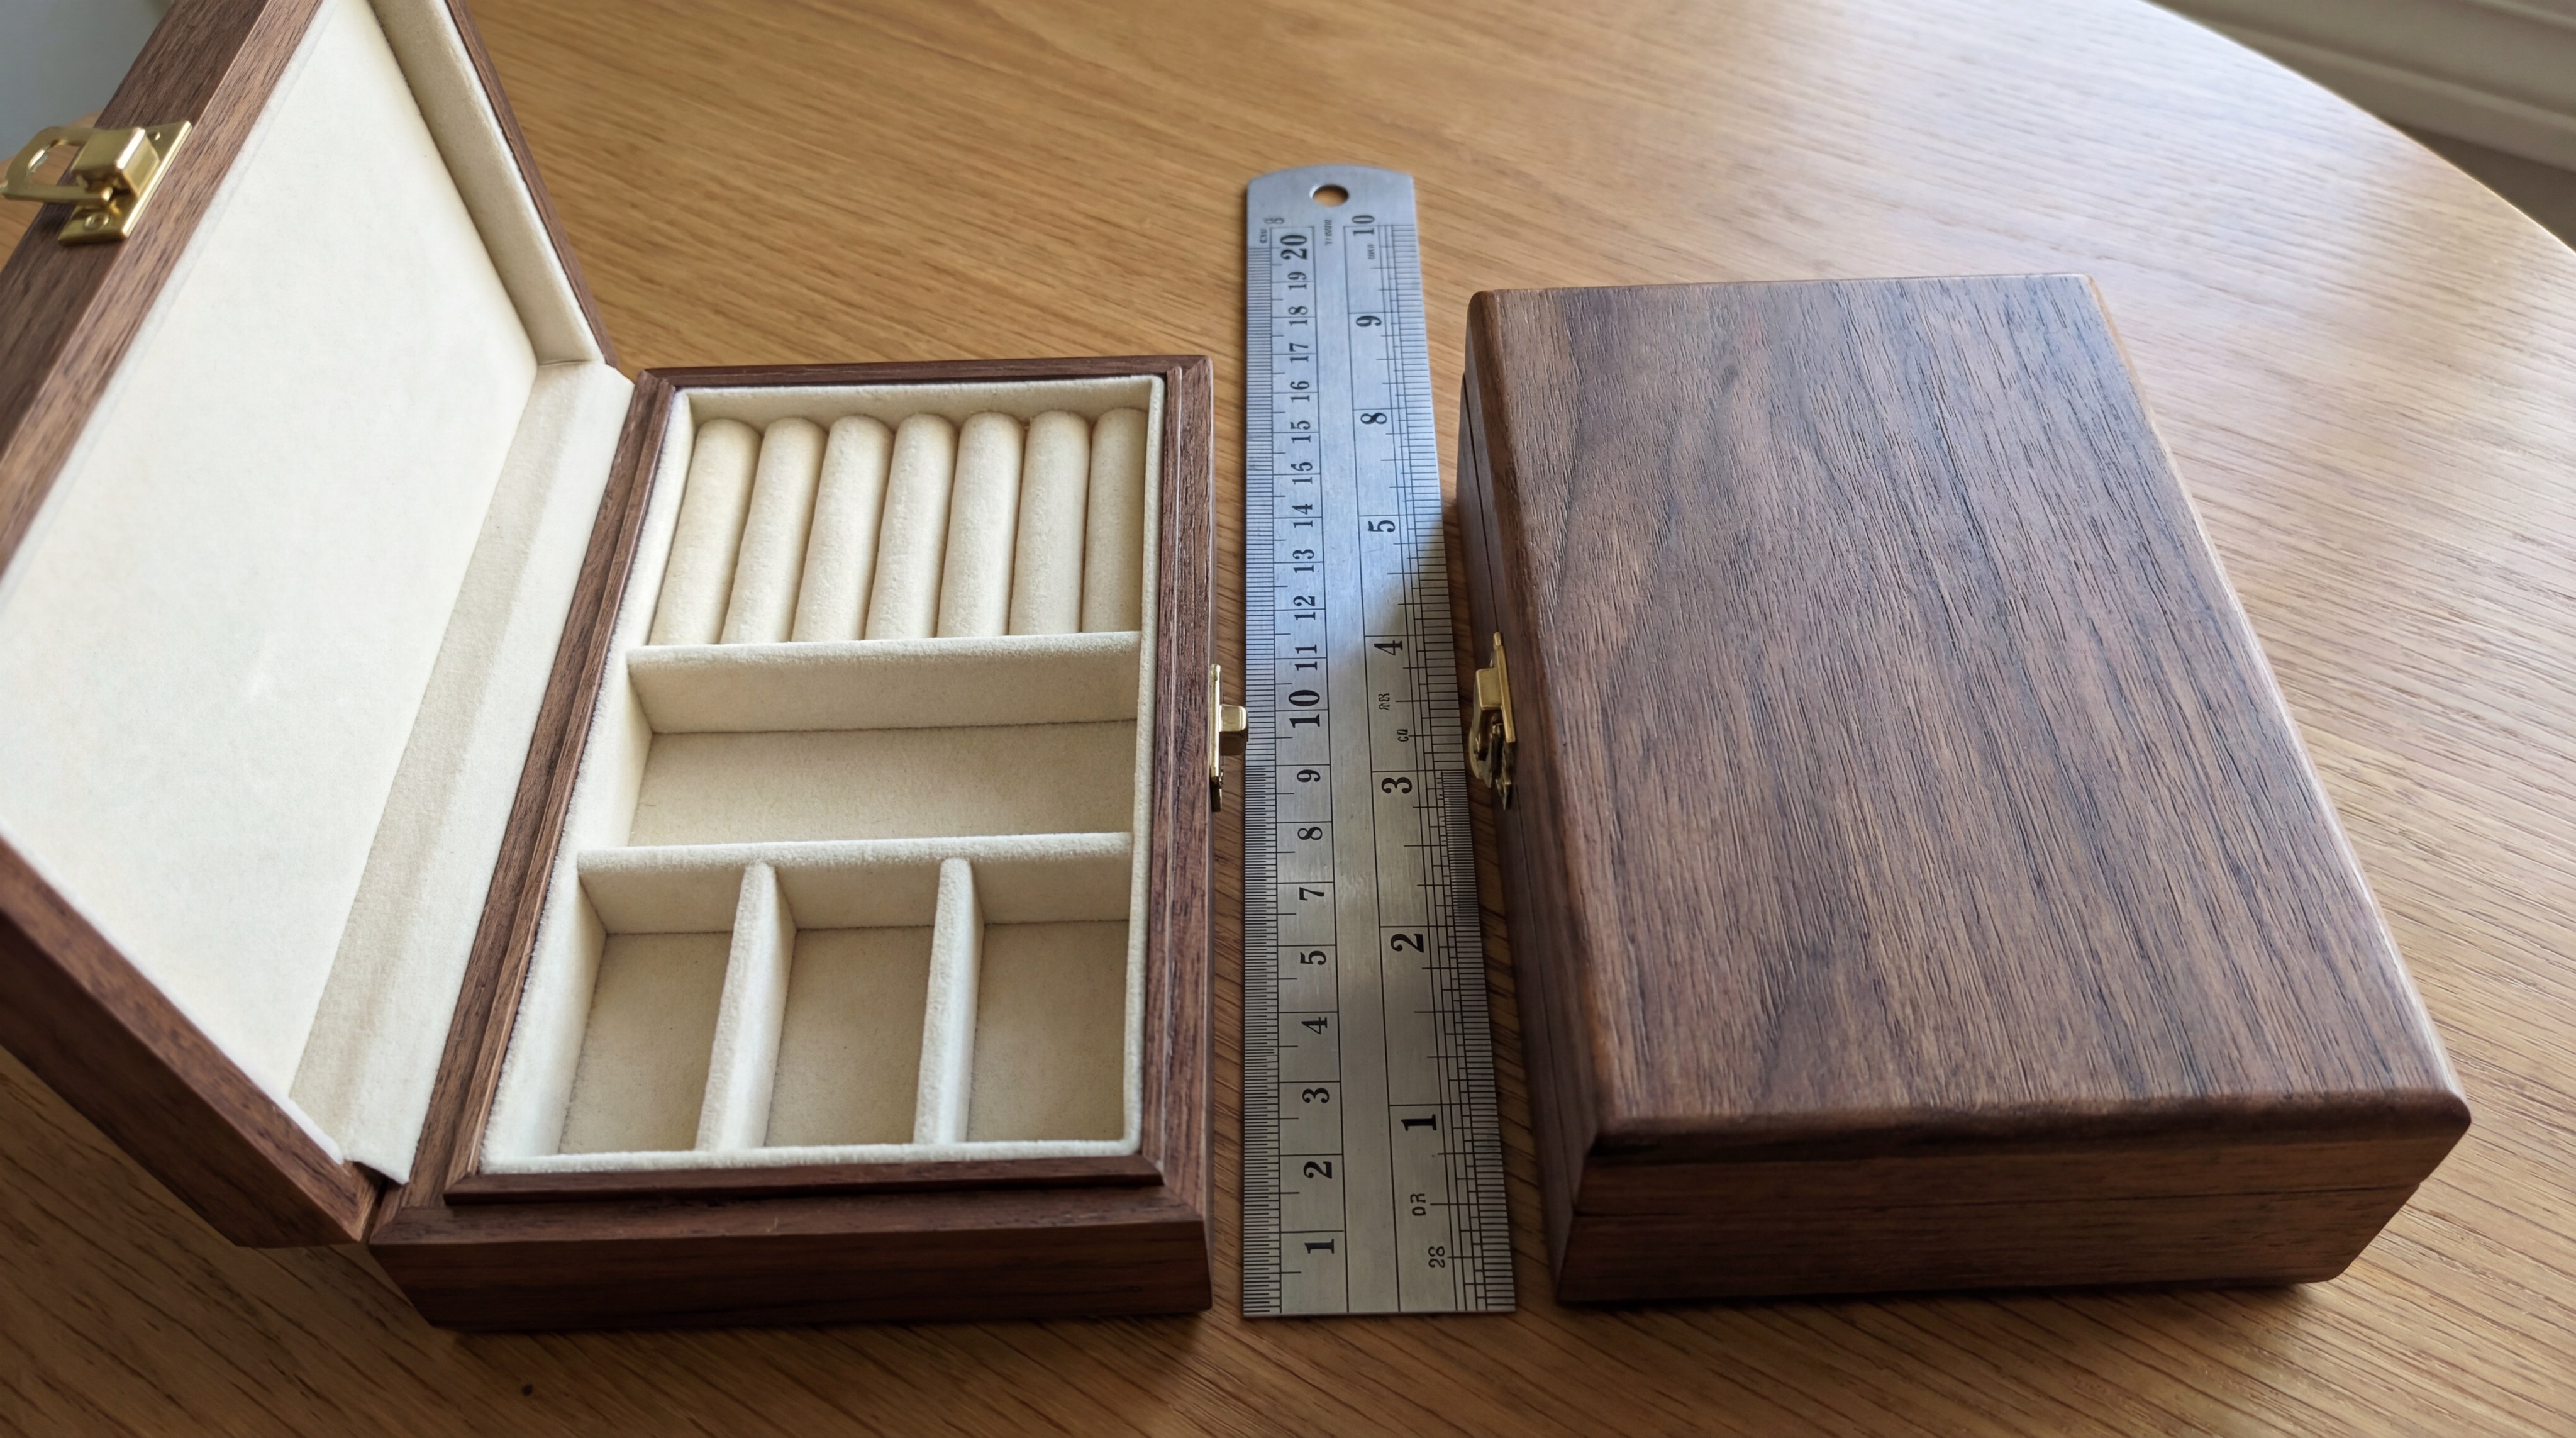
How should you utilize a metal ruler for length?
A rigid metal ruler with etched markings provides a durable and reliable reference for the primary length and width of the box footprint. Unlike printed rulers, etched versions remain legible after years of use and offer a clear “zero” point at the very edge of the tool.
- Precision markings in metric and imperial.
- Zero-point accuracy for corner measuring.
- Rigid structure preventing measurement bowing.
- Durability for long-term manufacturing use.
Think about this: A high-quality metal ruler is the baseline tool for any production manager looking to standardize their packaging inventory.
Key Takeaway: Using precision instruments like digital calipers ensures your specifications translate perfectly from the design phase to the factory floor.
| Tool | Best Application | Expected Accuracy | |
|---|---|---|---|
| Digital Caliper | Internal wall thickness and depth. | ±0.01 mm | |
| Metal Ruler | Overall length and width of large boxes. | ±0.5 mm | |
| Hard Surface | Establishing a level baseline. | Mandatory for all checks. |
Investing in high-grade tools prevents the compounding errors that occur when using consumer-grade measuring equipment for commercial orders.
How should you measure the internal length and width?
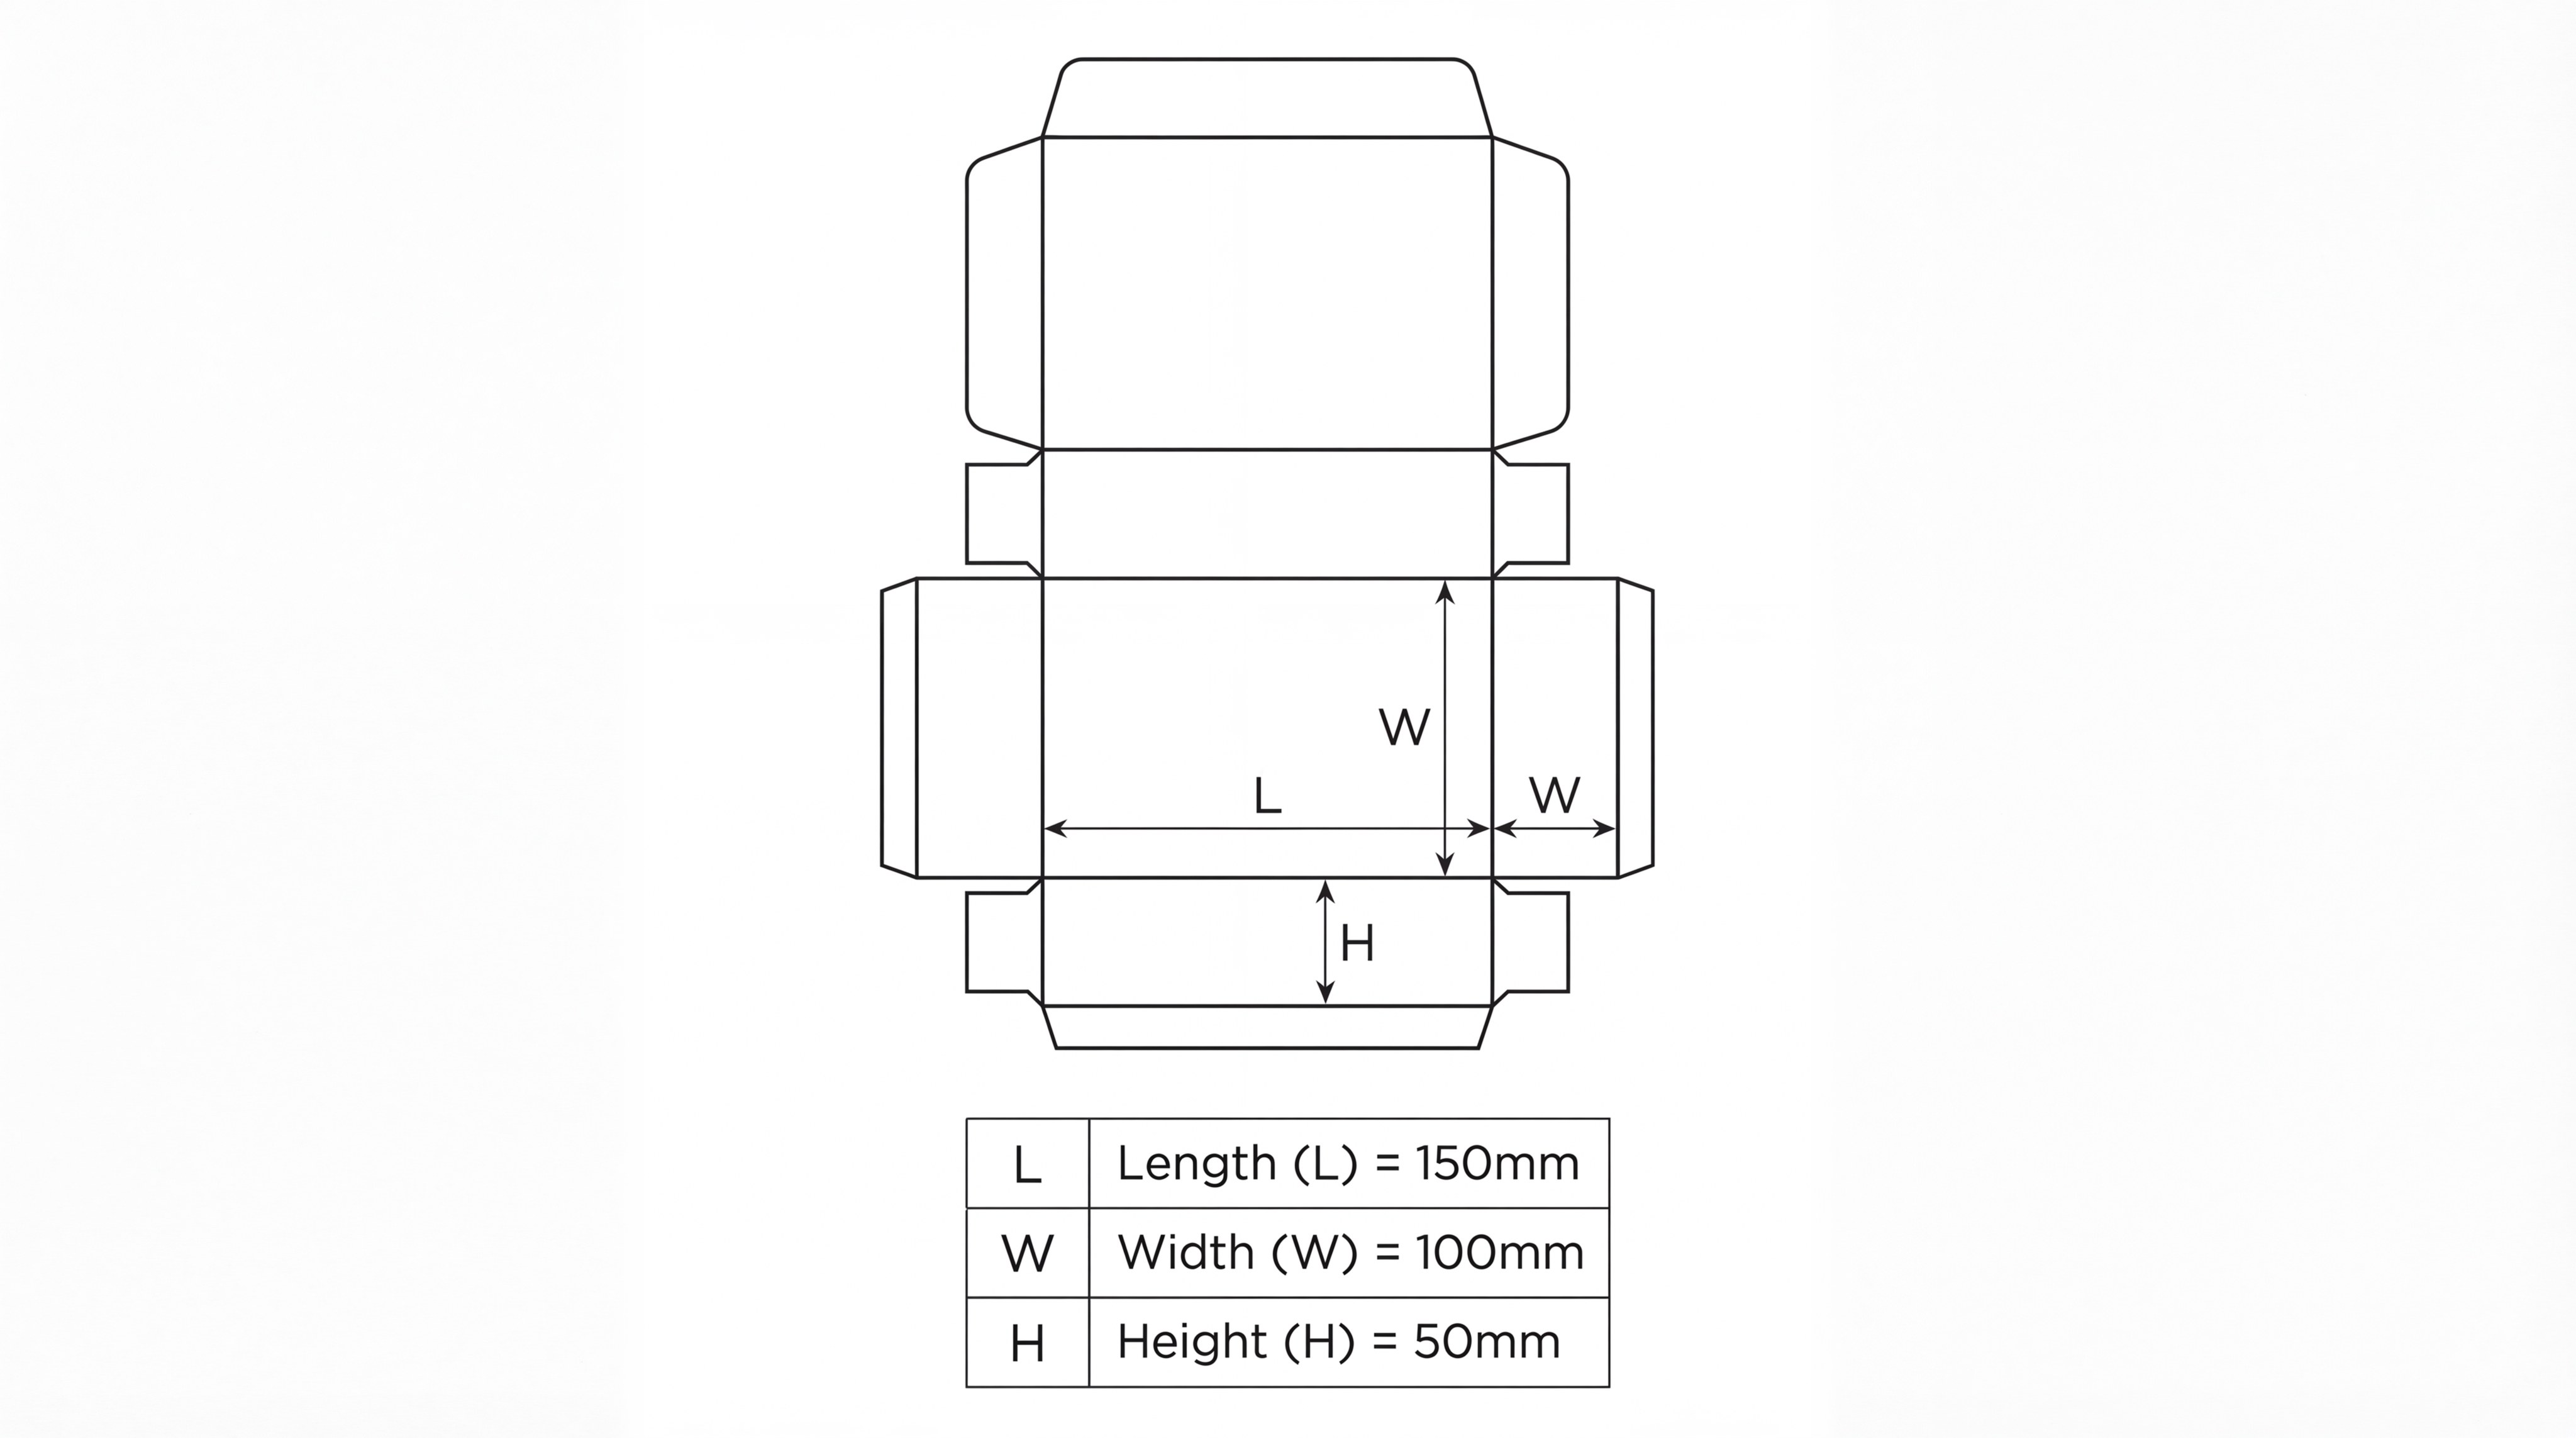
The core of determining jewelry box dimensions necklace box lies in the internal clearance from one inner wall to the other. You must ignore the outer shell during this phase because the thickness of the board or wood varies significantly between different manufacturing styles. Focus on the “usable floor” of the box where the jewelry insert will reside.
Where exactly should you place the ruler for length?
You should place the edge of your ruler firmly against one interior wall and extend it to the opposite side, ensuring the tool is parallel to the base. It is common to measure at the very bottom of the box to capture the narrowest point of the internal cavity.
- Measure from wall to wall internally.
- Keep the tool parallel to the box floor.
- Record the measurement at the bottom.
- Double-check for internal corner radii.
Listen to this: Many boxes have a slight “draft angle” or taper, meaning the top of the box may be wider than the bottom base.
How do you identify the usable width of the box?
The width is measured perpendicular to the length, following the same principle of internal wall-to-wall contact. You should verify this dimension at multiple points along the box to ensure there is no warping in the side walls that could interfere with your inserts.
- Ensure a 90-degree angle from the length.
- Measure at both ends of the box.
- Check for wall bowing or thickness variations.
- Document the minimum width found.
Keep this in mind: The narrowest width measurement is your limiting factor for any rigid inserts or secondary packaging layers.
Is the internal diagonal measurement necessary?
For irregular items or corner-to-corner displays, calculating the diagonal can help you determine if a long pendant or bracelet will fit without touching the walls. This is particularly useful for square boxes where you intend to display items at a creative angle.
- Useful for long, narrow jewelry pieces.
- Helps determine maximum “swing” room.
- Critical for round boxes being used for square items.
- Provides a check on box squareness.
Believe it or not: A diagonal measurement can reveal if a box is slightly out of alignment before you commit to a mass production order.
Key Takeaway: Internal length and width are the absolute foundations for ensuring your jewelry sits comfortably without crowding the edges of the box.
| Side | Measurement Location | Manufacturing Focus | |
|---|---|---|---|
| Length | Wall to wall (Internal base) | Determining the primary product orientation. | |
| Width | Wall to wall (Internal base) | Ensuring clearance for secondary items. | |
| Diagonal | Corner to corner (Internal) | Verification of shape and swing room. |
Standardizing the internal footprint allows you to utilize consistent inserts across multiple product lines for better efficiency.
What defines the difference between interior and exterior?
Understanding the gap between interior and exterior jewelry box dimensions is vital for logistics planning and shelf space management. The exterior dimensions represent the total volume your package occupies in a shipping container or a retail display case. These measurements include the thickness of the material, the outer decorative wrap, and any external hardware like hinges or clasps.
How does material thickness affect the final size?
A box made of 2mm chipboard will have a much smaller exterior footprint than a solid wooden box with the same internal capacity. You must account for the “wall gain” on all sides to accurately predict how many units will fit into your master cartons.
- Chipboard adds roughly 4mm to total width.
- Wood can add 12mm to 20mm to width.
- Plastic walls are typically 1mm to 3mm.
- Padding inside walls increases thickness.
Here is the kicker: A 100mm internal length can easily become 120mm on the exterior once you factor in premium wooden walls and velvet lining.
Why must you measure the exterior while closed?
External height must be measured from the very bottom of the base to the highest point of the lid when the box is fully latched. This “total height” is the metric used by couriers to calculate dimensional weight and shipping costs for your international orders.
- Measure from base to lid peak.
- Include any protruding hinges or feet.
- Check for “domed” lid heights.
- Verify measurements with the box closed.
The reality is: Measuring the lid and base separately will often result in an inaccurate total height due to the overlap in the closing mechanism.
Does the lid design change the exterior footprint?
Telescoping lids that slide over the base add another layer of material thickness to the length and width of the package. If you are switching from a hinged lid to a telescoping design, you must recalibrate your shipping mailer sizes to accommodate the extra bulk.
- Telescoping lids add dual wall thickness.
- Hinged lids maintain a more consistent width.
- Ribbon closures can add 1-2mm to width.
- Slip-cases require extra length clearance.
Look: Small design changes in the lid can push your packaging into a higher shipping bracket unexpectedly.
Key Takeaway: Exterior dimensions dictate your shipping and storage costs, while interior dimensions dictate the safety and fit of your jewelry.
| Dimension Type | Purpose | Primary Components | |
|---|---|---|---|
| Interior | Product Fit | Wall-to-wall clearance, usable floor. | |
| Exterior | Logistics & Shipping | Material thickness, lids, hardware. | |
| Delta (Gap) | Structural Integrity | Wall board, outer wrap, padding. |
Balancing a compact exterior with a spacious interior is the hallmark of efficient and modern B2B packaging design.
How does jewelry shape dictate the necessary volume?
The “volumetric envelope” of your product is the most critical factor in determining jewelry box dimensions earring box . You must measure the absolute widest, tallest, and longest points of the jewelry as it will sit in its display state. An irregular item, like a chandelier earring, requires more lateral clearance than a simple stud earring to prevent the item from hitting the walls.
How do you measure items with irregular silhouettes?
For items like brooches or pendants, you should envision a rectangular box that fits the furthest points of the design. This “bounding box” approach ensures that no part of the intricate metalwork is pressed against the rigid interior walls of the container.
- Identify the absolute furthest points.
- Measure width across the widest curve.
- Account for dangling components or drops.
- Add a buffer for items that move easily.
Believe it or not: Measuring the “average” width of an irregular piece is the most common reason for items arriving with bent or broken pins.
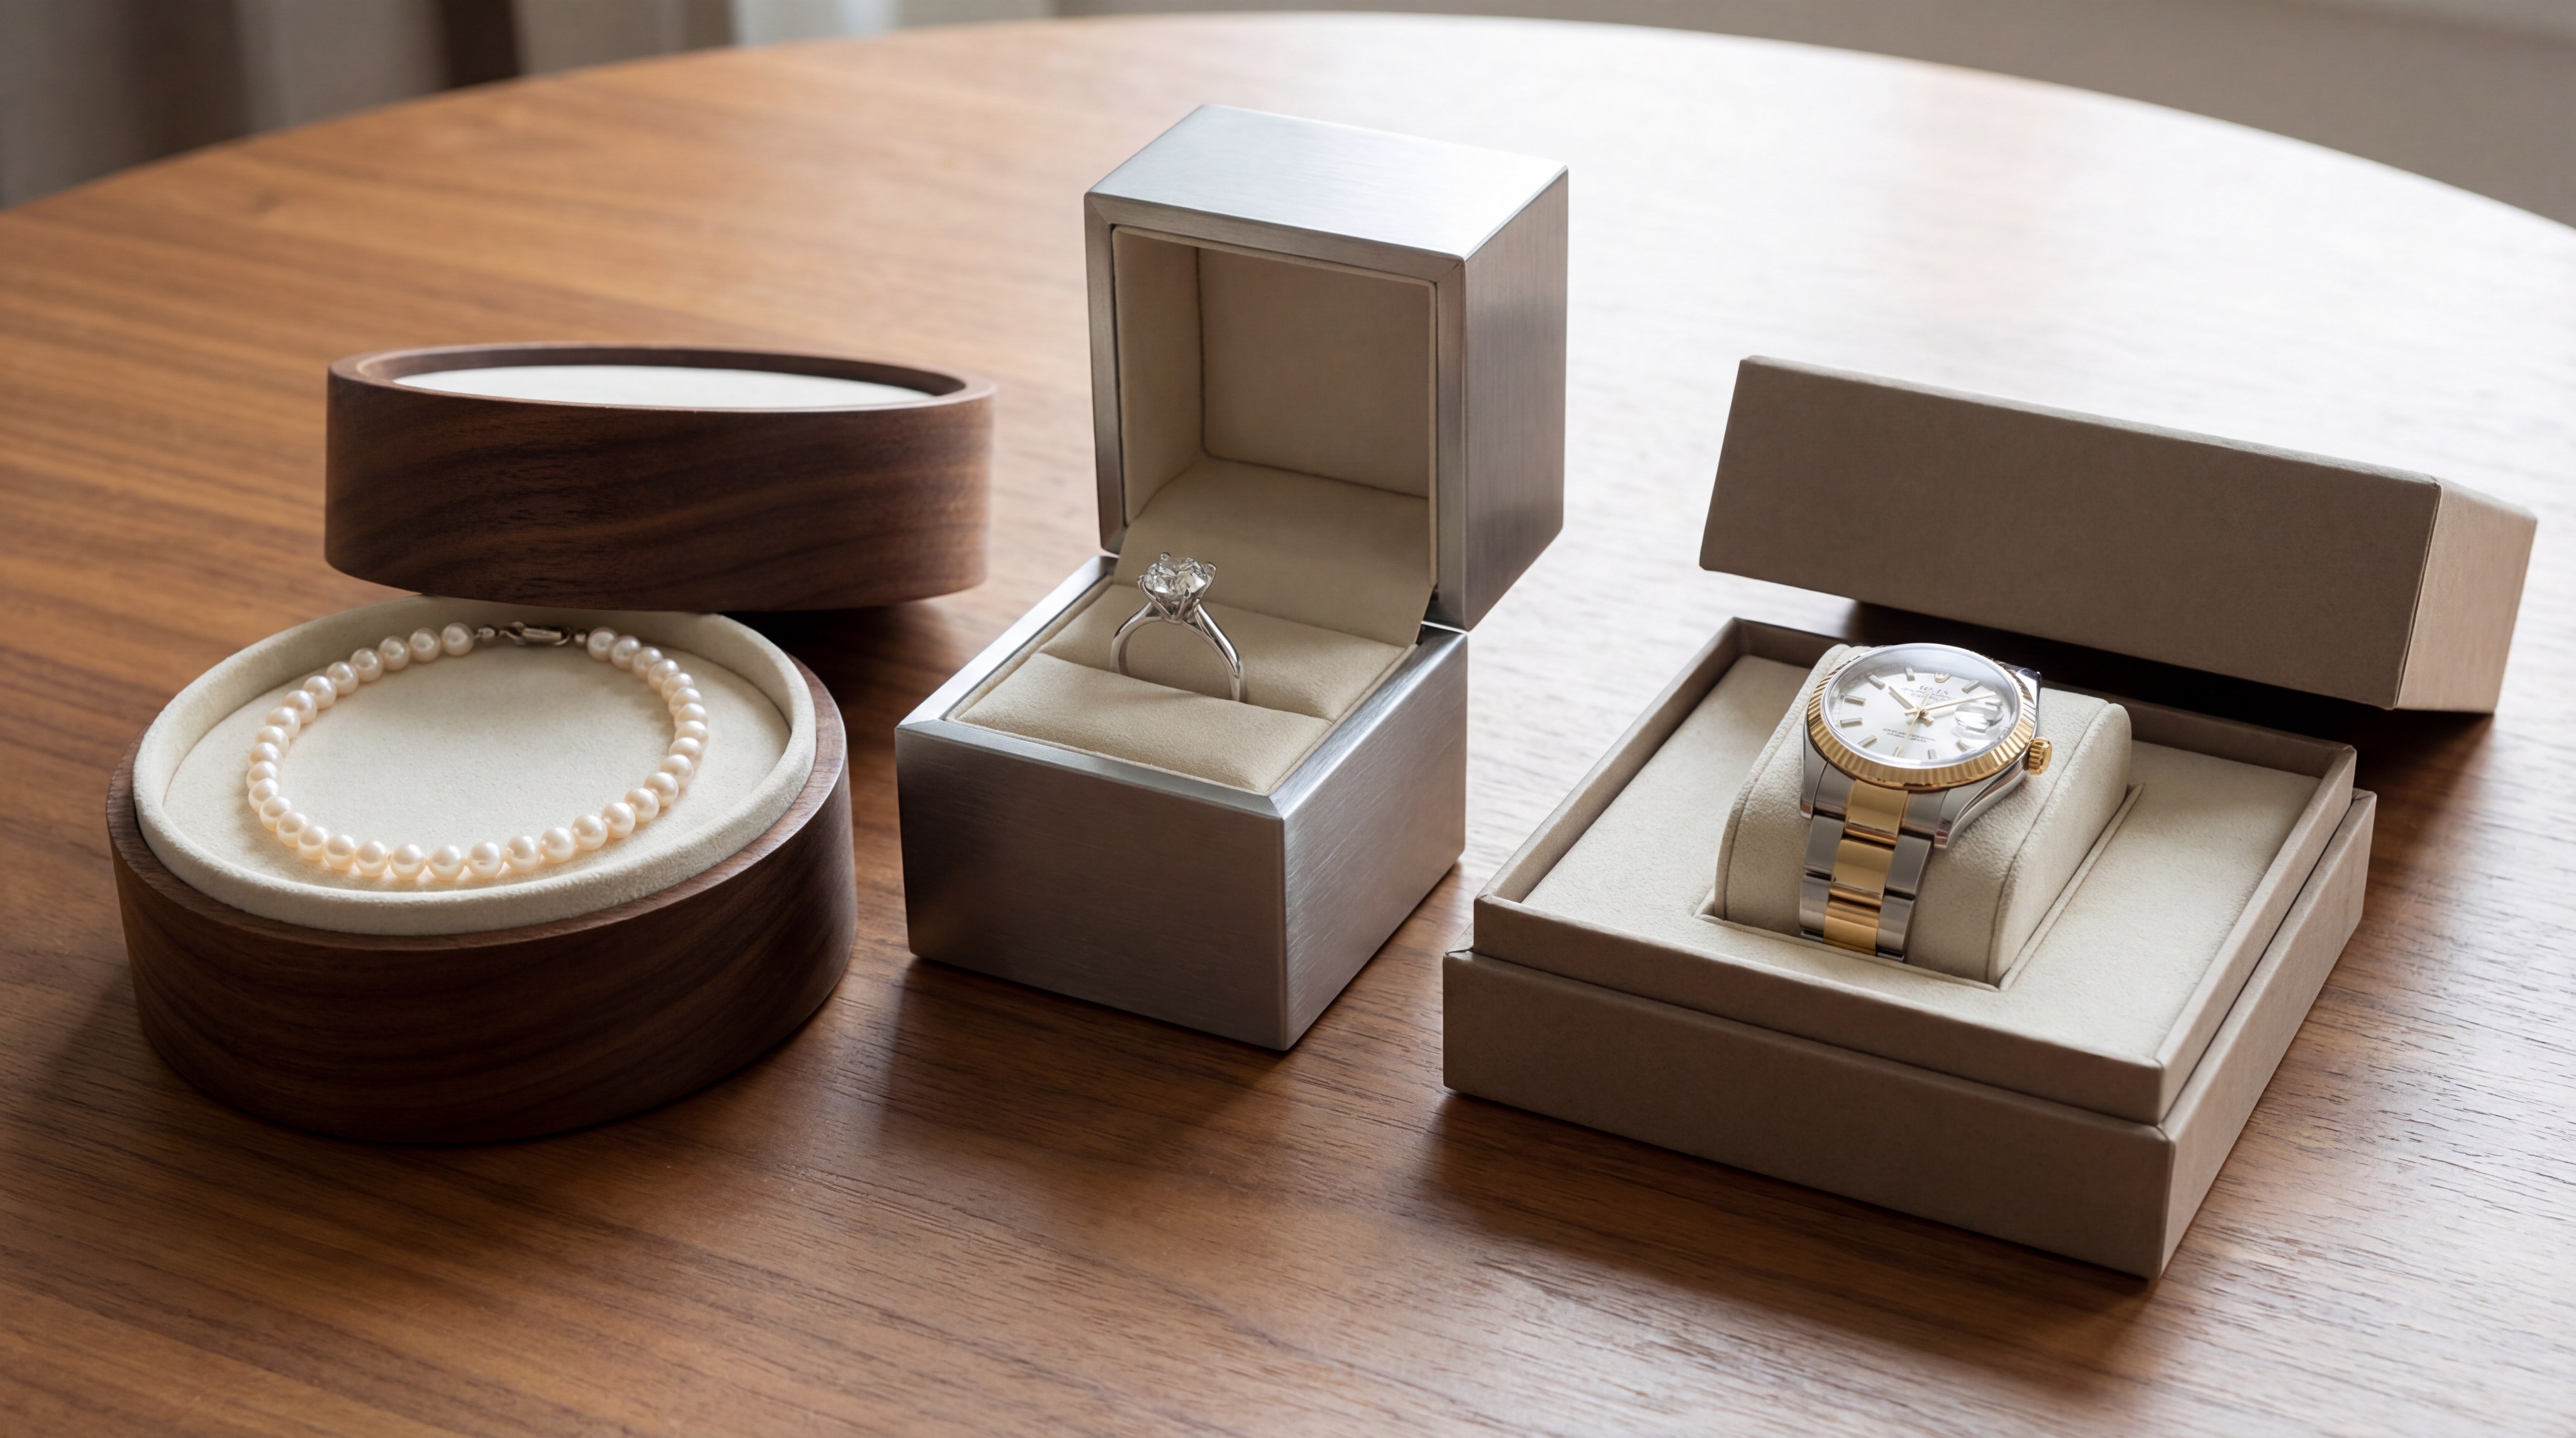
Why is vertical height critical for rings and watches?
Rings with high-profile settings, such as cathedral or halo mounts, require significant interior depth to avoid lid contact. If the depth of your box is insufficient, the lid will exert downward pressure on the gemstone, potentially loosening the setting during vibration.
- Measure from the base of the ring to the top of the stone.
- Factor in the height of the ring slot insert.
- Ensure 5mm of air space above the gemstone.
- Account for chunky bands and heavy shanks.
Here is the deal: The highest point of the jewelry is often the most fragile point, making vertical clearance a non-negotiable metric.
Does the display angle influence the box depth?
When jewelry is tilted forward for better visibility—a common technique in luxury displays—the vertical height of the item increases relative to the box floor. You must calculate the height of the item at its intended display angle rather than its flat measurement.
- Account for the angle of the foam wedge.
- Measure the “protrusion” height.
- Check if the lid closes without resistance.
- Verify the center of gravity to prevent tipping.
The kicker is: An item that fits perfectly while lying flat may become too tall once you add a professional display insert.
Key Takeaway: Always measure your jewelry in its “maximum volumetric envelope” to guarantee that no part of the piece touches the rigid box walls.
| Item Type | Critical Shape Factor | Dimension Focus | |
|---|---|---|---|
| High-Profile Ring | Vertical Clearance | Depth (Height) | |
| Chandelier Earrings | Lateral Swing | Width (Length) | |
| Bangle Bracelet | Circumference/Diameter | Length and Width |
Tailoring box volume to product shape reduces the need for excessive void fill and creates a more professional, “bespoke” appearance.
What space is required for padding and inserts?

You must never forget that jewelry box dimensions are not the same as the “usable space” once inserts are added. High-density EVA foam, velvet pads, and cotton fill all occupy physical volume that reduces the available room for your jewelry. To find the true usable dimensions, you must subtract the thickness of these protective layers from your initial internal measurements.
How much height does a velvet insert occupy?
A standard velvet-covered foam insert can range from 10mm to 20mm in thickness, significantly reducing the vertical clearance of the box. You should measure the distance from the top of the insert to the rim of the box to determine if your ring or watch will fit.
- Subtract insert thickness from total depth.
- Account for the “give” of the foam.
- Measure the height of the item above the foam.
- Ensure the lid has a soft lining to prevent scratching.
Keep in mind: The most expensive mistake in packaging is forgetting to subtract the insert height from the internal box depth.
What is the clearance for anti-tangle necklace cards?
Necklace boxes often use cards or “trees” to keep chains from knotting, and these require extra lateral space for the customer’s fingers. You should allow for at least 5mm of space on either side of the card so it can be easily removed from the box.
- Allow space for the chain hooks or slits.
- Ensure the card doesn’t rub against the walls.
- Account for the bulk of the chain behind the card.
- Provide a pull-tab or finger notch for easy access.
The truth is: If the card fits too snugly, the customer may accidentally break the chain while trying to force the card out of the box.
Does cotton fill require a compression factor?
Cotton fill is highly compressible, meaning it provides a varying amount of depth depending on how tightly it is packed. When using cotton-filled boxes, you should measure the height while the cotton is slightly compressed to simulate the pressure of a closed lid.
- Measure depth under light compression.
- Ensure the cotton covers all sharp edges.
- Watch for “bulging” lids from overfilling.
- Use a consistent weight of cotton fill.
Make no mistake: Relying on uncompressed cotton measurements will lead to boxes that pop open during transit.
Key Takeaway: Subtract the thickness of all inserts and padding from your interior measurements to discover the actual “live space” available for the jewelry.
| Insert Type | Typical Thickness | Compression Level | |
|---|---|---|---|
| EVA Foam | 15 mm – 20 mm | Low (Rigid) | |
| Velvet Pad | 2 mm – 5 mm | Medium | |
| Cotton Fill | 10 mm – 15 mm | High (Variable) |
Calculating the “true usable volume” is the only way to ensure your packaging function matches your design intent.
Are there industry standards for different jewelry types?
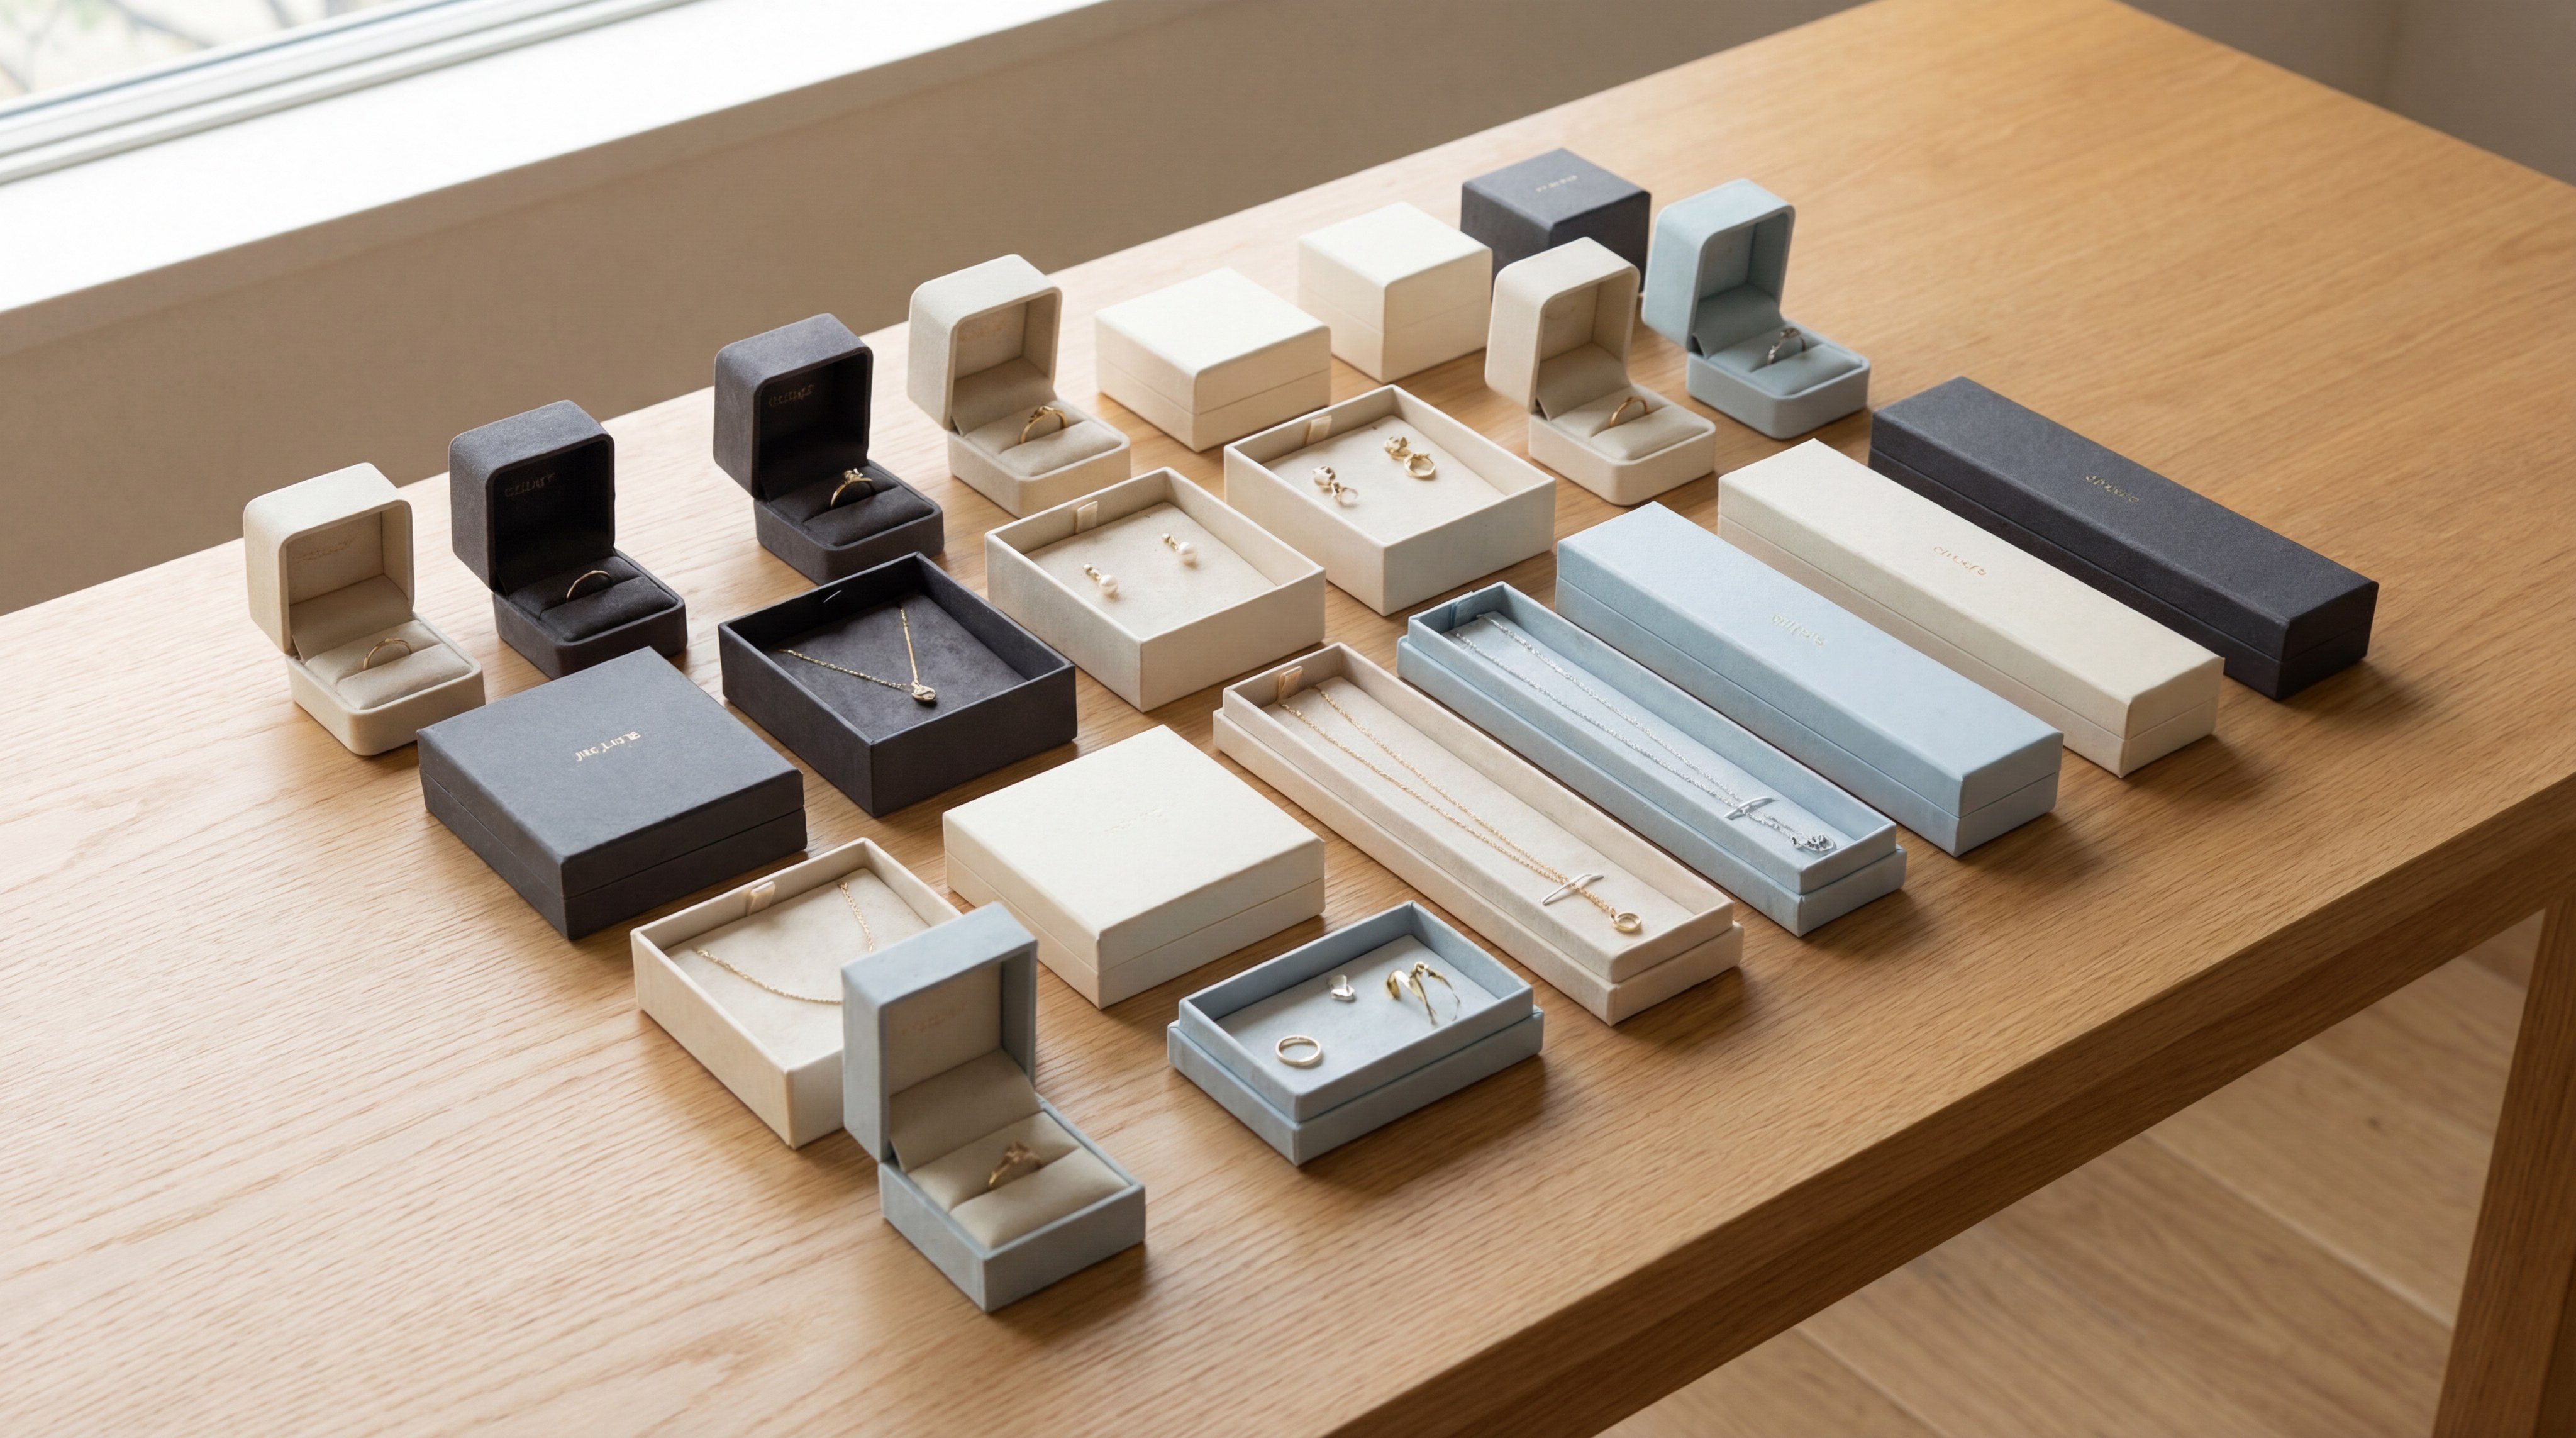
While custom options are plentiful, most brands start with standard jewelry box dimensions jewelry packaging box to optimize costs and lead times. These industry standards have been developed over decades to fit the vast majority of consumer jewelry items. Using these “golden ratios” can simplify your inventory management and ensure compatibility with standard retail display cases.
What are the standard sizes for rings and studs?
A classic ring box usually measures approximately 50mm x 50mm x 40mm (2″ x 2″ x 1.5″). This size provides a compact footprint while offering enough vertical depth for even the most elaborate engagement ring settings.
- 50mm square is the global standard.
- 40mm height allows for high stones.
- Ideal for single or double ring slots.
- Fits perfectly into coat pockets for proposals.
Here is the kicker: Deviating from this size can make your rings look lost in the box or dangerously crowded.
Is the “Goldilocks” size real for necklaces?
For pendants and light necklaces, the 85mm x 85mm x 30mm (3.5″ x 3.5″ x 1.2″) box is considered the most versatile size in the industry. It is large enough to display the item beautifully but small enough to keep shipping costs within the lowest weight brackets.
- Fits 80% of standard retail necklaces.
- Deep enough for small velvet pillows.
- Excellent for bracelets and large earrings.
- Highly cost-effective for mass production.
Think about this: Standardizing your collection around this one size can reduce your packaging SKU count and simplify your warehouse operations.
How large should a statement necklace box be?
Statement pieces or heavy collars require much larger dimensions, often starting at 200mm x 150mm (8″ x 6″) or larger. These boxes focus on “surface area” rather than depth, allowing the intricate details of the necklace to be fully laid out for the customer.
- Prevents tangling of multiple strands.
- Showcases the full “swing” of the piece.
- Requires reinforced walls to prevent bowing.
- Often features specialized silk or velvet liners.
Look: A statement piece in a small box looks cramped and loses its perceived value instantly.
Key Takeaway: Utilizing industry-standard dimensions can significantly lower your production costs while meeting 90% of your packaging needs.
| Product Type | Standard Dimensions (Approx.) | Market Role | |
|---|---|---|---|
| Engagement Ring | 50 x 50 x 40 mm | Specialized / Luxury | |
| Pendant / All-Purpose | 85 x 85 x 30 mm | Bulk / High Volume | |
| Statement Necklace | 200 x 150 x 35 mm | Premium / Display |
Aligning with industry standards ensures your packaging is compatible with standard shipping mailers and retail shelving systems.
How do custom dimensions impact branding and costs?
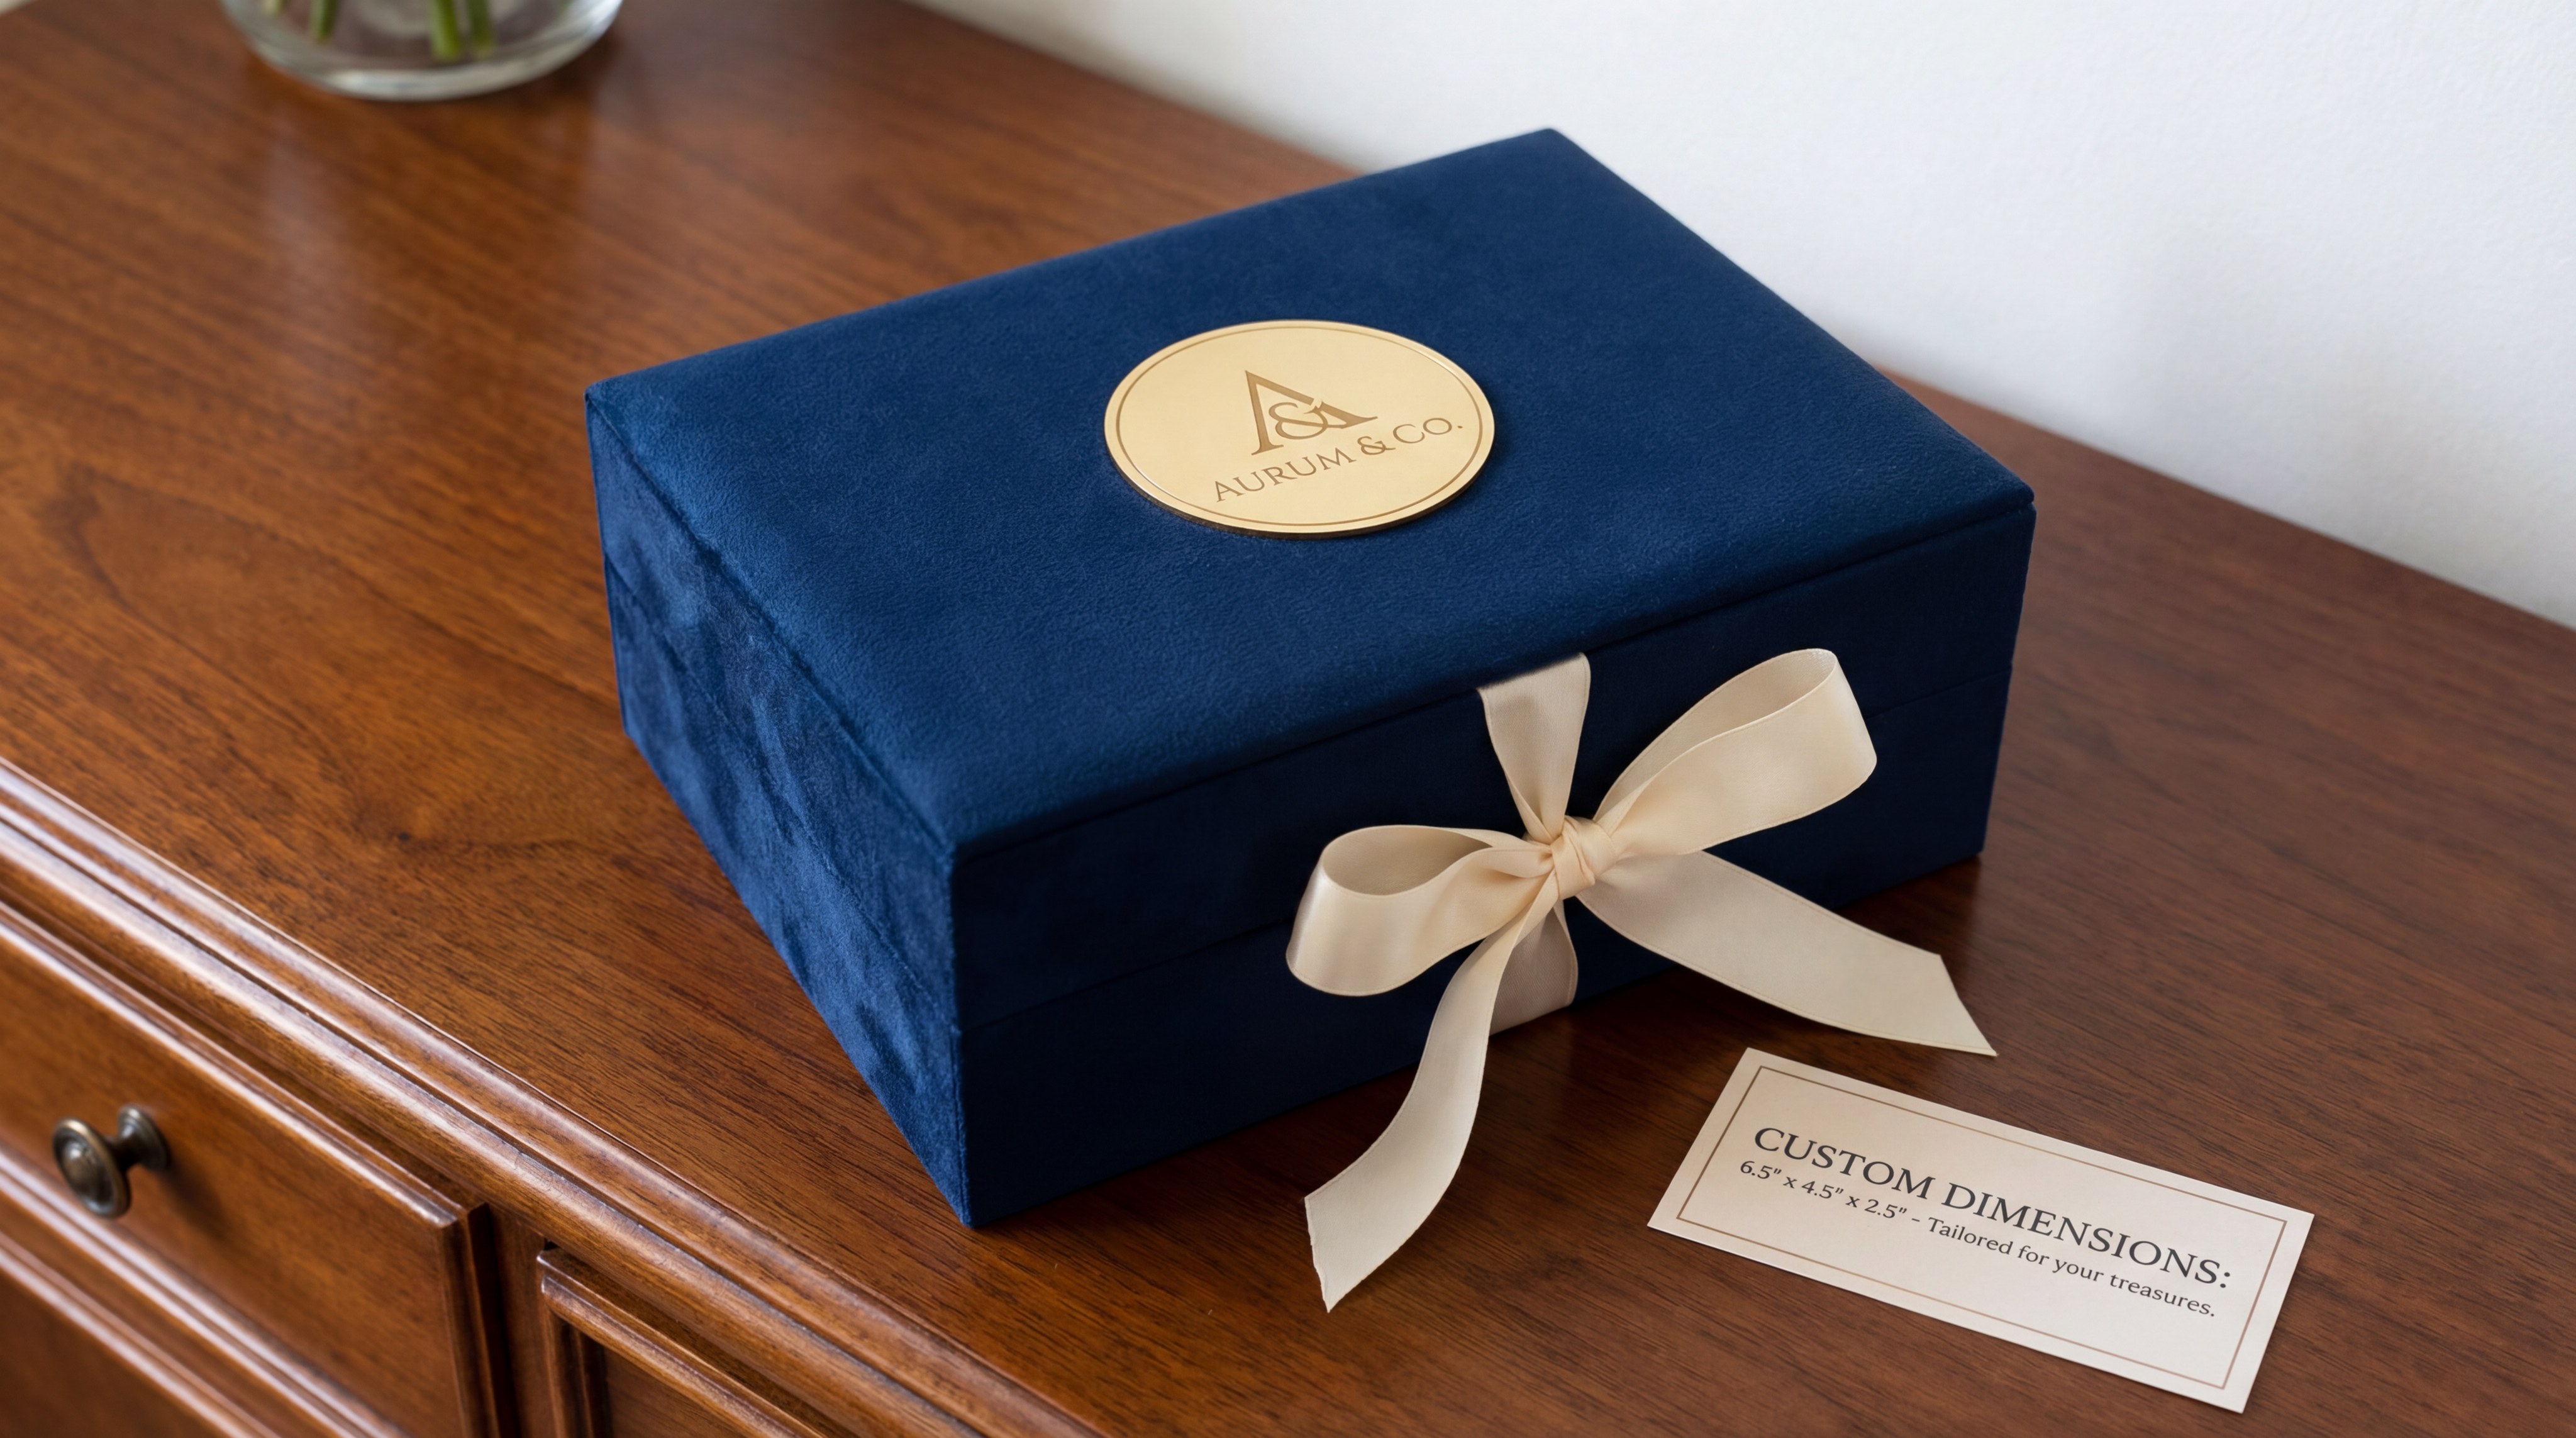
Choosing custom jewelry box dimensions is a strategic decision that allows a brand to create a unique “silhouette” in the marketplace. While standard sizes are efficient, custom dimensions can convey a specific brand personality—such as a slim, modern profile or a heavy, monolithic luxury feel. However, this level of customization involves higher upfront costs and longer lead times due to the creation of unique cutting dies.
Does a unique shape justify the higher MOQ?
Manufacturers typically require a Minimum Order Quantity (MOQ) of 500 to 1,000 units for custom-sized boxes to offset the cost of setting up the production line. You should evaluate if your sales volume supports this investment or if a standard size with custom printing would be more prudent.
- Higher initial investment for dies/molds.
- Minimum orders often start at 500 units.
- Exclusive branding that competitors can’t copy.
- Better fit for non-standard jewelry shapes.
The reality is: A custom box shape can become a “signature” of your brand, much like the iconic blue box of a world-famous jeweler.
How do custom dimensions affect production speed?
Ordering a custom size can add 4 to 6 weeks to your production timeline because the manufacturer must create new tooling and verify the structural integrity of the design. You must plan your product launches well in advance to account for this extended development cycle.
- Additional time for prototyping.
- Tooling and die creation phase.
- Structural testing for new dimensions.
- Potential for delays in material sourcing.
Keep this in mind: If you are on a tight deadline, choosing a standard size and focusing on custom materials is often a faster path to market.
Can custom sizing reduce hidden shipping costs?
By designing a box that is just 5mm smaller in one dimension, you may be able to fit more units into a standard shipping carton or qualify for a lower postage tier. This “micro-optimization” of dimensions can save thousands of dollars in international logistics costs over a year.
- Optimized fit for master shipping cartons.
- Reduction in “dimensional weight” fees.
- Less need for external bubble wrap/fillers.
- Improved “pallet density” for large shipments.
Believe it or not: Shaving a few millimeters off a custom box can pay for the cost of the custom dies within a single shipping season.
Key Takeaway: Custom dimensions offer superior brand differentiation but require careful planning regarding MOQ, lead times, and logistical efficiency.
| Consideration | Standard Size | Custom Size | |
|---|---|---|---|
| Brand Impact | Low / Recognizable | High / Unique | |
| Upfront Cost | Zero / Low | Medium / Tooling Fees | |
| Lead Time | 1-2 Weeks | 4-8 Weeks |
The strategic use of custom sizing can transform your packaging from a simple utility into a powerful brand asset.
What role do dimensions play in international logistics?
In the B2B world, jewelry box dimensions bracelet box are a primary driver of your shipping overhead. Global couriers use a “Dimensional Weight” calculation, which means they charge based on the box’s volume if it exceeds the actual physical weight. If your boxes are unnecessarily large, you are effectively paying to ship air across the ocean.
How do you calculate dimensional weight (DIM)?
The formula is generally (Length x Width x Height) / DIM Factor (usually 5000 for metric). If this result is higher than the actual weight of the package, the carrier will bill you for the larger amount, significantly impacting your profit margins on wholesale orders.
- Length x Width x Height in centimeters.
- Divide by the carrier’s DIM factor.
- Compare with the actual scale weight.
- Use the higher number for shipping costs.
Here is the kicker: A box that is just 1cm too tall across a 1,000-unit shipment can increase your shipping bill by hundreds of dollars.
Why does exterior height matter for mailers?
Many international mail services have a “large envelope” or “flat” category for items under 20mm (0.75″) in height. If your jewelry box exterior height is 21mm, you could be paying double the shipping rate for every single customer order.
- Keep height under 20mm for “flats.”
- Use “slimline” boxes for small jewelry.
- Maximize internal width to compensate for height.
- Test dimensions with postal gauges.
Think about this: Designing your boxes to fit within standard postal “slots” is the easiest way to increase your margins in the e-commerce sector.
Does “void space” in master cartons cause damage?
If the dimensions of your individual jewelry boxes do not neatly divide into the dimensions of your master shipping carton, you will have “void space.” This space allows the contents to shift during rough handling, which can crush the jewelry boxes at the bottom of the stack.
- Aim for a “perfect fit” in the master carton.
- Calculate carton dimensions as multiples of the box.
- Use dividers to prevent interior shifting.
- Reduce the need for expensive void fill.
Make no mistake: Efficient logistics starts with the dimensions of the smallest unit and works outward to the shipping pallet.
Key Takeaway: Optimizing your exterior dimensions for dimensional weight and postal categories is a critical strategy for maintaining profitability in international trade.
| Logic Metric | Impact on Cost | Solution | |
|---|---|---|---|
| Volume (DIM) | High (Shipping fees) | Minimize exterior excess. | |
| Height Category | Extreme (Postage tiers) | Design for “slot” compliance. | |
| Carton Density | Medium (Damage/Fill) | Standardize box multiples. |
Strategic measurement ensures that your beautiful packaging doesn’t become a logistical liability during global distribution.
Which common measurement pitfalls can damage a business?
Finalizing jewelry box dimensions without a rigorous testing process can lead to systemic failures across your entire product line. One of the most common errors is failing to account for “finger room,” which prevents the customer from easily removing the jewelry or the insert card. If the fit is too tight, the unboxing experience becomes frustrating rather than luxurious, leading to negative reviews.
Why is “finger room” a non-negotiable requirement?
You must provide at least 6mm of clearance on at least two sides of the insert so that the customer can grasp it with their fingertips. Without this space, people often resort to using tools like tweezers or scissors to pry the item out, which risks scratching the jewelry.
- Add 6mm clearance to two sides.
- Use ribbon pull-tabs for tight fits.
- Test removal with different hand sizes.
- Ensure the insert doesn’t “vacuum” seal.
Here is the deal: An unboxing experience that requires “force” is an experience that fails the luxury brand test.
What happens if you ignore the “lid drop” factor?
Many jewelry boxes feature a lid with a thick internal pad or a “pouchette” for certificates, which hangs down into the box cavity. If you don’t account for this “lid drop,” the top of the box will crush your jewelry as soon as the lid is closed for the first time.
- Measure the “protrusion” of the lid lining.
- Subtract lid padding from usable depth.
- Account for documents stored in the lid.
- Use “top-down” measurements to verify clearance.
The kicker is: The depth you see when the box is open is not the same depth available when the box is shut and locked.
Is guessing the “growth factor” a mistake?
Brands often choose dimensions that just barely fit their current product line, leaving no room for future designs that might be slightly larger. You should choose a box that is roughly 10-15% larger than your largest current item to ensure longevity for your packaging design.
- Plan for slightly larger future designs.
- Use a “modular” insert system.
- Avoid “skin-tight” dimensions.
- Consider a unified “one size fits many” strategy.
Look: Redesigning your packaging every time you release a new jewelry piece is an expensive and inefficient way to run a business.
Key Takeaway: Avoiding pitfalls like “finger room” and “lid drop” ensures that your packaging is as functional as it is beautiful.
| Pitfall | Consequence | Prevention Strategy | |
|---|---|---|---|
| Zero Clearance | Difficult item removal. | Add 6mm finger room/pull-tabs. | |
| Lid Drop | Crushed gemstones/settings. | Measure internal depth while closed. | |
| Static Sizing | Packaging becomes obsolete. | Add 15% buffer for future growth. |
Rigorous testing and a deep understanding of human ergonomics are what separate professional jewelry packaging from generic containers.
Accuracy in measurement is the bridge between a good product and a global brand legacy. By meticulously defining your interior needs, accounting for padding, and optimizing for international logistics, you protect both your precious inventory and your profit margins. We are dedicated to the vision of providing the jewelry industry with precision-engineered packaging that reflects the timeless beauty of the items they contain. If you are ready to transform your brand presentation with professionally sized, high-quality boxes, contact us today for a comprehensive consultation and custom quote.
Frequently Asked Questions
Can I use a standard tailor’s tape to measure my boxes?No, a standard tape is too flexible and prone to sagging, which can cause significant errors in jewelry box dimensions. You should always use a rigid metal ruler or a digital caliper to ensure your measurements are precise and consistent for manufacturing.
What’s the best way to handle irregular jewelry shapes?The most effective method is to determine the “maximum volumetric envelope” by identifying the furthest points of the piece in every direction. Measure these points to create a “bounding box” and then add a 6mm clearance buffer on all sides to prevent any contact with the box walls.
Can I use the same box size for both rings and necklaces?Generally, this is not recommended because rings require significant vertical depth, while necklaces require more lateral surface area to prevent chain tangling. However, you can use a medium-sized square box for both if you utilize specialized custom inserts that secure each item type according to its unique height and width requirements.
How do I calculate the shipping cost impact of my box dimensions?You should calculate the “Dimensional Weight” by multiplying the exterior Length x Width x Height (in cm) and dividing by 5000. If this number is greater than the actual weight of the box, the shipping carrier will charge you for the higher volume, so keeping your exterior dimensions as compact as possible is key to saving money.
Is it possible to order custom dimensions with a small budget?Custom dimensions usually require an MOQ of 500 units because the manufacturer has to create unique cutting dies for your design. If you have a limited budget, it is often better to choose a standard industry size and spend your funds on custom logo printing, premium papers, or unique velvet liners to differentiate your brand.