Repairing jewelry as a retail professional requires a combination of technical skill, appropriate tooling, and a strategic decision-making process for in-house versus outsourced work. Many jewelry businesses struggle with mounting inventory damage or minor customer returns that eat into profit margins and diminish brand reputation. It is frustrating to watch high-value pieces sit in the “back room” simply because of a loose stone or a bent prong. The best solution is learning how to fix jewelry through a standardized retail protocol that restores value and ensures every piece in your showcase remains in pristine, sellable condition.
How to fix jewelry by identifying common retail damage?
You can learn how to fix jewelry by conducting a thorough visual audit to spot metal fatigue, loose settings, or hairline fractures before they lead to total piece failure. Early detection prevents costly replacements and maintains the integrity of your showroom inventory.
Evaluating metal fatigue and weak points
Identifying stress in metal is the first step in ensuring long-term durability for your customers. You must look for thinning areas on shanks or hinges that suggest the metal has been overworked.
Here is the deal:
- Check for “greying” or discoloration in gold.
- Look for hairline cracks near solder joints.
- Measure the thickness of the band’s base.
By catching these issues early, you prevent the piece from snapping during a simple fitting. This proactive approach saves your reputation and your bottom line.
Inspecting stone settings for stability
Ensuring stones are secure is perhaps the most critical part of maintaining high-value inventory. You should use a jeweler’s loupe to check every prong and bezel for even the slightest movement.
Look:
- Test stones with a gentle “click” from a probe.
- Verify prongs are flush against the crown.
- Search for chipped girdles under magnification.
Key Takeaway: Consistent inspections allow you to address minor structural issues before they become expensive losses or customer service nightmares.
| Inspection Point | Detection Method | Typical Risk Level | |
|---|---|---|---|
| Metal Fatigue | Visual thinning | Medium | |
| Loose Prongs | Probe test | High | |
| Joint Cracks | 10x Magnification | Low-Medium |
This systematic evaluation helps you prioritize which pieces need immediate bench work and which are safe for the display case.
How to fix jewelry chains and replace broken clasps?

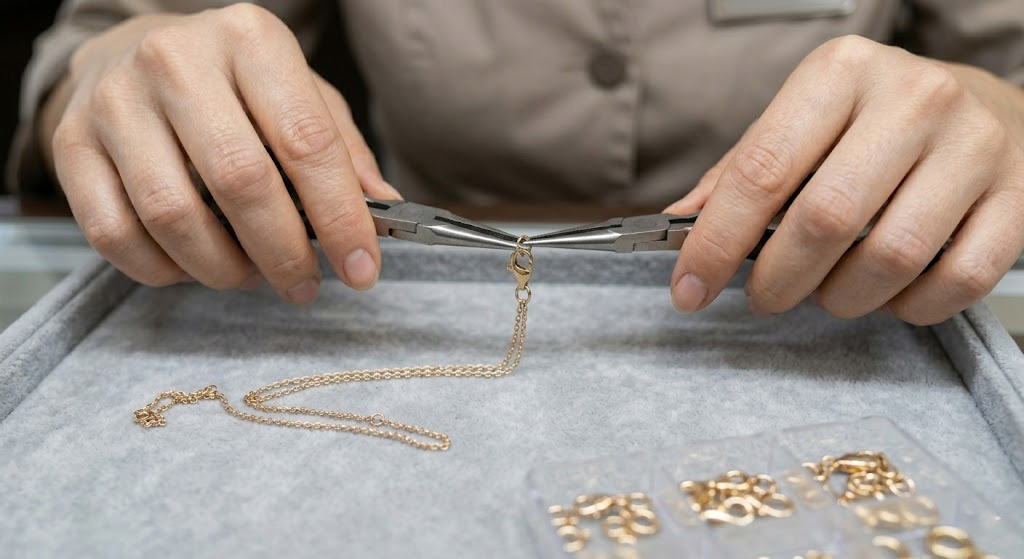
The most effective way how to fix jewelry chains is by identifying the specific link type and using precision pliers to replace damaged jump rings or failed lobster clasps. Most chain repairs are straightforward and can be completed in minutes with the right components.
Replacing damaged jump rings
Jump rings are the most common point of failure in necklaces and bracelets. You should always ensure that the replacement ring matches the metal alloy and gauge of the original chain.
Think about it:
- Use two pairs of flat-nose pliers for control.
- Twist the ring open laterally, never pull it apart.
- Ensure the ends meet perfectly for a flush finish.
When you master the lateral twist, you maintain the circular integrity of the ring. This ensures the chain remains secure even under tension.
Realigning twisted chain links
Tangled or twisted links can make a high-end necklace look cheap and neglected. You can often solve these “kinks” by using two fine-tipped needles to gently tease the links back into their proper orientation.
The best part?
- Avoid using force, which can stretch the metal.
- Work on a flat, white surface for maximum visibility.
- Apply a tiny drop of mineral oil for stubborn knots.
Key Takeaway: Offering quick chain and clasp repairs while the customer waits builds immense trust and keeps your inventory moving.
| Component | Common Repair | Skill Level | |
|---|---|---|---|
| Lobster Clasp | Complete replacement | Beginner | |
| Jump Ring | Lateral alignment | Beginner | |
| Cable Chain | Link realignment | Intermediate |
Managing these small repairs in-house significantly reduces your turnaround time and improves customer satisfaction scores.
How to fix jewelry rings that are bent or misshaped?
You can master how to fix jewelry rings that have lost their circular form by using a steel mandrel and a weighted mallet to gently reshape the shank. This process restores the aesthetic appeal and ensures the ring size remains accurate for the wearer.
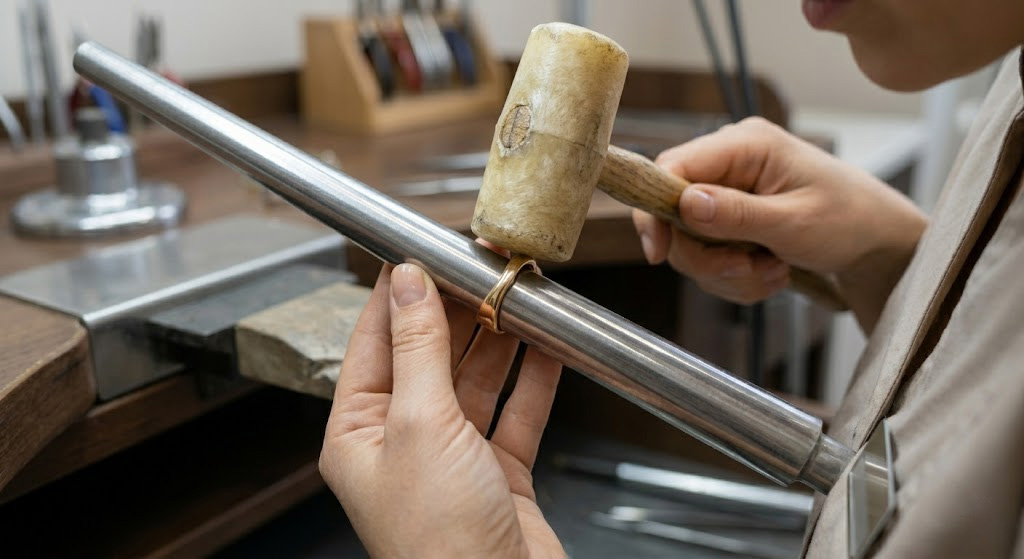
Reshaping with mandrels and hammers
A ring mandrel is your most important tool when correcting a “squashed” or oval-shaped band. You should slide the ring onto the mandrel and tap the high spots to move the metal back into a perfect circle.
The reality is:
- Use a rawhide or plastic mallet to avoid marring.
- Tap from the bottom up to ensure even pressure.
- Regularly flip the ring to maintain a consistent shape.
When you use the right mallet, you won’t leave unsightly marks on the polished surface. This maintains the piece’s value without requiring extensive polishing afterward.
Understanding the reshanking process
Sometimes a ring is too thin to simply reshape, requiring a new half-shank or full-shank replacement. You must recognize when the metal is too brittle to survive a simple hammering process.
Here is the deal:
- Measure the thickness with digital calipers.
- Look for deep gouges that compromise the structure.
- Consider a reshank if the metal is paper-thin.
Key Takeaway: Restoring a ring’s shape not only improves its appearance but also prevents the stones from popping out of their settings.
| Condition | Tool Needed | Recommended Action | |
|---|---|---|---|
| Minor Ovaling | Rawhide Mallet | Reshape on Mandrel | |
| Severe Flatness | Steel Hammer | Anneal and Reshape | |
| Thin Bottom | Saw and Torch | Professional Reshank |
Using a mandrel is a fundamental skill that allows you to handle the most common ring complaints quickly and effectively.
How to fix jewelry earring posts and lost backs?
You can learn how to fix jewelry earring issues by stocking a variety of post gauges and high-tension butterfly backs to replace components that have snapped or lost their grip. Earring repairs are high-volume tasks that require a steady hand and knowledge of metal compatibility.
Reattaching broken earring posts
When a post breaks off a stud or hoop, the most reliable fix is often a clean solder or a high-strength industrial adhesive for costume pieces. You must ensure the base of the post is perfectly flat against the earring body for a secure bond.
But there is a catch:
- Remove any old solder or glue residue first.
- Use a soldering jig to keep the post upright.
- Always check the hallmark to match the solder.
A clean attachment point ensures the earring sits correctly on the ear. You want the repair to be invisible to the customer’s naked eye.
Matching metal types for back replacements
Providing the wrong earring back can lead to skin irritation or the loss of the jewelry piece itself. You should maintain a categorized kit of sterling silver, 14k gold, and hypoallergenic titanium backs.
Think about it:
- Test the tension of the back before giving it to the client.
- Match the color and karat of the earring perfectly.
- Offer “heavy” backs for larger, sagging earrings.
Key Takeaway: Maintaining a robust inventory of earring components allows you to provide “instant” fixes that delight customers and prevent lost sales.
| Earring Part | Common Issue | Solution | |
|---|---|---|---|
| Standard Post | Snapped or bent | Soldering/Replacement | |
| Butterfly Back | Loose tension | Manual tightening | |
| Heavy Studs | Drooping on ear | Large diameter backs |
Properly functioning earring hardware is the difference between a wearable piece and a liability sitting in a drawer.
How to fix jewelry with essential tools at your store?
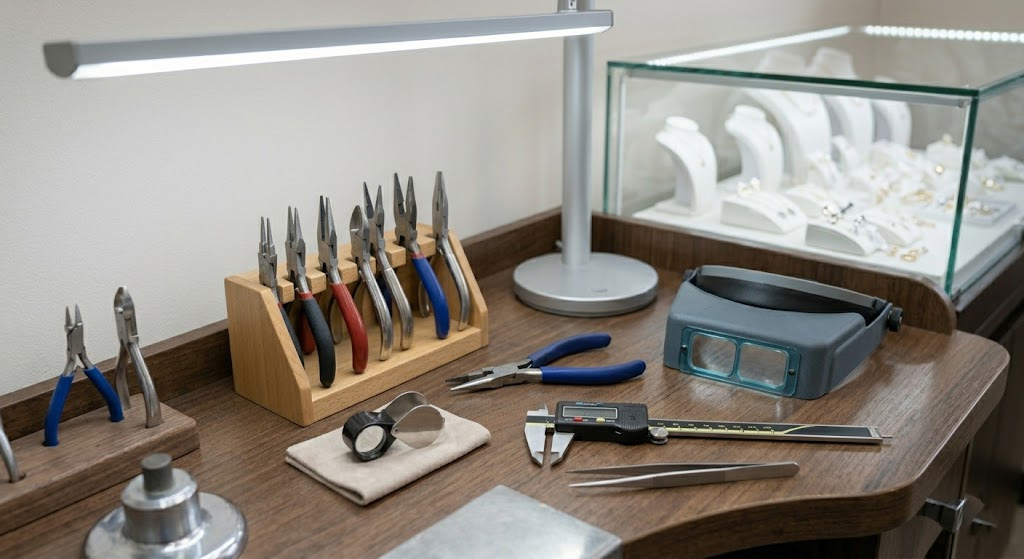
The best way how to fix jewelry in a retail setting is to invest in a dedicated repair bench equipped with precision pliers, magnification tools, and a reliable light source. Having the right tools on hand reduces the risk of damaging pieces during the repair process.
Essential pliers and precision tweezers
You need a variety of specialized pliers to handle the delicate components found in modern jewelry. Round-nose, chain-nose, and flat-nose pliers are the “big three” for any retail repair station.
Look:
- Use nylon-jaw pliers to prevent scratching gold.
- Invest in stainless steel tweezers for stone handling.
- Keep cutters sharp to ensure clean snips on wire.
When you use the correct plier for the task, you minimize the need for post-repair polishing. This keeps your workflow efficient and your results professional.
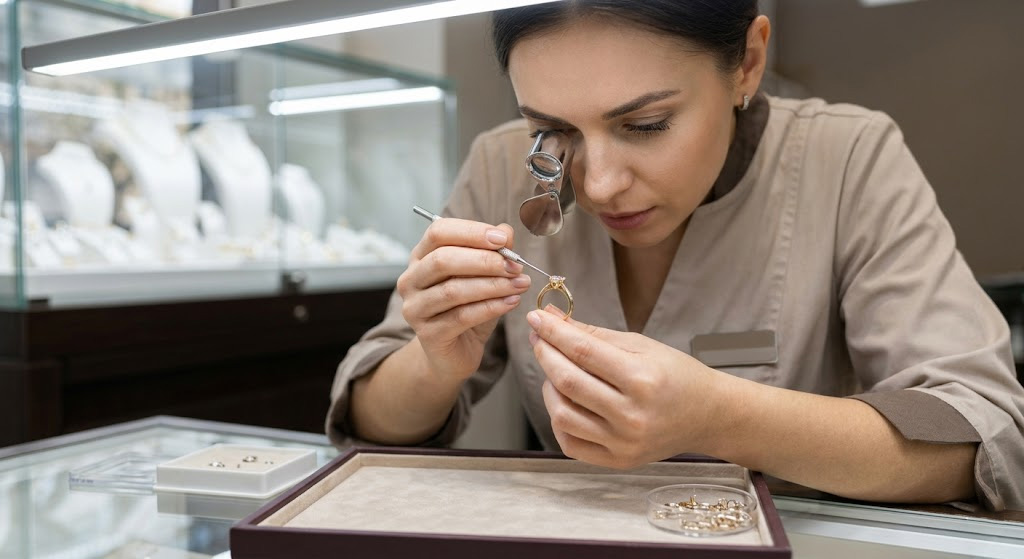
Using magnification loupes for detail work
You cannot fix what you cannot see, making high-quality magnification essential for every retailer. A 10x triplet loupe is the industry standard for inspecting settings and identifying hallmarks.
The best part?
- Hands-free headlamps or visors improve focus.
- Desktop magnifiers are great for steadying hands.
- Digital microscopes can help show damage to clients.
Key Takeaway: A well-equipped repair station allows you to perform professional-grade work that builds customer confidence and justifies your service fees.
| Tool Type | Primary Use | Retail Benefit | |
|---|---|---|---|
| Nylon Pliers | Bending without marking | Reduced finishing time | |
| 10x Loupe | Quality inspection | Accurate diagnosis | |
| Digital Caliper | Precise measurement | Correct part ordering |
Investing in quality tools pays for itself by reducing the rate of accidental damage during the repair process.
How to fix jewelry using soldering and advanced methods?
To understand how to fix jewelry using advanced methods, you must master the application of controlled heat for soldering and the selection of industrial adhesives for non-metallic bonds. Advanced repairs require a deeper understanding of metallurgy and chemical properties.
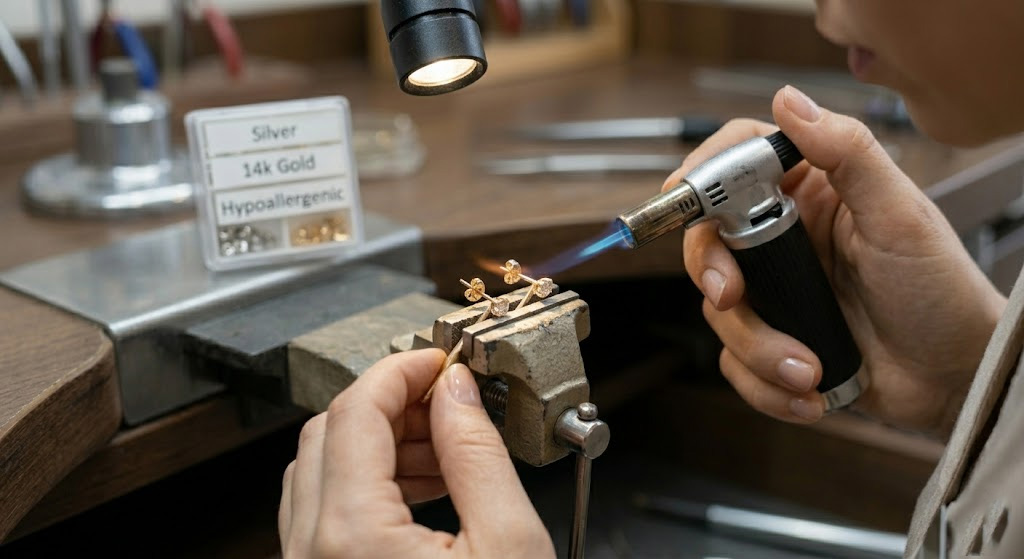
Applying heat with mini torches
Small butane torches provide the precision heat needed for most retail-level soldering tasks like joining jump rings or fixing small breaks. You must learn to control the flame to prevent melting the surrounding metal or damaging heat-sensitive stones.
But there is a catch:
- Always use a heat-shielding paste for stones.
- Ensure the area is clean and fluxed properly.
- Keep the torch moving to avoid “hot spots.”
When you master heat control, you can perform permanent repairs that are far superior to temporary adhesive fixes. This elevates your store’s technical reputation.
Selecting industrial adhesives for costume pieces
For fashion jewelry where soldering isn’t possible, you must choose the right industrial-grade glue to ensure a lasting bond. Cyanoacrylates and two-part epoxies are the most common choices for glass, plastic, or plated metals.
Here is the deal:
- Clean all surfaces with alcohol before applying glue.
- Use a toothpick for precise, minimal application.
- Allow for full 24-hour curing times for epoxies.
Key Takeaway: Knowing when to use heat versus adhesive allows you to safely repair a wider variety of jewelry styles without causing permanent damage.
| Method | Material Type | Best For | |
|---|---|---|---|
| Silver Soldering | Sterling Silver | Jump rings and charms | |
| Gold Soldering | 10k-18k Gold | Ring sizing and posts | |
| 2-Part Epoxy | Costume/Mixed Media | Stone resetting in base metal |
Mastering advanced methods ensures that no repair request is too difficult for your team to evaluate and potentially solve.
How to fix jewelry in-house versus outsourcing it?
You can decide how to fix jewelry by weighing the complexity of the repair against your staff’s skill level and the potential liability of the piece. Some repairs are better left to specialized trade shops with heavy equipment like laser welders.
Assessing the value and risk of the gemstone
High-value stones like emeralds or opals are extremely sensitive to heat and pressure. You should never attempt in-house repairs on fragile gemstones unless you have extensive gemological training and specialized equipment.
The reality is:
- Emeralds are prone to cracking under heat.
- Opals contain water and can “crazing” if dried.
- Diamonds can be burnt if not shielded properly.
When you recognize your limits, you protect your business from catastrophic insurance claims. Transparency with the customer about outsourcing builds long-term trust.
Partnering with certified repair experts
Building a relationship with a local trade shop allows you to offer “full-service” repairs without the overhead of a master jeweler on staff. You should vet your partners based on their turnaround time, insurance coverage, and quality of work.
Think about it:
- Get a written quote before starting any outsourced work.
- Use tracked shipping for all transit to the trade shop.
- Mark all items clearly with customer IDs.
Key Takeaway: A hybrid approach—handling minor repairs in-house and outsourcing complex jobs—maximizes your profit while minimizing operational risk.
| Repair Type | In-House | Outsource | |
|---|---|---|---|
| Simple Polishing | Yes | No | |
| Prong Re-tipping | Maybe | Recommended | |
| Laser Welding | No | Yes |
Strategic outsourcing ensures that every job is handled by the most qualified professional, maintaining the highest standards for your clients.
How to fix jewelry through professional cleaning?
The fastest way how to fix jewelry that has lost its luster is through a multi-stage cleaning process that includes ultrasonic vibration, steam cleaning, and high-speed polishing. Often, a “repair” is simply a deep cleaning that restores the original shine of the metal and stones.
Polishing techniques for precious metals
Polishing involves using abrasive compounds on a high-speed wheel to remove scratches and oxidation from the surface of the jewelry. You must start with a coarser compound like Tripoli and finish with a high-luster Rouge.
Look:
- Always wear eye protection and a dust mask.
- Hold the piece firmly to prevent it from flying.
- Do not over-polish, as it removes metal weight.
The best part is seeing a dull, scratched ring transform into a mirror-like finish in seconds. This visual transformation is a powerful selling tool for your repair services.
Safe ultrasonic cleaning practices
Ultrasonic cleaners use high-frequency sound waves to blast dirt out of hard-to-reach areas. You must be careful, however, as these vibrations can loosen stones or damage porous gems.
But there is a catch:
- Never put pearls, opals, or emeralds in the ultrasonic.
- Use a mild, specialized cleaning solution.
- Always check stone tightness after the cleaning cycle.
Key Takeaway: Professional cleaning is the “easy win” of the jewelry world, providing immediate gratification for the customer and making the piece look brand new.
| Cleaning Stage | Method | Purpose | |
|---|---|---|---|
| Pre-Wash | Manual scrub | Removing heavy grease | |
| Ultrasonic | Sound waves | Cleaning under settings | |
| Final Polish | Buffing wheel | Restoring surface shine |
A clean piece of jewelry is easier to inspect for actual structural damage, making cleaning the first step in any comprehensive repair.
How to fix jewelry storage to prevent future damage?
You can learn how to fix jewelry inventory issues by implementing a strict storage protocol that uses protective linings and anti-tarnish materials. Prevention is always more cost-effective than repair, and proper storage keeps your inventory showroom-ready at all times.
Using velvet-lined trays to prevent scratches
Hard gemstones can easily scratch precious metals if they are allowed to rub against each other in a drawer. You should ensure that every piece of inventory has its own dedicated slot in a soft-lined tray.
Think about it:
- Separate diamonds from softer gems like tanzanite.
- Use individual pouches for high-end statement pieces.
- Keep chains hanging or coiled to avoid knotting.
When you organize your inventory properly, you spend less time polishing and more time selling. It also demonstrates professional care to any customers who see your back-of-house operations.
Anti-tarnish solutions for silver inventory
Silver tarnish is a chemical reaction that can be prevented by controlling the environment where the jewelry is stored. You should use anti-tarnish strips or specialized cloths in every display case and storage box.
Here is the deal:
- Keep humidity levels low in your storage area.
- Replace anti-tarnish strips every six months.
- Store silver in airtight bags when not on display.
Key Takeaway: Proper storage and environmental controls reduce the labor hours required for maintenance, directly increasing your operational efficiency.
| Storage Issue | Prevention Tool | Benefit | |
|---|---|---|---|
| Surface Scratches | Velvet-lined trays | Maintains “new” look | |
| Silver Tarnish | Anti-tarnish strips | Reduces polishing frequency | |
| Chain Tangling | Hanging racks | Prevents link damage |
A proactive approach to storage ensures that your jewelry remains in “factory-new” condition until the moment it is sold.
How to fix jewelry branding with custom packaging?
The final step in how to fix jewelry services is to present the repaired item in high-quality, branded packaging that reinforces your store’s value. Custom packaging turns a simple repair into a premium experience that encourages repeat business and word-of-mouth referrals.
Enhancing value with custom branded boxes
When a customer picks up a repaired item, the packaging they receive it in sets the tone for their perceived value of the work. You should use custom boxes that feature your logo and brand colors to create a cohesive professional image.
The best part?
- It makes the repair feel like a brand-new purchase.
- The box serves as a long-term marketing tool.
- High-quality packaging protects the repair during transit.
Investing in your presentation shows that you value the customer’s jewelry as much as they do. This attention to detail is what separates luxury retailers from the competition.
Packaging repaired items for client delivery
For repairs that are being shipped back to the customer, you must use secure, multi-layered packaging to prevent damage or theft. You should consider using double-boxing and tamper-evident seals for high-value shipments.
Look:
- Use PE film boxes for a modern, secure display.
- Include a “care card” with instructions for the customer.
- Ensure the outer shipping box is discreet and unbranded.
Key Takeaway: Professional packaging is the “finishing touch” that justifies professional repair pricing and builds lasting brand loyalty.
| Packaging Element | Function | Impact | |
|---|---|---|---|
| Branded Box | Professionalism | High brand recall | |
| PE Film Insert | Secure display | Modern aesthetic | |
| Care Card | Customer education | Reduced future damage |
The way you return a piece of jewelry is just as important as the quality of the repair itself for the customer’s overall experience.
We provide the tools and packaging solutions you need to elevate your retail business from a simple shop to a full-service jewelry destination. By mastering repair protocols and presentation, you solve the problems of inventory degradation and lost customer trust while increasing your average transaction value. Contact us to discover how our premium packaging and retail solutions can transform your jewelry service department into a profit-generating machine.
Frequently Asked Questions
Can I perform gold soldering at my retail counter?Yes, but you must have a proper ventilation system and a fire-safe workspace. Soldering requires a mini-torch and specific flux to ensure the gold flows correctly without damaging nearby stones.
What’s the best way to clean customer jewelry for free?A quick steam cleaning is the most effective “while-you-wait” service. It provides instant shine by removing skin oils and lotion buildup without the risks associated with ultrasonic vibration.
How do I know if a stone is too loose for the display case?Perform the “rattle test” by holding the piece near your ear and tapping it gently with your finger. If you hear any clicking or movement, the prongs need to be tightened before the piece is shown to a customer.
Can I use superglue for gemstone resetting?Generally, no, because most superglues are brittle and will fail over time when exposed to moisture or heat. For retail repairs, use a two-part jeweler’s epoxy which offers a flexible, durable bond for non-soldered settings.
What’s the best material for preventing silver tarnish in a showcase?Activated carbon strips are the gold standard for tarnish prevention in enclosed cases. They absorb the sulfur in the air that causes the chemical reaction, keeping your silver bright for months at a time