You can easily learn how to make a homemade jewelry box by following a simple step-by-step assembly and resin-finishing process. It is incredibly frustrating to deal with tangled necklaces or lost earring backs when you are in a rush. By mastering the art of how to make a homemade jewelry box , you create a customized sanctuary for your treasures that reflects your personal style.
What supplies for how to make a homemade jewelry box?
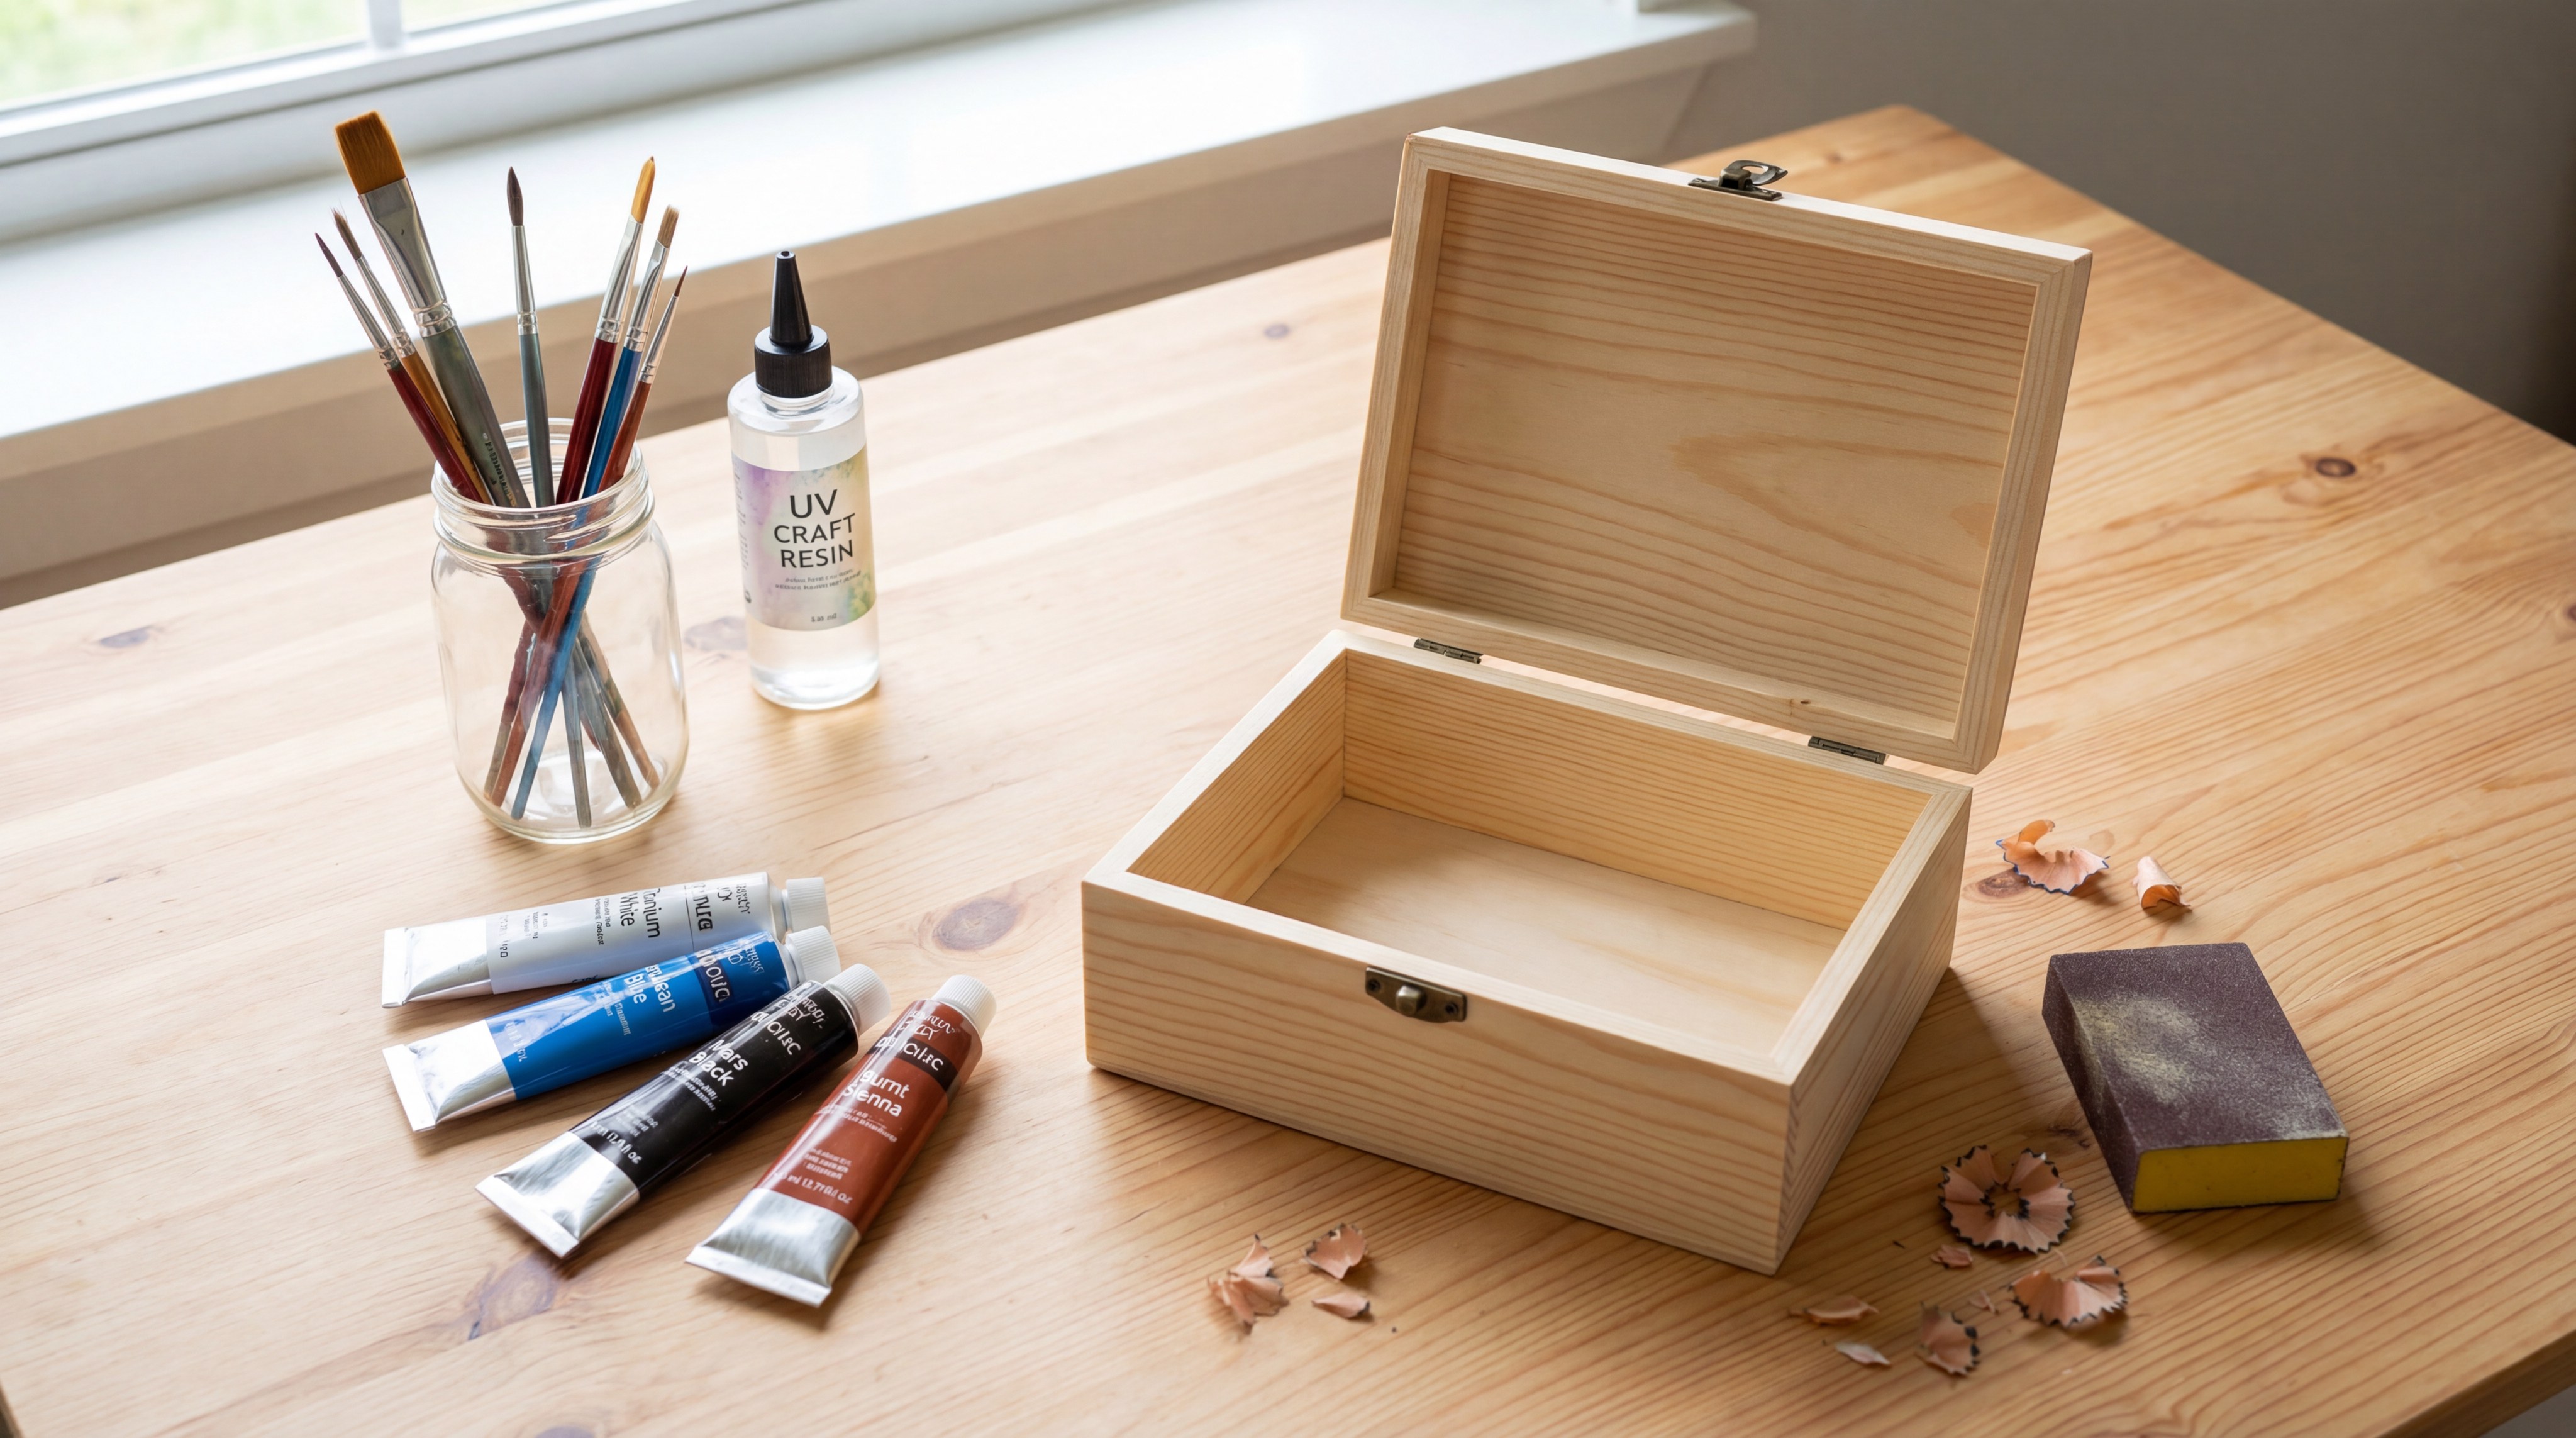
You need specific materials to start how to make a homemade jewelry box successfully. An unfinished wood box with a recessed lid is the foundation for this project. You will also require high-gloss resin, craft paints, and basic mixing tools.
Choosing Your Wood Base
The secret? A recessed top allows the resin to pool perfectly without spilling over the edges. You should look for smooth, unfinished pine or balsa wood boxes.
- Unfinished wooden box
- Sandpaper (fine grit)
- Tack cloth for cleaning
Selecting the Resin and Tools
Look: Quality epoxy resin is what gives the box its professional, glass-like finish. You will need precise measuring cups to ensure the chemical reaction occurs correctly.
- Two-part epoxy resin
- Plastic measuring cups
- Wooden stir sticks
Key TakeawayPreparation is the most vital step in crafting; having all your supplies organized ensures a seamless workflow from start to finish.
| Item Type | Essential Requirement | |
|---|---|---|
| Wood Base | Must have a recessed lid area | |
| Resin | High-gloss, two-part epoxy | |
| Paint | Multi-surface acrylic or vintage wash |
Choosing high-quality base materials prevents common DIY failures such as wood warping or resin cloudiness.
Which paints for how to make a homemade jewelry box?

The best paints for how to make a homemade jewelry box are vintage washes or watered-down acrylics that highlight the wood grain. These formulas allow the natural beauty of the timber to show through while providing a modern pop of color. You should choose a shade that complements your room’s decor.
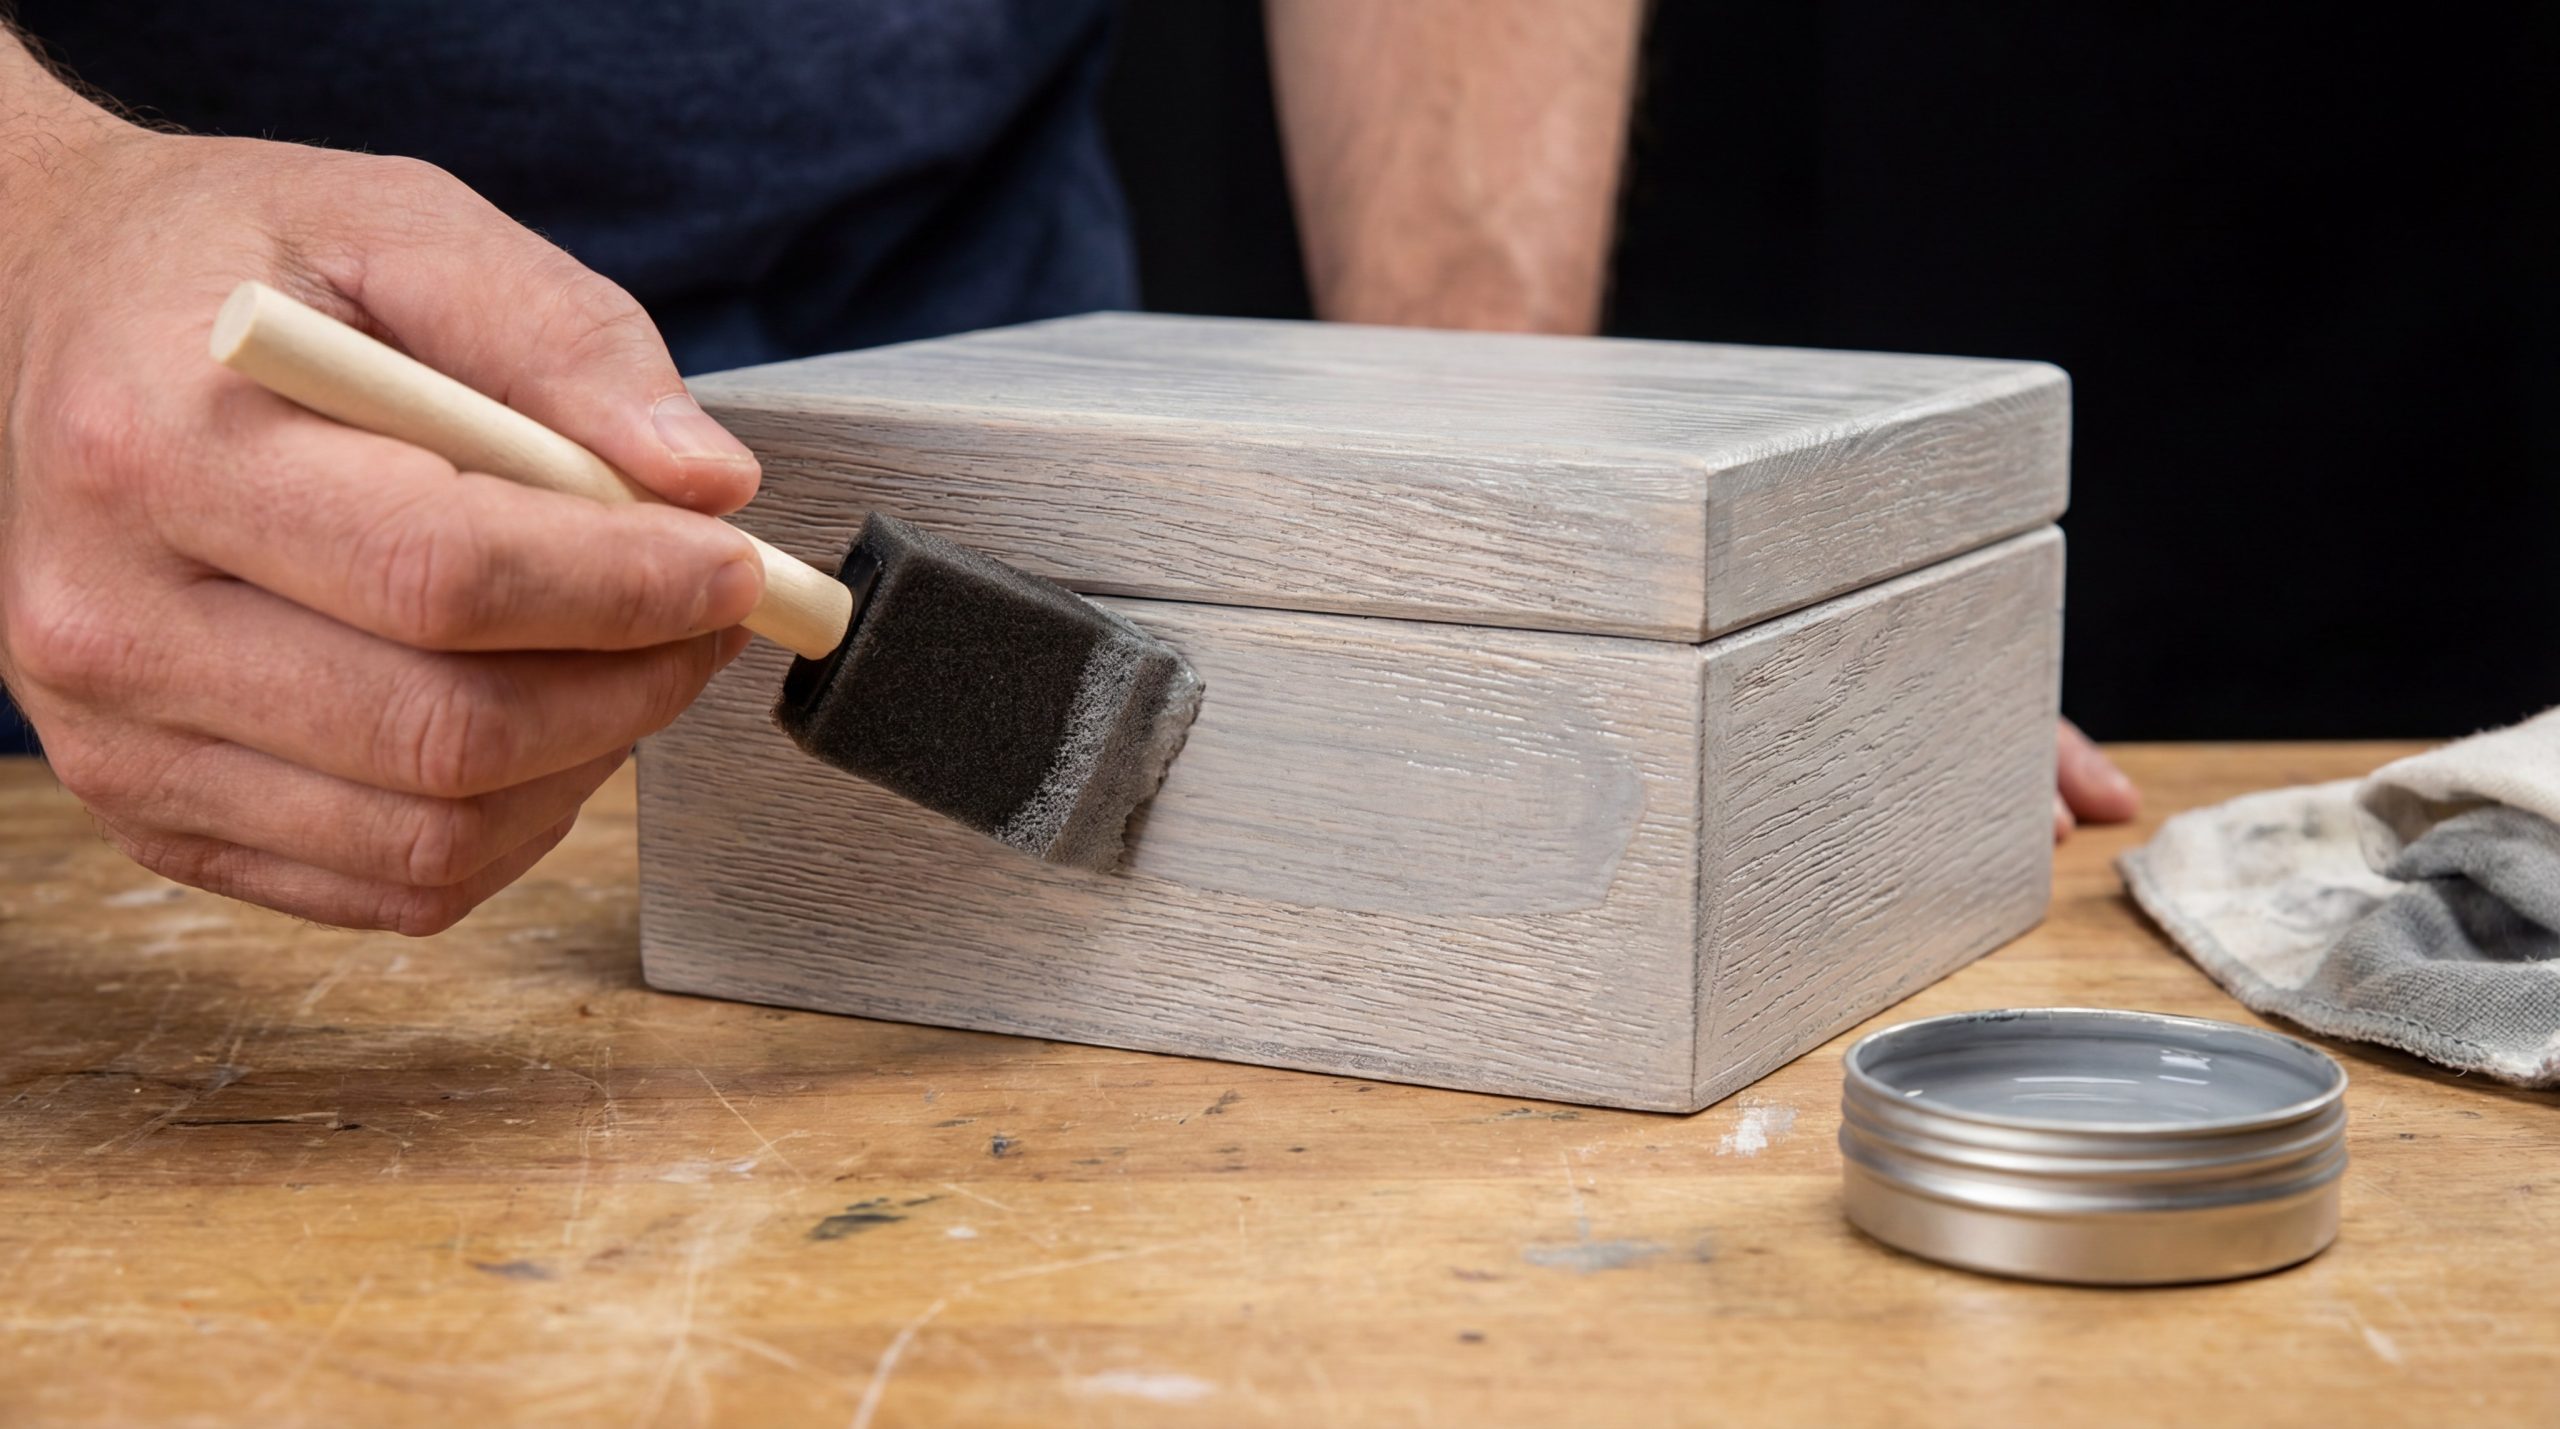
Applying the Vintage Wash
The best part? This paint acts more like a stain than a heavy coating. Brush the wash onto the wood, let it sit for a minute, and then wipe it away with a clean rag.
- Large foam brush
- Lint-free cotton rag
- Vintage effect wash paint
Selecting Interior Accent Colors
Actually: The inside of the box is the perfect place to use a contrasting, bright color. Teal or silver provides a surprising “wow” factor whenever you open the lid.
- Soft-bristle detail brush
- Metallic or matte acrylics
- Paper plate for mixing
Key TakeawayUsing a wipe-off technique with your paint creates a sophisticated, professional look that highlights the organic textures of the wood.
| Paint Phase | Recommended Product | Technique | |
|---|---|---|---|
| Exterior | Vintage Effect Wash | Brush on and wipe off | |
| Interior | Bright Acrylic | Two thin, even coats |
Proper paint selection ensures the wood remains breathable and prevents the finish from peeling over time.
Why seal wood for how to make a homemade jewelry box?
Sealing the wood is critical when learning how to make a homemade jewelry box to prevent the resin from leaking through gaps. If the recessed area isn’t airtight, the liquid resin will seep into the wood or out of the corners. This creates a messy workspace and ruins the level of your marbled top.
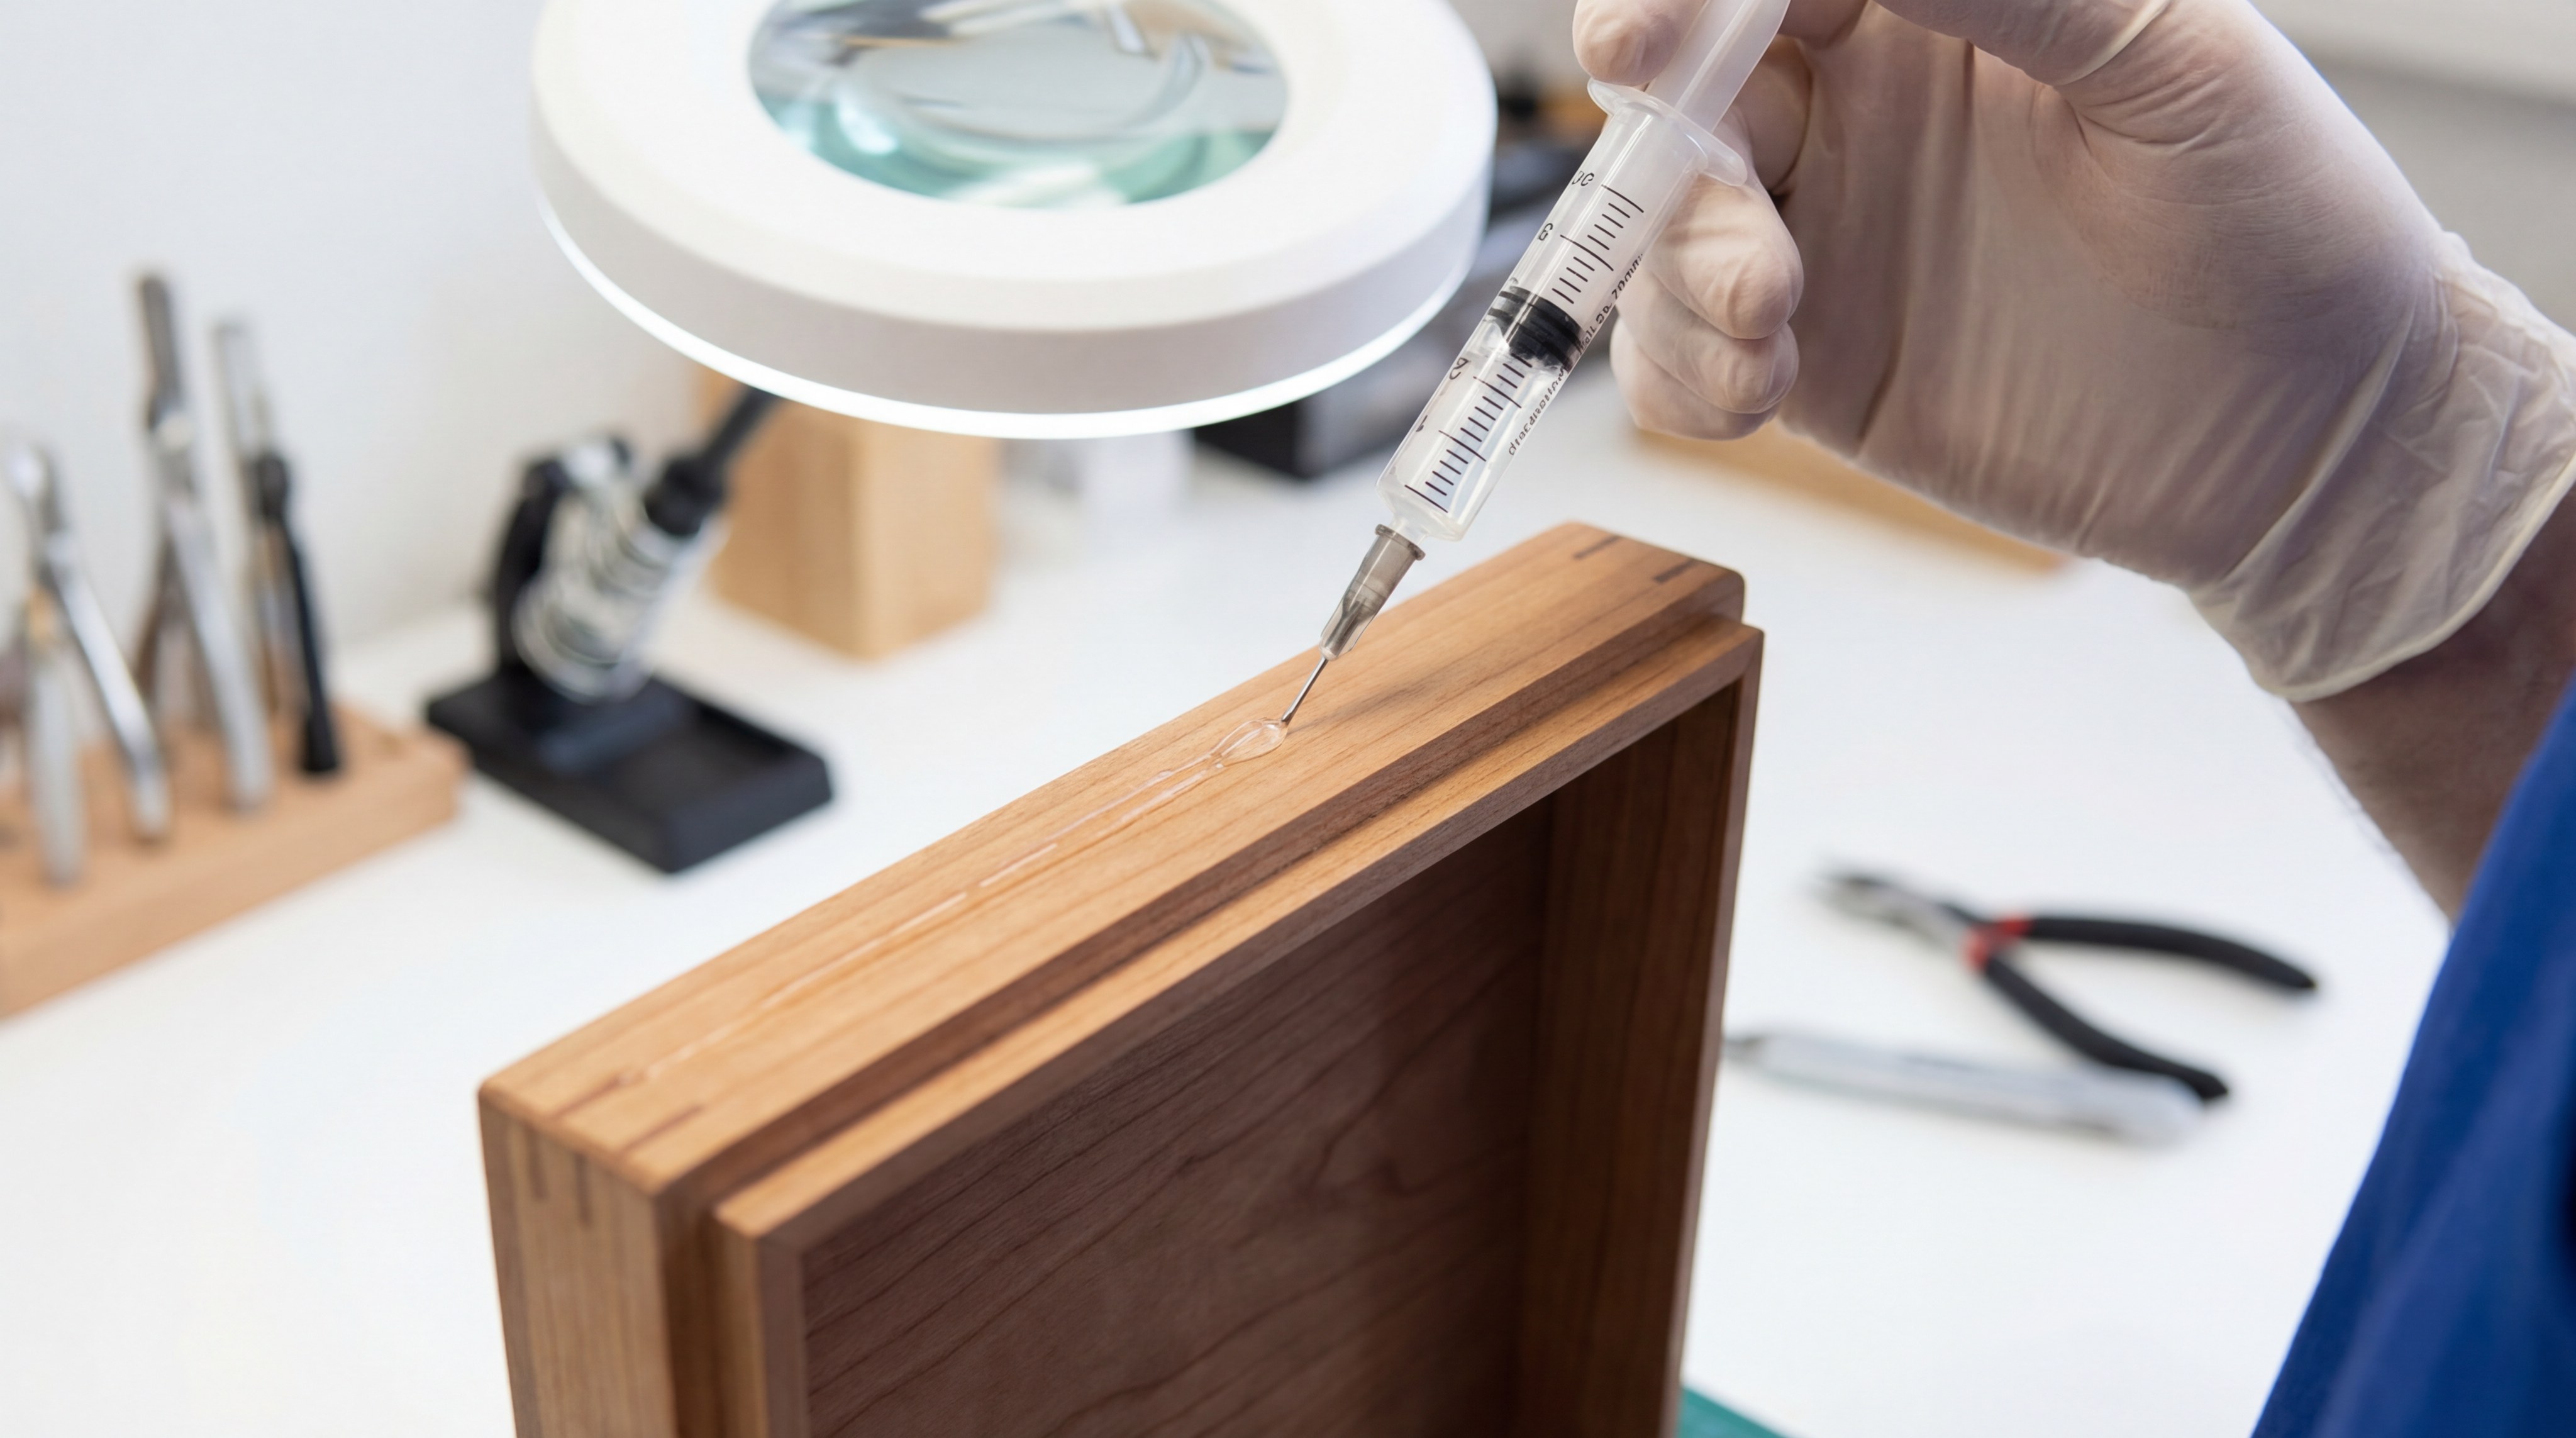
Applying Clear Adhesive
The secret? A bead of clear adhesive or wood glue along the inner seams of the recess creates a perfect dam. Ensure the glue is completely dry before moving on to the resin phase.
- Clear waterproof adhesive
- Precision tip applicator
- Small spatula for smoothing
Preventing Air Bubbles
Think about it: Raw wood is porous and can release tiny air bubbles into your resin as it cures. Applying a thin sealer coat prevents these “off-gassing” bubbles from marring your final glossy surface.
- Clear sealer spray
- Foam pouncer
- Sanding block
Key TakeawayAn airtight seal is the only way to ensure your resin stays exactly where you pour it, preventing waste and structural issues.
| Sealing Method | Purpose | Drying Time | |
|---|---|---|---|
| Corner Adhesive | Prevents resin leakage | 30 minutes | |
| Surface Sealer | Blocks air bubbles | 1 hour |
Taking the time to seal the wood properly guarantees a crystal-clear resin finish without frustrating imperfections.
How to mix resin for how to make a homemade jewelry box?

You must mix the resin with a precise 1:1 ratio to succeed at how to make a homemade jewelry box. Combining equal parts of the resin and the hardener triggers the chemical curing process. Failure to measure accurately will result in a sticky surface that never fully hardens.
Mastering the 1:1 Ratio
Listen: Precision is everything when you are working with epoxy. Always pour the hardener into the cup first, followed by the resin, to ensure they blend thoroughly.
- Graduated mixing cups
- Timer or stopwatch
- Steady hand for pouring
The Two-Cup Stirring Method
The secret? Stirring in one cup and then transferring the mixture to a second clean cup ensures no unmixed resin remains on the sides. Use a slow, circular motion to minimize the introduction of air.
- Secondary mixing cup
- Clean stir sticks
- Flat-bottomed containers
Key TakeawayMeticulous mixing for at least three minutes is the foundation of a durable, rock-hard finish for your jewelry storage.
| Mixing Step | Action | Duration | |
|---|---|---|---|
| Initial Stir | Slow, deliberate circles | 2 minutes | |
| Transfer | Pour into clean cup | 30 seconds | |
| Final Mix | Blend once more | 1 minute |
Achieving a perfect mix prevents the resin from staying tacky, which would otherwise ruin your jewelry pieces.
Can you add color for how to make a homemade jewelry box?
Yes, you can add vibrant pigments when researching how to make a homemade jewelry box to create a marbled effect. A single drop of acrylic paint or specialized resin tint is usually enough to color a small batch. It is important to keep the paint-to-resin ratio low so the cure isn’t affected.
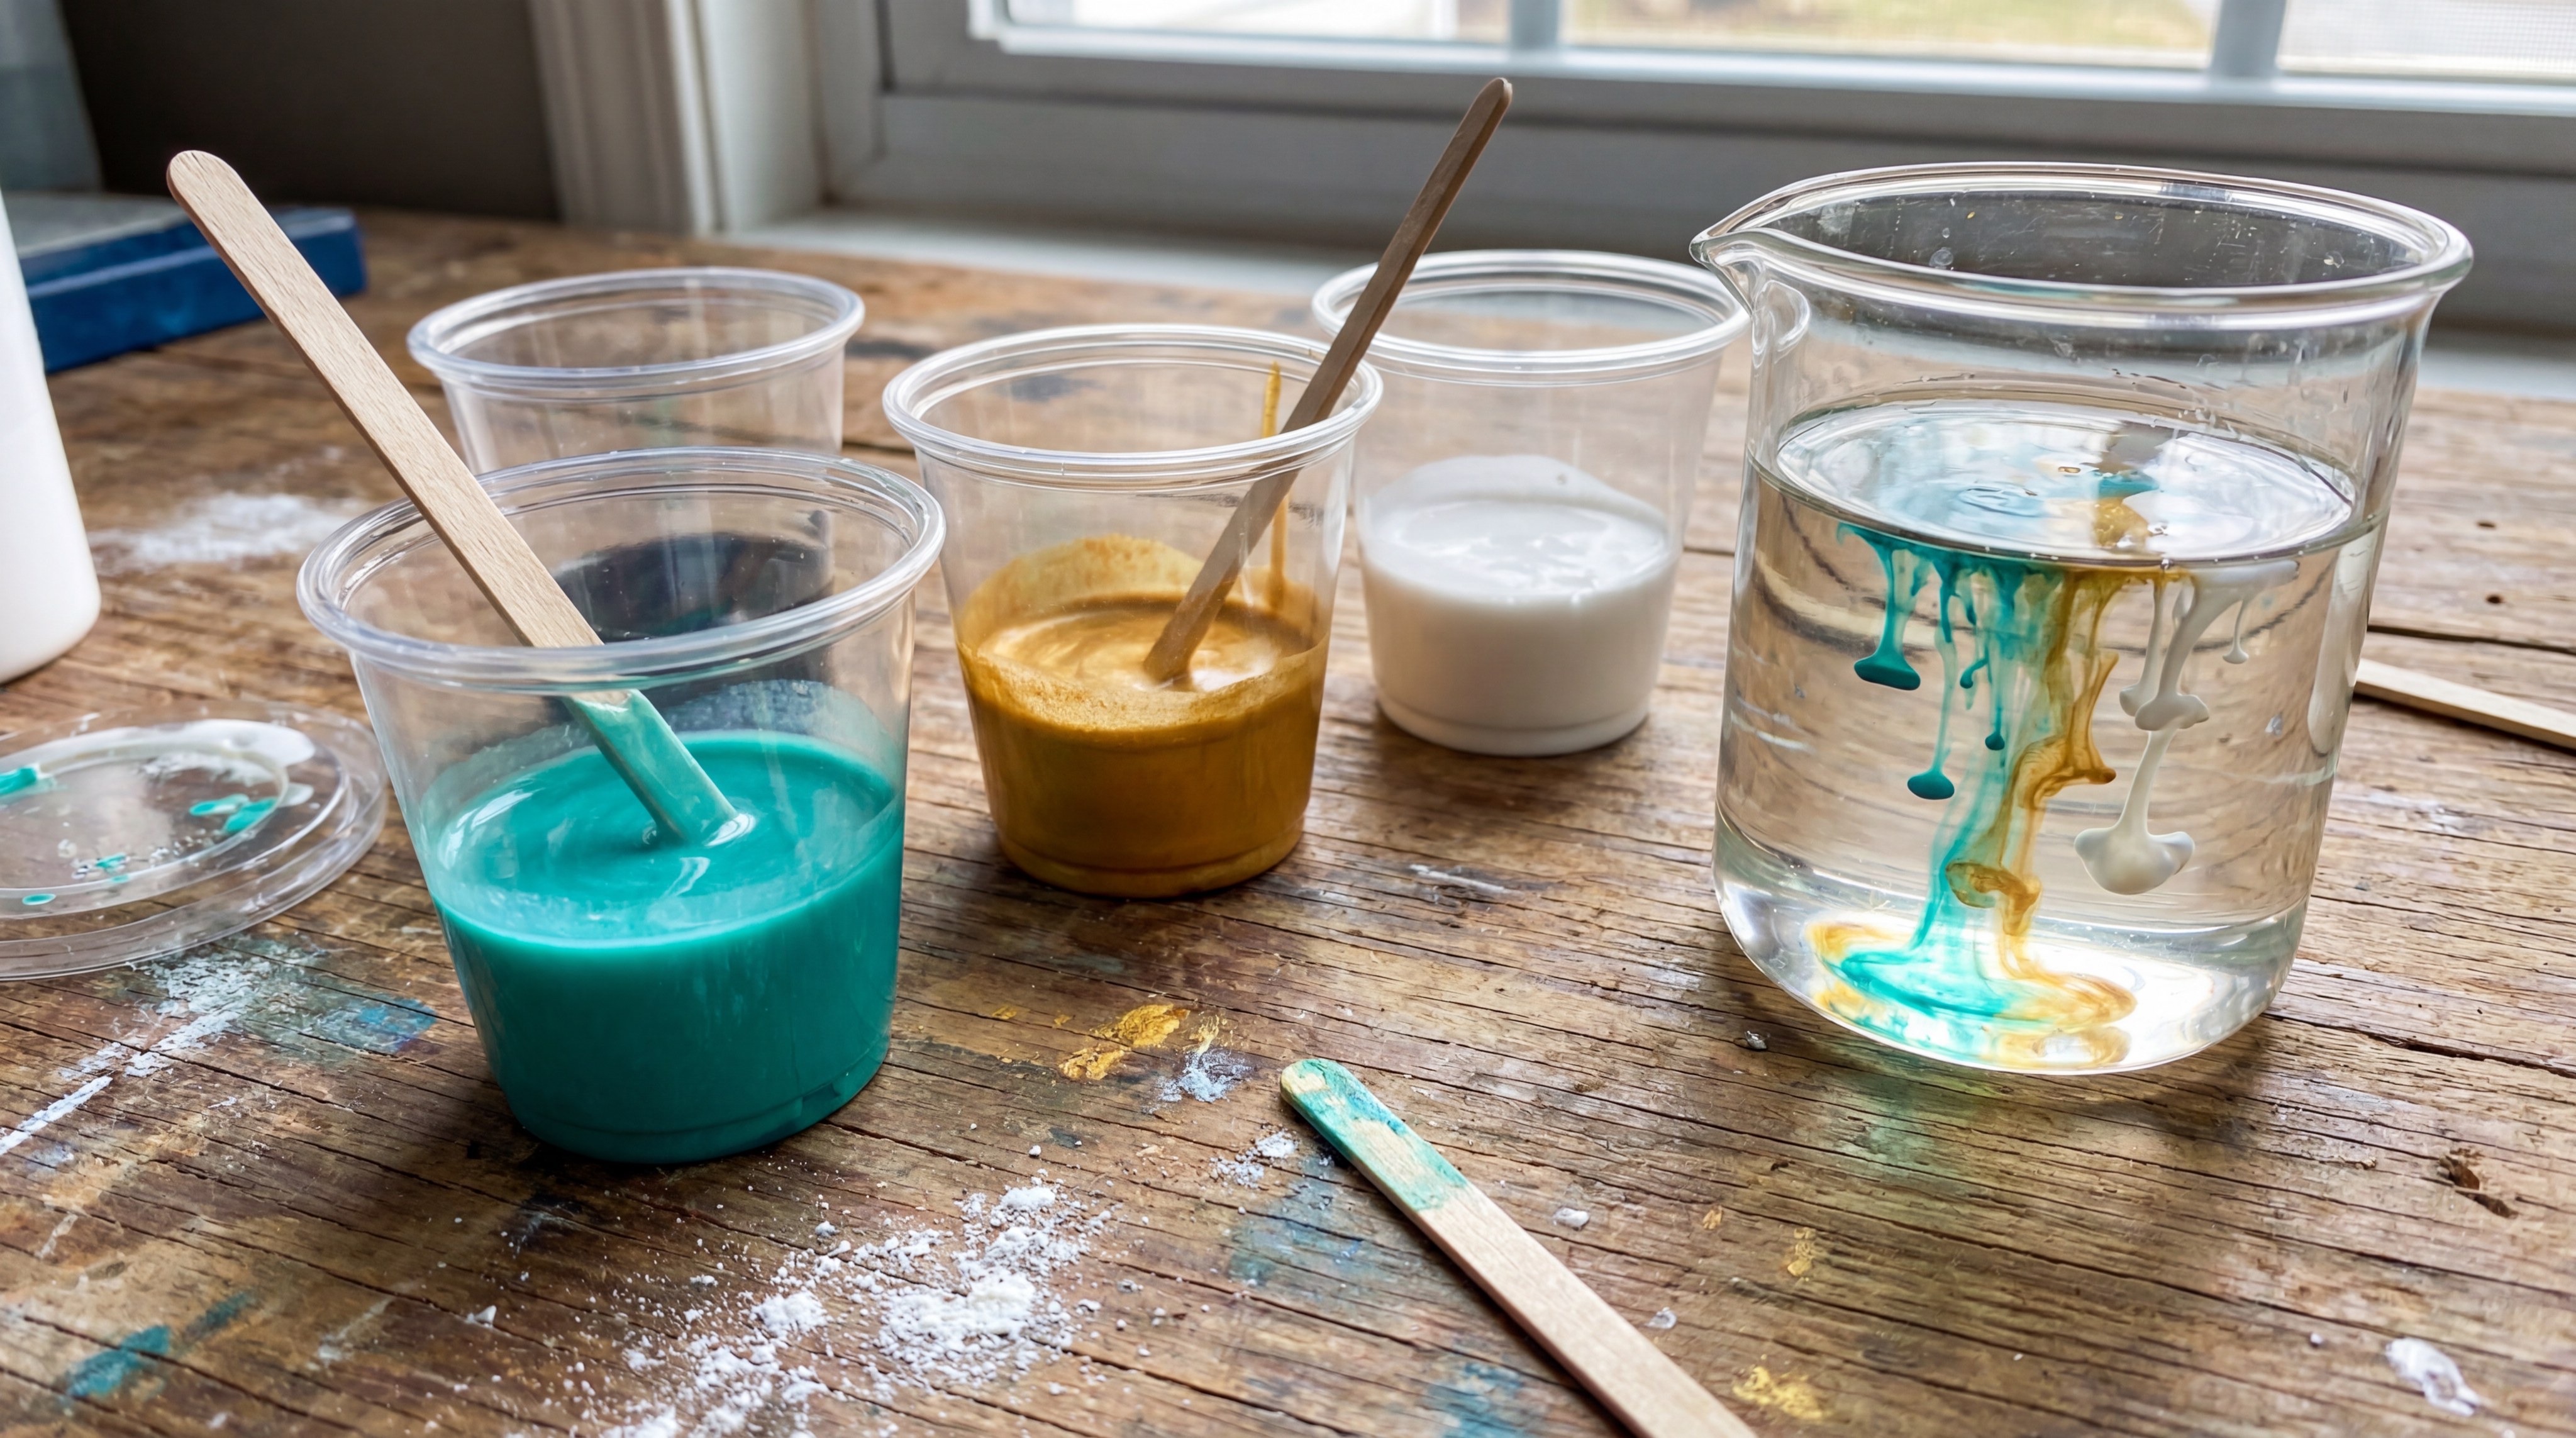
Creating the Color Palette
Look: You only need about half a tablespoon of resin for each individual color cup. Choose three or four shades that harmonize well together, such as gold, white, and turquoise.
- Small plastic shot cups
- Concentrated pigments
- Toothpicks for detail
Maintaining Resin Consistency
It gets better: If you add too much liquid paint, the resin might become too thin or fail to harden properly. Stick to high-pigment paints so you only need a tiny amount for bold results.
- Heavy-body acrylics
- Mica powders
- Alcohol inks
Key TakeawayA “less is more” approach to coloring resin ensures the material retains its strength while providing deep, rich visual interest.
| Coloring Agent | Effect | Recommended Amount | |
|---|---|---|---|
| Acrylic Paint | Opaque and bold | 1 drop per oz | |
| Mica Powder | Shimmering/Metallic | Small pinch | |
| Alcohol Ink | Translucent/Vibrant | 1-2 drops |
Carefully balanced pigments allow for creative expression without compromising the structural integrity of the box lid.
Where to pour resin for how to make a homemade jewelry box?
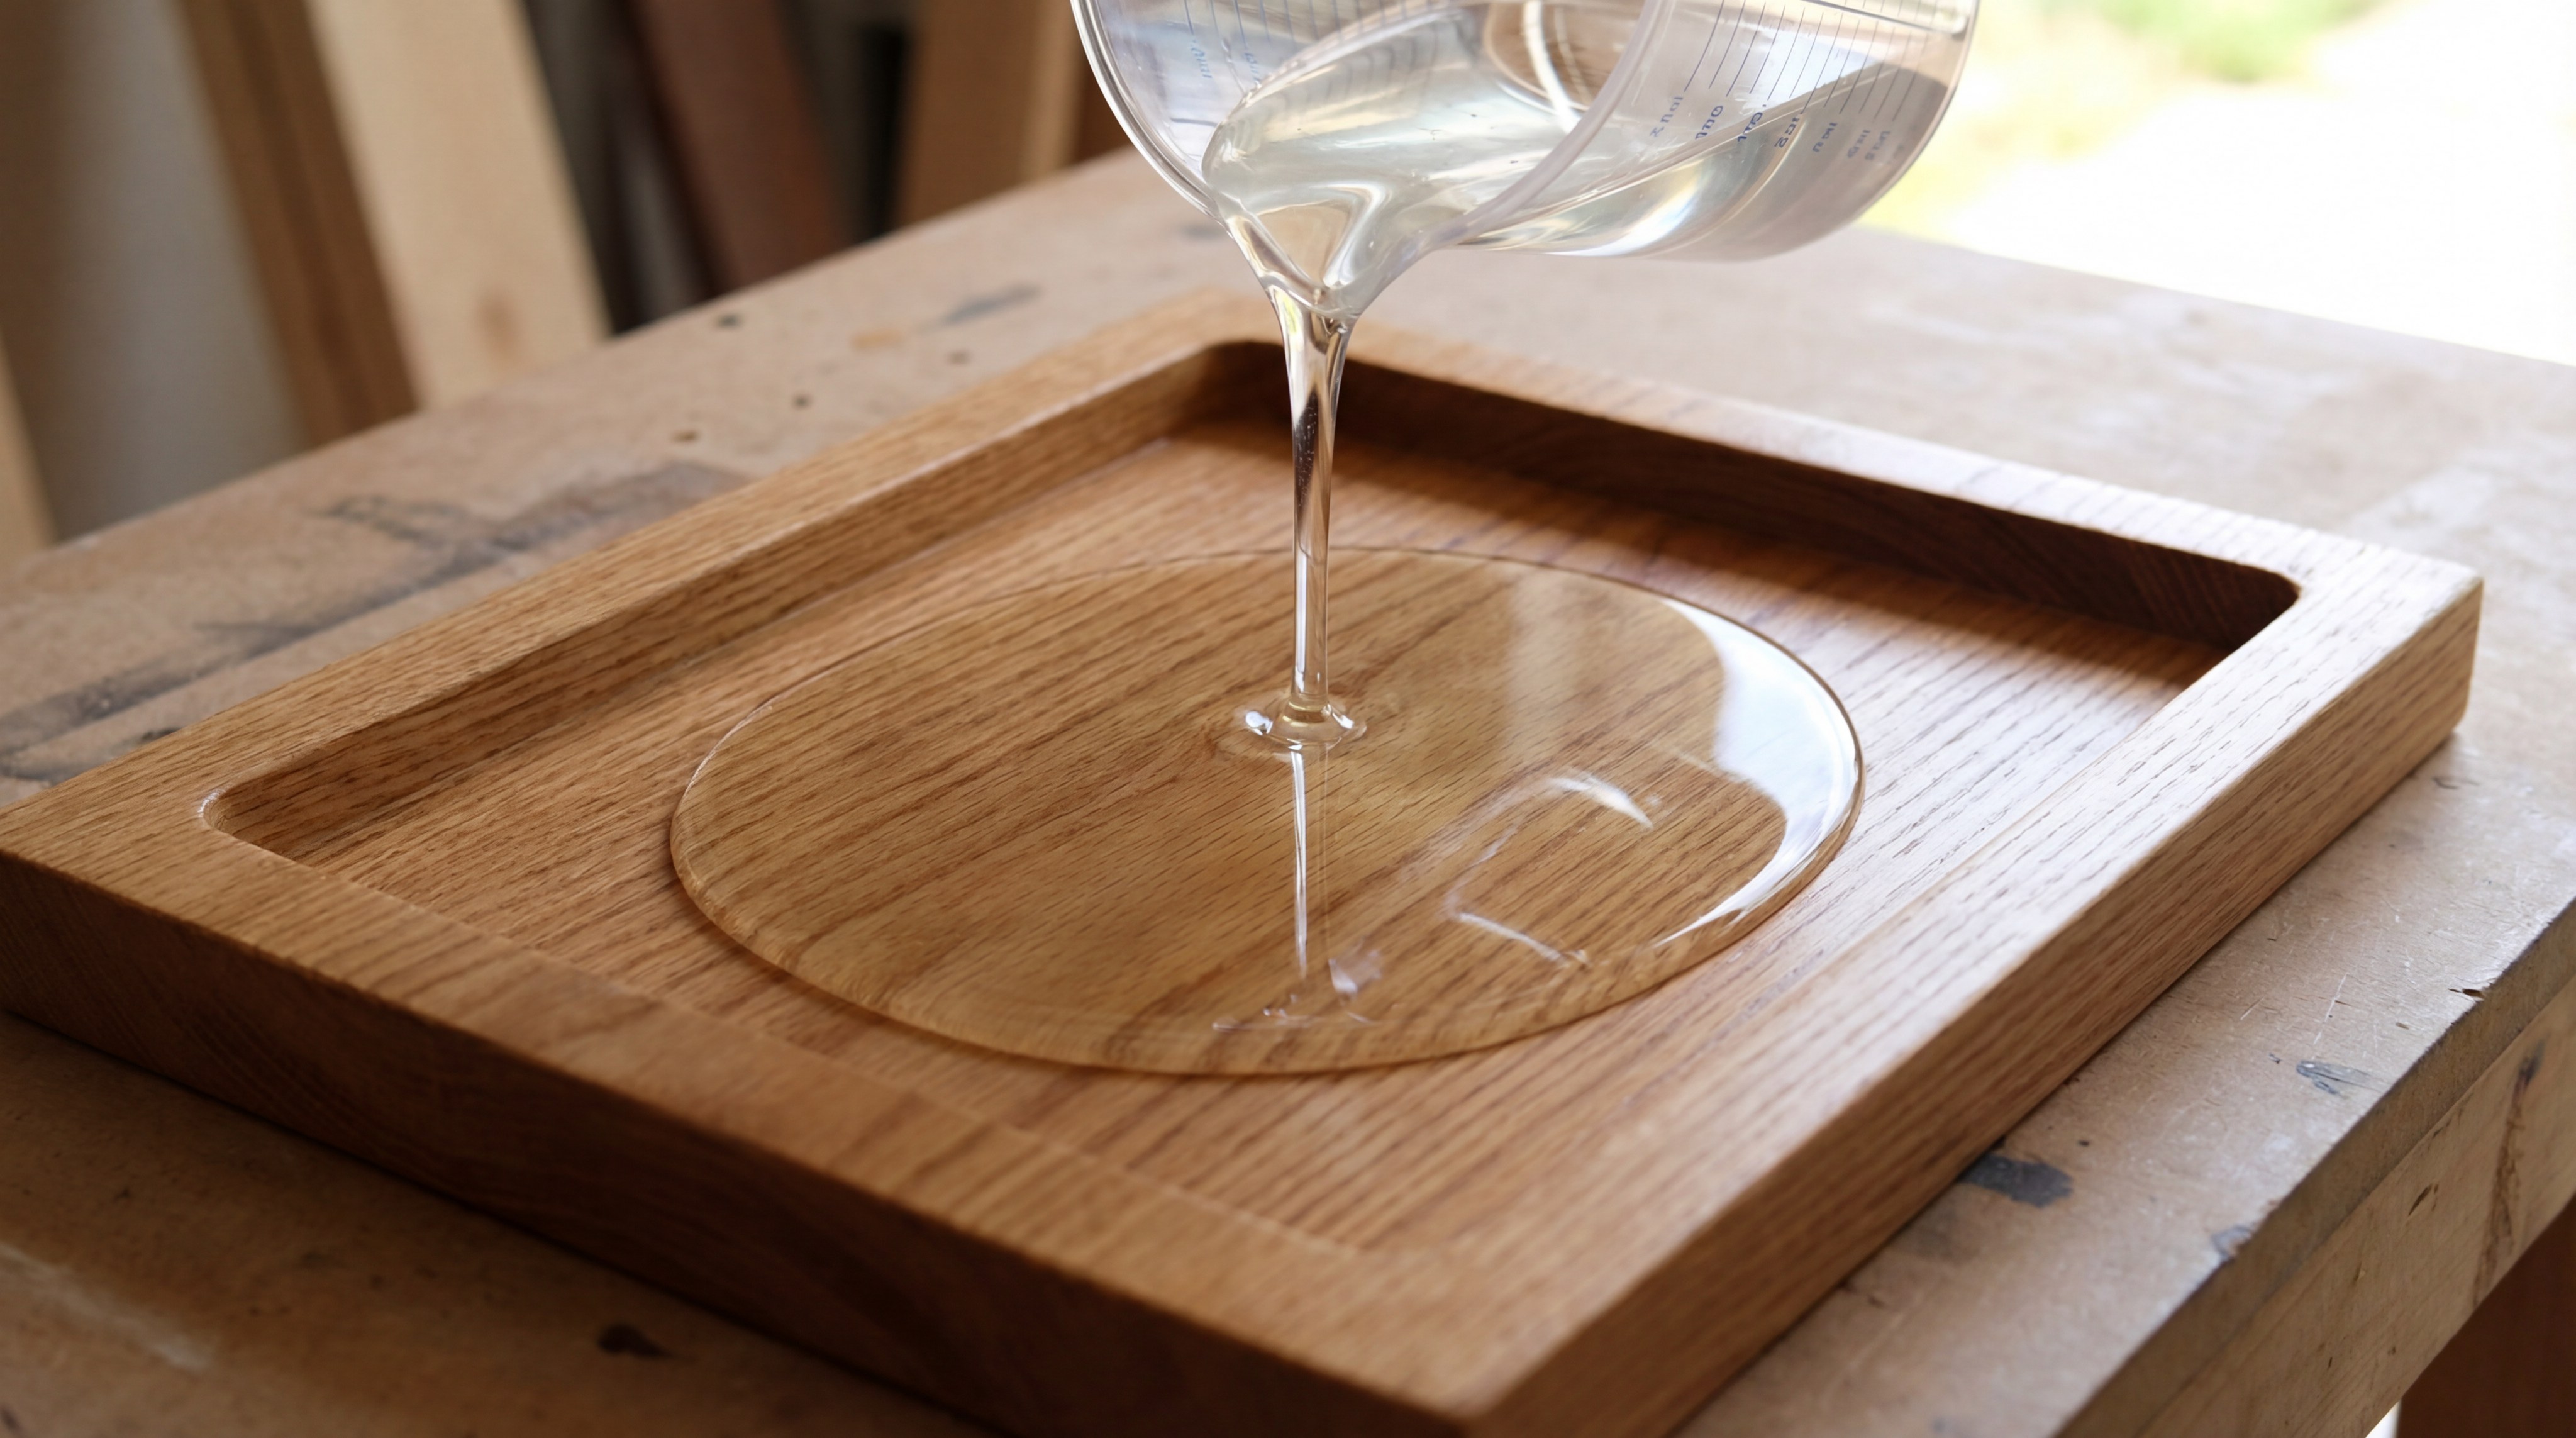
You should pour the clear base resin directly into the recessed center for how to make a homemade jewelry box. Start from the middle and allow the liquid to naturally flow toward the edges. Use a stir stick to gently nudge the resin into the far corners of the lid.
Establishing the Base Layer
Wait, there’s more. The clear layer acts as a canvas for the colored resins you will add later. Ensure the box is sitting on a perfectly level surface before you begin the pour.
- Leveling tool
- Clear mixed resin
- Silicone mat (for spills)
Ensuring Corner Coverage
The secret? Resin has high surface tension and may resist flowing into sharp 90-degree corners. Use your stir stick to “pull” the resin into those gaps to avoid empty spots.
- Pointed stir sticks
- Tweezers for debris
- Bright task lighting
Key TakeawayStarting with a level base and ensuring full corner coverage prevents “divots” or unevenness in the final cured lid.
| Pour Step | Goal | Tool Used | |
|---|---|---|---|
| Center Pour | Even distribution | Mixing cup | |
| Corner Nudge | Fill every gap | Stir stick |
A controlled pour creates the necessary depth for your marbling techniques to truly shine in the finished product.
How to marble tops for how to make a homemade jewelry box?
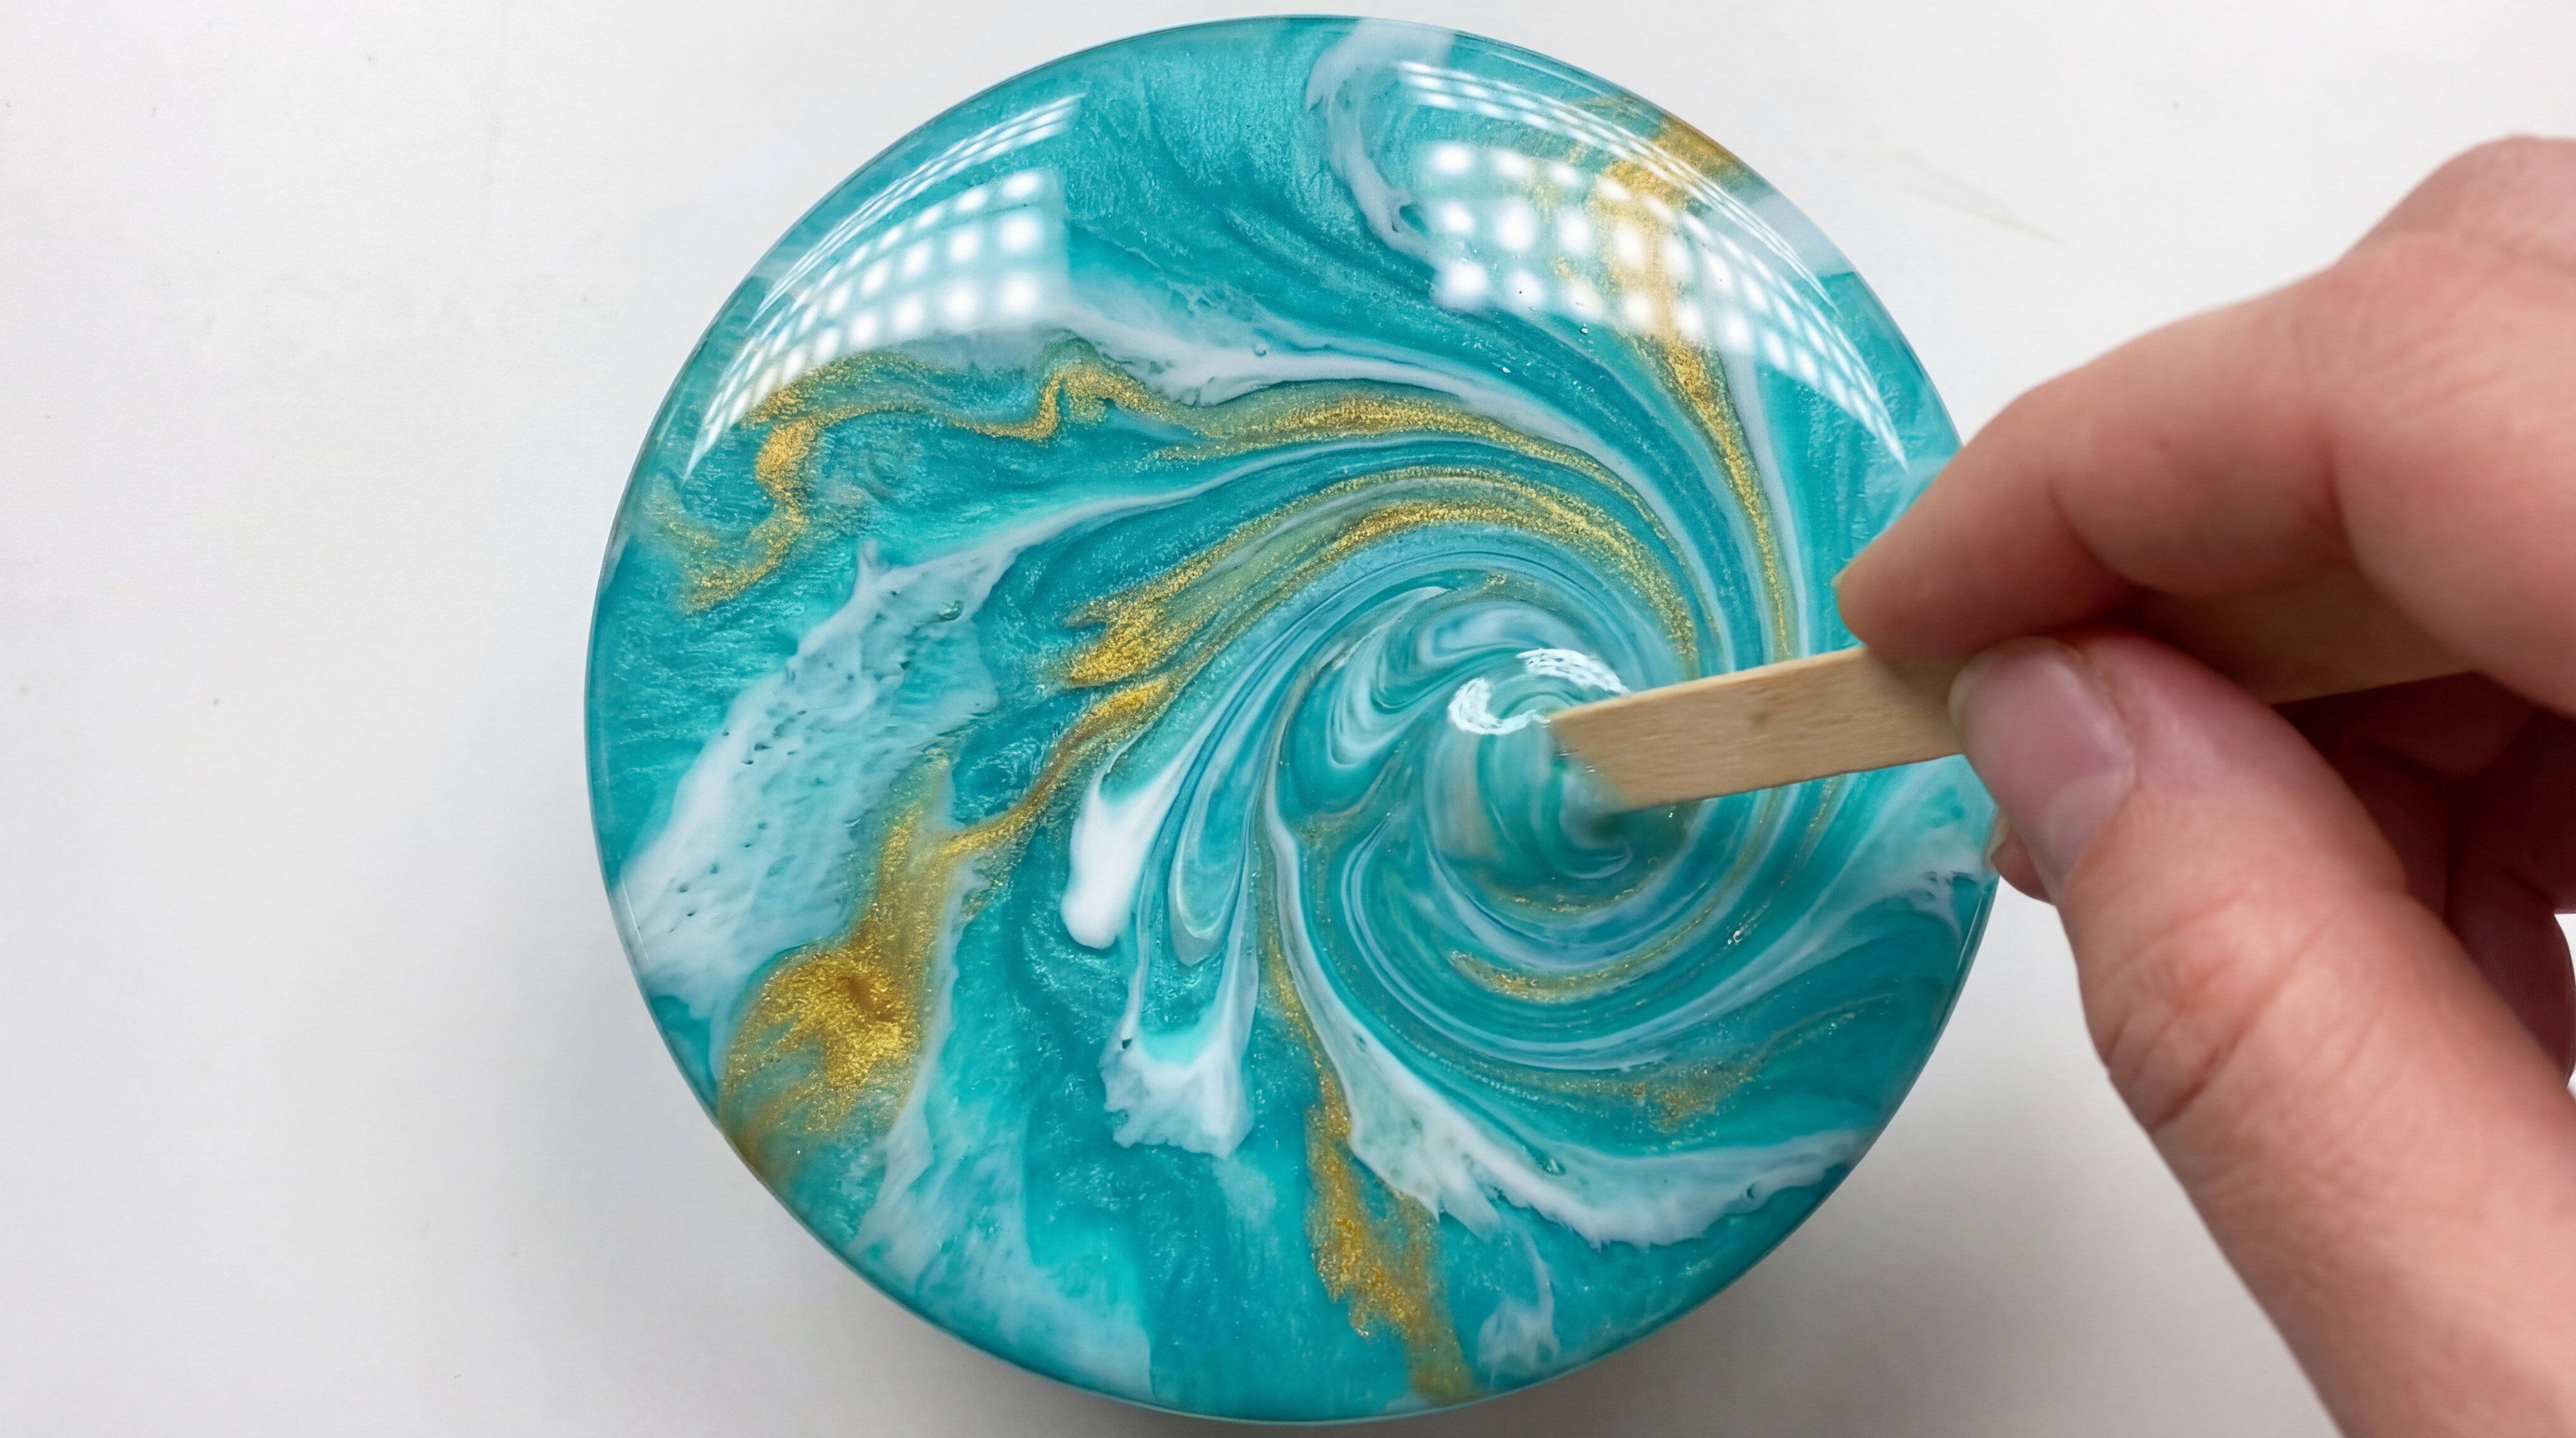
You create the marble effect during how to make a homemade jewelry box by drizzling colored resin over the clear base. Once the colors are applied, use a clean stick to swirl them together in a figure-eight motion. This technique mimics the natural veins found in high-end stone like carrara marble.
Drizzling the Pigments
Here is the kicker: Randomness is your friend when drizzling the colored resin. Don’t worry about being too precise, as the swirling process will blend the hard lines into soft gradients.
- Colored resin cups
- Small spoons
- Pipettes (optional)
The Swirl Technique
The best part? You can control how “busy” the pattern looks by how much you stir. A few broad strokes create large veins, while more movement creates a delicate, clouded appearance.
- Clean stir stick
- Steady hand
- Creative intuition
Key TakeawayMarbling is an organic process where less movement often results in a more sophisticated and realistic stone-like finish.
| Swirl Style | Technique | Visual Result | |
|---|---|---|---|
| Bold Veins | 2-3 long strokes | Modern stone look | |
| Soft Clouding | Multiple circular swirls | Dreamy, ethereal finish |
Mastering the swirl allows you to transform a simple wooden box into a piece of art that looks professionally manufactured.
How to remove bubbles for how to make a homemade jewelry box?
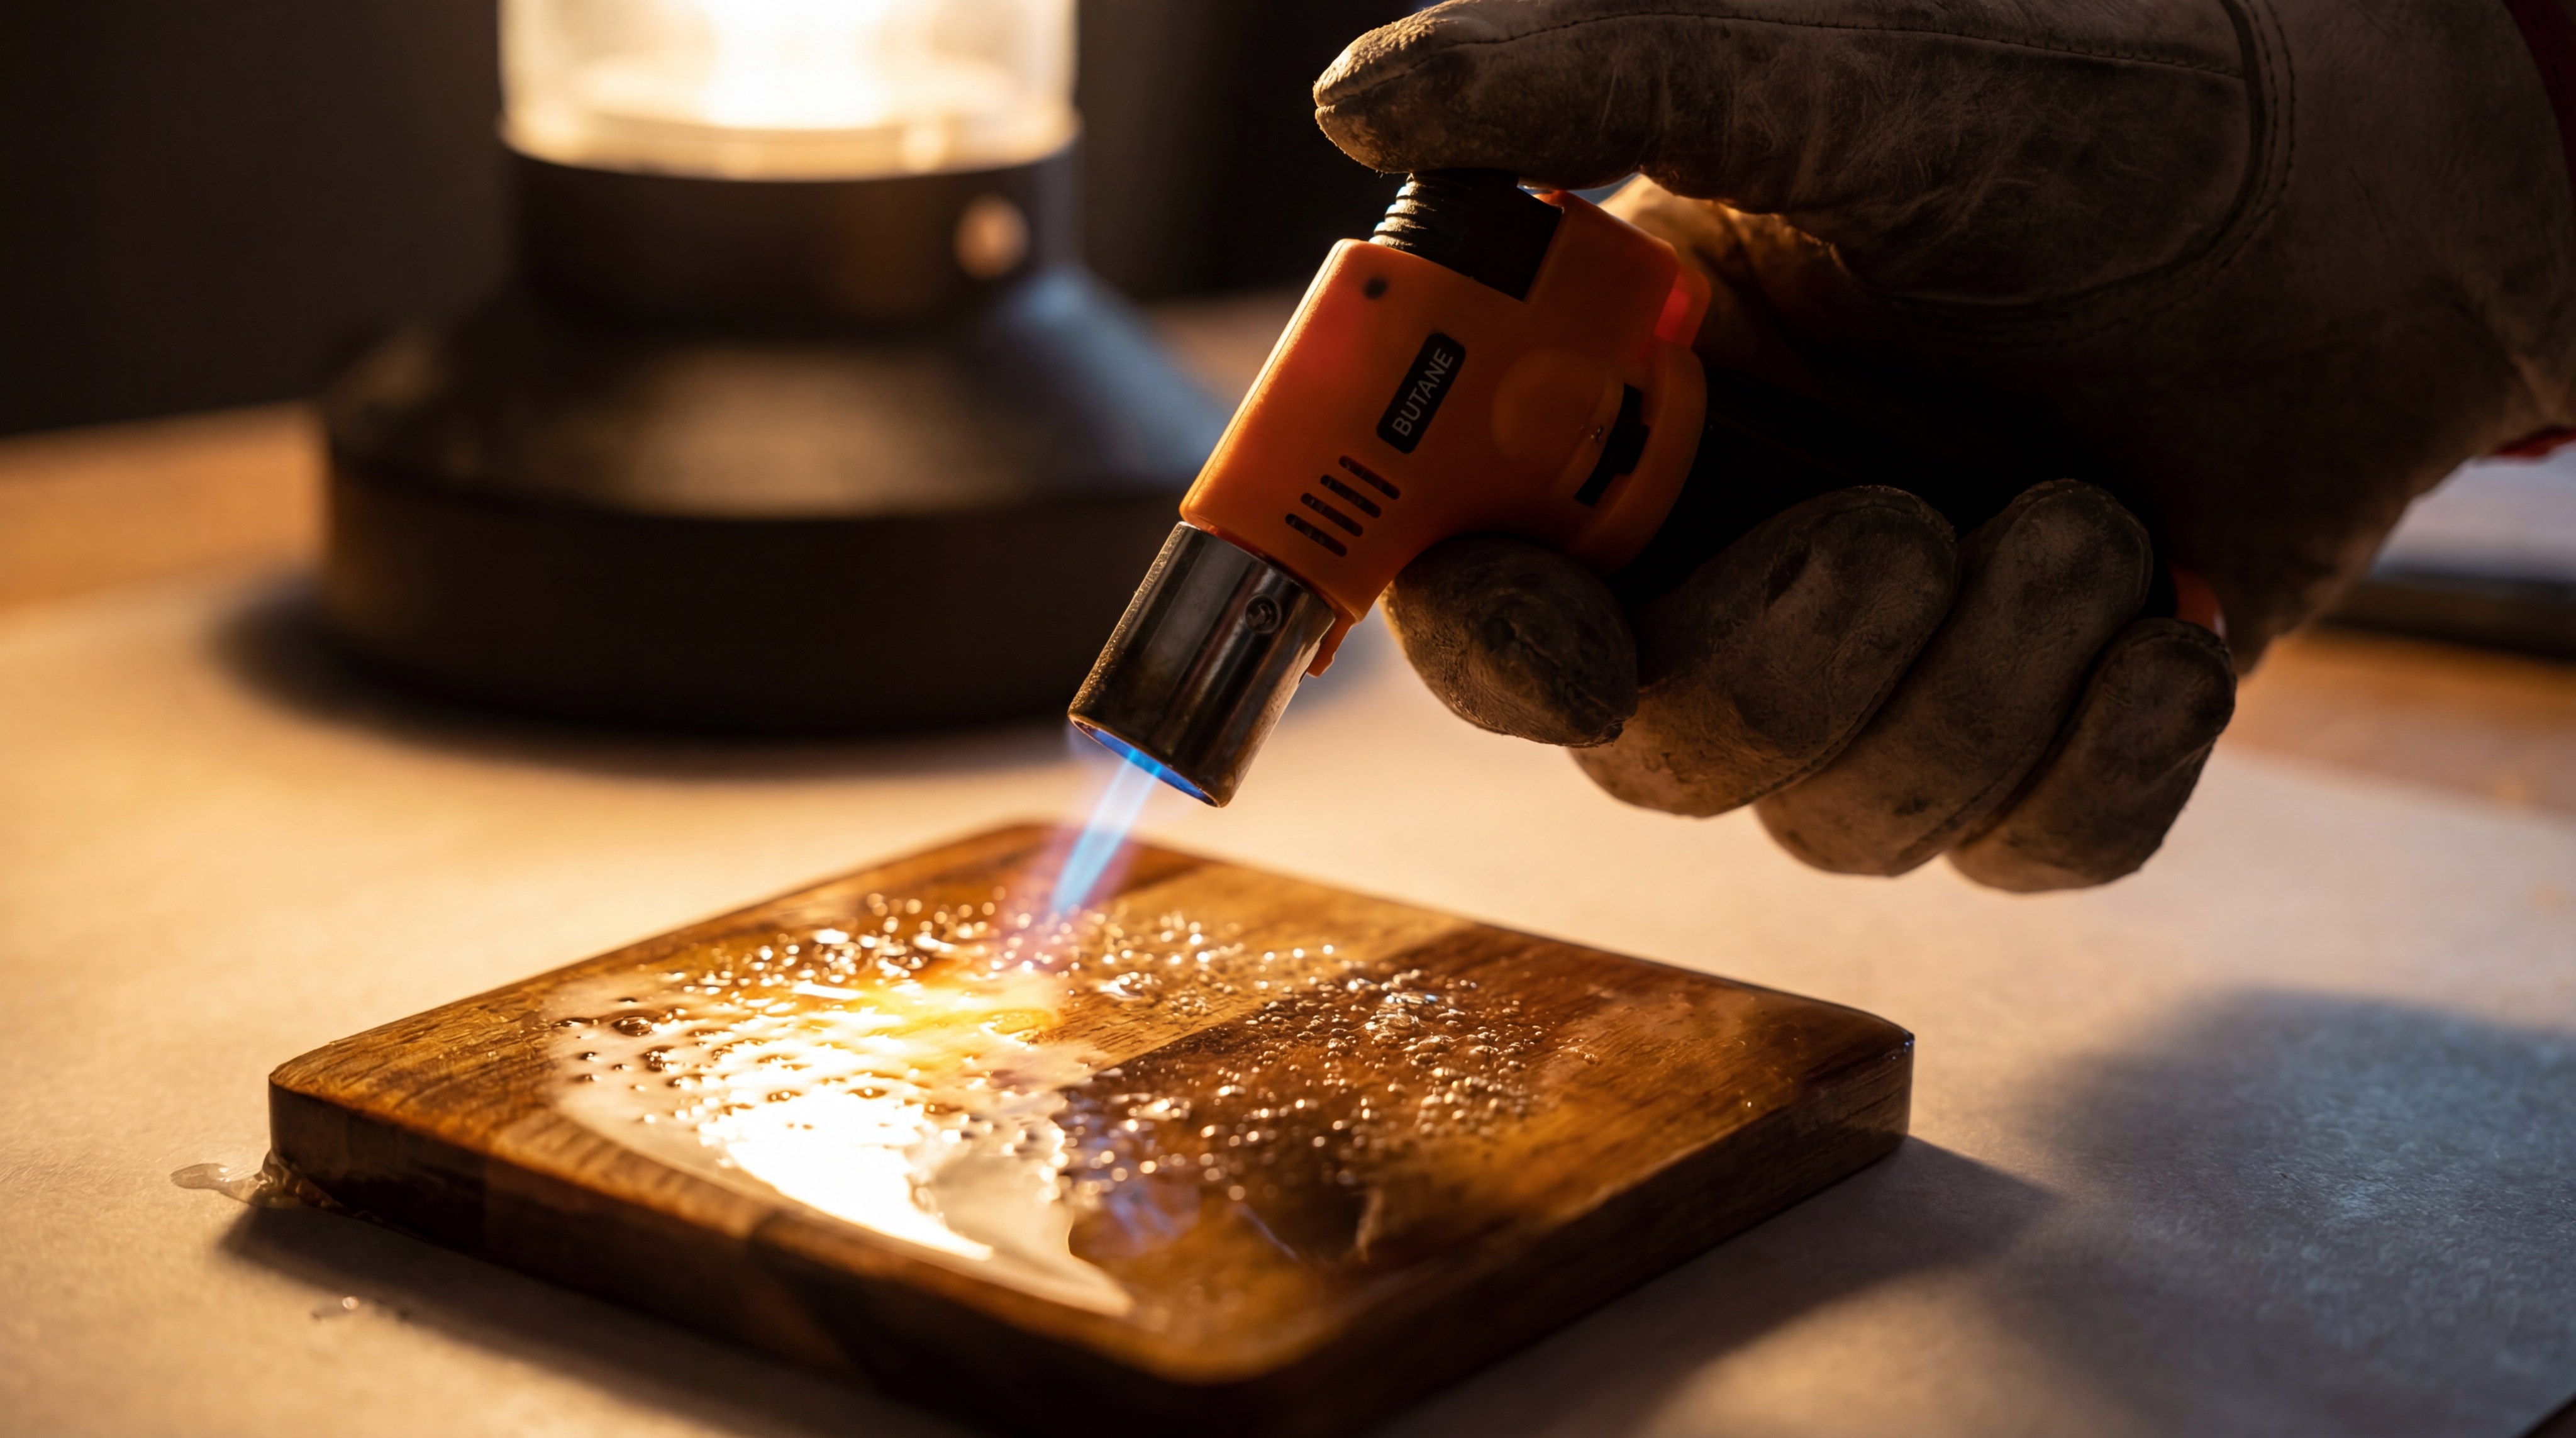
The most effective way to remove bubbles for how to make a homemade jewelry box is by using a butane torch or heat gun. Passing heat quickly over the surface causes the trapped air to expand and pop instantly. You should hold the heat source a few inches away and keep it moving to avoid scorching the resin.
Using Heat for Clarity
Look: Tiny micro-bubbles can make your resin look cloudy instead of glass-like. A quick pass with a torch is like magic, instantly revealing the vibrant colors beneath.
- Handheld butane torch
- Safety goggles
- Fire-safe workspace
Protecting the Cure
Bottom line? Once the bubbles are gone, you must protect the box from dust while it dries. Turn a clean cardboard box upside down over the project to create a dust-free dome.
- Clean cardboard box
- Level drying area
- 24-hour patience
Key TakeawayApplying heat is the professional secret to achieving that “mirror finish” that makes homemade gifts look expensive.
| Problem | Solution | Tool | |
|---|---|---|---|
| Surface Bubbles | Quick heat passes | Butane torch | |
| Dust/Pet Hair | Protective covering | Cardboard box |
Eliminating air pockets ensures that your marbled design remains crisp and clear for the lifetime of the jewelry box.
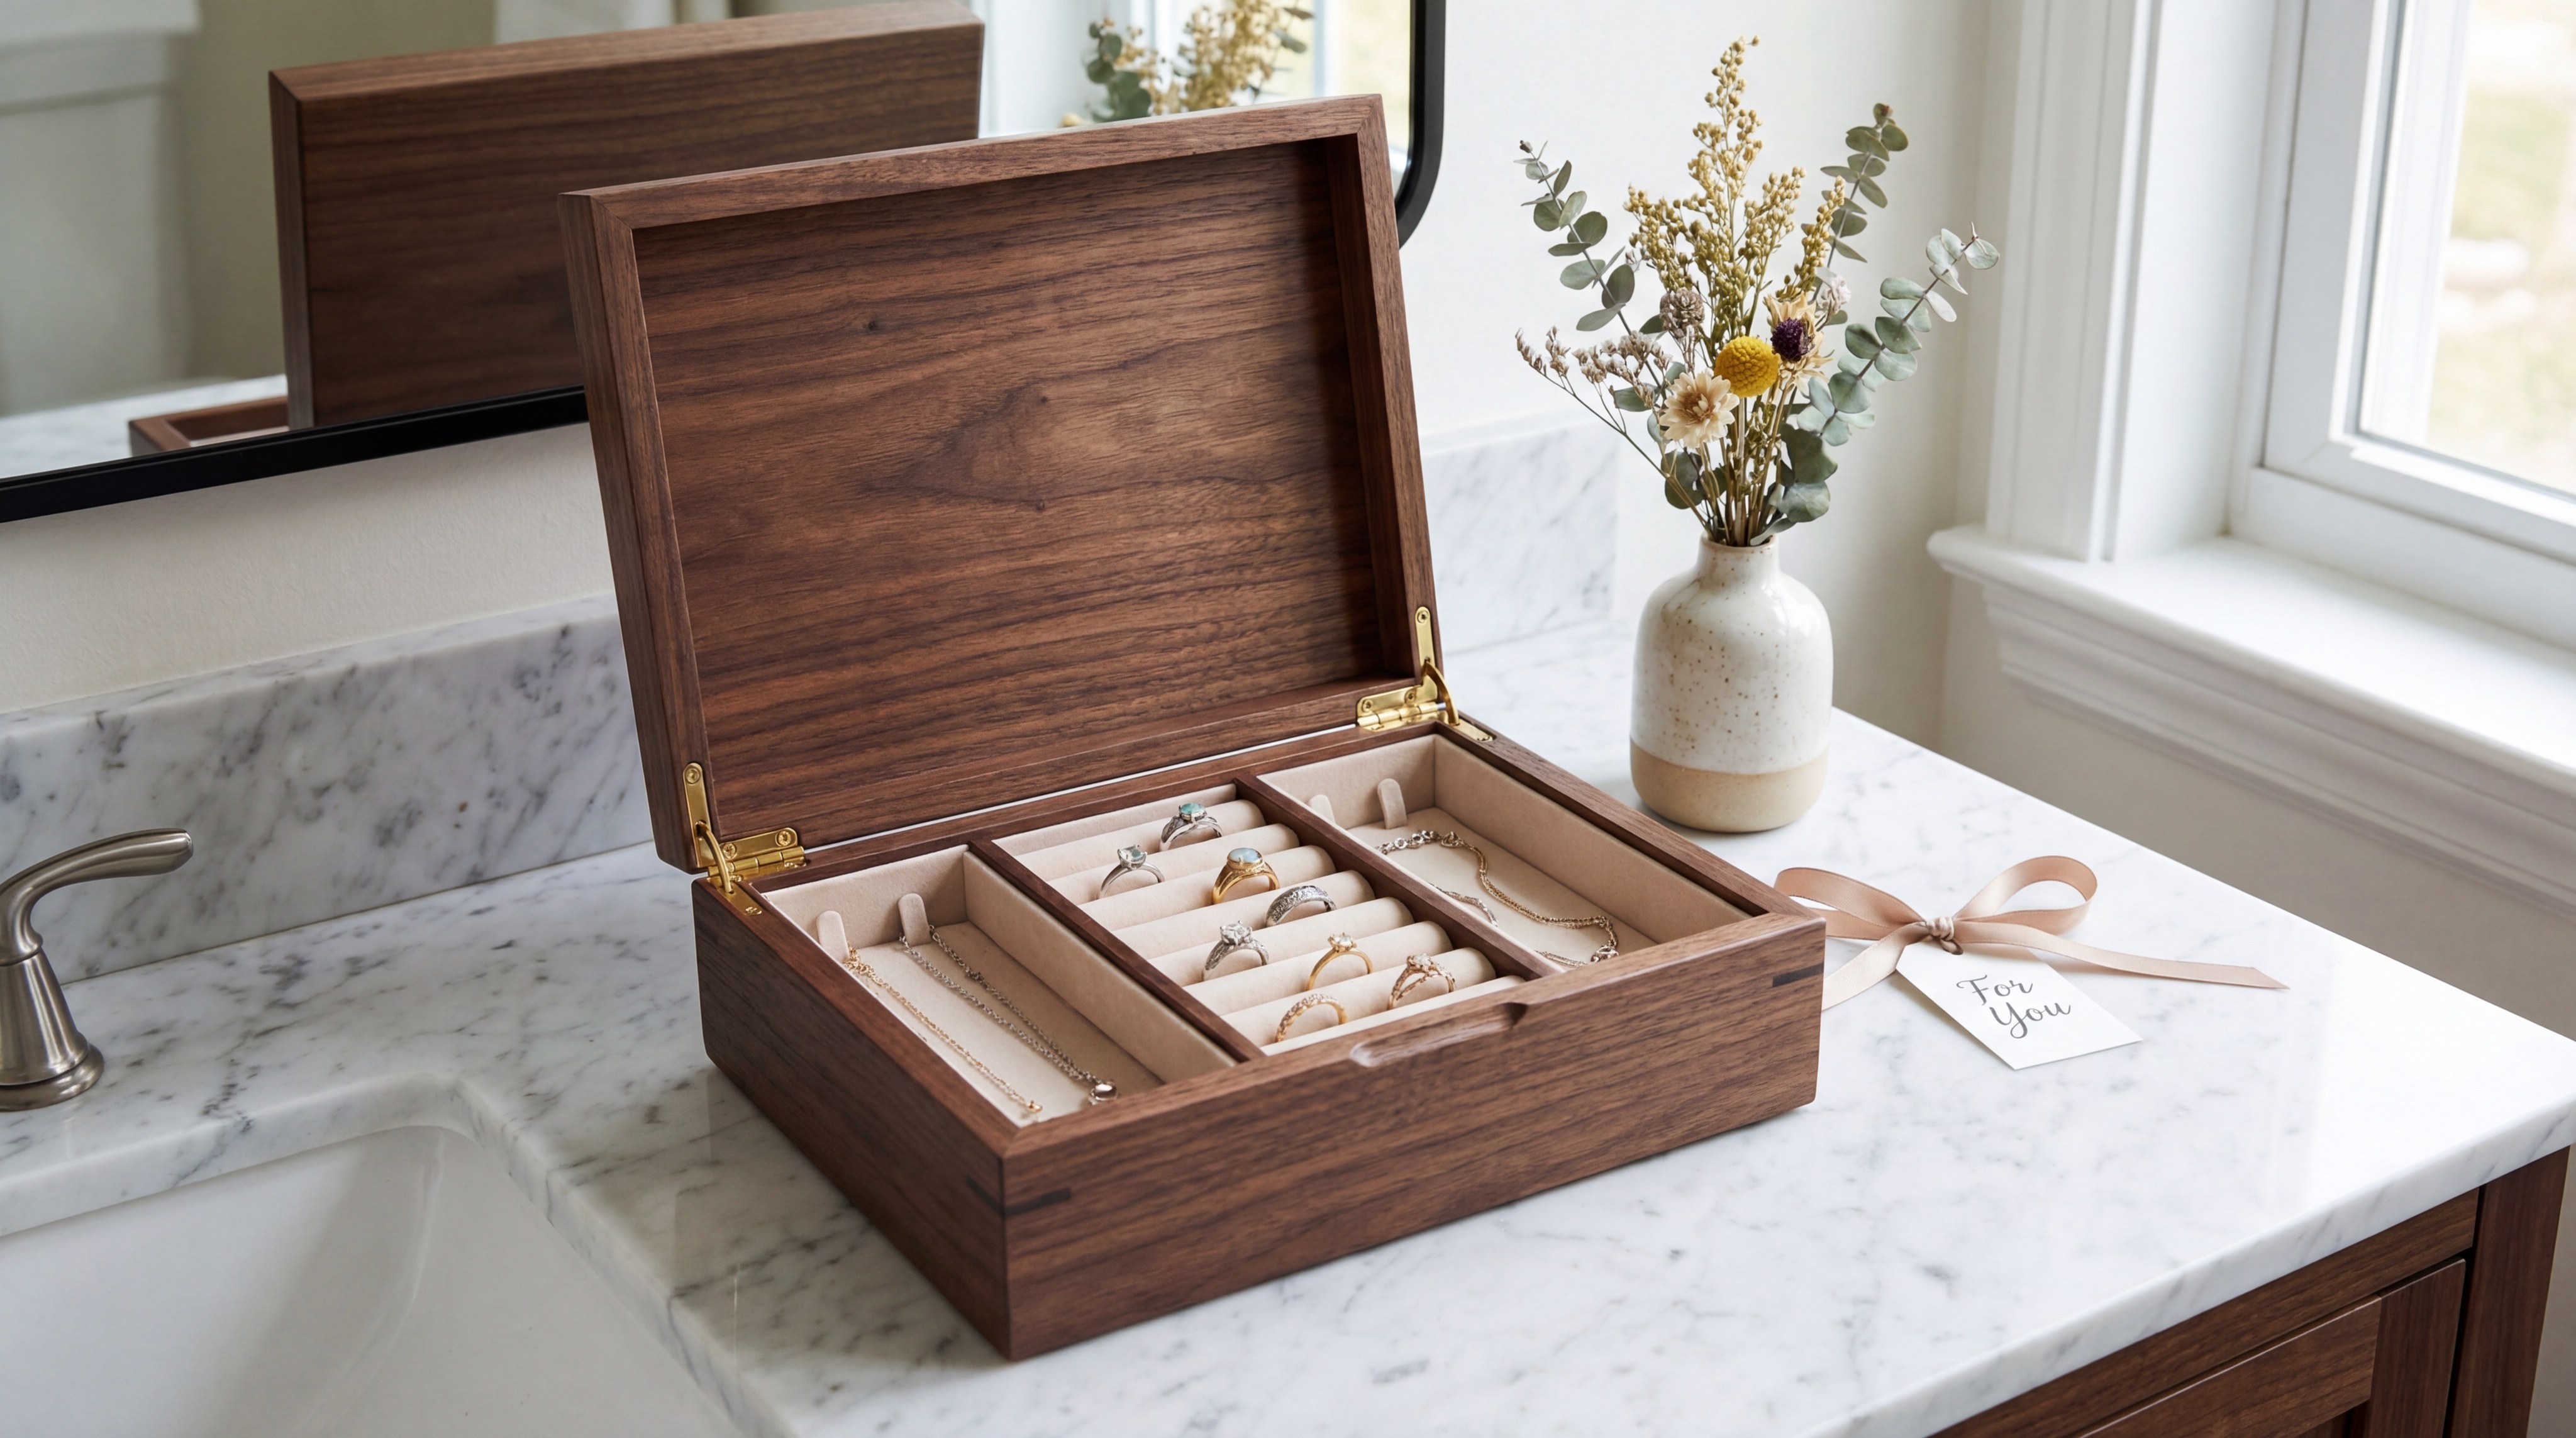
How to line inside for how to make a homemade jewelry box?
You should use soft felt or velvet when learning how to make a homemade jewelry box to protect your delicate items from scratches. Measure the interior dimensions carefully and cut your fabric slightly smaller for a snug fit. Use a spray adhesive to secure the lining without creating lumps or wet spots on the cloth.
Selecting Protective Fabrics
The secret? Choose a fabric color that makes your jewelry stand out, such as a deep charcoal or a soft cream. Self-adhesive felt sheets are the easiest option for beginners who want a clean look.
- Self-adhesive felt
- Sharp fabric shears
- Metal ruler
Creating Custom Dividers
Think about it: Adding small wooden slats or foam rolls allows you to organize rings and earrings separately. This prevents your pieces from rubbing against each other and causing damage.
- Balsa wood strips
- Velvet-covered foam
- Hot glue gun
Key TakeawayA soft, lined interior transforms a simple painted box into a functional, high-quality jewelry organizer that protects your investment.
| Lining Material | Best For | Application | |
|---|---|---|---|
| Velvet | High-end protection | Spray adhesive | |
| Felt | Easy DIY use | Peel-and-stick |
A thoughtful interior layout ensures that every piece of jewelry has a safe, dedicated home within your new creation.
Need more tips for how to make a homemade jewelry box?
One of the best tips for how to make a homemade jewelry box is to always work in a temperature-controlled environment. Resin cures best at room temperature, as cold air can cause it to remain soft or become cloudy. You should also ensure your workspace is well-ventilated to handle the fumes safely.
Troubleshooting Sticky Resin
Actually: If your resin is still tacky after 24 hours, it usually means the mixing was insufficient or the ratio was off. You can often fix this by pouring a thin, properly mixed “flood coat” over the top.
- Extra resin kit
- Clean workspace
- Patience for re-curing
Personalizing Your Gift
The best part? You can add small charms, dried flowers, or even photos into the resin layers for a personalized touch. These embedded items create a unique 3D effect that makes the gift unforgettable.
- Dried pressed flowers
- Metal charms
- Printed photographs
Key TakeawayMastering the environment and adding personal touches are what elevate a standard craft into a cherished family heirloom.
| Tip Category | Recommendation | Benefit | |
|---|---|---|---|
| Environment | Keep above 70°F | Faster, clearer cure | |
| Creativity | Embed 3D objects | Unique personalization |
Paying attention to these final details ensures your DIY project is a resounding success that you will be proud to display.
Now that you have mastered the techniques for creating a stunning, marbled jewelry box, it is time to take your crafting or business to the next level. Whether you are making these for friends or planning a professional product line, the right presentation makes all the difference. For premium supplies and wholesale options to complement your creations, contact us today .
FAQ
Can I use a different type of box for this project?Yes, as long as the lid has a recessed area to hold the liquid resin.
What’s the best way to clean my jewelry box?Use a soft microfiber cloth and mild soapy water on the resin top.
Can I use food coloring to tint my resin?No, food coloring is water-based and will ruin the resin’s chemical cure.
What’s the best temperature for curing resin?Aim for a consistent room temperature between 70°F and 75°F for optimal results.
Can I add more resin layers later?Yes, you can add multiple layers once the previous one is “tack-free” to the touch.