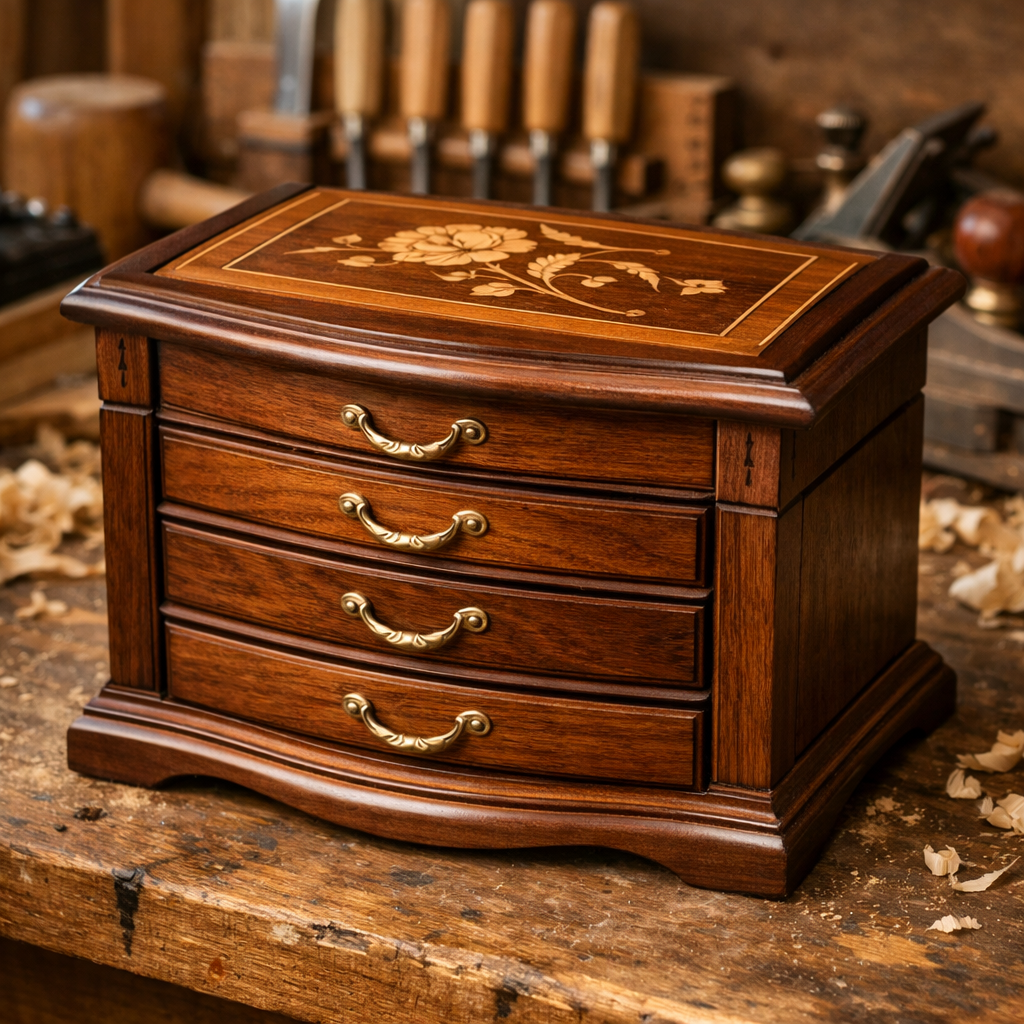
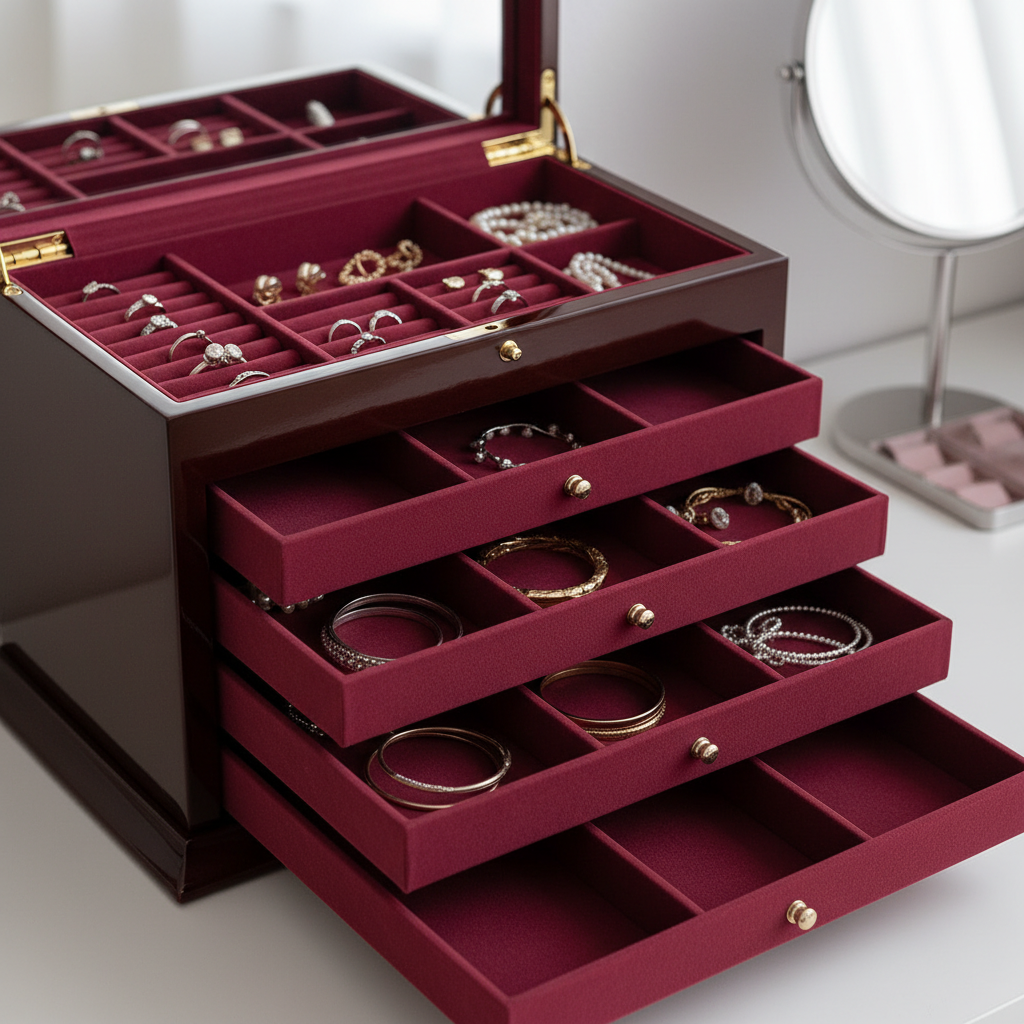
You can learn how to make a jewelry box out of wood by selecting stable hardwoods, cutting precise miter joints, and assembling a secure housing for your valuables. Most owners store necklaces in disorganized drawers where metals scratch against each other. This constant friction ruins polished surfaces while causing frustrating tangles that damage delicate clasps. Discovering how to make a jewelry box out of wood provides a custom, elegant solution that preserves your collection.
What wood works for how to make a jewelry box out of wood?
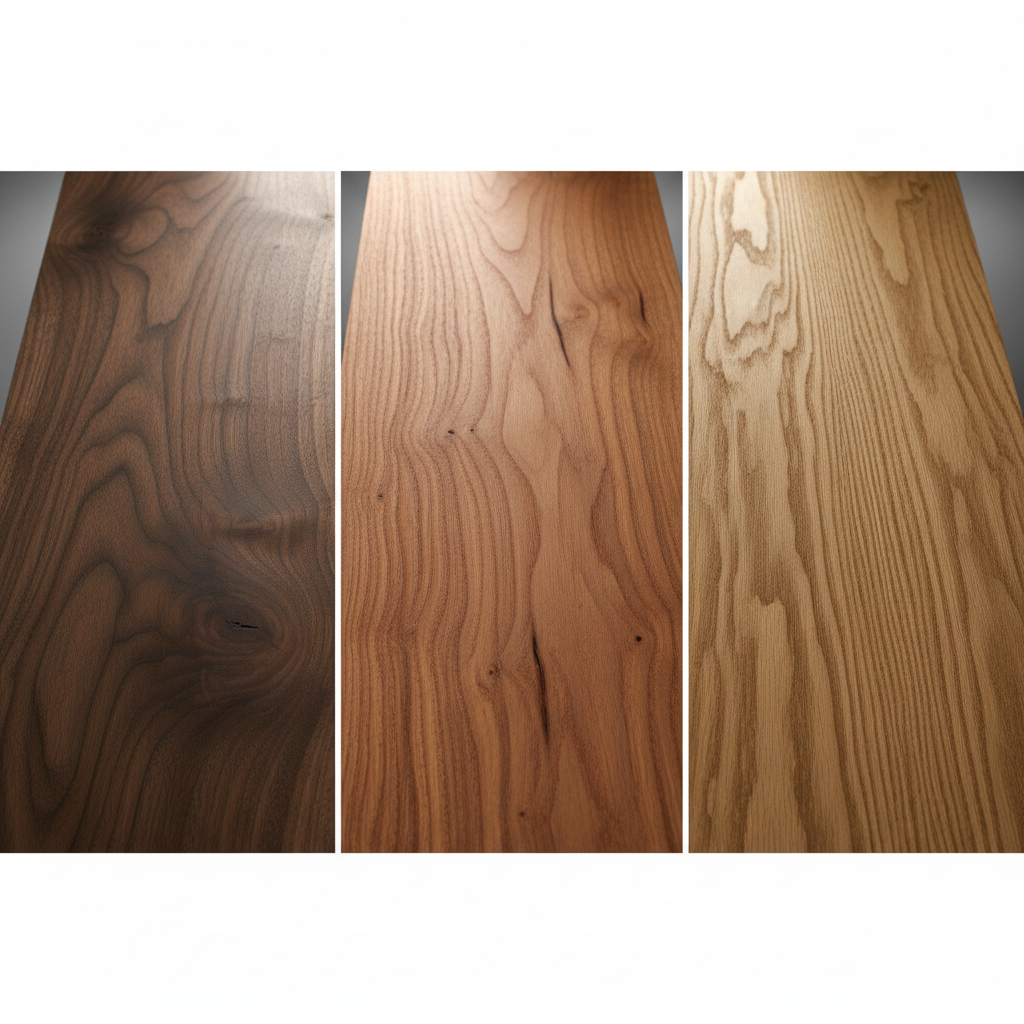
Selecting lumber for how to make a jewelry box out of wood requires choosing species with high stability. Figured walnut remains a premier choice because its rich color complements gold or silver items. You should prioritize hardwoods like cherry or oak for long-lasting durability.
Can scrap wood provide quality material?
Woodworking professionals often utilize shop offcuts for small containers to minimize waste. A single walnut board measuring eight inches wide offers ample stock for these dimensions. You might find unique grain patterns in smaller pieces that larger furniture projects cannot utilize.
- Use walnut for elegance.
- Choose oak for strength.
- Select cherry for warmth.
Here is the deal. Using recycled materials lowers costs while allowing experimentation with premium timber species.
Why does figured walnut remain popular?
Walnut provides a classic aesthetic that fits most interior design styles. The fibers machine cleanly while accepting various oils with high consistency. Stable grain ensures your lid stays flat across changing seasons.
- Rich dark tones.
- Excellent machining properties.
- High natural luster.
It gets even better. This species creates a professional appearance that mimics high-end retail displays.
Key Takeaway: Premium hardwoods like walnut offer the best combination of workability and beauty for custom jewelry storage.
| Wood Species | Density | Workability | Color Profile | |
|---|---|---|---|---|
| Walnut | Medium-High | Excellent | Deep Brown | |
| Cherry | Medium | Good | Reddish Tan | |
| Oak | High | Moderate | Light Straw |
Effective material selection establishes the foundation for a successful woodworking build.
Which tools assist in how to make a jewelry box out of wood?

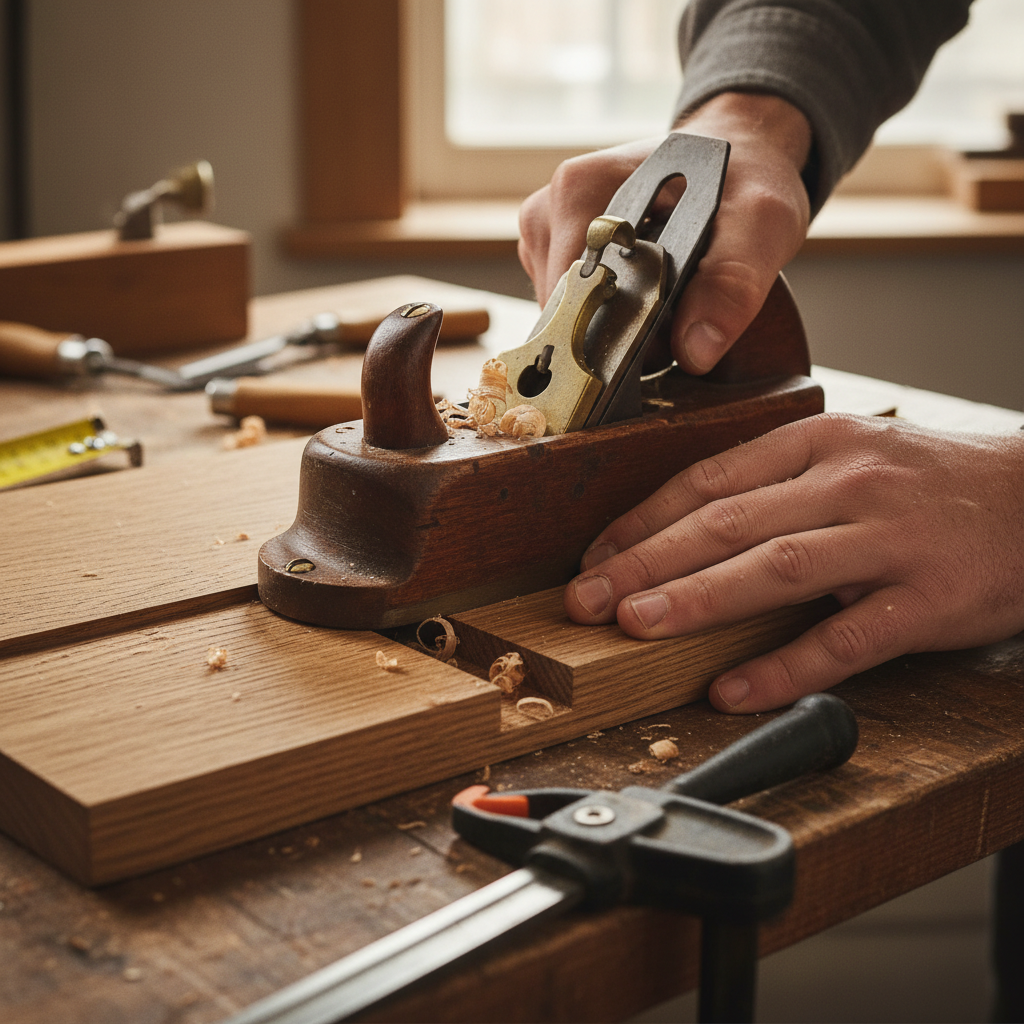
How to make a jewelry box out of wood demands calibrated table saws plus measuring squares. Precision cutting ensures every corner aligns perfectly without visible gaps. You need sharp chisels for hinge mortises and smoothing internal surfaces.
Why use a miter saw for angles?
A miter saw produces exact forty-five-degree cuts necessary for seamless joinery. Small errors in your settings multiply across four corners, creating unsightly joints. Always verify your equipment alignment using scrap timber before starting final cuts.
- Calibrate blade angles.
- Use backer boards.
- Secure workpieces tightly.
Think about this. Perfect angles at the start prevent massive headaches during the final assembly phase.
Which measuring tools ensure accuracy?
Combination squares allow you to mark identical lengths on opposite panels. Using marking knives instead of pencils provides thinner lines for extreme precision. Consistency remains vital when sizing components that must fit together tightly.
- Steel rules for length.
- Marking gauges for depth.
- Squares for alignment.
Wait, there is more. Digital calipers help verify material thickness when fitting internal trays or dividers.
Key Takeaway: High-quality measuring and cutting tools are indispensable for achieving professional results in small-scale woodworking.
| Tool Name | Core Function | Importance | Material Used | |
|---|---|---|---|---|
| Table Saw | Ripping Panels | Primary | Carbide Blade | |
| Miter Saw | Angle Cutting | Primary | Steel | |
| Square | Alignment | High | Brass/Steel |
Selecting the right equipment allows you to execute complex designs with confidence.
How to plan for how to make a jewelry box out of wood?
Detailed blueprints for how to make a jewelry box out of wood should specify wall thickness plus internal volume. Most builders prefer sides around four inches high to provide sufficient storage depth. You must account for hardware clearances before milling your lumber to final size.
Determining your storage dimensions
Standard containers often measure twelve inches long by eight inches wide for balanced proportions. These sizes fit comfortably on most dressers while holding various jewelry types. Consider what specific items you intend to house before finalizing your layout.
- Length: 12.5 inches.
- Width: 8.5 inches.
- Height: 4.0 inches.
It gets even better. Planning your dimensions around standard felt sheet sizes simplifies the lining process later.
How to design internal layouts?
Internal trays provide tiered organization for smaller items like rings or earrings. You should leave enough vertical space so the tray slides without hitting the lid. Adding support rails inside the main body facilitates this movement.
- Main bottom section.
- Sliding upper tray.
- Vertical divider walls.
Here is the deal. A well-conceived plan allows the wood grain to flow continuously around every corner.
Key Takeaway: Proper planning ensures the finished box meets your functional needs while maintaining aesthetic proportions.
| Component | Height | Length | Thickness | |
|---|---|---|---|---|
| Front/Back | 4.0 Inches | 12.5 Inches | 0.5 Inches | |
| Side Walls | 4.0 Inches | 8.5 Inches | 0.5 Inches | |
| Base Panel | 0.25 Inches | 12.0 Inches | MDF/Wood |
Strategic design prevents material waste while streamlining the construction sequence.
Which joints benefit how to make a jewelry box out of wood?
Mastering how to make a jewelry box out of wood involves selecting joints that balance strength and visual appeal. Miter joints remain popular because they hide end grain while allowing patterns to wrap around corners. This technique creates a sophisticated “waterfall” effect that enhances the natural timber beauty.
Why select mitered corners?
Mitered corners offer a clean appearance suitable for contemporary jewelry storage designs. This joint type is relatively simple to execute using a well-tuned power saw. Professional results are achievable even for woodworkers new to the craft.
- Seamless corner look.
- Hidden end grain.
- Simple glue application.
Think about this. Using splines can reinforce these joints if you desire additional structural integrity.
How to maintain grain continuity?
Cutting every side from a single long board preserves the natural timber pattern. Mark your pieces sequentially so you know which edges meet during glue-up. This method makes the box look carved from one solid block.
- Sequential part marking.
- Careful blade alignment.
- Continuous grain flow.
Wait, there is more. Matching the grain across corners distinguishes custom craftsmanship from mass-produced items.
Key Takeaway: Miter joints provide the most aesthetically pleasing connection for boxes highlighting natural wood grain.
| Joint Style | Visual Rating | Strength | Skill Level | |
|---|---|---|---|---|
| Miter | Excellent | Moderate | Intermediate | |
| Dovetail | High | Very High | Advanced | |
| Butt Joint | Low | Low | Beginner |
Selecting appropriate joinery defines both the longevity and the style of your project.
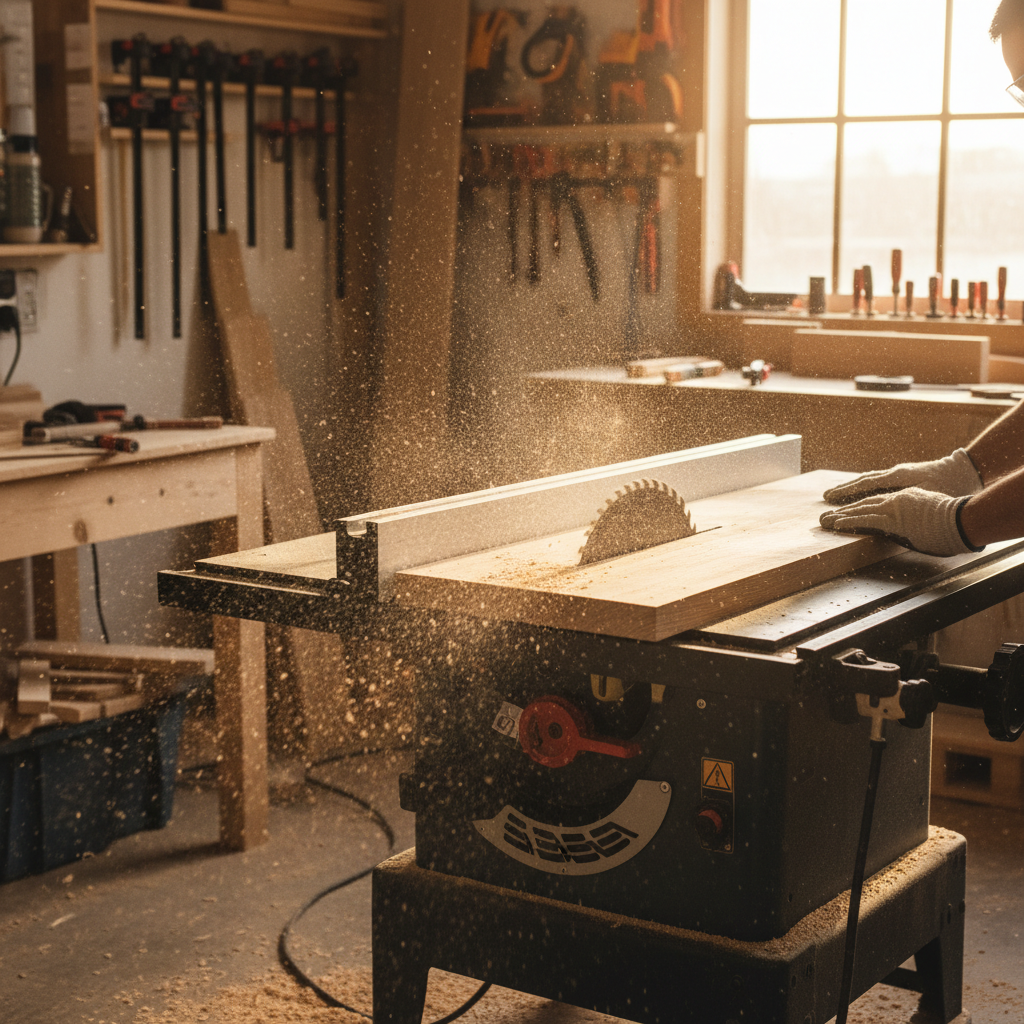
How to cut panels for how to make a jewelry box out of wood?
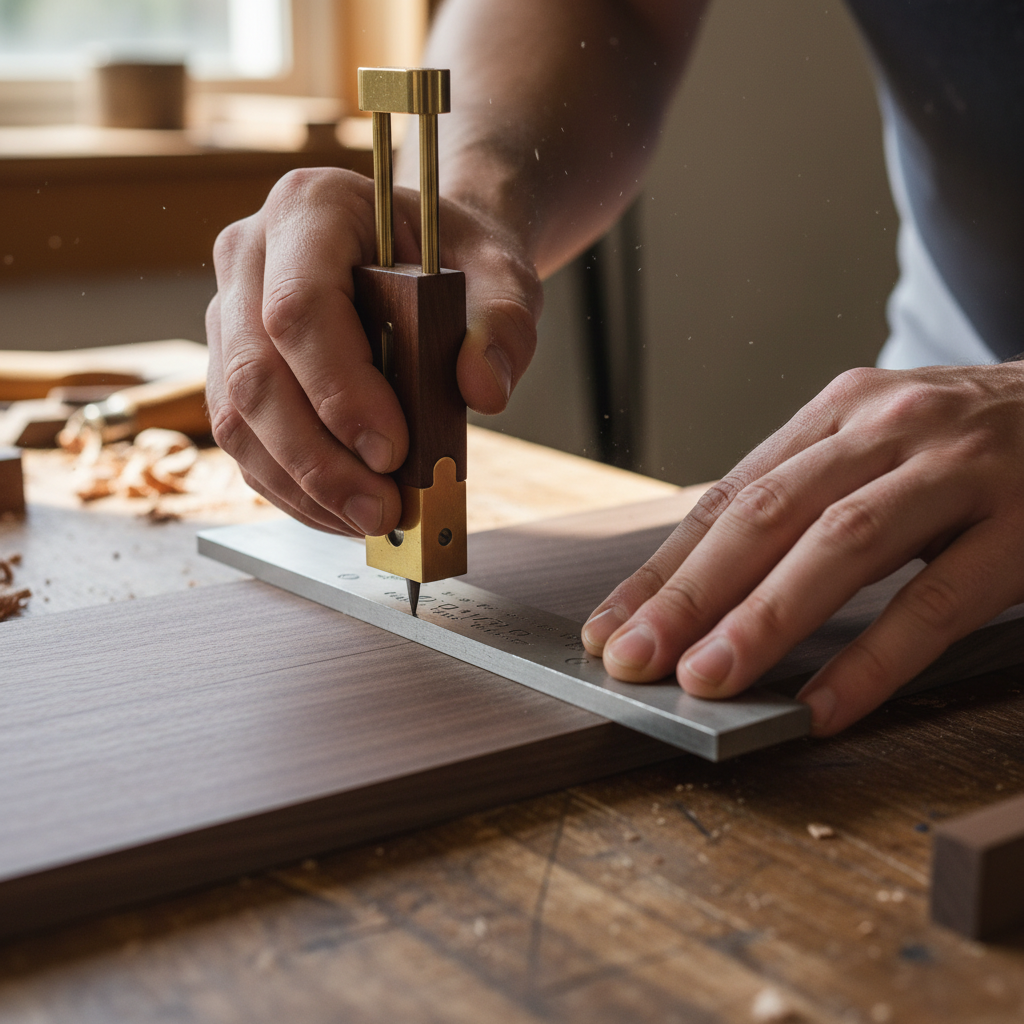
Precision cutting for how to make a jewelry box out of wood ensures that opposite sides match perfectly. Start by squaring one end of your board before measuring for the front panel. You should use a marking knife to define cut lines with absolute clarity.
Cutting the main body panels
Front and back panels must be identical in length to maintain a square profile. Set a stop block on your saw to guarantee that both pieces match exactly. This approach removes human error from your measurement process.
- Front: 12.5 inches.
- Back: 12.5 inches.
- Sides: 8.5 inches.
Here is the deal. Even a tiny difference in length will prevent the box from closing properly.
How to minimize wood tear-out?
Backer boards support the wood fibers as the saw blade exits the workpiece. This simple trick keeps your miter cuts crisp and professional on both sides. Place the scrap board behind your timber during every stroke.
- Use sharp blades.
- Add support boards.
- Control feed speed.
It gets even better. Reducing tear-out saves significant time during the final sanding and finishing stages.
Key Takeaway: Accurate panel sizing and clean cuts form the essential framework for a professional-grade jewelry container.
| Panel Type | Quantity | Measurement | Match Requirement | |
|---|---|---|---|---|
| Long Sides | 2 | 12.5 Inches | Perfect | |
| Short Sides | 2 | 8.5 Inches | Perfect | |
| Lid Top | 1 | 12.5 x 8.5 | High |
Maintaining strict tolerances during the cutting phase results in a much easier assembly.
How to fit a base for how to make a jewelry box out of wood?
How to make a jewelry box out of wood requires a sturdy base to support the internal storage area. Many builders use quarter-inch MDF because it remains flat and stable under varying humidity. You must cut grooves into the side panels to hold this base securely.
Cutting the internal bottom grooves
Set your table saw blade to a height of one-quarter inch for the initial pass. Position the fence so the groove sits near the bottom edge of your side walls. Ensure the groove width matches your base material for a snug fit.
- Blade height: 0.25″.
- Groove depth: 0.25″.
- Consistent alignment.
Think about this. Since the base is often covered with felt, the wood species choice is less important here.
Sizing the bottom panel correctly
Measure the distance between opposite grooves and subtract a small fraction for movement. A panel that fits too tightly can blow your miter joints apart over time. Testing the fit before applying any glue is a mandatory step.
- Allow for expansion.
- Verify squareness.
- Dry fit check.
Wait, there is more. Using a stable material like plywood or MDF prevents the box from warping as it ages.
Key Takeaway: A floating base design allows the wood to expand and contract without damaging the external joints.
| Base Material | Stability | Thickness | Preferred Use | |
|---|---|---|---|---|
| MDF | Very High | 0.25 Inch | Fabric Lined | |
| Plywood | High | 0.25 Inch | Utility/Shop | |
| Solid Walnut | Moderate | 0.25 Inch | Luxury Build |
Securely housing the base ensures the structural integrity of your entire woodworking project.
Which hinges suit how to make a jewelry box out of wood?
Hardware selection for how to make a jewelry box out of wood dictates final functionality and wall thickness. Stop hinges are excellent because they hold the lid open at a ninety-degree angle automatically. This prevents the top from falling backward and damaging the wood or hinges.
Why choose premium stop hinges?
Stop hinges eliminate the need for stay chains or external lid supports inside the box. They provide a clean look while offering reliable performance over thousands of opening cycles. Installation involves mortising the back panel to accept the metal leaves.
- 95-degree opening.
- Integrated lid stop.
- Clean interior look.
Here is the deal. High-quality brass hinges add a weight and feel that screams professional luxury.
Checking wall thickness for hardware
Ensure your wood is thick enough to prevent screws from poking through the exterior walls. Most professional hinges require at least seven-sixteenths of an inch of material for secure mounting. If your sides are too thin, you might need reinforcement.
- Minimum 0.43″ thickness.
- Pre-drill screw holes.
- Align hinges precisely.
It gets even better. Measuring your hardware before milling allows you to adjust the side thickness for a perfect fit.
Key Takeaway: Selecting the right hinges ensures the lid functions smoothly while protecting the box from mechanical stress.
| Hinge Type | Opening Angle | Mounting Style | Difficulty | |
|---|---|---|---|---|
| Stop Hinge | 95 Degrees | Surface/Mortise | Moderate | |
| Quadrant | 90 Degrees | Internal Slot | High | |
| Butt Hinge | 180 Degrees | Surface | Easy |
Precision hardware installation elevates a simple container into a sophisticated organizational tool.
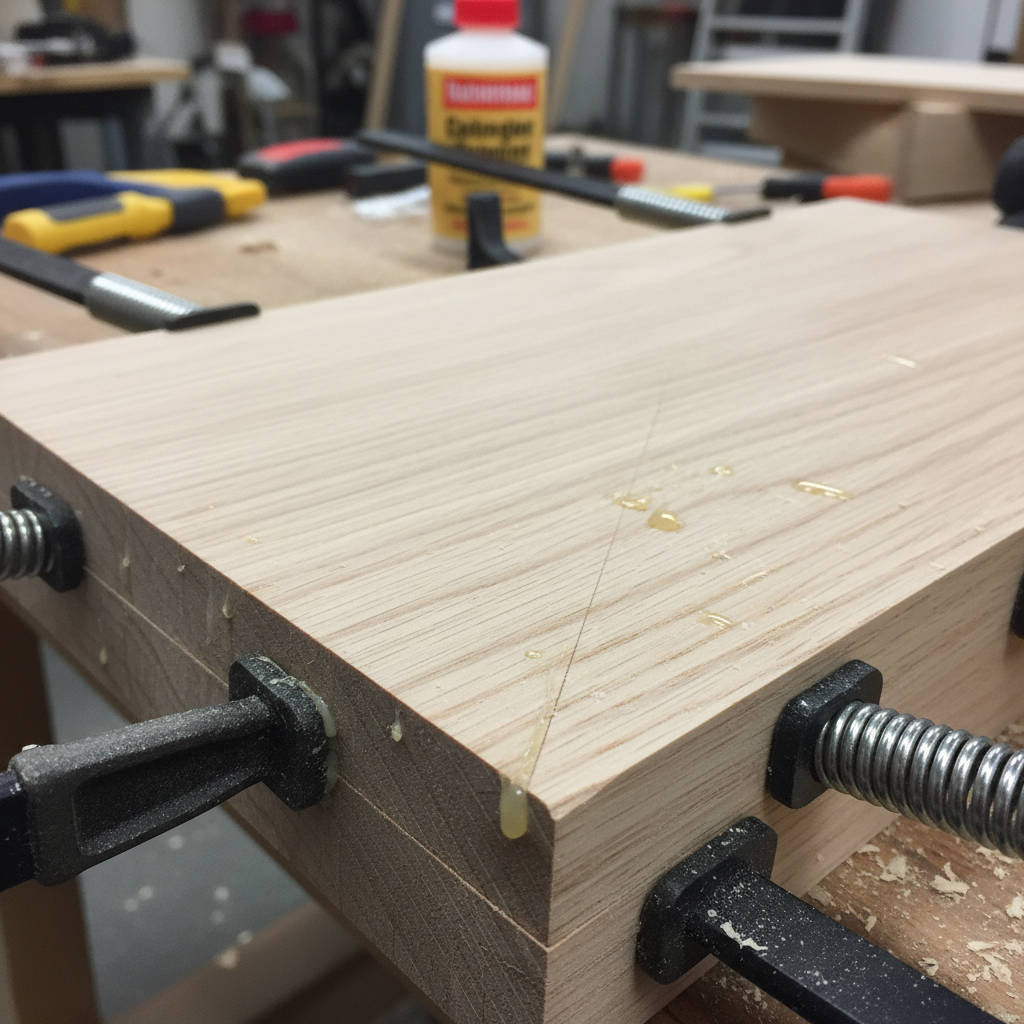
How to assemble how to make a jewelry box out of wood?

The assembly phase for how to make a jewelry box out of wood is where your careful preparation finally pays off. Start with a dry fit to ensure every miter closes tightly around the base panel. You should use specialized clamps or painter’s tape to hold the corners together during this test.
Performing a successful dry fit
Never apply glue until you have verified that all parts fit together without excessive force. A dry fit reveals issues with base size or miter angles before they become permanent. This patience results in a much higher success rate for your project.
- Check miter closure.
- Verify squareness.
- Test base movement.
Think about this. Gluing the top and bottom panels simultaneously creates a solid “cube” that you cut open later.
Tips for a clean glue application
Apply wood glue sparingly to the miter faces to minimize internal squeeze-out during clamping. Use a damp cloth to wipe away any excess adhesive immediately before it hardens. Proper pressure ensures the fibers bond correctly for a permanent hold.
- Thin glue layers.
- Even clamp pressure.
- Immediate cleanup.
Wait, there is more. Checking for squareness during the glue-up is vital for ensuring the lid sits level.
Key Takeaway: Methodical assembly and careful glue management are the secrets to achieving seamless, professional-looking corners.
| Assembly Step | Primary Goal | Required Tool | |
|---|---|---|---|
| Dry Fit | Check Alignment | Tape/Clamps | |
| Glue Up | Fiber Bonding | Wood Glue | |
| Squaring | Perfect 90 Deg | Square |
A successful assembly ensures the box remains structural and attractive for decades of use.
How to build trays for how to make a jewelry box out of wood?
Internal trays for how to make a jewelry box out of wood offer tiered organization and maximize storage space. These trays are typically made with thinner wood to keep the overall weight low. You can use simple miter joints for tray corners to match the main style.
Installing internal tray supports
Thin strips of walnut act as rails for your internal tray to rest upon. Position these supports low enough so the tray does not interfere with the lid. Use a small amount of glue and tiny pins to hold them.
- Walnut support strips.
- Level positioning.
- Secure fastening.
Here is the deal. Adding a sliding tray makes the box feel like a professional organization system.
Customizing your tray dividers
Construct the tray using the same principles as the main box but on a smaller scale. Ensure the tray is narrow enough to slide easily but wide enough to stay on rails. Lining the tray with velvet protects delicate items like rings.
- Velvet or felt lining.
- Adjustable dividers.
- Easy finger lifts.
It gets even better. Custom dividers allow you to tailor the storage to your specific jewelry collection needs.
Key Takeaway: Well-designed internal trays double your storage capacity while keeping different types of jewelry separated and safe.
| Tray Feature | Purpose | Material | |
|---|---|---|---|
| Support Rails | Hold Tray | Hardwood | |
| Dividers | Organization | Thin Stock | |
| Felt Lining | Protection | Soft Fabric |
Adding internal components transforms a simple wooden box into a high-utility storage solution.
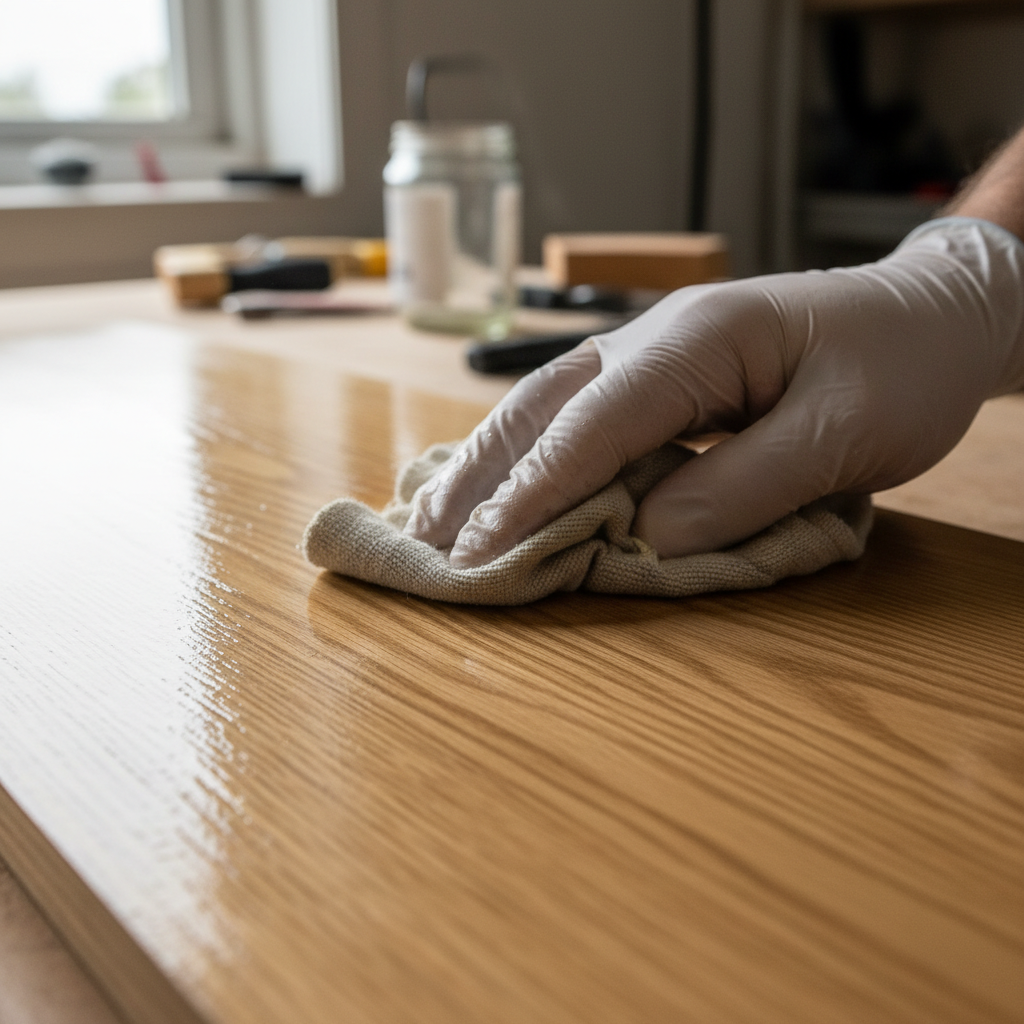
How to finish how to make a jewelry box out of wood?
Applying a finish is the final step in learning how to make a jewelry box out of wood . Sand the exterior through various grits to achieve a surface that feels smooth to the touch. A clear oil or wax finish highlights the natural beauty of the walnut grain.
Choosing the right protective finish
Wipe-on polyurethanes or natural oils provide a durable barrier with a low-sheen look. Apply several thin coats rather than one thick layer for the best results. Sanding lightly between coats removes any dust nibs that settled on the surface.
- Wipe-on Poly.
- Natural Tung Oil.
- Beeswax Finish.
Think about this. The right finish protects the timber from moisture and fingerprints over many years.
Adding the final fabric linings
Glue felt or velvet to the bottom and tray interiors to cushion your jewelry items. This prevents metal pieces from scratching the wood or making noise when moved. Choose a color that complements the wood species for a luxury appearance.
- Velvet for luxury.
- Felt for durability.
- Color coordination.
Wait, there is more. This final touch makes your handmade project ready for daily use or gifting.
Key Takeaway: A high-quality finish and soft lining provide the final layer of protection and beauty for your jewelry.
| Finish Type | Gloss Level | Protection | Maintenance | |
|---|---|---|---|---|
| Polyurethane | Medium-High | High | Low | |
| Natural Oil | Low | Moderate | Moderate | |
| Wax | Low | Low | High |
Completing the finishing process ensures your craftsmanship remains preserved for future generations.
Final Summary
Creating a custom wooden container requires patience, precision, and the right materials. By following these steps, you transform a simple board into a beautiful storage solution for your most valued items. Focus on tight joinery and smooth finishes to ensure your project looks professional. Our brand vision is to empower creators with the knowledge and tools needed to preserve their most cherished memories. If you require professional assistance or bulk packaging solutions, contact us today for expert guidance.
Frequently Asked Questions
Q1: Can I use softwood for this project?No, hardwoods are significantly better because they offer superior stability and a finer finish. Pine or cedar may warp over time, potentially causing the lid to misalign or the joints to fail.
Q2: What’s the best way to clean wood glue squeeze-out?Use a damp cloth to wipe away wet glue immediately after clamping the joints. If the glue has already dried, carefully use a sharp chisel to pop the beads off without damaging the wood fibers.
Q3: Can I make this box without expensive power saws?Yes, you can achieve excellent results using sharp hand saws and a miter box for the angles. It simply requires more time, careful manual measurement, and patience during the cutting phase.
Q4: What’s the best fabric for lining the interior?Velvet or high-quality felt are the preferred choices because they provide a soft, non-abrasive cushion for metals. Avoid synthetic fabrics that might hold moisture or shed fibers onto your jewelry.
Q5: Can I add a lock to my jewelry box?Yes, installing a small brass box lock is possible but requires advanced mortising skills. You must plan for the lock mechanism before assembling the front panel to ensure proper fitment.