
Keeping your inventory organized or presenting a high-end gift requires more than just a container; it requires a vessel that reflects the quality of the contents within. Many professionals and enthusiasts struggle with cluttered storage and tangled chains that lead to damaged inventory and customer frustration. By following this guide, you will learn how to make a simple jewelry box that meets professional standards, ensuring your valuables are protected and showcased with elegance. Using premium components from YX Jewelry Packaging , you can transition from basic storage to a high-grade organizer that safeguards your long-term investment.
What wood is best for how to make a simple jewelry box?
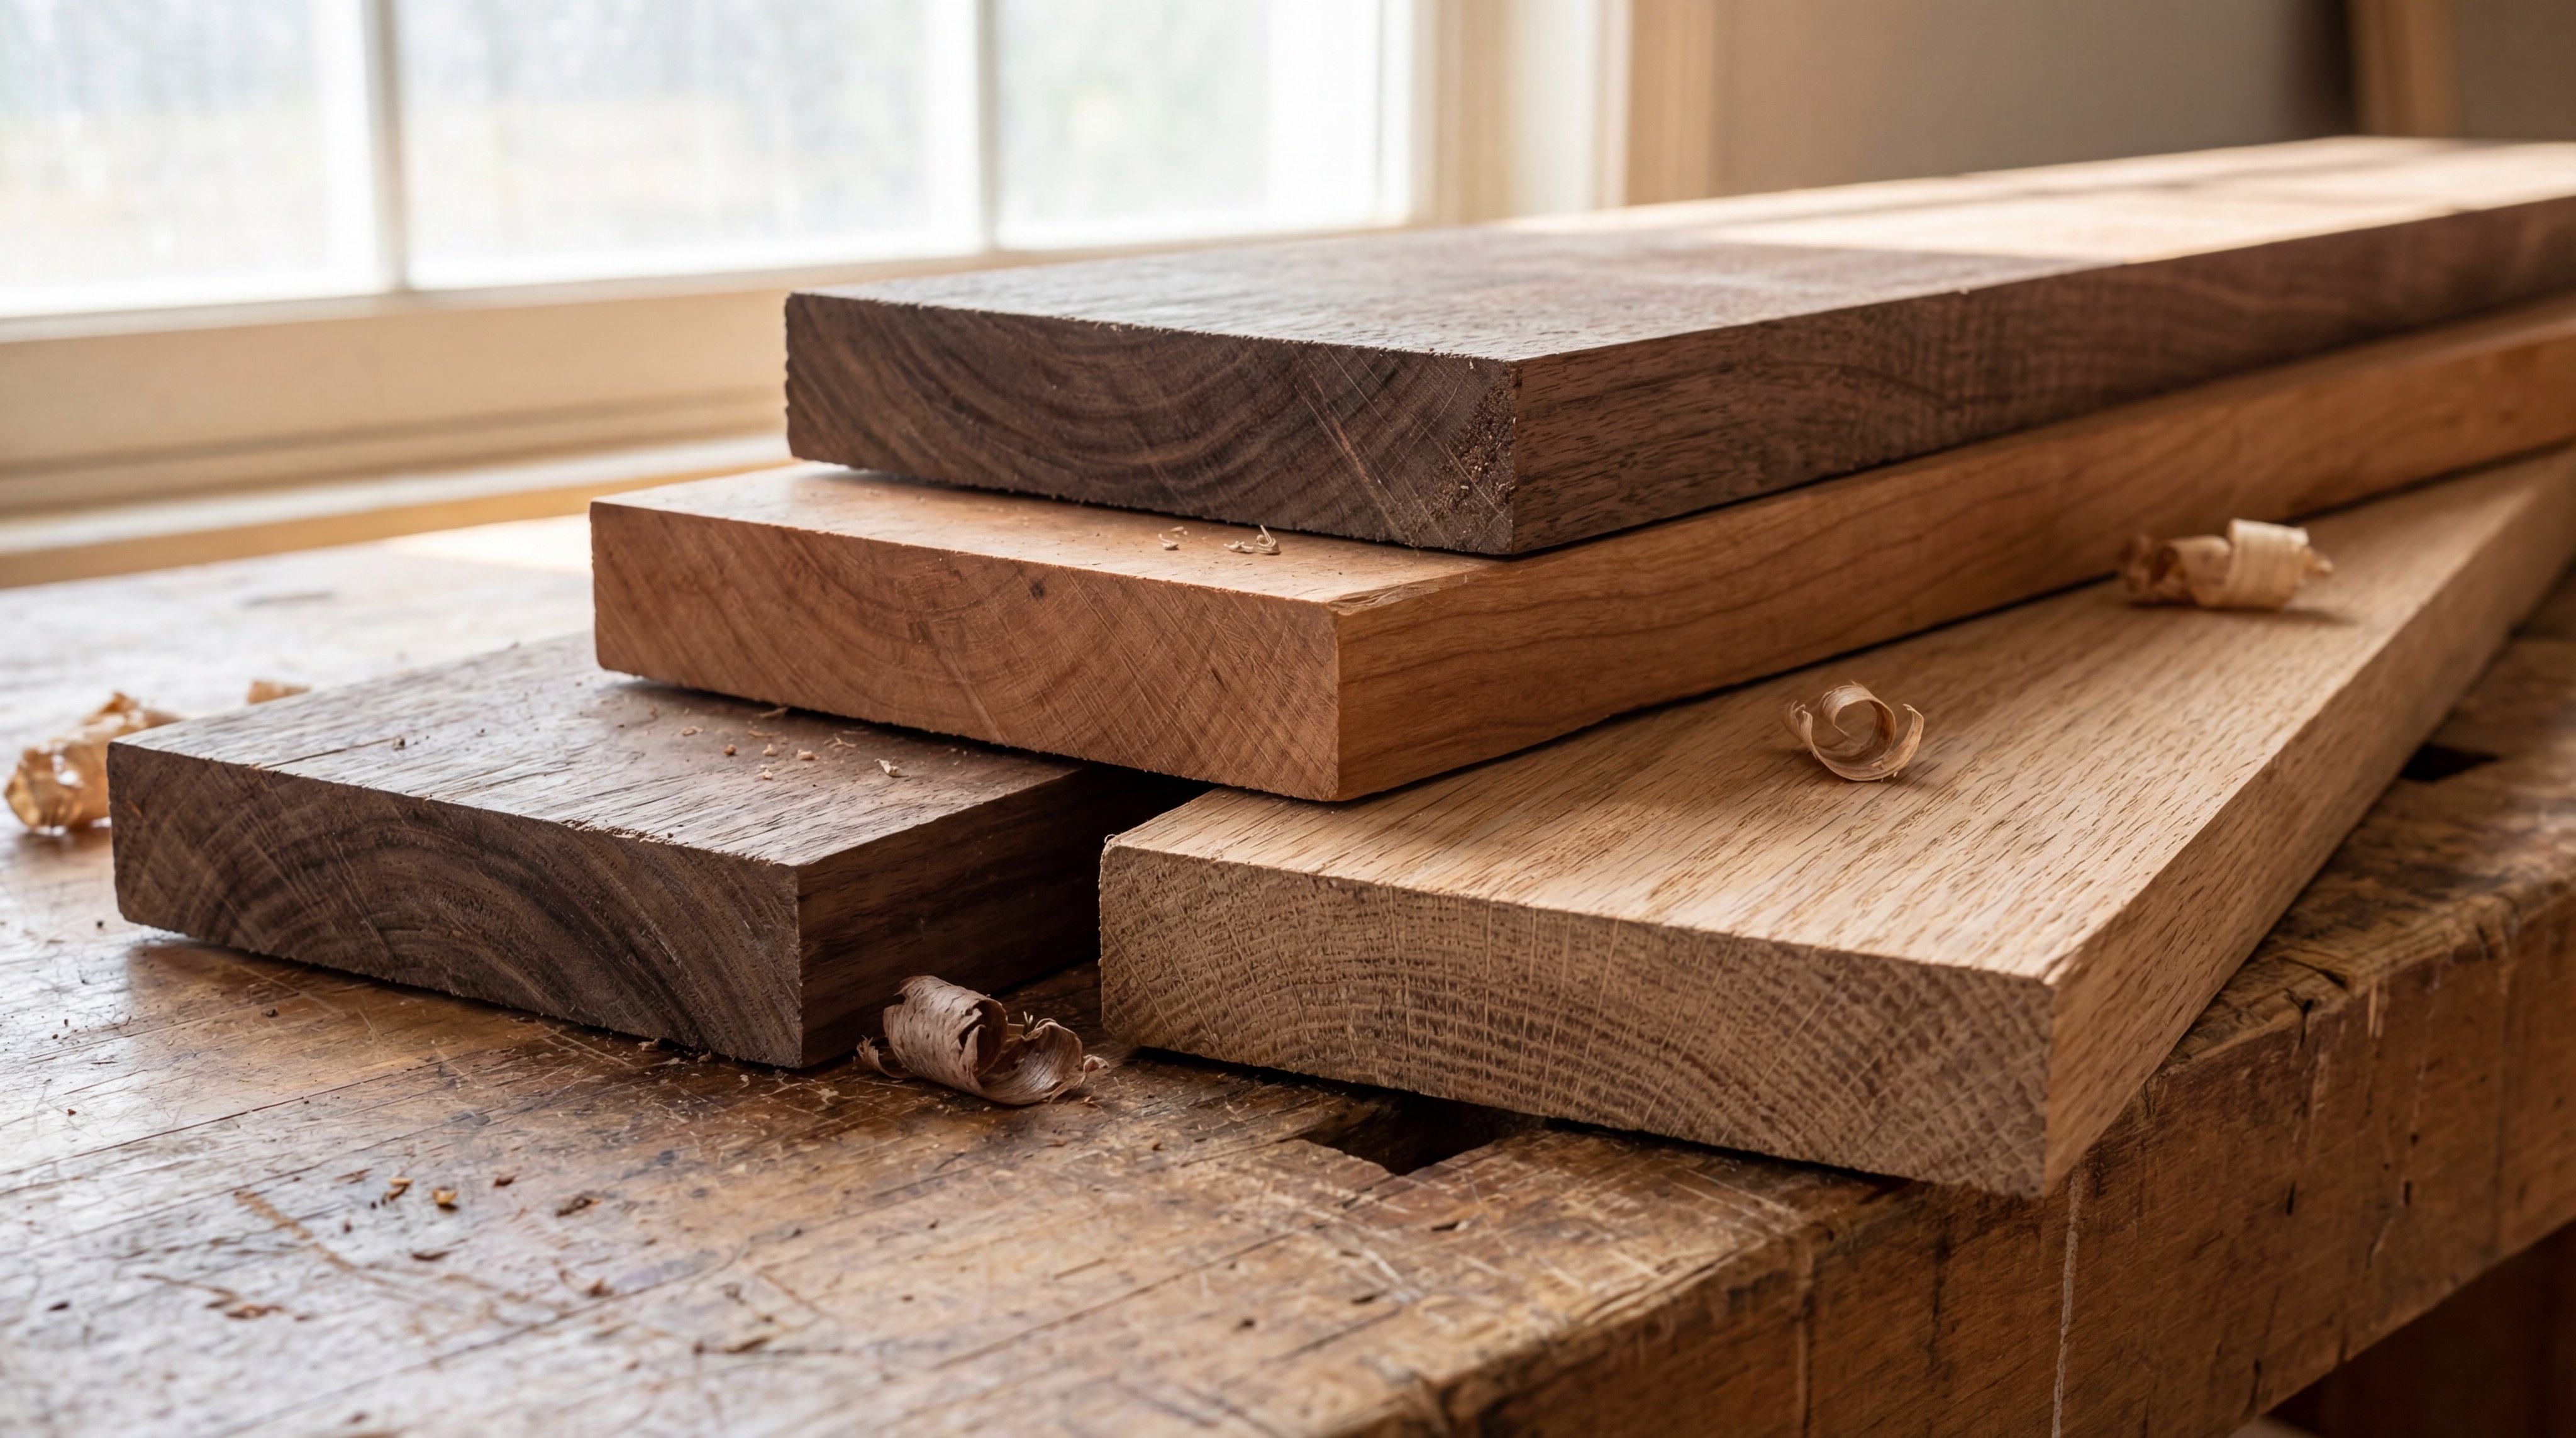
Selecting Durable Hardwoods
You should choose hardwoods like cherry, walnut, or oak because they provide structural stability and a premium look. These species are easier to sand to a high-gloss finish compared to softwoods, which often splinter. High-density wood ensures your hinges stay tight for years, which is a critical consideration for B2B applications where durability is paramount.
- Cherry: Known for a warm reddish tone that deepens over time.
- Walnut: Provides a dark, luxurious feel suitable for high-end collections.
- Oak: Offers traditional durability and a prominent grain pattern.
Think about this: The wood species you select is the primary driver of the finished product’s perceived market value.
Choosing Plywood for Bases
While solid wood is ideal for sides, using a high-quality birch plywood for the bottom prevents warping. This ensures your box stays flat and stable on any vanity or display case, regardless of climate changes.
- 1/4 inch thickness: The industry standard for a sturdy yet lightweight base.
- Grade A veneer: Ensures a smooth surface that won’t snag interior fabrics.
- Dimensional stability: Resists expansion and contraction caused by humidity.
The secret is: Plywood handles moisture fluctuations much better than solid wood panels, preventing the box from “rocking.”
Key Takeaway
| Material | Best Use | Durability | |
|---|---|---|---|
| Hardwood | Exterior Walls | High | |
| Plywood | Box Bottom | Medium-High |
Is safety vital when you how to make a simple jewelry box?
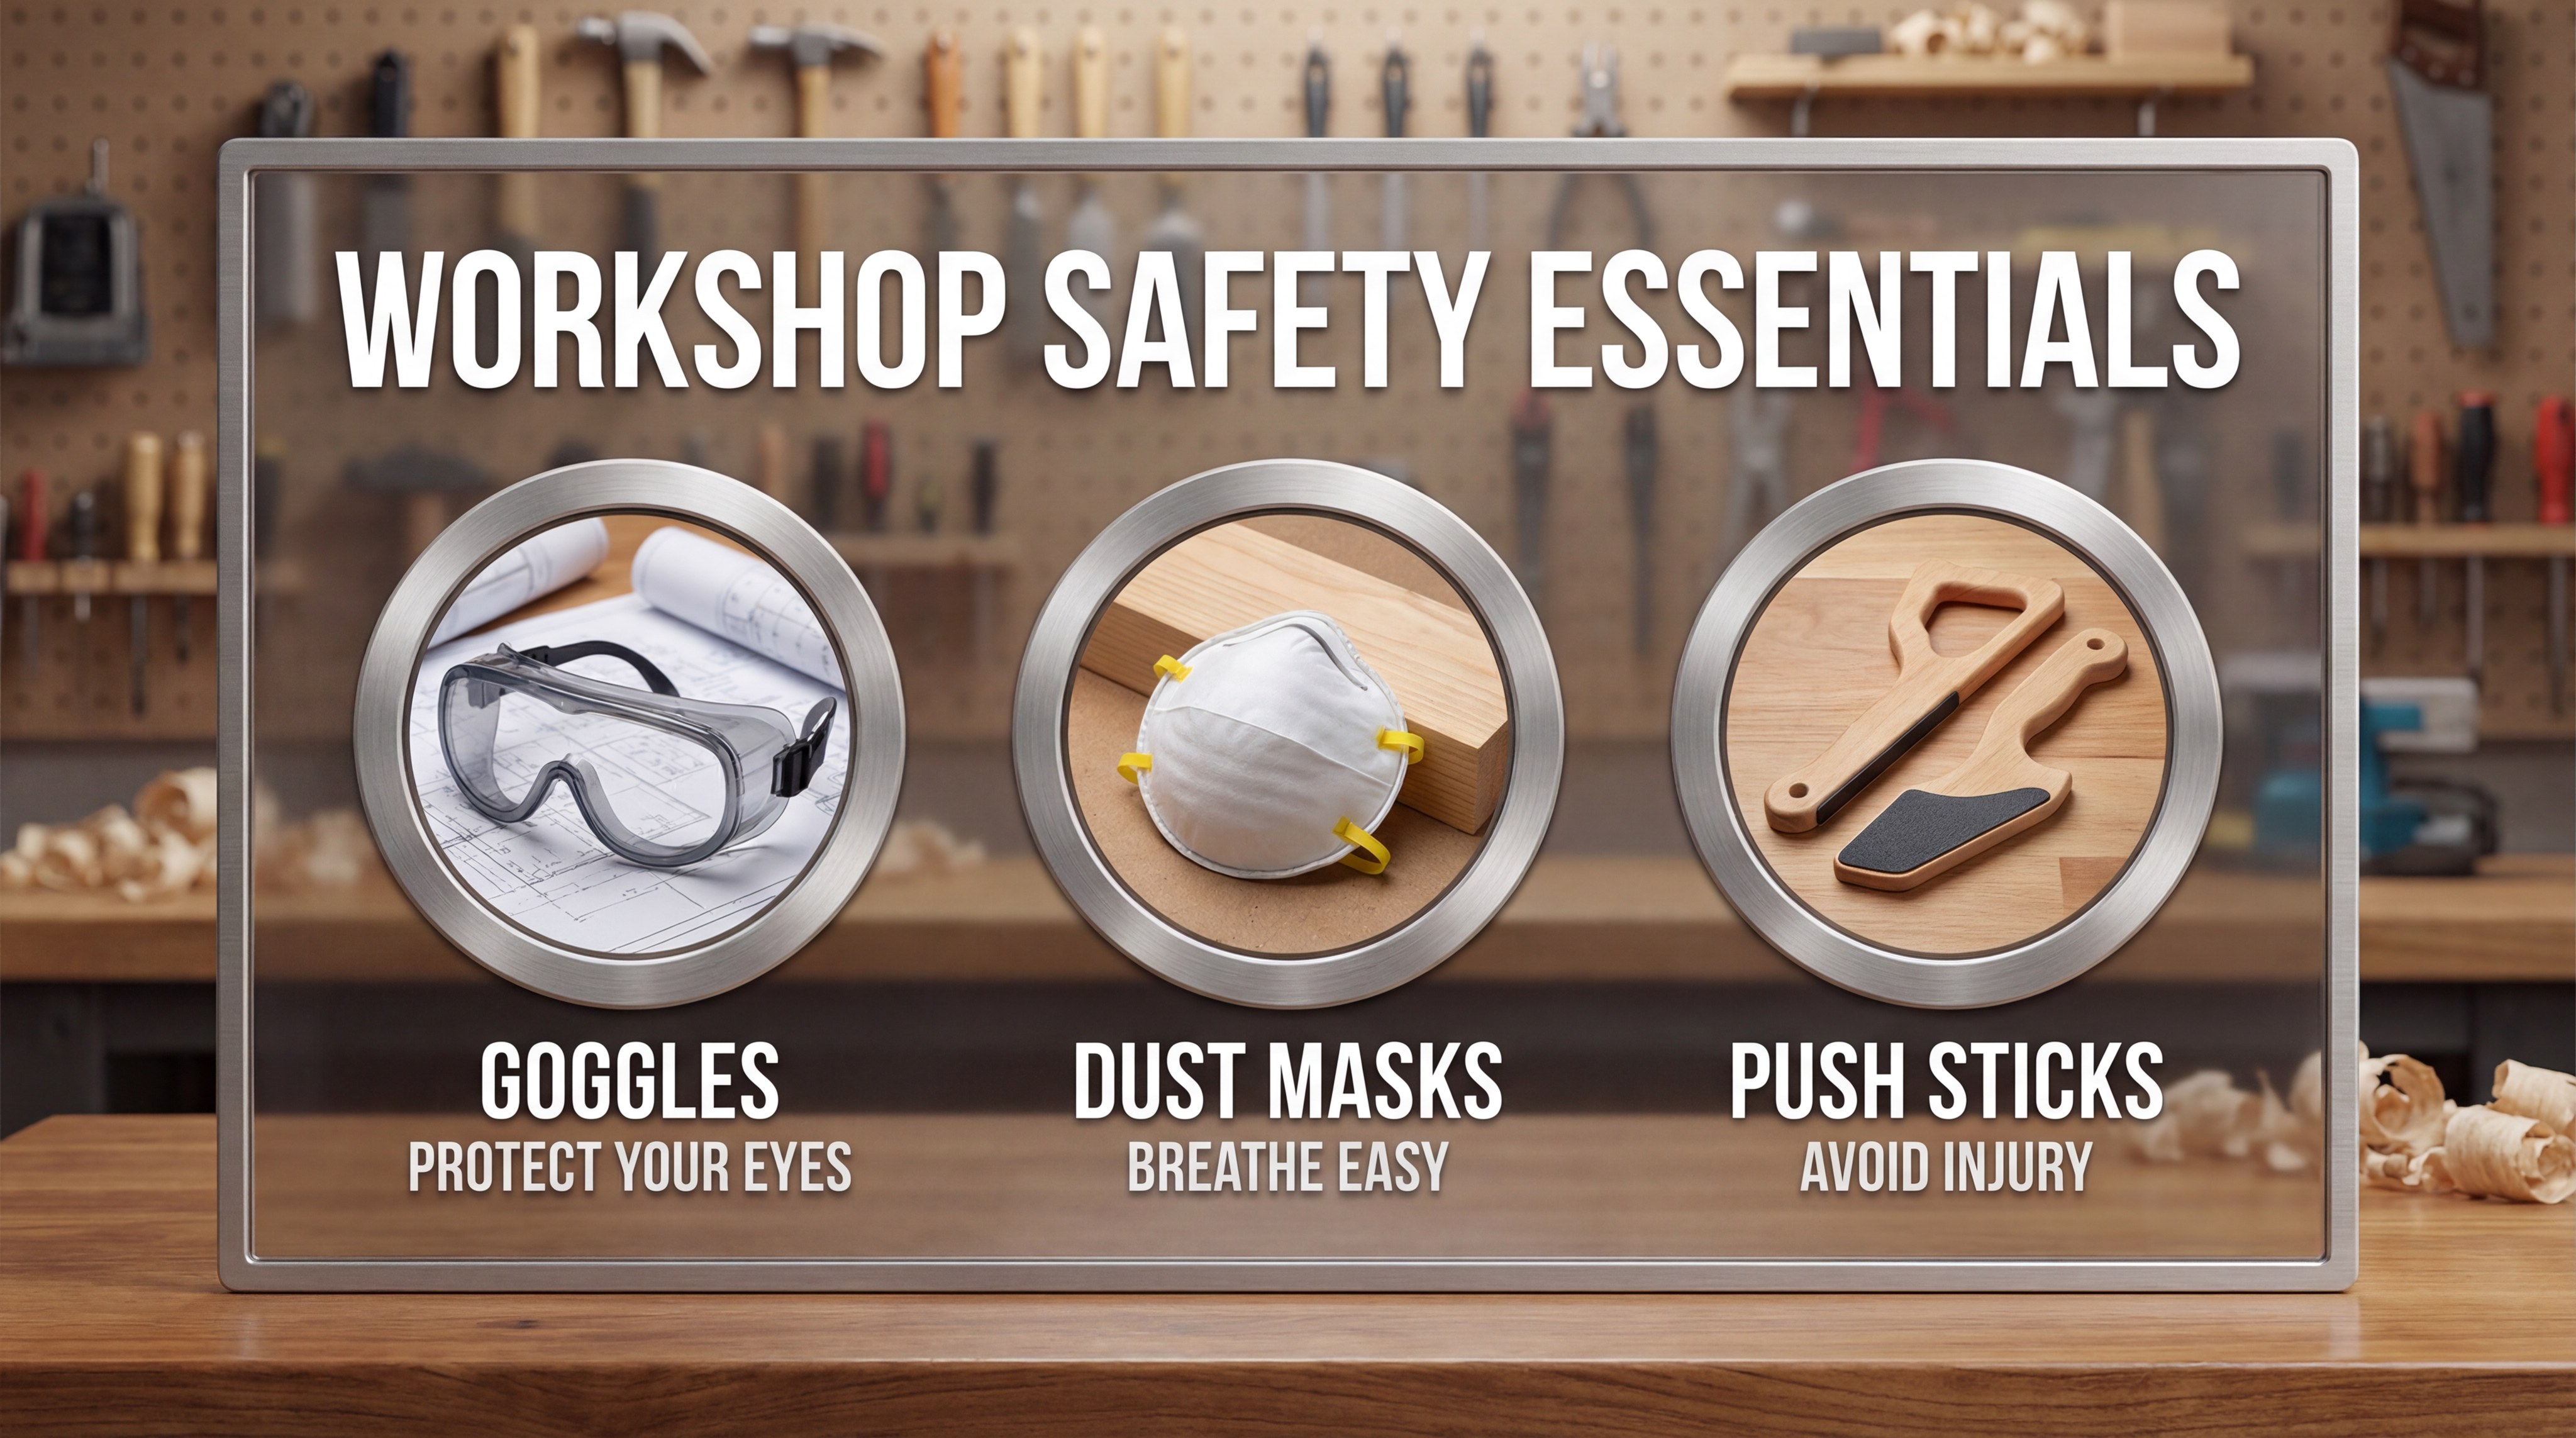
Essential Personal Protective Equipment
Safety starts with protecting your eyes and lungs before you even touch a saw. You should always wear impact-resistant goggles and a dust mask to handle fine wood particles produced during the sanding process. If you prefer a ready-made solution for your business needs, consider a custom jewelry box to save production time.
- Polycarbonate glasses: Essential for protection against high-velocity wood chips.
- N95 rated mask: Filters out fine particulates that can cause respiratory irritation.
- Form-fitting gloves: Provides grip without the risk of getting caught in machinery.
You may be wondering: Fine sawdust can be more harmful to long-term health than the sharp blades themselves.
Safe Power Tool Operation
You must keep your fingers at least six inches away from any moving blade during the build. Always use push sticks when ripping narrow side blanks to maintain full control and keep your hands clear of the danger zone.
- Blade Guard Check: Ensure all safety covers are operational before power-on.
- Power Down: Always unplug tools during blade changes or maintenance.
- Workplace Tidiness: A clean floor prevents slips during critical cuts.
Here is the deal: Complacency is the biggest risk in any woodworking project, regardless of your experience level.
Key Takeaway
| Equipment | Purpose | Importance | |
|---|---|---|---|
| Goggles | Eye Protection | Mandatory | |
| Push Stick | Finger Safety | Critical |
How to cut side blanks for how to make a simple jewelry box?
Measuring and Marking Panels
You should mark your wood clearly with a sharp pencil to ensure every cut is precise. Measure twice and cut once to avoid wasting expensive hardwood blanks, which is vital for maintaining a lean production budget.
- Height Consistency: Ensure all four sides are identical to prevent lid gaps.
- Grain Matching: Arrange boards so the grain flows around the corners.
- Face Markings: Clearly label the interior and exterior faces to avoid assembly errors.
But wait, there’s more: Continuous grain patterns make the box look like it was carved from a single, solid piece of wood.
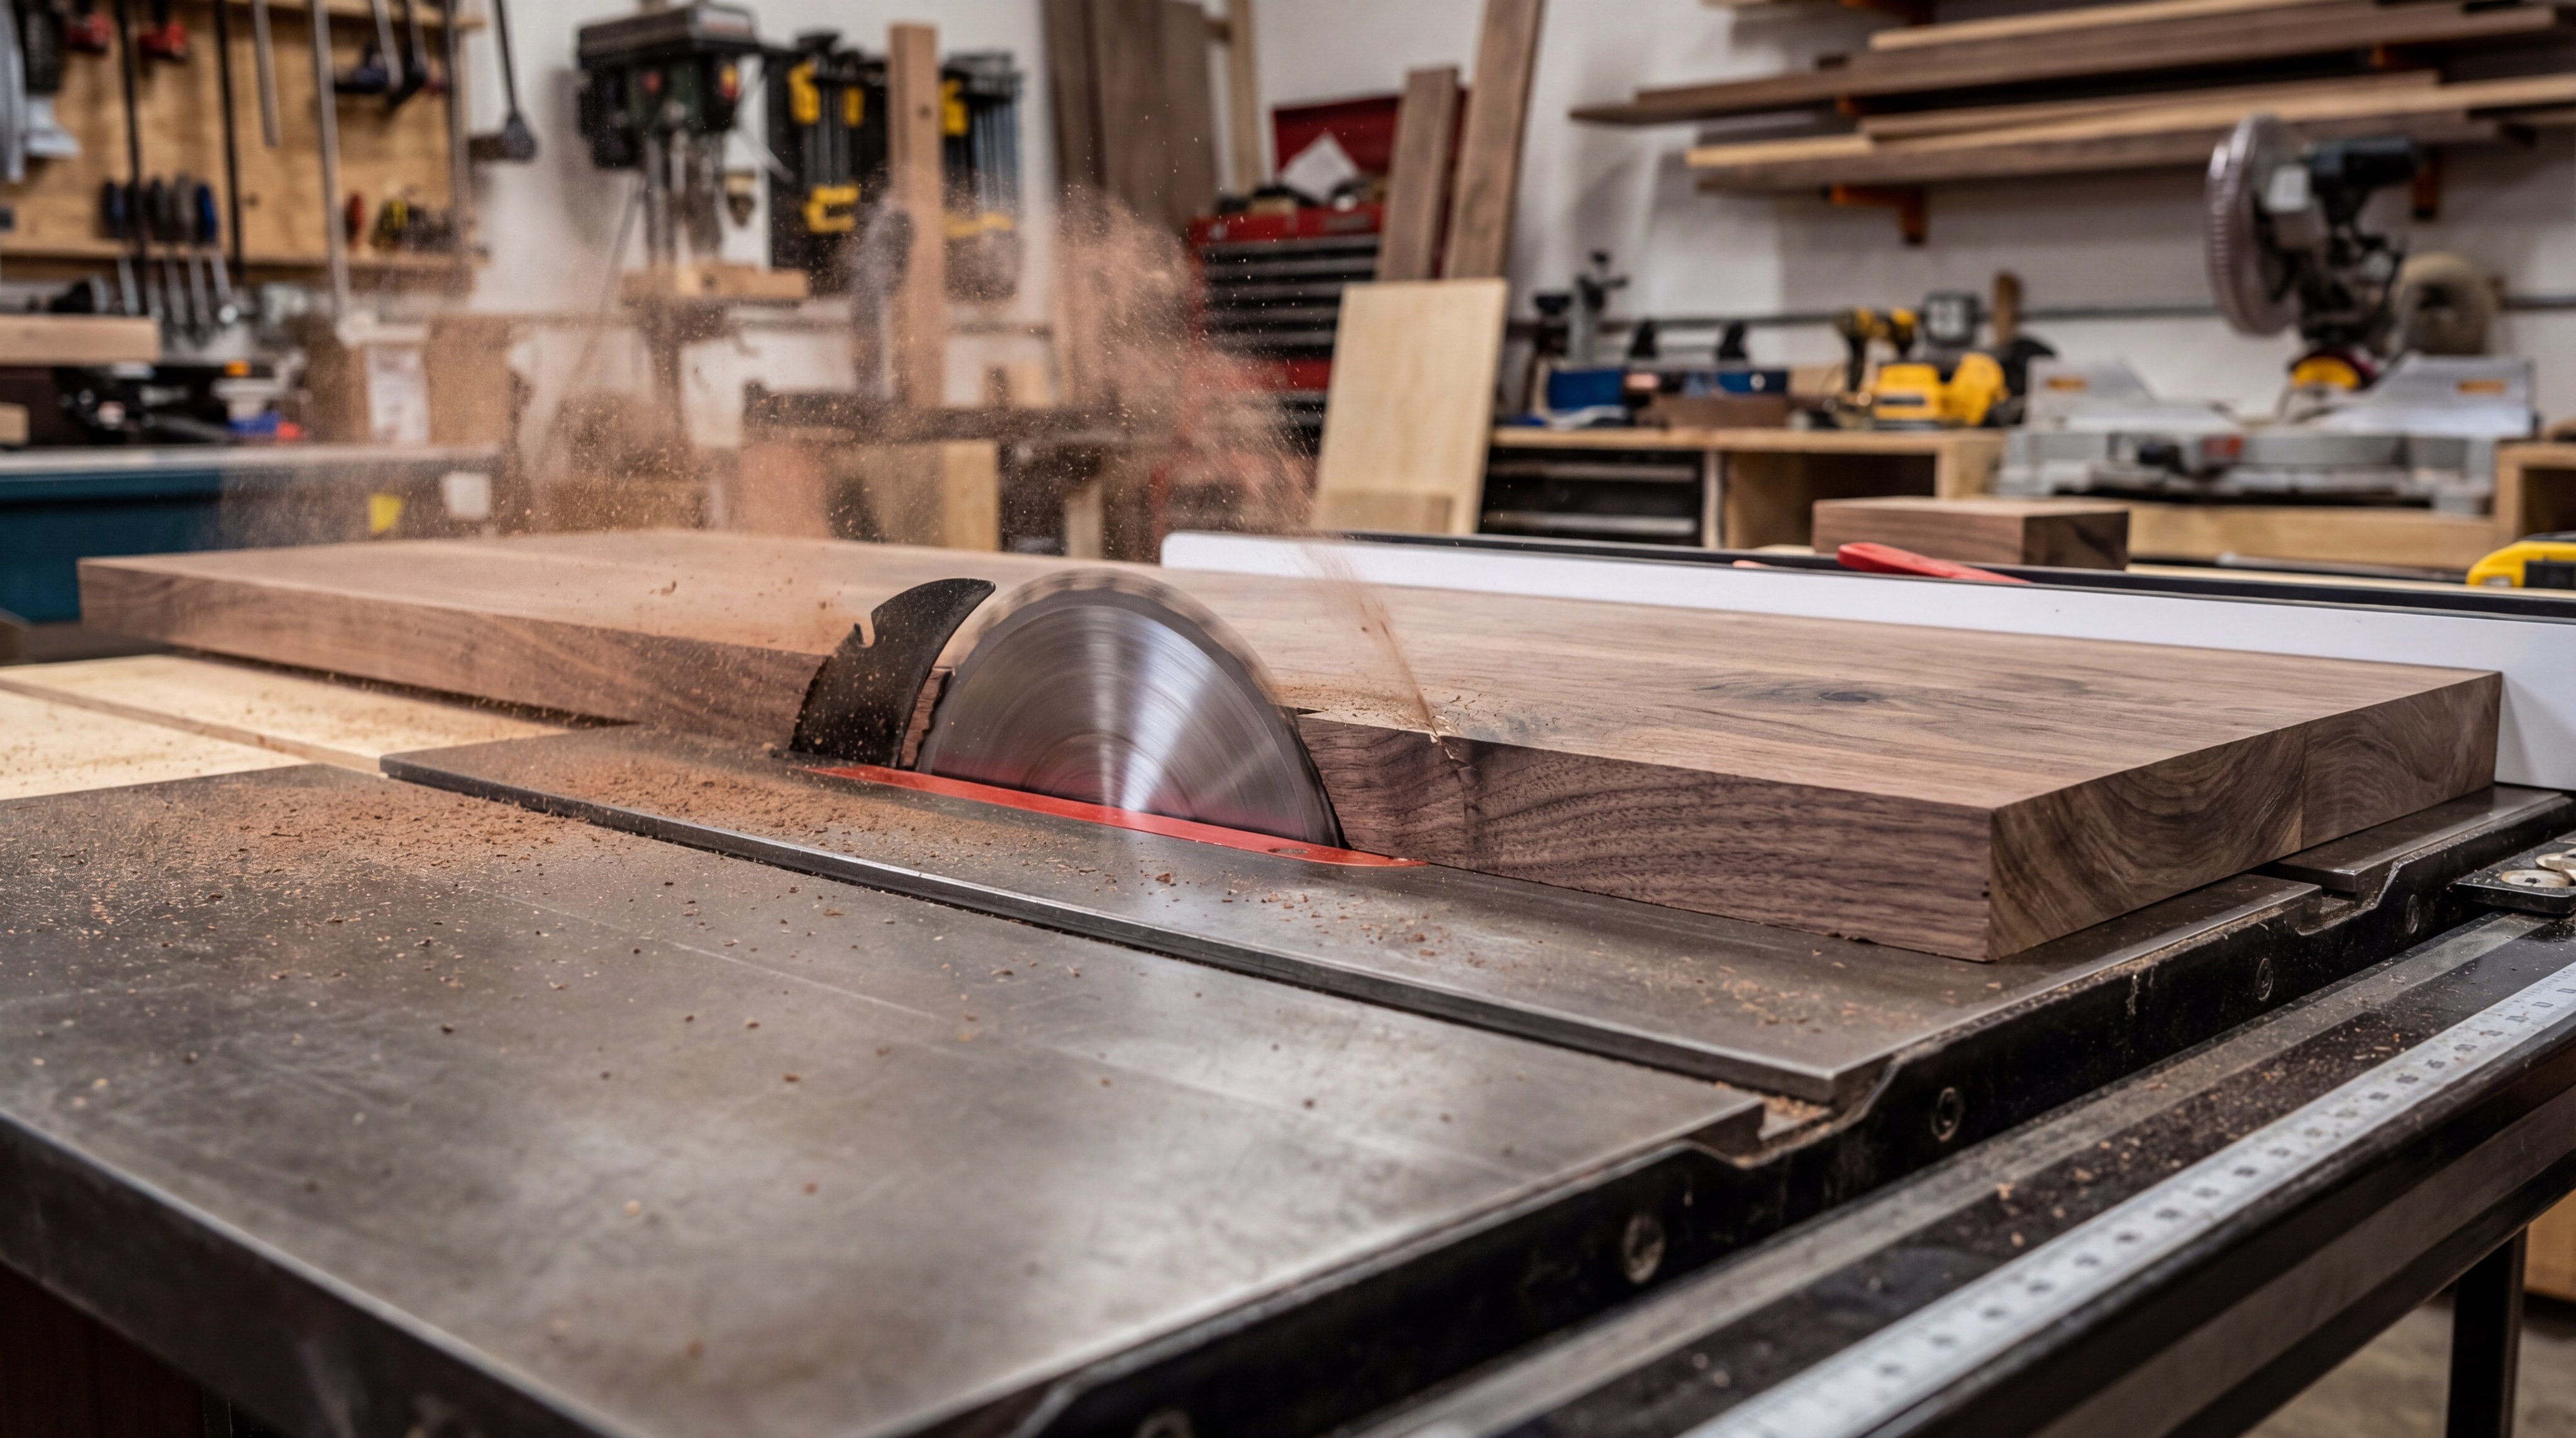
Ripping and Crosscutting Wood
You will need to rip your boards to the desired width first on a table saw to establish the height of the box. Then, crosscut them to the specific lengths required for the long and short sides.
- Slow Feed Rate: Prevents burn marks on the wood surface.
- Zero-Clearance Inserts: Minimizes tear-out on the underside of the cut.
- Square Edges: Use a miter gauge to ensure every end is perfectly vertical.
The best part? Perfectly square blanks make the subsequent glue-up and assembly process incredibly smooth.
Key Takeaway
| Step | Tool | Accuracy Level | |
|---|---|---|---|
| Ripping | Table Saw | High | |
| Marking | Layout Square | Absolute |
How to cut grooves for how to make a simple jewelry box?
Setting Up Your Miter Saw
You should set your miter saw to exactly 45 degrees to create the corner joints for your box. If you want to see professional joinery examples for high-volume retail, check out this PE film jewelry box design for modern inspiration.
- Test Cuts: Always use scrap wood to verify the angle before cutting your blanks.
- Secure Clamping: Hold the wood firmly to prevent shifting during the cut.
- Corner Check: Join two test pieces to ensure they form a perfect 90-degree angle.
Check this out: Even a half-degree error will result in a box that refuses to close properly or sit square.
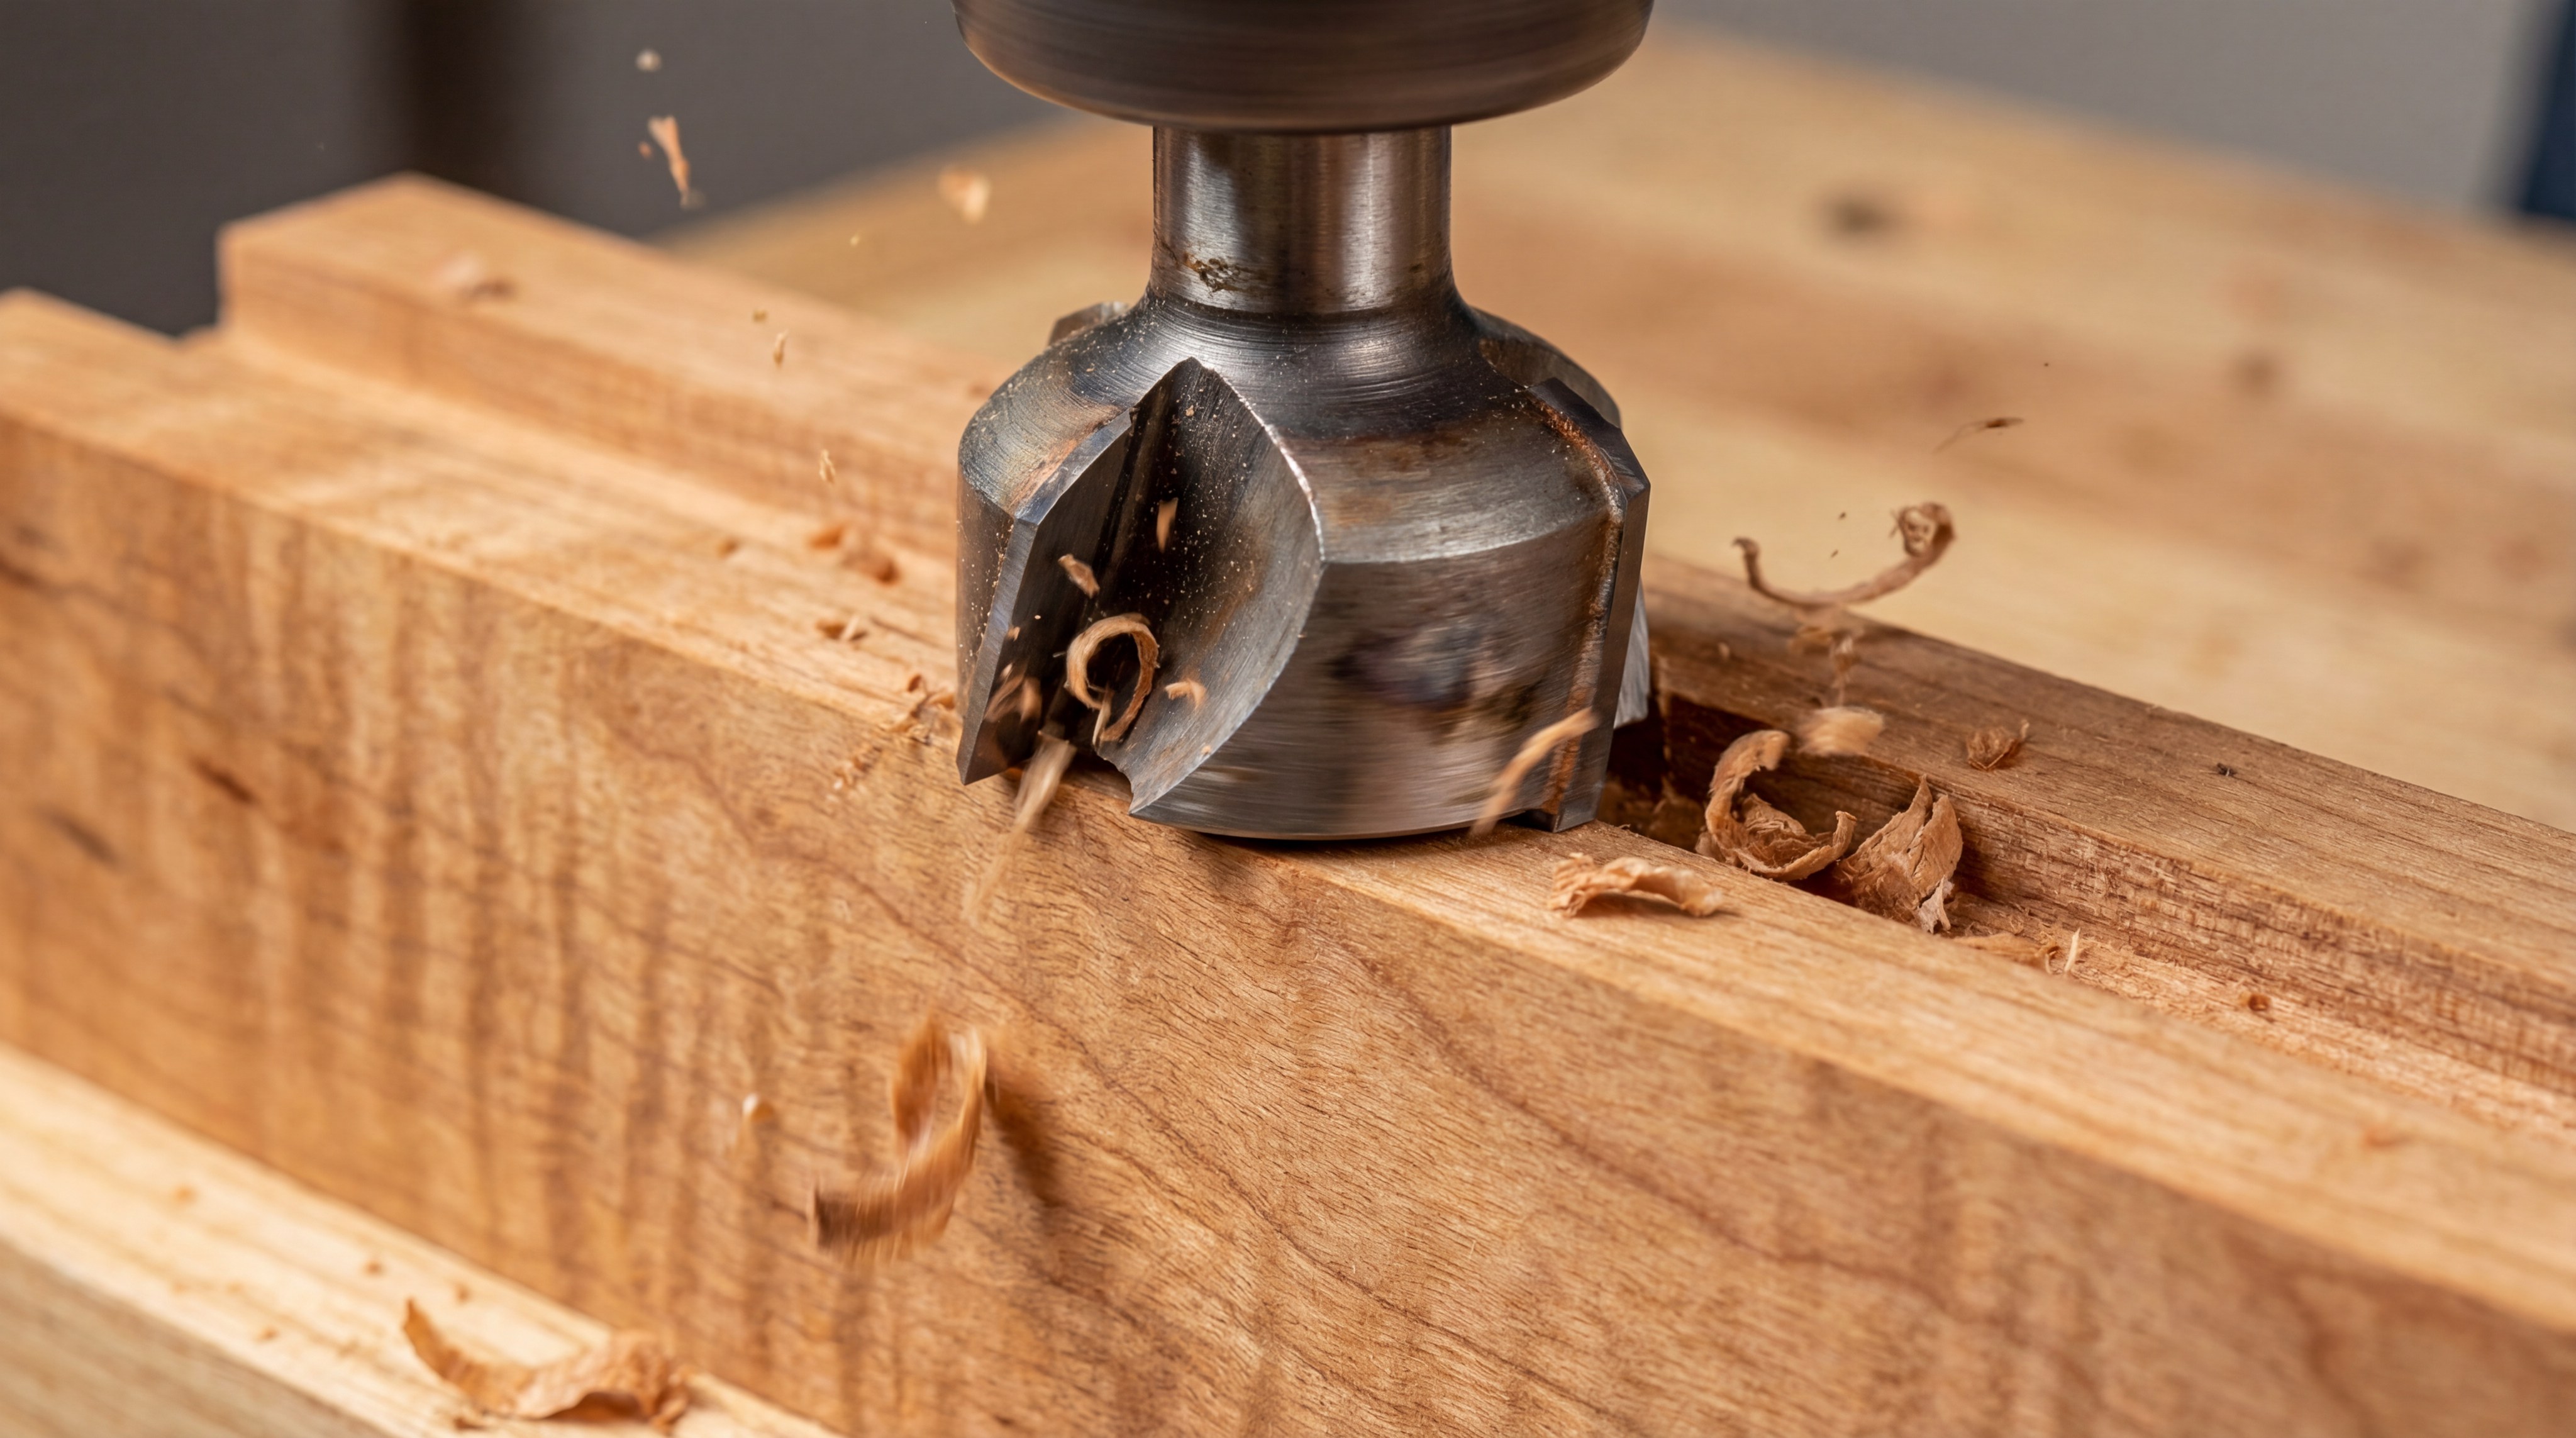
Routing Grooves for the Base
You need to cut a small channel, or “dado,” near the bottom of each side piece. This groove will hold the bottom panel securely without needing any visible nails or screws.
- 1/4 inch depth: Provides enough “meat” for the base to sit securely.
- Consistent Height: Ensures the base sits level across all four sides.
- Snug Fit: The base should slide in easily but not rattle.
It gets better: A floating base allows the wood to expand and contract naturally without cracking the box.
Key Takeaway
| Joint Type | Benefit | Difficulty | |
|---|---|---|---|
| Miter | Aesthetic Appeal | Medium | |
| Groove | Structural Support | Low |
How to glue up parts for how to make a simple jewelry box?
Applying Wood Glue Correctly
You should apply a thin, even layer of wood glue to both faces of your miter joints. Too much glue will cause a mess that interferes with the finish, while too little will lead to joint failure under stress.
- Glue Brush: Use a dedicated applicator for even distribution.
- Squeeze-out Management: Wipe away excess wet glue with a damp cloth immediately.
- End-Grain Saturation: Since miter joints are end-grain, they may require a slightly heavier coat.
Don’t forget: Wet glue is much easier to clean than dried, hardened bumps that require heavy sanding later.
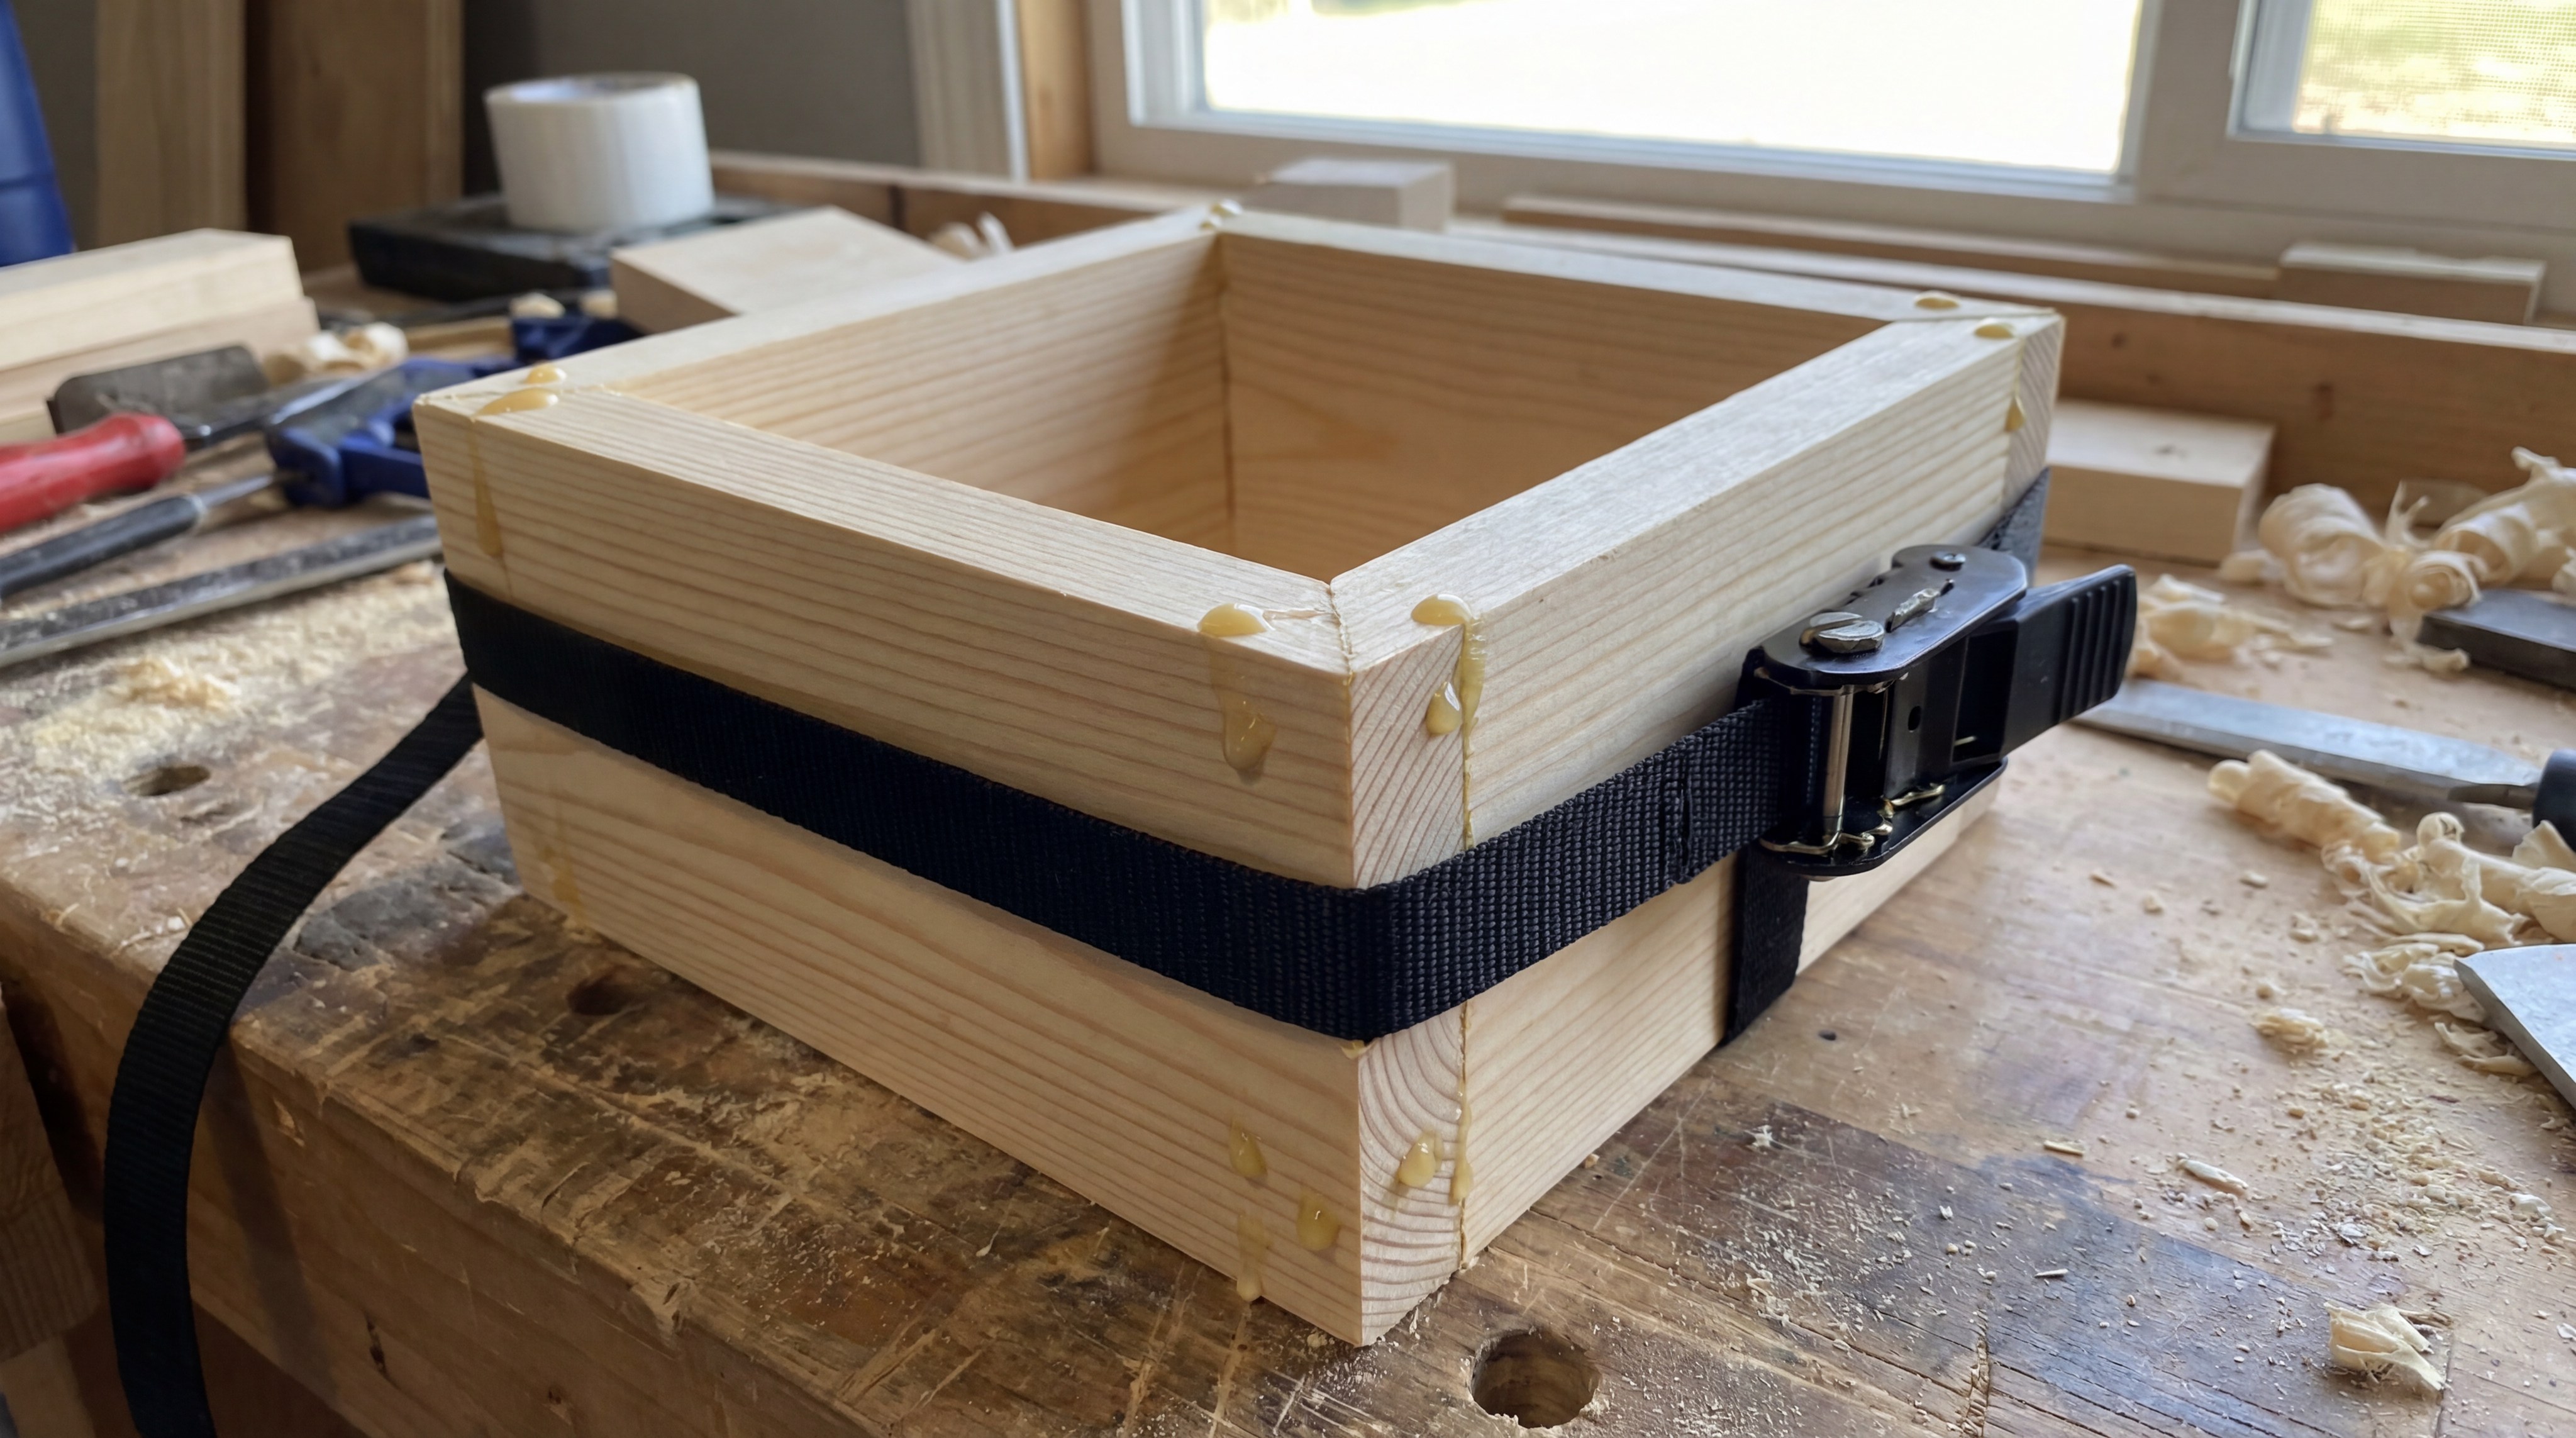
Using Clamps for Squareness
You must use band clamps or F-clamps to hold the box together while the glue cures. Check the diagonals with a ruler; if the measurements are identical, the box is perfectly square.
- Even Pressure: Apply force slowly to prevent the joints from sliding out of alignment.
- Scrap Blocks: Use wood scraps between the clamp and the box to prevent indentations.
- Curing Time: Wait at least 24 hours before removing the clamps for maximum strength.
Here is the kicker: Proper clamping pressure is what creates a bond stronger than the wood itself.
Key Takeaway
| Tool | Function | Result | |
|---|---|---|---|
| Wood Glue | Adhesion | Strong Bond | |
| Band Clamp | Pressure | Square Box |
How to part the lid for how to make a simple jewelry box?
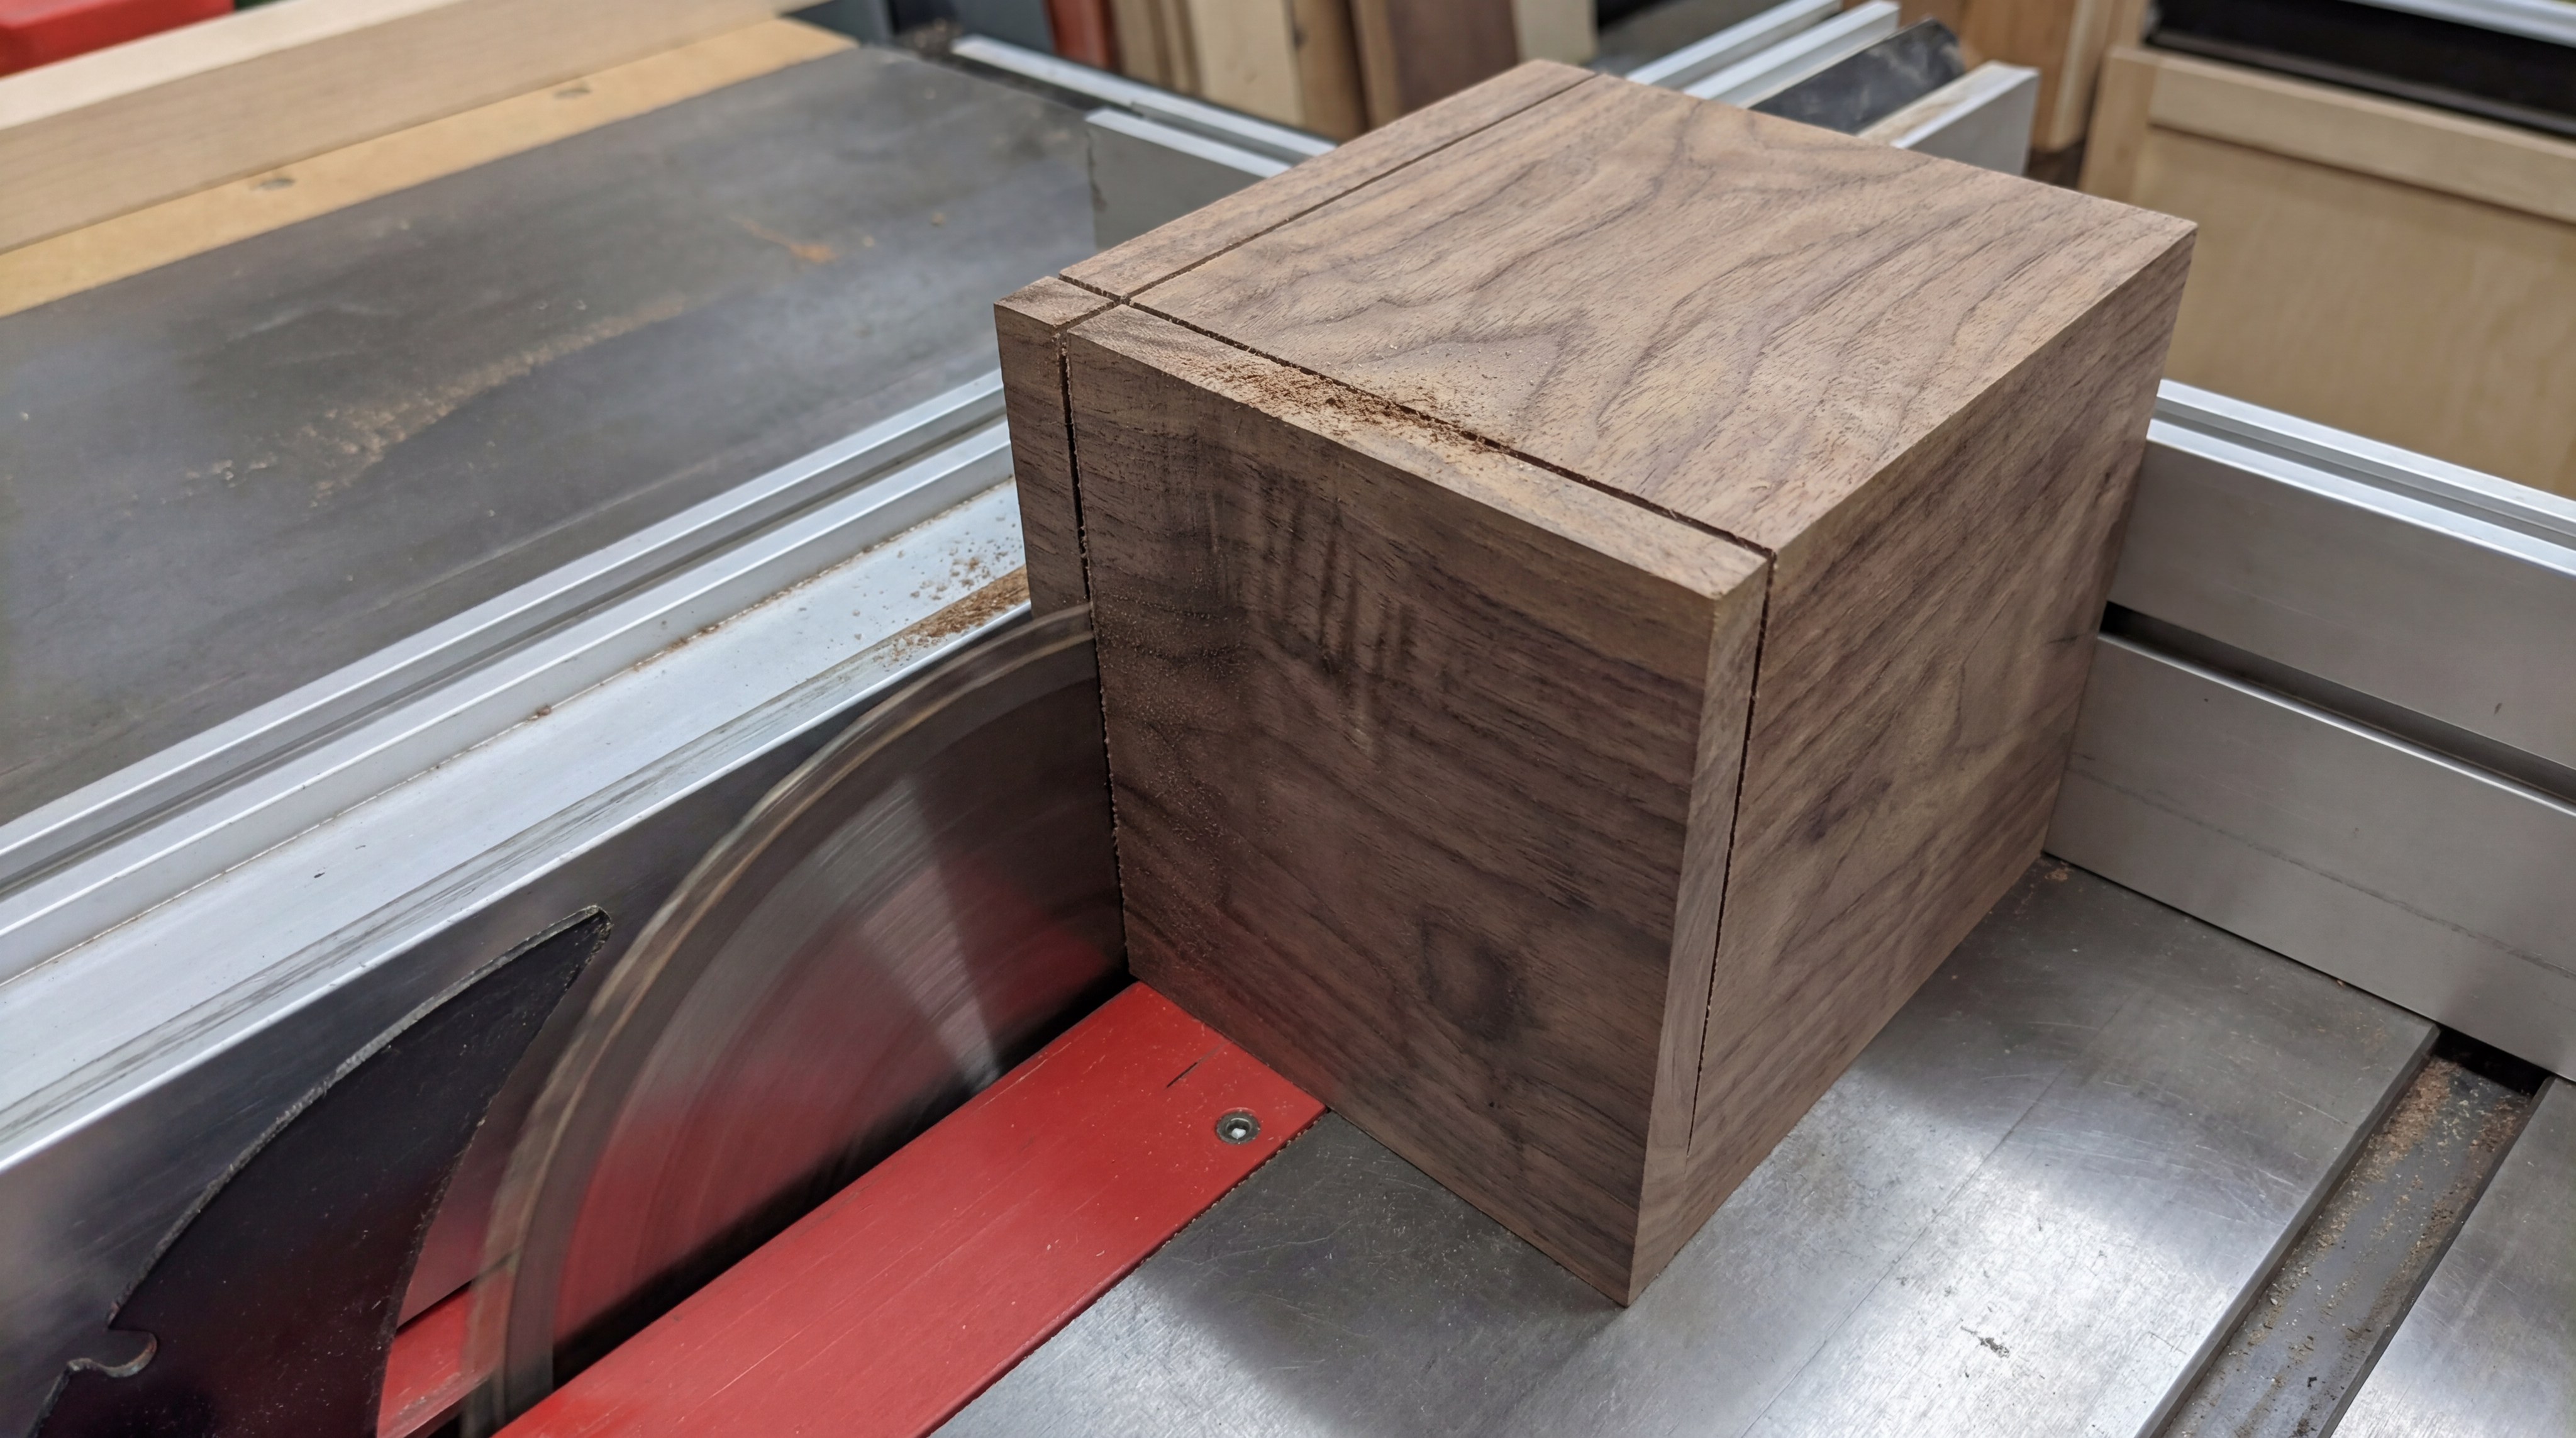
Marking the Separation Line
You should build the box as a solid cube first and then cut the lid off later. This technique ensures the lid and base align perfectly, much like the precision found in a professional necklace box .
- Lid Depth: Determine if you want a shallow or deep lid based on the jewelry type.
- Perimeter Marking: Use a marking gauge for a perfectly level line around the box.
- Level Check: Ensure the line returns to its starting point precisely.
Listen closely: Cutting the lid from a solid box guarantees a perfect grain match across the separation line.
Cutting the Lid on a Table Saw
You will carefully run the glued box through the table saw on all four sides. Leave a tiny sliver of wood on the last cut to prevent the lid from pinching the blade, which can cause dangerous kickback.
- Blade Height: Set the blade just slightly higher than the wall thickness.
- Fine-Tooth Blade: Use a high tooth-count blade to minimize sanding later.
- Fence Alignment: Keep the box tight against the fence to ensure a straight cut.
Believe it or not: This is the scariest but most rewarding cut in the whole project, revealing the box’s final form.
Key Takeaway
| Cut Sequence | Risk Level | Accuracy | |
|---|---|---|---|
| Perimeter | Low | High | |
| Final Release | Medium | Critical |
How to install liners for how to make a simple jewelry box?
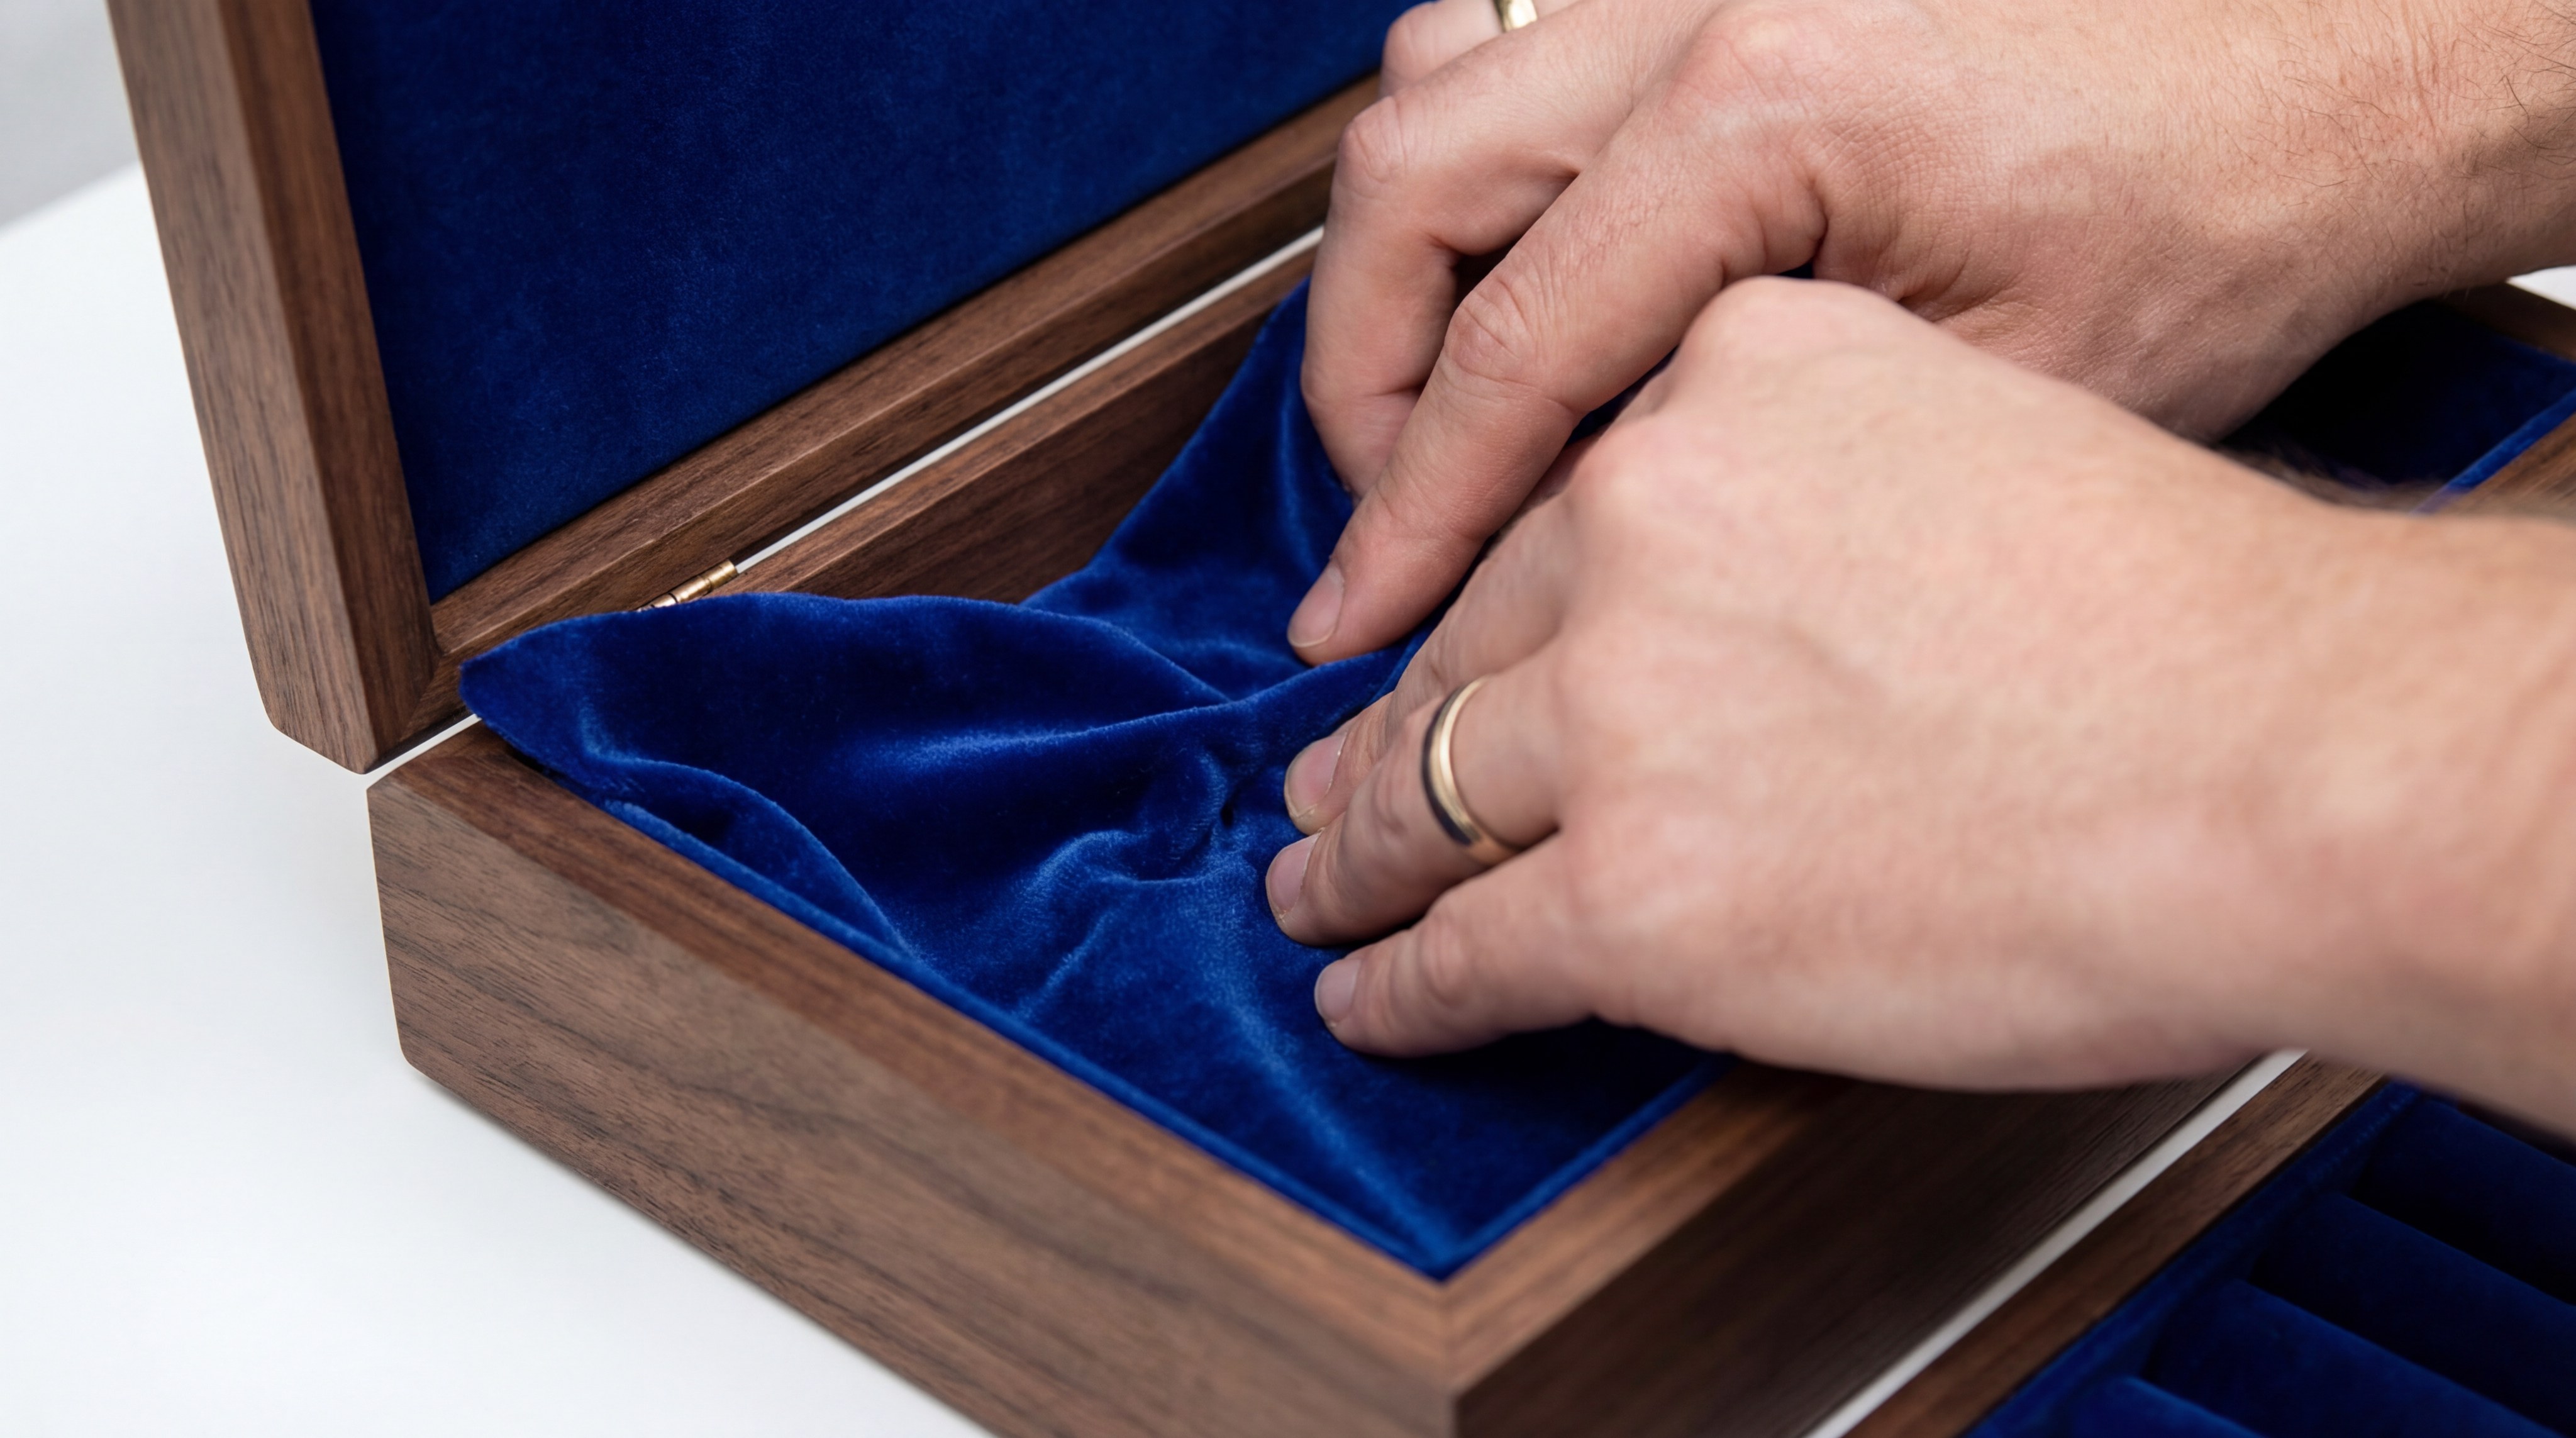
Choosing Soft Lining Fabrics
You should select velvet, felt, or microfiber to protect your jewelry from scratches. These materials provide a soft cushion that keeps metals and gemstones safe from the abrasive nature of raw wood.
- Velvet: The gold standard for a luxury, high-end feel.
- Felt: A durable and cost-effective option for everyday organizers.
- Acid-Free Fabrics: Essential for preventing silver tarnish over time.
Look at this: The right liner transforms a simple wooden box into a professional-grade jewelry sanctuary.
Cutting and Gluing Liners
You can cut thin cardboard inserts to size and wrap them with your chosen fabric. Glue these inserts into the box for a clean, professional look without any visible raw edges or seams.
- Spray Adhesive: Provides a thin, even coating that won’t soak through the fabric.
- Gift Wrapping Technique: Fold corners neatly to ensure a flush fit in the box corners.
- Firm Pressure: Ensure the liner is fully adhered to prevent peeling later.
It’s simpler than you think: Using removable inserts makes it easy to clean or replace the fabric if it becomes worn.
Key Takeaway
| Fabric | Texture | Protection Level | |
|---|---|---|---|
| Velvet | Plush | High | |
| Microfiber | Smooth | Extreme |
What finish works for how to make a simple jewelry box?
Sanding for a Smooth Surface
You must sand the wood through progressive grits, starting at 120 and ending at 320. This removes tool marks and prepares the wood to absorb the finish evenly. For displaying your finished pieces, a bracelet box can provide additional design inspiration.
- Grain Direction: Always sand with the grain to avoid visible cross-grain scratches.
- Dust Removal: Use a tack cloth to ensure the surface is pristine before finishing.
- Bright Light Inspection: Check for missed spots under a raking light source.
Here is the secret: The quality of your final finish is 90% preparation and sanding.
Applying Oil or Varnish
You should apply a natural oil or polyurethane to protect the wood and enhance its natural color. Wipe on thin coats to avoid drips and ensure a fast drying time, which is essential for efficient production.
- Danish Oil: Penetrates the wood for a natural, “close-to-the-wood” look.
- Spray Lacquer: Best for achieving a high-gloss, factory-standard finish.
- Furniture Wax: Provides a soft, satin sheen and a smooth tactile feel.
Simply put: Multiple thin coats always look better than one thick, messy coat that may never fully dry.
Key Takeaway
| Finish Type | Appearance | Protection | |
|---|---|---|---|
| Oil | Natural/Matte | Low-Medium | |
| Polyurethane | Glossy/Durable | High |
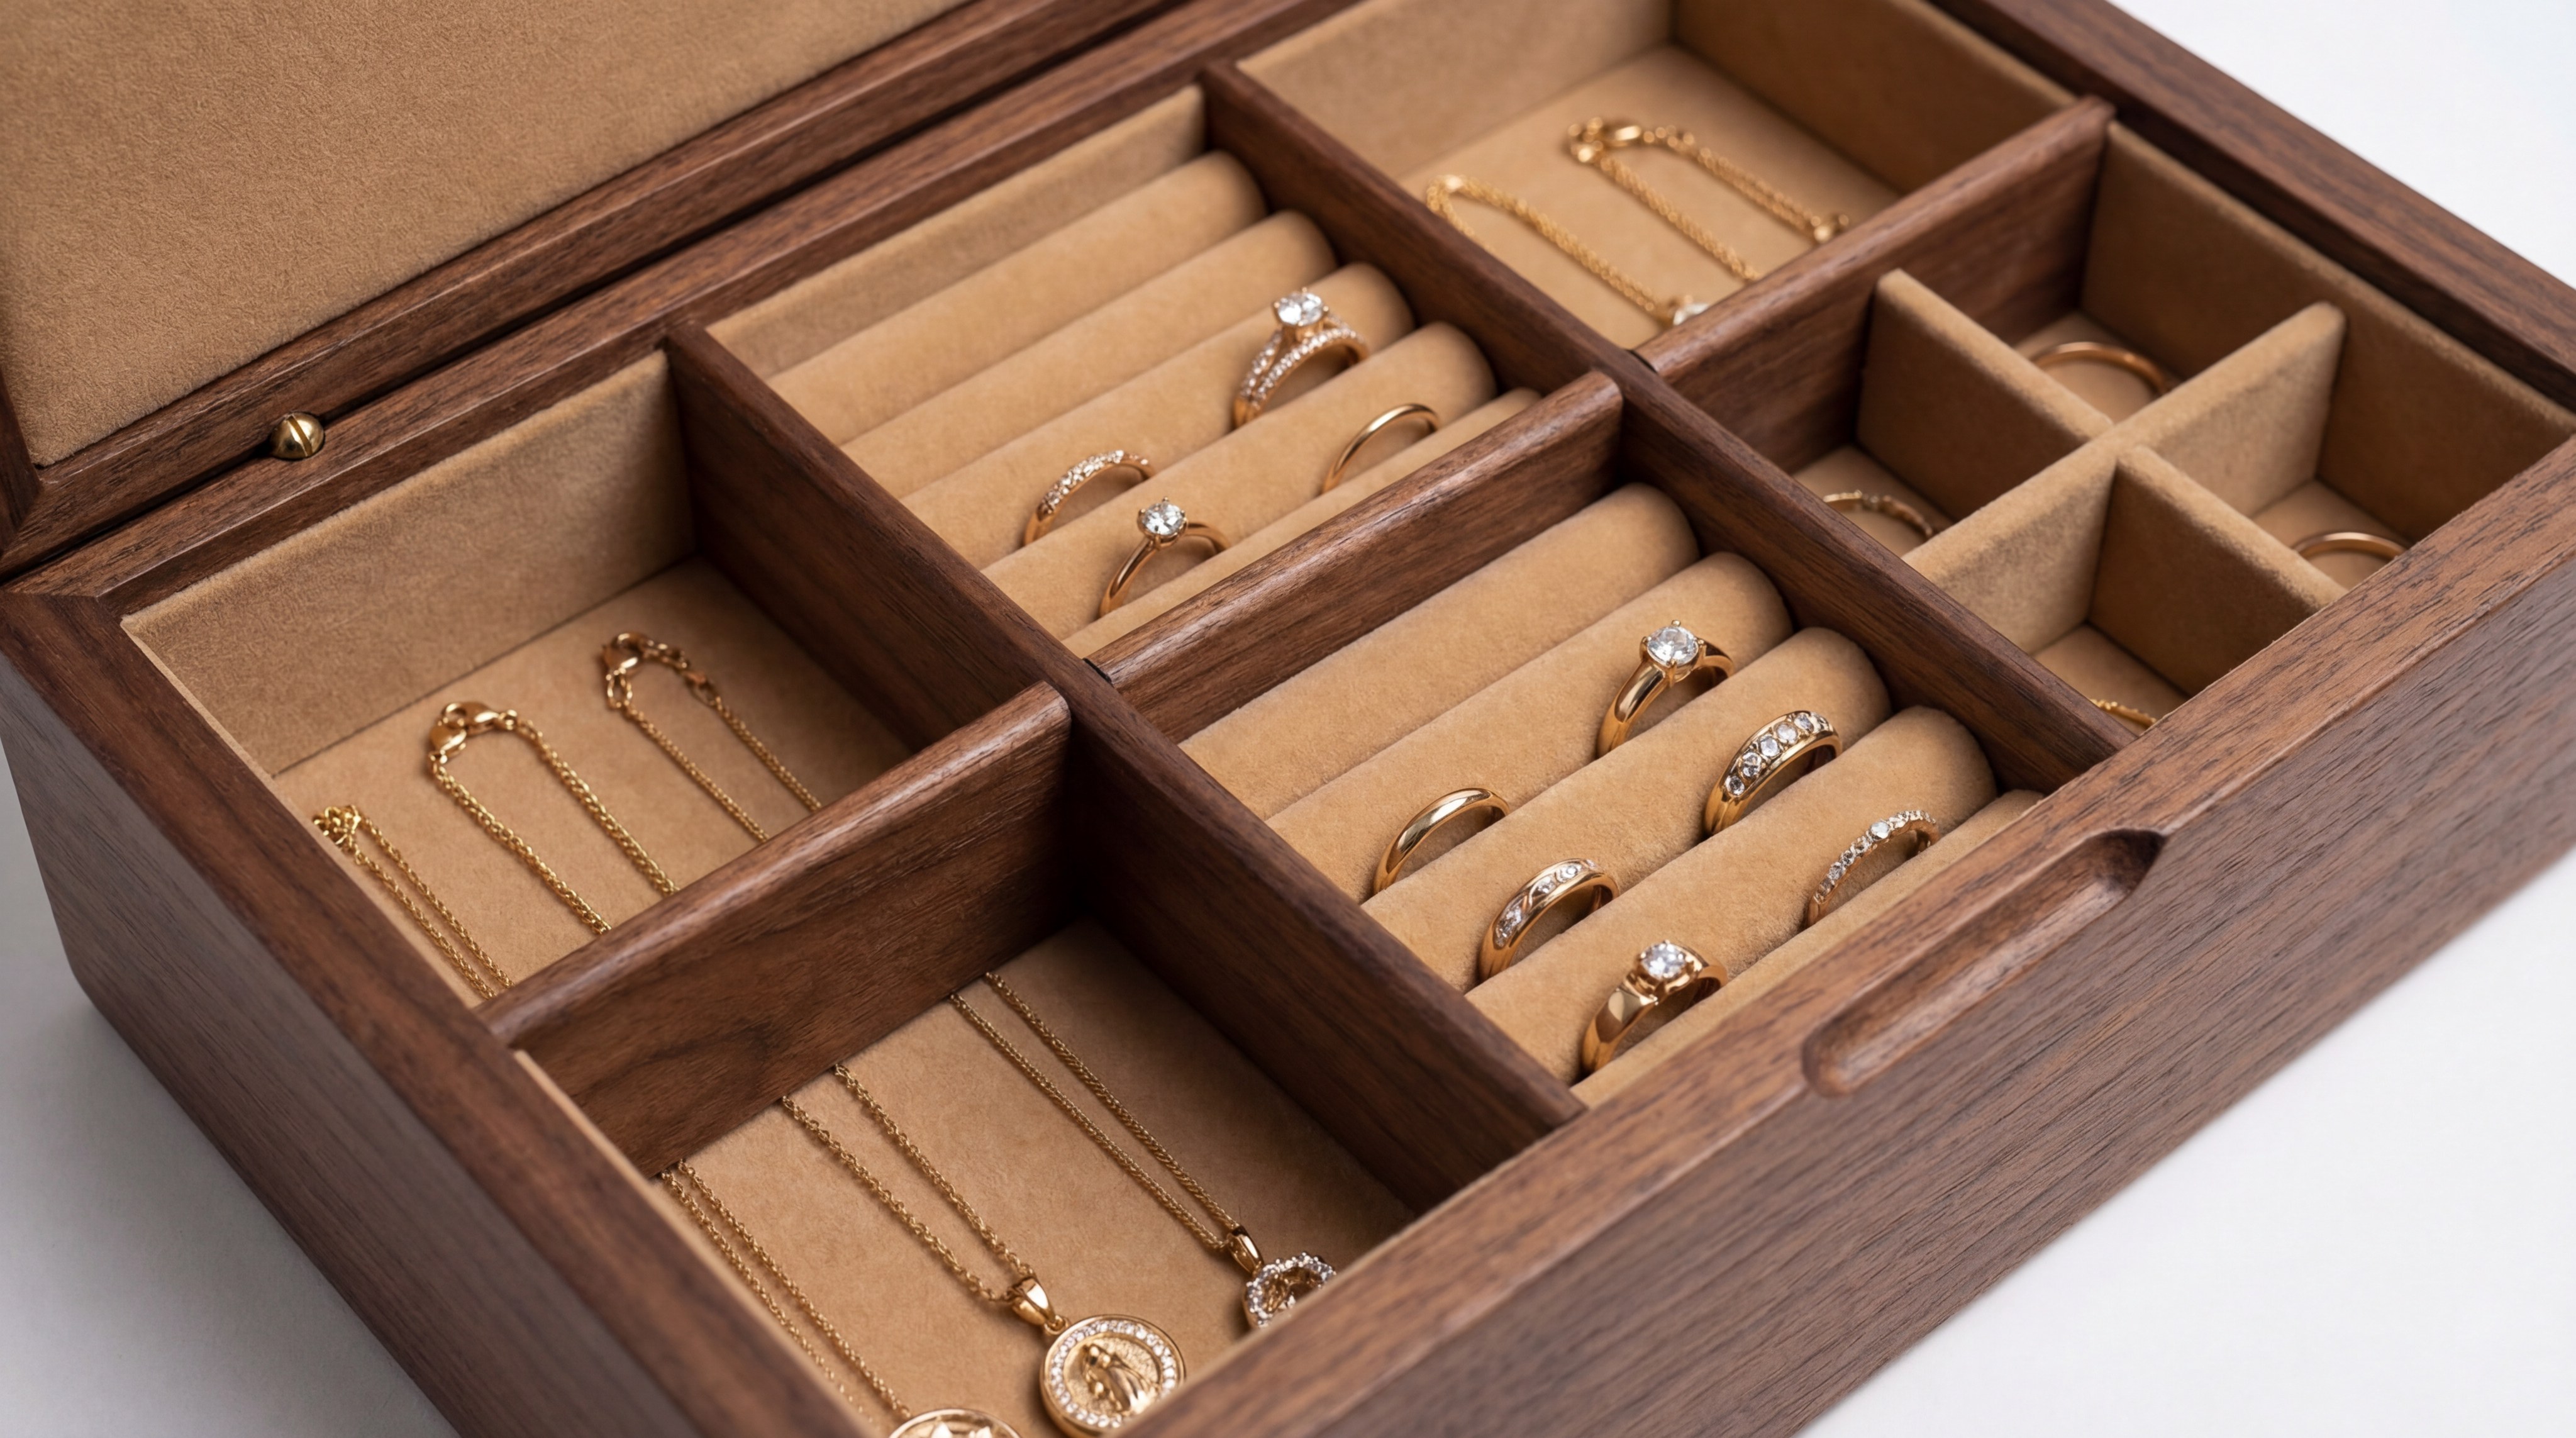
How to organize the inside of how to make a simple jewelry box?
Creating Custom Wood Dividers
You can add thin strips of wood to create separate compartments for rings, earrings, and watches. This keeps your items organized and prevents them from knocking into each other during transport or storage.
- Interlocking Notches: Creates a stable grid that won’t shift.
- Adjustable Slots: Allows for flexibility as your collection grows.
- Material Match: Use the same wood species as the box exterior for a cohesive look.
The truth is: Organization is the primary reason customers invest in a high-quality jewelry box.
Adding Ring Rolls and Trays
You should consider adding foam rolls covered in velvet to hold your rings securely in place. A lift-out tray provides a second layer of storage for items you use less frequently, maximizing the vertical space.
- Foam Ring Inserts: Provide tension to hold various ring sizes.
- Removable Trays: Ideal for separating daily wear from heirloom pieces.
- Watch Cushions: Essential for preventing bracelets and straps from kinking.
Try this out: Layering your storage effectively doubles the capacity of even a small jewelry box.
Key Takeaway
| Component | Function | Space Impact | |
|---|---|---|---|
| Dividers | Separation | Organizes | |
| Trays | Double Layering | Increases |
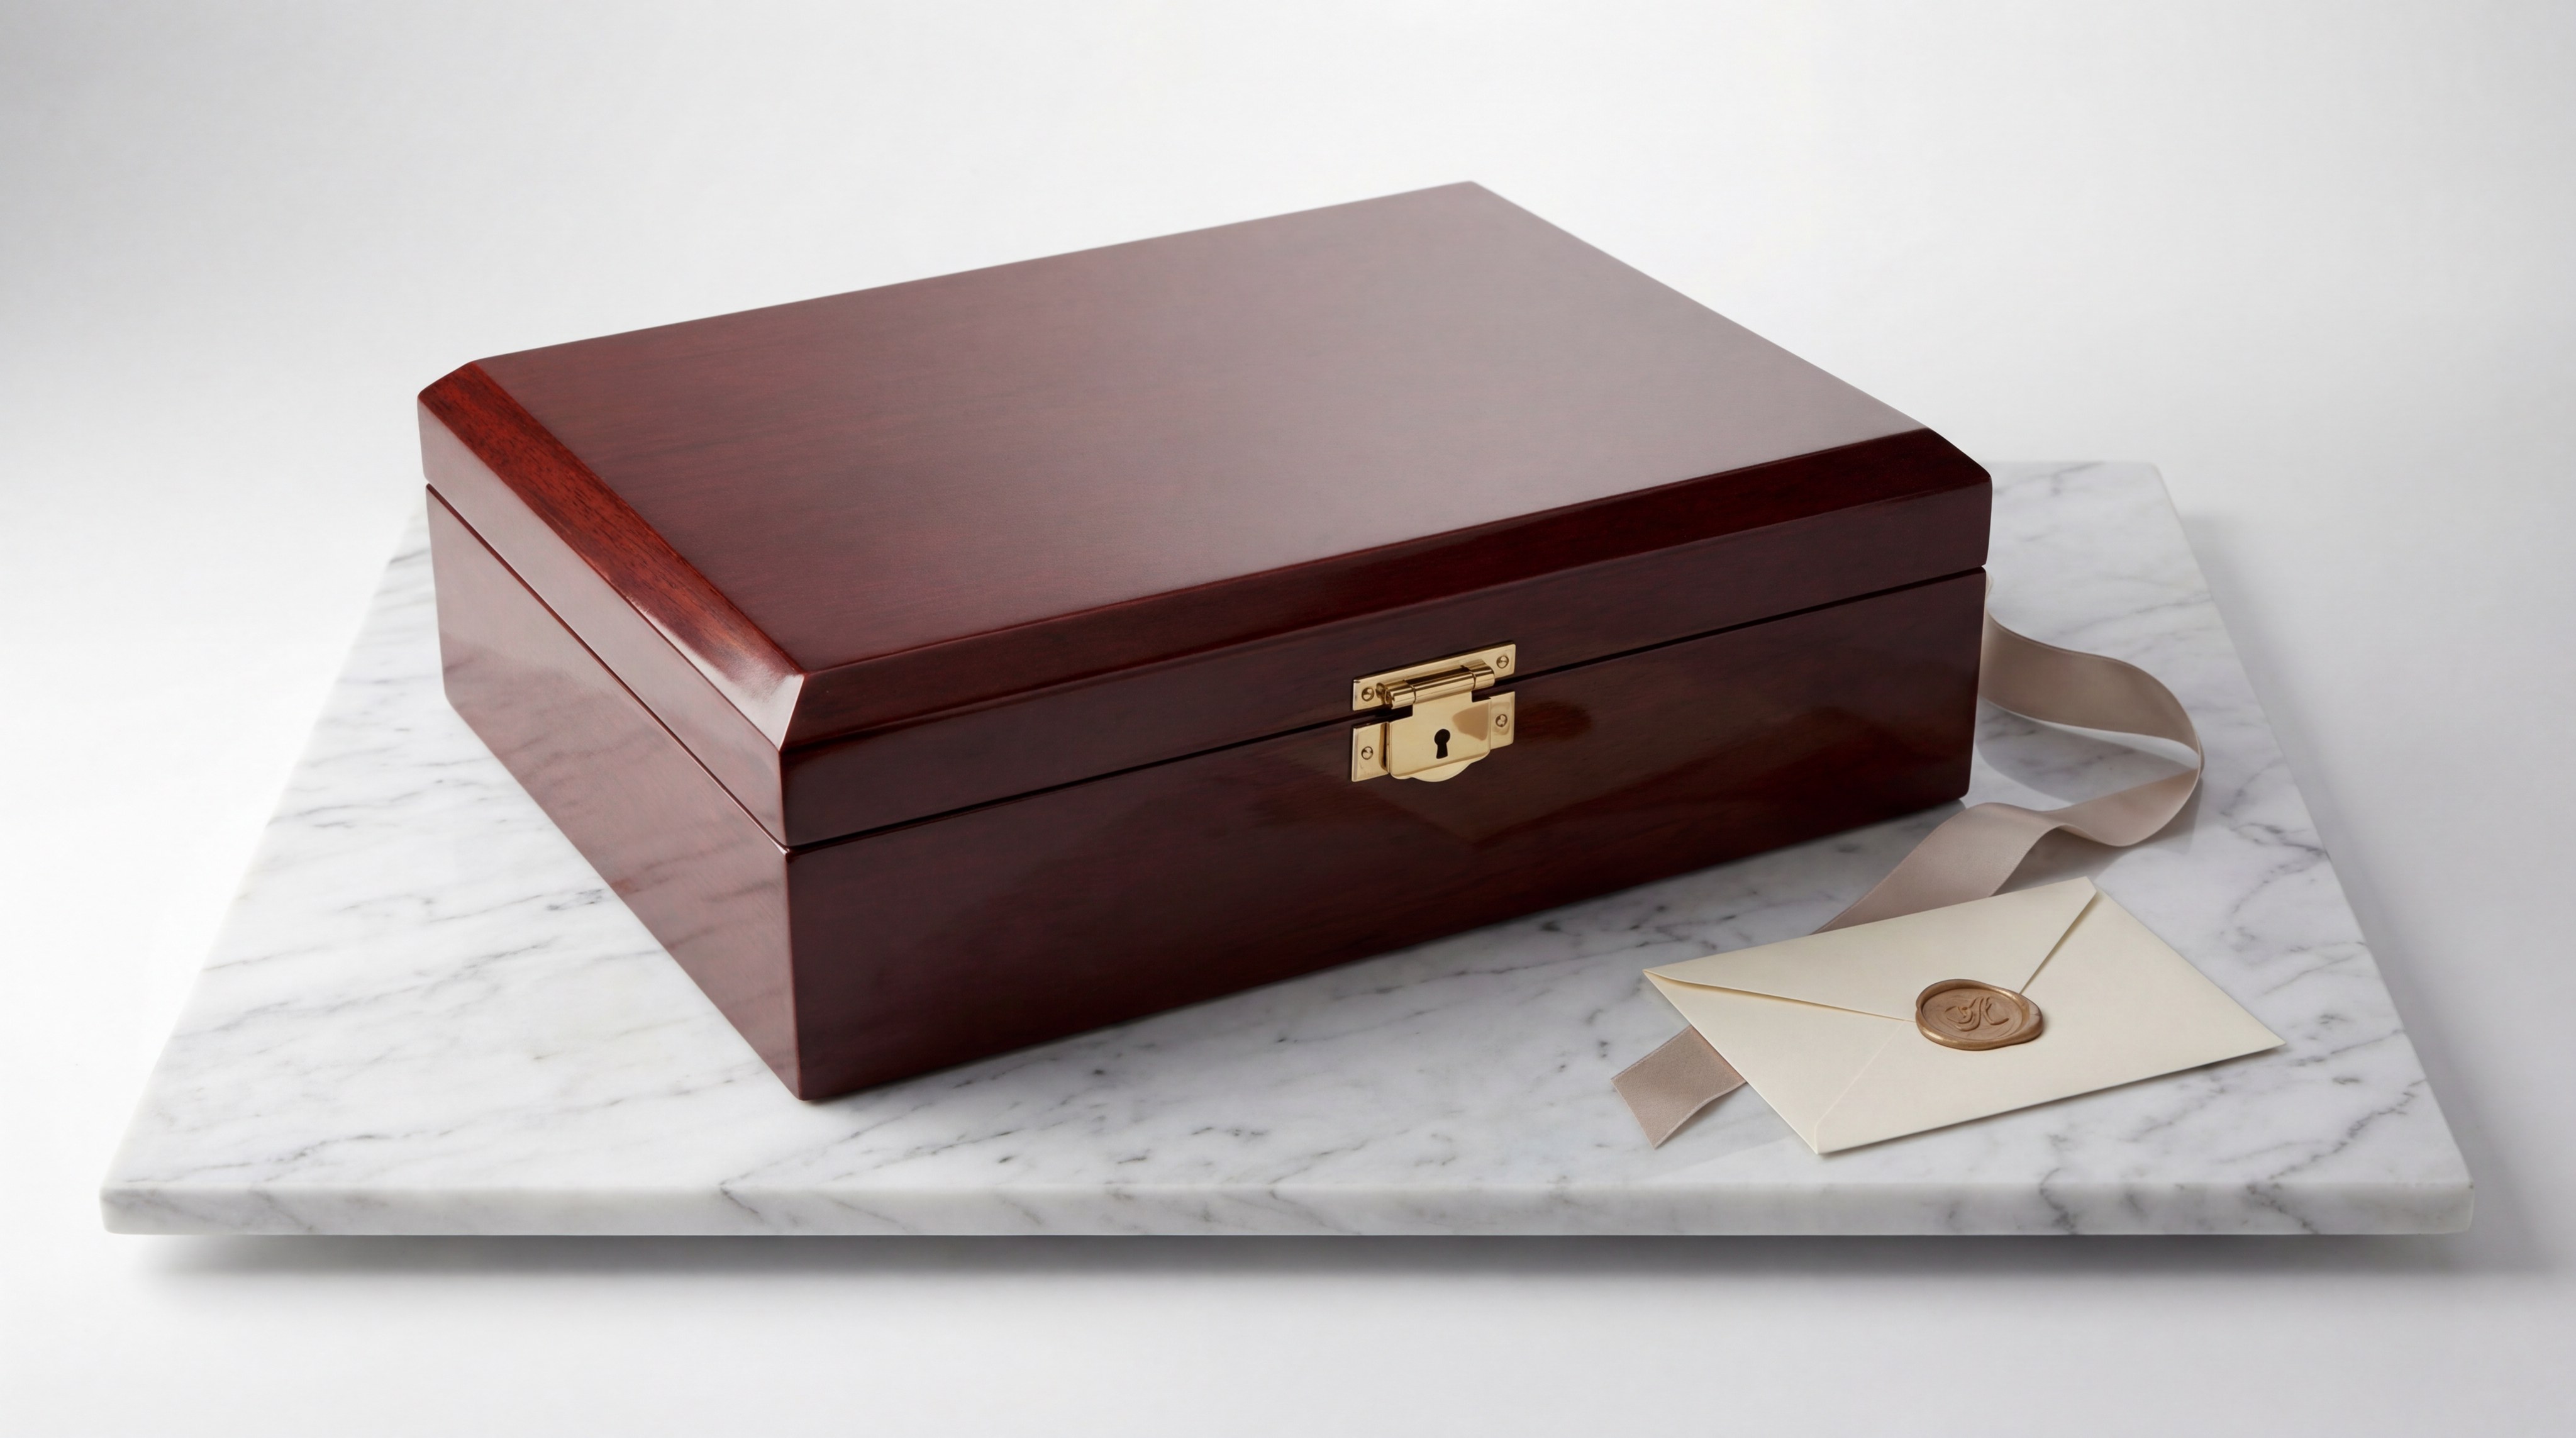
How to gift or protect how to make a simple jewelry box?
Adding Protective Felt Feet
You should glue small felt or rubber pads to the bottom four corners of your box. This prevents the wood from scratching your furniture and provides a non-slip grip on smooth surfaces. If you need help with bulk orders for your brand, feel free to contact us for professional advice.
- Felt Dots: The traditional choice for a soft, scratch-free base.
- Rubber Feet: Best for heavy boxes that need to stay firmly in place.
- Recessed Installation: For a more professional, “hidden” look.
Keep this in mind: A simple set of feet makes the box feel more premium and stable during use.
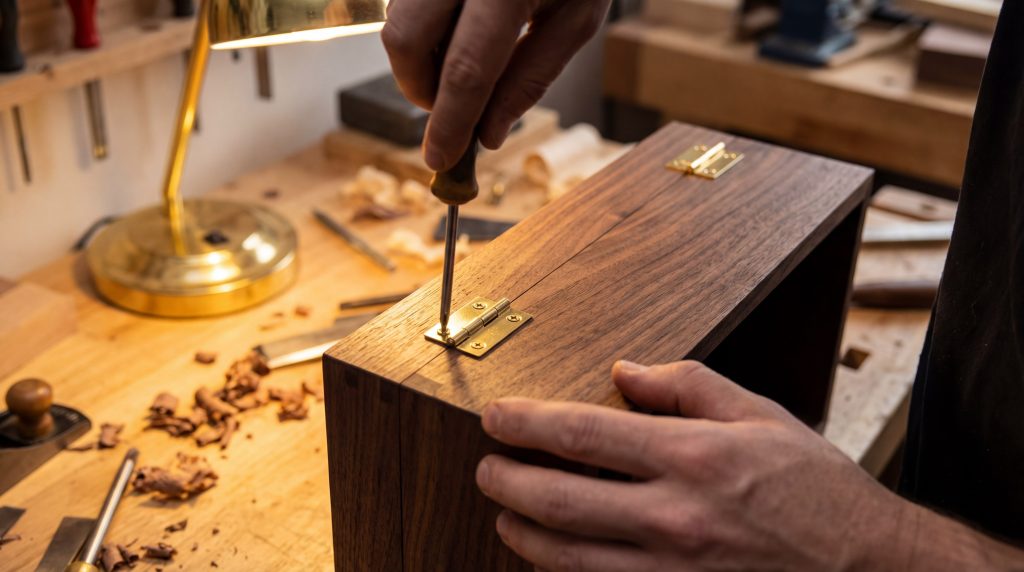
Final Quality Inspection
You must check the hinges and the fit of the lid one last time before declaring the project finished. Ensure the lid opens smoothly and that there are no sharp edges or rough spots that could injure the user or damage jewelry.
- Hinge Movement: Should be silent and smooth without binding.
- Flush Closure: The lid should meet the base perfectly on all sides.
- Final Buff: Use a soft microfiber cloth to remove fingerprints and dust.
You’ve done it: A final inspection ensures your handmade box is perfect for its recipient or the retail shelf.
Key Takeaway
| Feature | Importance | Benefit | |
|---|---|---|---|
| Feet | Functional | Furniture Safety | |
| Inspection | Quality Control | Professionalism |
Summary of the Crafting Journey
Building your own jewelry box is a rewarding blend of precision and creativity. By mastering the cuts, assembly, and finishing, you create something far more meaningful than a mass-produced item. If you find yourself needing professional packaging solutions or bulk quantities for a business, please contact us at YX Jewelry Packaging for expert assistance.
Frequently Asked Questions
- Can I make this without a table saw? Yes, you can use a hand saw and a miter box for the cuts, though it requires significantly more manual effort and precision.
- Can I use reclaimed wood for the box? Absolutely, as long as the wood is dry, flat, and thoroughly inspected for old nails or screws that could damage your tools.
- Can I skip the lining? You can, but a soft lining is highly recommended to protect delicate gemstones and polished metals from the natural abrasiveness of wood grain.
- Can I add a lock to the box? Yes, installing a decorative brass lock during the final assembly phase adds both security and a classic aesthetic.
- Can I paint the jewelry box instead of staining it? You certainly can, though most professionals prefer to showcase the natural beauty and grain of the hardwood.