To learn how to make a small jewelry box out of wood, you need to combine precision woodworking techniques with a thoughtful selection of high-quality timber and protective lining materials. Many jewelry lovers suffer from the frustration of finding their favorite necklaces tangled or their precious rings scratched due to inadequate storage in generic plastic bins. This lack of organization doesn’t just waste your time during the morning rush; it actively degrades the value of your sentimental investments through abrasion and oxidation. By creating a custom jewelry box , you provide a bespoke, rigid environment that ensures your collection remains pristine and accessible for years to come.
Why learn how to make a small jewelry box out of wood?

Learning this skill allows you to move beyond generic, poorly-sized storage solutions and create a home for your valuables that fits your specific needs. You can design compartments for oversized watches or delicate studs that commercial boxes often ignore.
Is your jewelry collection messy?
Standard drawers often lead to a chaotic mess where fine chains knot and silver tarnishes quickly. You will find that a dedicated wooden structure provides the rigid protection needed to keep pieces separated.
Think about it.
- Knotted necklaces are prone to breaking.
- Exposed metals tarnish faster in open air.
- Gemstones can scratch one another if touching.
You will notice an immediate difference in the longevity of your items once they are housed in a stable, wooden environment.
Why is a custom wooden box best?
Hardwood offers natural humidity control and a timeless aesthetic that plastic or cardboard alternatives simply cannot match. You can choose the exact grain and color to complement your bedroom or dressing area decor.
Believe it or not.
- Oak and walnut offer superior durability.
- Custom dimensions maximize your shelf space.
- Personalized dividers stop items from sliding.
You deserve a storage solution that reflects the value of the treasures held inside.
What are the key planning takeaways?
Before you start sawdust production, you must verify the dimensions of your largest pieces to ensure the internal compartments are functional. Measuring twice at this stage prevents wasted materials and ensures a perfect fit for your rings and bracelets.
Look no further.
- Standard outer dimensions often hover around 21x11cm.
- Depth should accommodate your thickest bangles.
- Internal walls should be thin to save space.
Key Takeaway: Success in woodworking starts with a clear plan and precise measurements tailored to your unique jewelry inventory.
| Dimension Type | Recommended Size | Purpose | |
|---|---|---|---|
| External Length | 21 cm | Main frame stability | |
| External Width | 14 cm | Desktop footprint | |
| Internal Depth | 4 cm | Multi-layer storage |
This table illustrates that a compact footprint can still offer significant depth for various jewelry types.
What tools show how to make a small jewelry box out of wood?

Understanding how to make a small jewelry box out of wood begins with mastering the specific power tools and hand instruments required for fine-scale joinery. Using the right gear ensures that your corners are flush and your finish is professional.
Which power saws do you need?
A precision mitre saw is essential for creating the 45-degree angles needed for a seamless box frame. You must ensure the blade is sharp to prevent splintering the edges of your hardwood boards.
Here is the secret.
- Mitre saws provide consistent angle repeats.
- Fine-tooth blades leave smoother edges.
- G-clamps keep the wood steady during cuts.
You will find that taking the time to secure your workpiece leads to much safer and more accurate results.
What measuring tools are required?
Accuracy is the difference between a box that closes perfectly and one that wobbles on the table. You should utilize digital calipers or a laser measure for the most reliable readings.
But that’s not all.
- Triangles help verify square corners.
- Marking gauges prevent pencil width errors.
- Tape adapters assist with internal cavity checks.
You can achieve professional-grade results by trusting your tools more than your eyesight.
What are the essential tool takeaways?
A well-prepared workspace with all your tools within reach will make the assembly process much more enjoyable and efficient. You should always double-check your saw settings before making the final cuts on expensive timber.
It gets better.
- Keep a shop vac nearby for dust.
- Ensure all batteries are fully charged.
- Organize your workspace for better flow.
Key Takeaway: Investing in precision measuring and cutting tools is the most effective way to elevate a DIY project to professional standards.
| Tool Name | Essential Feature | Function | |
|---|---|---|---|
| Mitre Saw | 45-degree capability | Corner joinery | |
| Laser Measure | Digital accuracy | Dimension verification | |
| Multi-sander | G120 grit compatibility | Surface smoothing |
A comprehensive toolset allows you to tackle both the heavy shaping and the delicate finishing stages of construction.
How to make a small jewelry box out of wood with right wood?

Choosing the correct species and thickness of timber is a vital step in ensuring your box is both beautiful and structurally sound. You want a wood that is easy to work with but hard enough to resist dents and scratches.
Should you use hardwood or plywood?
Hardwood is the preferred choice for the exterior frame because of its strength and the beauty of its natural grain patterns. You can use thin plywood for the base and internal dividers to keep the overall weight manageable.
Here is why.
- Oak provides a classic, heavy feel.
- Walnut offers a dark, luxurious look.
- Plywood is cost-effective for hidden parts.
You will appreciate the contrast between a solid exterior and a functional, lightweight interior.
Where can you find custom jewelry box inspiration?
Looking at professional designs can help you decide on the best wood pairings and grain orientations for your project. You can observe how experts use different finishes to highlight the natural beauty of the wood.
Check this out.
- Study grain patterns for visual flow.
- Look for contrast between lid and body.
- Observe how light reflects off different oils.
You can mimic high-end aesthetics by carefully selecting boards with interesting knots or straight grains.
What are the material selection takeaways?
Selecting your wood is about balancing aesthetic appeal with the practicalities of woodworking, such as grain stability and hardness. You should look for boards that are straight and free from large cracks or warping.
Listen closely.
- Check for moisture content in the wood.
- Avoid boards with large sapwood streaks.
- Purchase more wood than you think you need.
Key Takeaway: The quality of your raw materials directly dictates the final elegance and durability of your handmade jewelry box.
| Wood Type | Best Use | Key Benefit | |
|---|---|---|---|
| 18mm Hardwood | Outer Box Frame | Structural Integrity | |
| 4mm Plywood | Base and Lid Panels | Lightweight Support | |
| Cedar Inserts | Internal Lining | Natural Fragrance |
Using specialized wood for different parts of the box optimizes both the weight and the protection of the contents.
How to make a small jewelry box out of wood: cutting boards?

The cutting phase of how to make a small jewelry box out of wood is where your vision begins to take physical shape through precise geometry. Each cut must be exactly the same length as its opposite side to ensure the rectangle is perfectly square.
How do you cut a perfect 45-degree mitre?
Set your saw to exactly 45 degrees and use a scrap piece of wood first to test the accuracy of the angle. You should press the board firmly against the back fence of the saw to prevent any movement during the cut.
It’s easier than you think.
- Test cuts reveal saw calibration errors.
- Sharp blades reduce wood burn marks.
- Slow passes ensure a cleaner finish.
You will see that a slow, steady hand produces a much better joint than rushing through the timber.
How to measure for accurate cuts?
Mark your lengths clearly using a sharp pencil or a marking knife for the highest possible level of precision. You should measure from the long point of the mitre to ensure the exterior dimensions of the box remain consistent.
The results are worth it.
- Marking knives leave a physical groove.
- Measure twice to avoid cutting errors.
- Label your boards as you cut them.
You can avoid confusing your side panels by marking them with light pencil letters on the interior face.
What are the cutting safety takeaways?
Safety should always be your top priority when operating power saws, so you must wear protective gear at all times. You should keep your fingers well away from the blade path and use push sticks for smaller pieces of wood.
Think about this.
- Safety goggles protect against flying chips.
- Ear protection prevents long-term damage.
- Dust masks keep your lungs clear.
Key Takeaway: Precision cutting is a disciplined process that rewards patience and safety with perfectly fitting components.
| Board Part | Dimensions | Cut Angle | |
|---|---|---|---|
| Long Sides (2) | 21 cm | 45 Degrees | |
| Short Sides (2) | 14 cm | 45 Degrees | |
| Lid/Base (2) | 21 x 14 cm | Straight 90 |
Following these specific dimensions ensures that the frame aligns perfectly for the next stage of assembly.
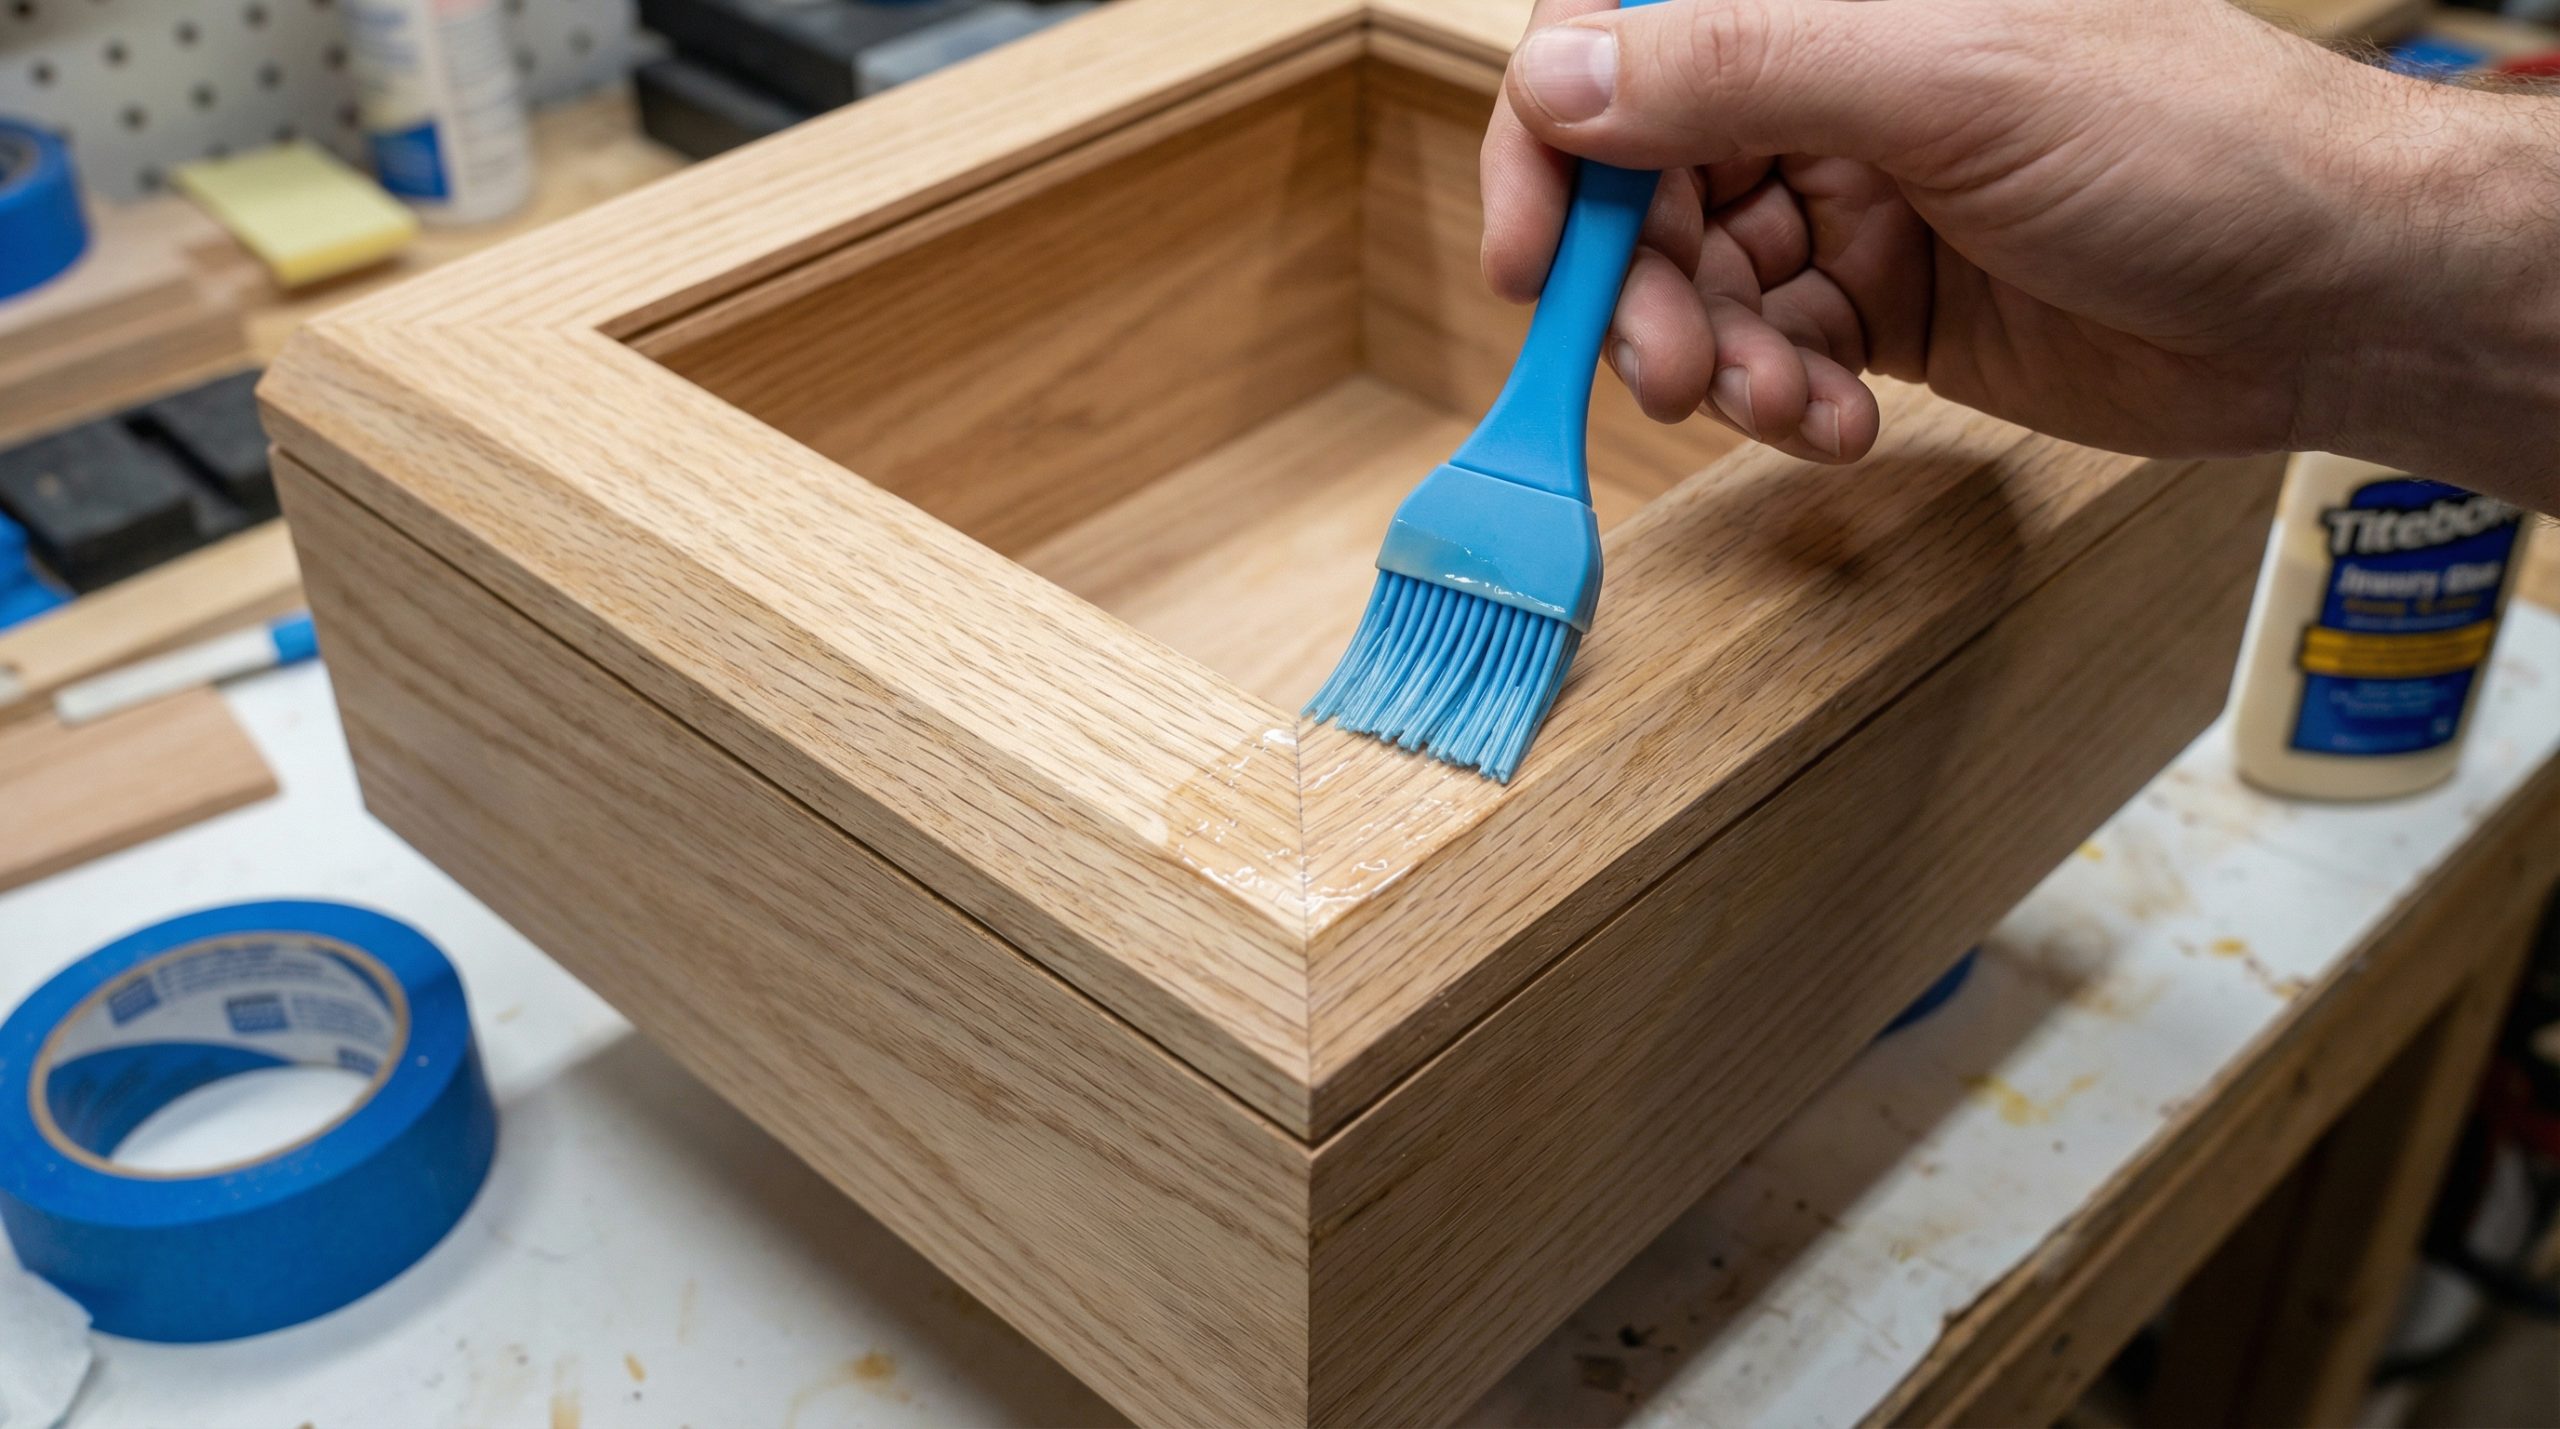
How to make a small jewelry box out of wood: gluing the frame?

Gluing is the stage where your individual boards become a single, solid unit, requiring careful alignment and steady pressure. A good bond is essential for a box that will last for decades without falling apart.
Can adhesive tape help with alignment?
Using the “tape and fold” method allows you to align all four sides of the box perfectly before the glue even touches the wood. You lay the boards flat, tape the exterior joints, flip them over, apply glue, and then fold them into a square.
Believe it or not.
- Tape acts as a flexible hinge.
- It prevents boards from sliding around.
- Alignment becomes much more manageable.
You will find this technique significantly reduces the stress of trying to hold four boards at once.
How long should the wood glue dry?
You should allow the glue to cure for at least 24 hours under clamp pressure to ensure the joints reach their maximum strength. Even if the glue feels dry to the touch, the internal bond needs time to stabilize.
The fact is.
- Curing time varies with humidity levels.
- Clamping pressure must be even.
- Wipe away excess glue immediately.
You can use a damp cloth to remove any squeeze-out before it hardens and ruins your sanding process.
What are the frame assembly takeaways?
Assembly is all about speed and precision, so you should have all your clamps and glue ready before you start applying the adhesive. Checking for squareness during the first few minutes of drying is critical for a level box.
Here is a tip.
- Dry-fit the pieces before gluing.
- Use a corner square for verification.
- Keep your workspace clean and flat.
Key Takeaway: Proper gluing and clamping techniques are what transform four separate boards into a singular, heirloom-quality structure.
| Assembly Step | Tool Needed | Purpose | |
|---|---|---|---|
| Tape Alignment | Masking Tape | External positioning | |
| Glue Application | Wood Glue | Structural bonding | |
| Clamping | G-Clamps | Uniform pressure |
Consistency in glue application ensures that there are no weak spots or gaps in the corner joints.
How to make a small jewelry box out of wood: the lid and base?
Integrating the top and bottom panels is a crucial part of how to make a small jewelry box out of wood because these pieces provide the final enclosure. You must ensure they are cut slightly smaller than the outer frame to allow for a seamless fit.
How to fit the bottom and top boards?
You should measure the inner recess of your assembled frame and cut your plywood or hardwood panels to match those dimensions. A “friction fit” is ideal, where the board stays in place without glue but isn’t so tight that it bows.
But wait, there’s more.
- Check all four corners for fitment.
- Sand the edges for a smoother entry.
- Ensure the grain runs parallel to the sides.
You will achieve a much more professional look if the lid sits perfectly flush with the top of the side walls.
Is this useful for online jewelry sellers?
Crafting your own high-quality wooden boxes can provide inspiration for how you might package items if you decide to sell your jewelry online. Understanding the structural needs of a box helps you appreciate the protection required for shipping delicate items.
It gets better.
- Durability is key for mail transport.
- Luxury packaging increases brand value.
- Custom inserts stop pieces from rattling.
You can use these DIY skills to evaluate which professional packaging solutions best suit your business needs.
What are the lid and base takeaways?
The lid and base are the most visible parts of the box besides the sides, so they require the highest level of finishing. You should choose your best-looking boards for the lid to make the box truly stand out.
Here is why.
- The lid is the first thing people see.
- A solid base prevents the box from tipping.
- Proper fitting avoids unsightly gaps.
Key Takeaway: The top and bottom panels complete the structural box and provide the primary surfaces for decorative finishes.
| Panel Type | Material | Attachment Method | |
|---|---|---|---|
| Lid Panel | Hardwood | Hinged to frame | |
| Base Panel | Plywood | Glued/Nailed to bottom | |
| Internal Divider | 4mm Wood | Slotted friction fit |
Correctly choosing materials for the lid versus the base balances the box’s beauty with its functional weight.
How to make a small jewelry box out of wood: smooth sanding?
Sanding is the process that turns a rough wooden construction into a tactile piece of art that feels soft to the touch. You must be methodical, moving through different grits of sandpaper to remove all scratches.
Which sandpaper grit should you use?
Start with a G80 or G120 grit to level the joints and remove any dried glue or unevenness from the assembly phase. You should then progress to a G180 or G240 grit for a silky-smooth finish that is ready for oiling.
Think about it.
- Coarse grits remove material quickly.
- Fine grits remove the scratches of the previous grit.
- Always sand in the direction of the grain.
You will find that taking your time with the final sanding stages makes the wood grain “pop” once the finish is applied.
How to sand edges for a flush finish?
Use a sanding block or a multi-sander to ensure that the corners where the lid meets the body are perfectly aligned. You want to avoid rounding over the edges too much, as this can create a “pillowed” look that hides the sharp mitre joints.
Look at this.
- Sanding blocks keep surfaces flat.
- Power sanders save time on large areas.
- Hand sanding is best for delicate corners.
You can feel the quality of your work by running your fingers over the joints to check for any ridges or bumps.
What are the sanding process takeaways?
The goal of sanding is to create a surface that looks like it was grown as one piece rather than assembled from many. You should frequently wipe away dust with a tack cloth to see your progress clearly.
Believe it or not.
- Dust hides imperfections from your eyes.
- Changing paper often keeps cuts sharp.
- Sanding is 90% of the final look.
Key Takeaway: Methodical sanding from coarse to fine grits is the secret to achieving a professional, store-bought feel.
| Sanding Stage | Grit Level | Goal | |
|---|---|---|---|
| Initial Levelling | G80 – G120 | Remove glue and uneven joints | |
| Surface Smoothing | G180 | Prepare for wood finish | |
| Final Polishing | G240+ | Achieve a silky hand-feel |
A staged approach to sanding ensures that no deep scratches are left behind to be magnified by the final oil or wax.
How to make a small jewelry box out of wood: adding hinges?
Installing hardware is a delicate part of how to make a small jewelry box out of wood because even a tiny misalignment can cause the lid to sit crookedly. You need a steady hand and a precise screwdriver to finish the job correctly.
How to install a metal piano hinge?
A piano hinge is ideal for small boxes because it provides continuous support along the entire back edge of the lid. You should pre-drill small pilot holes for the screws to prevent the hardwood from splitting as you drive them in.
It’s quite simple.
- Pilot holes should be slightly smaller than the screw.
- Center the hinge carefully on the back wall.
- Use a manual screwdriver for the final tightening.
You will notice that a well-installed hinge allows the lid to open and close with a satisfying, smooth motion.
Why is a box fastener important?
Adding a clasp or a decorative latch ensures that your jewelry doesn’t spill out if the box is accidentally knocked over. You can choose from brass, chrome, or even magnetic fasteners depending on the aesthetic you want to achieve.
Here is the truth.
- Latches provide a secure “click” closure.
- Magnets offer a clean, hidden look.
- Fasteners protect contents during travel.
You can add a touch of personality to your box by selecting hardware that matches your style.
What are the hardware takeaways?
Hardware is both functional and decorative, acting as the “jewelry” for your jewelry box. You should always buy high-quality screws and hinges, as cheap metal can snap or tarnish over time.
Look no further.
- Stainless steel resists corrosion.
- Solid brass offers a classic look.
- Check the hinge “swing” before mounting.
Key Takeaway: High-quality hinges and fasteners provide the mechanical reliability needed for a box that is used every single day.
| Hardware Item | Best Material | Purpose | |
|---|---|---|---|
| Piano Hinge | Brass or Steel | Full-length lid support | |
| Toggle Latch | Decorative Metal | Secure box closure | |
| Mounting Screws | Hardened Steel | Permanent attachment |
Using a full-length hinge distributes the weight of the lid evenly, preventing the wood from warping or the screws from pulling out.
How to make a small jewelry box out of wood: luxury lining?
The interior of your box is just as important as the exterior, as it provides the soft cushioning your jewelry needs to stay safe. You can create a professional look by lining your internal panels with velvet or suede.
How to create a soft velvet interior?
You should cut thin pieces of cardboard or 4mm plywood slightly smaller than your internal dimensions and wrap them in your chosen fabric. Secure the fabric to the back of the panel with a tacker or spray adhesive before sliding it into the box.
The difference is huge.
- Wrapped panels hide rough wood edges.
- Velvet prevents scratches on soft metals.
- Padded bottoms cushion heavy watches.
You will love the way your jewelry sparkles against a dark, plush fabric background.
Do you need specialized necklace box features?
If you have many chains, consider adding small brass hooks to the inside of the lid to keep them from tangling. This feature mimics a professional necklace box and makes it much easier to select your accessories in the morning.
But that’s not all.
- Hooks keep pendants from scratching.
- Elastic pouches catch dangling ends.
- Ring rolls keep bands organized and upright.
You can customize the interior layout as many times as you want until it perfectly matches your collection.
What are the internal lining takeaways?
A luxury lining transforms a simple wooden box into a high-end storage case that protects your most delicate treasures. You should choose a color that provides a nice contrast to the exterior wood grain.
Believe it or not.
- Dark linings highlight gold and silver.
- Light linings make small items easy to find.
- Fabric quality affects the “feel” of the box.
Key Takeaway: The internal lining is the final touch that ensures your jewelry is protected from both impact and abrasion.
| Lining Element | Recommended Material | Function | |
|---|---|---|---|
| Base Cushion | High-density foam + Velvet | Impact protection | |
| Lid Hooks | Small Brass Screws | Tangle prevention | |
| Side Panels | Fabric-wrapped card | Aesthetic finish |
A well-lined interior not only protects your jewelry but also adds a professional, finished look to the entire project.
How to make a small jewelry box out of wood: personal style?
The final step in how to make a small jewelry box out of wood is adding the personal touches that make it uniquely yours. Whether it’s a specific oil finish or a custom engraving, this is your chance to shine.
How to engrave designs on the lid?
You can use a rotary tool or a wood-burning kit to add initials, dates, or intricate patterns to the top of your box. If you prefer a cleaner look, a simple high-gloss lacquer or a natural linseed oil can highlight the wood’s inherent beauty.
Think about this.
- Engraving adds sentimental value.
- Oil finishes are easy to repair.
- Waxes provide a soft, matte sheen.
You will find that the wood grain changes character completely once the first coat of finish is applied.
Where to learn about professional box makers?
If you find yourself enjoying the process of creating boxes, you may want to research how large-scale manufacturers handle mass production. Learning about the industrial standards for durability and quality control can help you improve your own hobbyist techniques.
Look at the facts.
- Professionals use specialized jigs for speed.
- Material sourcing is done in bulk.
- QC standards ensure zero-defect results.
You can take these industrial concepts and apply them to your workshop to make your DIY projects even more robust.
What are the customization takeaways?
Personalization is what makes a DIY project superior to anything you can buy in a store. You should choose a finish that not only looks good but also provides the level of protection you need for your environment.
It gets better.
- Linseed oil is food-safe and natural.
- Polyurethane provides a waterproof shield.
- Beeswax gives a traditional, aromatic feel.
Key Takeaway: Customizing your finish and design is the ultimate expression of your craftsmanship and personal style.
| Finishing Option | Visual Effect | Protection Level | |
|---|---|---|---|
| Wood Oil | Natural and matte | Moderate | |
| Gloss Lacquer | Shiny and reflective | High | |
| Wood Wax | Soft and tactile | Low to Moderate |
Selecting the right finish ensures that your box is not only a beautiful decorative piece but also a durable long-term investment.
Conclusion: Your Path to Professional Organization
Mastering the art of jewelry storage starts with solving the problem of cluttered, damaging environments that ruin your precious items. If you continue to let your necklaces tangle and your rings scratch in low-quality containers, you risk permanent damage to your most sentimental pieces. By following this guide and learning how to build a custom solution, you provide the ultimate protection and organizational system for your collection. We believe that every piece of jewelry deserves a home that is as beautiful and durable as the items it holds. If you’re ready to take your branding or storage to the next level, contact us today to explore premium packaging solutions that complement your craftsmanship.
FAQ: Common Questions on DIY Jewelry Box Construction
- Can I use a hand saw instead of a power saw?Yes, but you will need a mitre box to ensure your 45-degree angles are accurate and consistent.
- What is the best wood for a beginner?Pine is affordable and soft, making it great for practice, though hardwoods like Oak are better for final projects.
- How do I prevent the wood from splitting?Always drill pilot holes before inserting screws, especially when working near the edges of hardwood.
- What fabric is easiest to work with for lining?Cotton velvet is excellent because it has a slight stretch and stays in place well with spray adhesive.
- How do I keep the lid from falling backward?The use of a piano hinge provides stability, but you can also install a small chain or ribbon as a lid stay.