To learn how to make a wooden jewelry box, you need to follow a structured woodworking plan that involves cutting hardwood boards and adding a protective lining. You likely have a tangled mess of necklaces and rings sitting on your dresser right now. This disorder leads to scratches, tarnishing, and lost earrings, which can ruin your most precious investments. Fortunately, how to make a wooden jewelry box is a rewarding DIY project that provides a stylish, custom-made solution for your storage needs.
What materials are needed for a jewelry box?

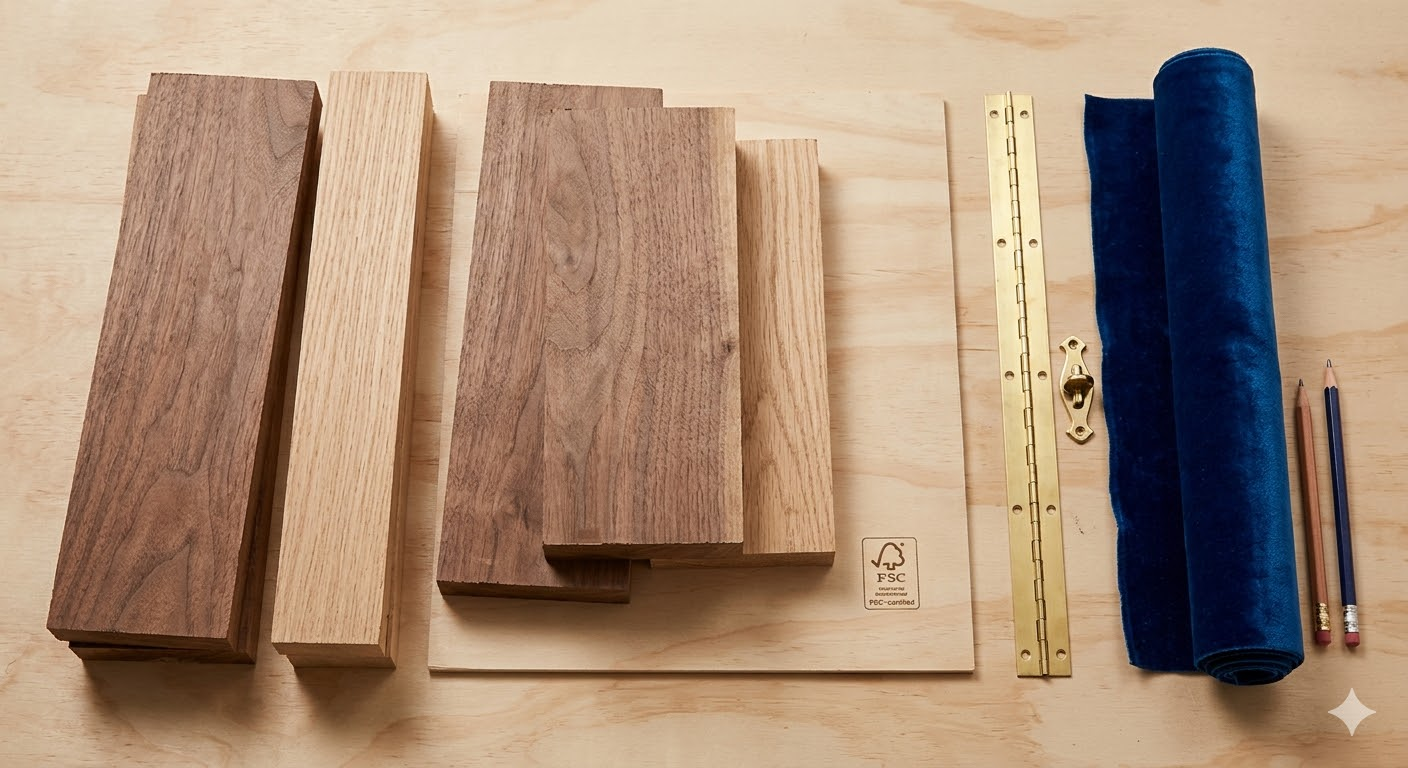
You need six hardwood boards, plywood for the interior, a piano hinge, a box fastener, and velvet fabric. Learning how to make a wooden jewelry box starts with gathering these quality supplies.
Professional results often depend on using the right high-density materials that resist warping. If you prefer a ready-made professional solution, you can also explore a custom jewelry box to see how industry standards compare to your DIY build.
Which wood types are most durable?
Let’s dive right in. Selecting the right species ensures your box lasts for generations rather than just a few years.
- Hardwood: Oak and walnut offer the best density for structural integrity.
- Plywood: 4mm boards are ideal for creating lightweight interior liners.
- Sourcing: Always look for FSC-certified wood to ensure your project is eco-friendly.
What tools are essential for this project?
Here is the deal. You don’t need a full industrial workshop, but precision tools are non-negotiable for clean joints.
- Saws: A NanoBlade saw is perfect for making precise mitre cuts.
- Sanding: A multi-sander helps achieve that professional, touchable finish.
- Fastening: A cordless screwdriver and a tacker for the velvet lining are required.
Key Takeaway: Quality materials like hardwood and velvet are the foundation of a box that protects your jewelry for years.
| Material Category | Examples | Purpose | |
|---|---|---|---|
| Primary Structure | Oak or Walnut boards | Frame and lid strength | |
| Interior Lining | Velvet fabric and plywood | Scuff protection | |
| Hardware | Piano hinge and fastener | Functionality and security |
Proper material selection reduces the risk of wood movement and ensures a snug fit for all internal components.
How do you prepare the wood for cutting?

You prepare the wood by marking precise dimensions with a pencil and securing the boards to a work surface using G-clamps. Meticulous preparation is the first step in how to make a wooden jewelry box .
Before the first cut is made, you must double-check all measurements against your project plan. Even a millimeter of error can cause the mitre joints to show visible gaps during assembly.
How do you measure for precise mitre cuts?
Think about it. A box is only as good as its corners, which require absolute mathematical accuracy.
- Marking: Always use a sharp pencil to define the length and width clearly.
- Squaring: Use a triangle tool to ensure your lines are at a perfect 90-degree angle to the edge.
- Saw Kerf: Remember to account for the width of the saw blade when marking consecutive cuts.
How do you cut a perfect 45-degree angle?
You might be wondering. The secret to a professional corner is the bevel setting on your saw.
- Clamping: Secure the workpiece firmly with G-clamps to prevent any slipping during the cut.
- Bevel Setting: Set your saw to exactly 45 degrees and perform a test cut on scrap wood first.
- Guide Rails: Using a second piece of wood as a guide helps maintain a perfectly straight line.
Key Takeaway: Precise measurement and secure clamping are the only ways to achieve the tight mitre joints seen in luxury boxes.
| Preparation Step | Tool Needed | Critical Success Factor | |
|---|---|---|---|
| Dimension Marking | Tape measure & pencil | Double-checking measurements | |
| Angle Alignment | Triangle or protractor | 45-degree accuracy | |
| Cutting Stability | G-clamps | Zero movement during sawing |
Starting with perfectly squared and measured boards saves hours of corrective sanding later in the process.
What is the best way to assemble the frame?

The best way to assemble the frame is using the “tape method” combined with high-quality wood glue for strong, seamless mitre joints. Following these steps helps you master how to make a wooden jewelry box.
This method allows you to apply even pressure to all four corners simultaneously without expensive specialized clamps. It is particularly effective for a necklace box where a sleek, uninterrupted exterior grain is desired.
Why use adhesive tape during gluing?
It gets better. Adhesive tape acts as a flexible clamp that pulls the mitre joints together from the outside.
- Alignment: Laying the boards flat on tape ensures the corners meet perfectly when folded.
- Cleanliness: The tape catches excess glue squeeze-out, protecting the wood’s exterior surface.
- Simplicity: This method allows a single person to assemble a four-sided frame with ease.
Is wood glue enough for long-term stability?
Best of all. Modern wood glue creates a chemical bond that is actually stronger than the wood fibers themselves.
- Bonding: The glue penetrates the wood grain to create a permanent, rigid structure.
- Drying Time: Most hardwoods require at least 30 minutes of clamping and 24 hours to fully cure.
- Application: Using a paintbrush ensures the glue is spread evenly across the entire mitre surface.
Key Takeaway: The tape-and-glue method provides a professional bond while keeping the corners perfectly square.
| Assembly Element | Method | Advantage | |
|---|---|---|---|
| Joint Style | Mitre joint | Hidden end-grain for a clean look | |
| Clamping | Adhesive tape | Even pressure on all corners | |
| Bonding | Wood glue | Permanent structural integrity |
The combination of chemical bonding and physical alignment creates a frame that won’t rack or wobble over time.
How do you create the bottom and lid?

You create the bottom and lid by measuring the inner edges of your frame and cutting two boards to fit snugly inside. Accuracy at this stage is vital when learning how to make a wooden jewelry box .
These panels provide the structural floor and the initial top of your case. Measuring the internal dimensions after the frame has dried ensures a custom fit that accounts for any minor assembly variations.
How do you fit the inner base panels?
As it turns out. A snug fit is better than a forced fit, which could crack the frame.
- Internal Measuring: Use a laser measure or tape to get the exact distance between inner walls.
- Expansion Gaps: Leave a tiny fraction of a millimeter to allow for natural wood expansion.
- Edge Gluing: Apply glue only to the edges of the panel before sliding it into the frame.
Why is measurement accuracy vital here?
Look. If the panels are too small, they will leave unsightly gaps; if too large, they won’t fit at all.
- Flush Finish: Accurate panels ensure the bottom of the box is level with the frame edges.
- Reinforcement: The bottom panel acts as a gusset, keeping the entire box from twisting.
- Aesthetics: A gap-free interior provides the perfect surface for your later velvet lining.
Key Takeaway: Fitting the bottom and lid panels internally reinforces the frame and creates a clean, professional interior.
| Component | Installation Method | Function | |
|---|---|---|---|
| Bottom Panel | Internal glue-in | Structural floor and support | |
| Initial Lid | Internal glue-in | Top seal before separation | |
| Fitting | Friction and glue | Strength and gap elimination |
Measuring the internal frame after assembly is the only way to guarantee the lid and bottom panels fit perfectly.
What techniques ensure a smooth wooden finish?

Achieving a smooth finish involves progressive sanding from coarse to fine grit to remove imperfections. This refinement is a hallmark of how to make a wooden jewelry box .
Sanding is what transforms a rough construction project into a piece of fine furniture. For items like a bracelet box , a silky smooth surface prevents the wood from snagging on delicate metal links.
Which sandpaper grit should you use?
But wait, there’s more. You must work through specific grits to achieve a professional-grade luster.
- 80-Grit: Use this first to level any uneven joints or remove glue residue.
- 120-Grit: This is the “sweet spot” for removing scratches left by the coarser paper.
- 240-Grit: Finish with this fine grit for a surface that feels like glass.
How do you sand safely and effectively?
In other words. Technique matters just as much as the paper you choose.
- Grain Direction: Always sand in the direction of the wood grain to avoid permanent swirl marks.
- Dust Control: Wear a mask and clear away sawdust frequently so the paper doesn’t clog.
- Surface Check: Run your fingers over the wood; your sense of touch will find bumps your eyes miss.
Key Takeaway: Progressive sanding with the grain is the secret to a professional, high-end furniture finish.
| Sanding Stage | Grit Level | Goal | |
|---|---|---|---|
| Initial | 80 – 100 | Removing imperfections and glue | |
| Smoothing | 120 – 150 | Creating a uniform surface | |
| Finishing | 220+ | Pre-oil or pre-stain perfection |
Taking the time to sand every surface ensures the box is as beautiful to touch as it is to look at.
How do you separate the lid from the box?
You separate the lid by measuring a consistent line around the box and sawing through it with a NanoBlade saw. This specific technique for how to make a wooden jewelry box ensures that both halves align perfectly.
Instead of building a separate lid, you build a solid block and then cut it open. This method guarantees that the wood grain continues seamlessly from the base to the top.
How do you cut the lid from the body?
The best part? This process ensures the lid fits the box exactly because they were once the same piece.
- Marking: Draw a line 3cm down from the top edge around all four sides of the box.
- Rotation: Saw one side at a time, rotating the box as you go for maximum control.
- Consistency: Maintain a steady saw speed to prevent the wood from splintering at the exit points.
Should you sand the new edges immediately?
That’s not all. The freshly cut edges will be rough and need immediate attention to ensure a tight seal.
- Splinter Removal: Lightly sand the inner and outer edges to prevent painful splinters.
- Leveling: Place the box on a flat surface to see if the lid sits perfectly flush against the base.
- Hinge Prep: Smooth the back edge where the piano hinge will soon be attached.
Key Takeaway: Cutting the lid from a solid box ensures the grain matches and the fit is 100% accurate.
| Cutting Step | Tool | Importance | |
|---|---|---|---|
| Layout | Pencil and Ruler | Uniform lid height | |
| Separation | NanoBlade Saw | Clean, straight cut lines | |
| Refining | Sanding Block | Smooth contact surfaces |
Building the box as a single unit before cutting ensures that any minor warping affects the lid and base equally.
Which hardware works best for jewelry cases?
A 17cm piano hinge and a sturdy box fastener are the best hardware choices for durability and security. Proper installation is key when you understand how to make a wooden jewelry box.
High-quality hardware adds a touch of luxury and ensures the box opens smoothly every time. If you are building a ring box , using gold or brass-toned hardware provides a classic, timeless aesthetic.
How do you install a piano hinge?
To put it simply. A piano hinge runs the full length of the box, offering superior strength compared to small butt hinges.
- Centering: Align the hinge exactly in the middle of the back edge for a symmetrical look.
- Pilot Holes: Always pre-drill small holes to prevent the hardwood from splitting when you drive the screws.
- Manual Control: Use a cordless screwdriver on a low torque setting to avoid stripping the small screws.
Where does the box fastener go?
You see. The fastener keeps the lid closed securely and adds a decorative element to the front.
- Alignment: Use a ruler to find the exact center of the front panel for both the latch and the catch.
- Tension: Position the hardware so there is a slight “click” when the lid is closed, ensuring a tight seal.
- Depth: Be careful not to use screws that are longer than the thickness of your wood boards.
Key Takeaway: Piano hinges provide the best structural support for the lid, while centered fasteners ensure security.
| Hardware Type | Primary Benefit | Installation Tip | |
|---|---|---|---|
| Piano Hinge | Full-length support | Pre-drill all pilot holes | |
| Box Fastener | Security and style | Center perfectly on front | |
| Screws | Connection | Match metal finish to hardware |
Using high-quality metal hardware prevents the lid from sagging or becoming misaligned over years of use.
How do you install a luxury velvet lining?
You install the lining by wrapping velvet fabric around plywood inserts and stapling them before sliding them into the box. Soft interiors are essential to how to make a wooden jewelry box that protects gems.
The lining creates a barrier between your jewelry and the hard wood surfaces. This is a critical feature found in every professional how to make a wooden jewelry box to prevent micro-scratches.
How do you wrap plywood in velvet?
Want to know a secret? Wrapping individual panels is much easier than trying to glue fabric directly into the corners.
- Sizing: Cut your plywood pieces roughly 2mm smaller than the internal walls to account for fabric thickness.
- Tacking: Use a heavy-duty stapler or tacker on the back of the plywood to secure the fabric.
- Corners: Fold the velvet neatly at the corners like a gift wrap to avoid bulky lumps.
What is the easiest way to fit inserts?
Here’s the kicker. If you’ve measured correctly, the inserts should stay in place with a simple friction fit.
- Order: Install the bottom panel first, then the long sides, and finally the short side panels.
- Adhesive: If an insert feels loose, a small dab of wood glue on the back will secure it permanently.
- Finishing: Use your fingers to smooth out any wrinkles in the velvet for a plush, high-end appearance.
Key Takeaway: Using fabric-wrapped plywood inserts creates a professional, padded interior that is easy to install.
| Lining Component | Material | Installation Tip | |
|---|---|---|---|
| Interior Walls | Velvet-wrapped plywood | Friction fit for a clean look | |
| Padded Base | High-density foam/fabric | Extra cushion for heavy items | |
| Corners | Folded velvet | Minimize bulk for a tight fit |
A high-quality lining not only protects your valuables but also adds a significant “wow” factor when the box is opened.
Can you personalize the wooden exterior?
You can personalize the box using a rotary tool for engraving or applying wood oil to enhance the natural grain. Customization makes learning how to make a wooden jewelry box a truly creative endeavor.
Personal touches transform a standard storage box into a cherished heirloom or a thoughtful gift. For those with larger collections, creating a matching watch box with the same engraved patterns can build a beautiful set.
How do you engrave custom patterns?
Believe it or not. You don’t need to be an artist to add beautiful designs to the lid of your box.
- Sketching: Always draw your design in pencil first to ensure it is centered and sized correctly.
- Rotary Tools: Use a high-speed tool with a fine engraving bit to trace over your pencil marks.
- Depth: Keep a steady hand and consistent depth to ensure the pattern looks uniform across the surface.
Should you apply wood oil for protection?
Keep this in mind. Raw wood is vulnerable to moisture and stains, so a protective finish is essential.
- Grain Enhancement: Wood oil deeply penetrates the fibers to make the natural colors “pop.”
- Protection: It creates a water-resistant barrier that keeps the wood from drying out or cracking.
- Application: Apply with a lint-free cloth, let it sit for 10 minutes, and then buff away the excess.
Key Takeaway: Engraving and oiling are the final steps that give your handmade box its unique character and durability.
| Personalization Method | Tool Needed | Result | |
|---|---|---|---|
| Engraving | Rotary tool | Unique, permanent designs | |
| Finishing | Wood oil | Enhanced grain and protection | |
| Polishing | Microfiber cloth | Sophisticated, glossy luster |
Adding a protective oil finish ensures that the wood remains vibrant and protected from environmental damage for years.
Why is a handmade box better than retail?
A handmade box offers superior durability, custom dimensions for your specific collection, and significant cost savings. Choosing how to make a wooden jewelry box allows for a level of quality control retail often lacks.
While mass-produced options are available, they often use cheap plastic cores and thin veneers. When you build it yourself, you control the thickness of the hardwood and the quality of the velvet lining.
How do you store jewelry securely?
Bottom line? Handmade boxes allow you to design the exact compartments you need for your specific collection.
- Organization: You can add custom dividers for rings, earrings, or watches to keep everything separate.
- Protection: Solid wood provides a stable environment that regulates moisture better than plastic.
- Safety: A heavy, handmade box is less likely to be knocked over, keeping your gems safe from impact.
Is this project suitable for beginners?
It’s easier than you think. With the right tools and a bit of patience, anyone can achieve professional results.
- Skill Growth: This project teaches fundamental woodworking skills like mitre joints and hardware installation.
- Value: You can create a luxury-grade box for a fraction of the price of high-end retail versions.
- Satisfaction: There is a unique pride in using a beautiful object that you created with your own hands.
Key Takeaway: DIY boxes provide better materials, custom organization, and a sense of accomplishment that retail can’t match.
| Feature | DIY Handmade Box | Standard Retail Box | |
|---|---|---|---|
| Material Quality | Solid hardwood | Plastic or MDF | |
| Customization | Infinite options | Fixed layouts | |
| Longevity | Generations | 1-5 years |
Investing time into a handmade jewelry box results in a superior product that perfectly serves your organizational needs.
Conclusion
Creating your own jewelry storage is a journey that combines technical skill with artistic expression. This guide proves that with the right materials and a step-by-step approach, you can build a professional-grade case that rivals any store-bought alternative. For those looking to elevate their jewelry brand with high-volume, professional-grade packaging solutions, we invite you to contact us today to discuss your vision.
Frequently Asked Questions
Can I use softwood like pine for this project?Short answer: Yes, but hardwood is better. Pine is easier to cut for beginners, but it dents easily and doesn’t hold a fine finish as well as oak or walnut.
What’s the best way to clean the velvet lining?Short answer: Use a lint roller or compressed air. Since velvet attracts dust, these methods remove debris without damaging the delicate fibers of the fabric.
Can I build this without power tools?Short answer: Yes, with a miter box and hand saw. It will take significantly more physical effort and time, but you can achieve the same 45-degree accuracy manually.
What is the best glue for velvet to wood?Short answer: Spray adhesive or white wood glue. Spray adhesive provides the most even coverage without soaking through the fabric, while wood glue is better for small touch-ups.
How do I prevent the wood from splitting?Short answer: Always pre-drill pilot holes. Hardwoods are very dense, and driving a screw directly into them creates internal pressure that can snap the wood along the grain.