You can make jewelry by mastering foundational wire-working techniques, selecting professional-grade components, and focusing on simple, elegant designs that build your confidence. Starting a new creative hobby often feels overwhelming when you see intricate boutique pieces you cannot yet replicate. It is exhausting to spend money on supplies only to have your finished products look amateurish or break after one wear. Our expert guide simplifies how to make jewelry so you can transform raw wire and beads into stunning, wearable art with ease.
How to make jewelry with no experience?
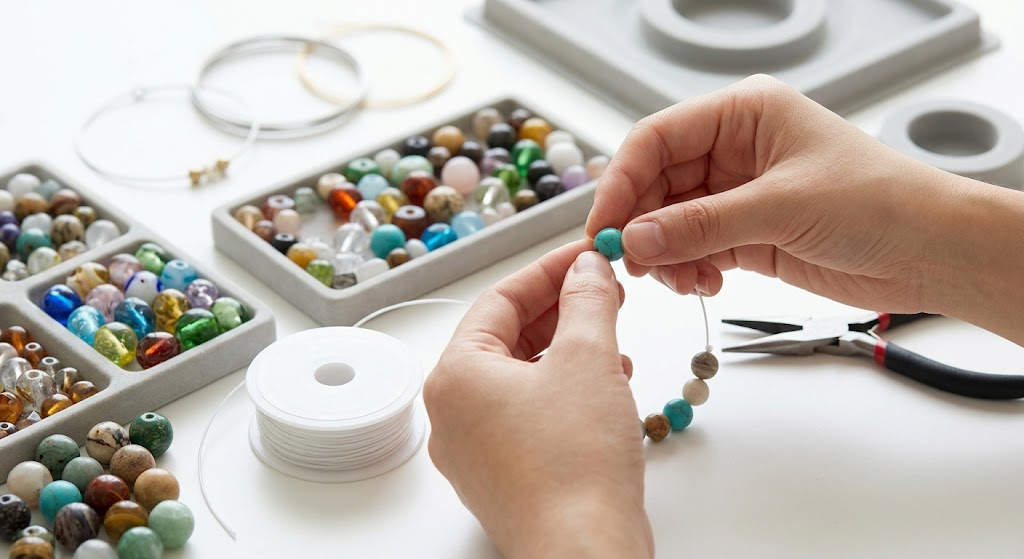
You can start making jewelry with no experience by focusing on basic bead stringing and simple jump ring connections. These foundational skills allow you to understand how to make jewelry without needing a massive upfront investment in complex machinery.
What are the easiest projects for beginners?
Beginner-friendly projects focus on repetition and basic tool handling. Starting with these allows you to develop muscle memory quickly.
- Single pearl necklaces using pre-made chains.
- Beaded bracelets on elastic cord.
- Simple drop earrings using headpins.
Think about it: Starting with a complex necklace usually leads to burnout. Success with a 15-minute earring project keeps your creative momentum high and your workspace organized.
Why should you focus on one technique first?
Mastering one specific method ensures your quality remains high as you scale your hobby. You will find that specializing prevents the “jack of all trades, master of none” syndrome.
- Focus on jump ring weaves (Chainmaille).
- Master the art of the perfect wire loop.
- Learn basic stringing and finishing techniques.
Look: A focused approach saves you hundreds of dollars on tools you might never actually use. You can always expand your repertoire once you have perfected your initial signature style.
Key TakeawayStarting small with a single technique prevents overwhelm and ensures professional results from day one.
| Project Type | Difficulty | Time Required | |
|---|---|---|---|
| Beaded Bracelet | Very Low | 10 Minutes | |
| Drop Earrings | Low | 15 Minutes | |
| Single Pearl Necklace | Low | 20 Minutes |
This table demonstrates that high-impact jewelry can be created in a remarkably short timeframe.
What is the first step in how to make jewelry?

The first step is selecting a specific style or niche to define the exact materials and tools you will need to purchase. Researching how to make jewelry effectively requires narrowing your focus so you do not buy unnecessary inventory.
Should you choose a specific jewelry niche?
Choosing a niche helps you brand your creations and streamlines your learning process significantly. It allows you to become an expert in a specific aesthetic rather than struggling with varied techniques.
- Metal stamping for personalized charms.
- Wire-wrapping for organic, gemstone-focused pieces.
- Minimalism using sterling silver jump rings.
Here is the kicker: A niche makes your work recognizable to others and simplifies your supply chain. You will spend less time searching for parts and more time actually creating.
How to select your initial materials?
Quality materials are the backbone of any piece that people will actually want to wear. You should avoid base metals that tarnish quickly and instead opt for durable, high-value components.
- Sterling silver or gold-filled wire.
- Genuine freshwater pearls or semi-precious stones.
- High-quality clasps and ear wires.
But wait, there’s more: Using premium materials actually makes the crafting process easier because they are often more malleable and consistent. Your hands will thank you for using professional-grade supplies.
Key TakeawayDefining your niche and sourcing quality materials is the essential foundation for any successful jewelry project.
| Niche | Primary Material | Recommended Tool | |
|---|---|---|---|
| Beading | Silk Thread | Beading Needle | |
| Wire-Wrapping | Copper/Silver Wire | Round-Nose Pliers | |
| Chainmaille | Jump Rings | Two Flat-Nose Pliers |
Selecting the right combination of materials and tools determines the overall longevity of your handmade pieces.
Which tools are needed for how to make jewelry?
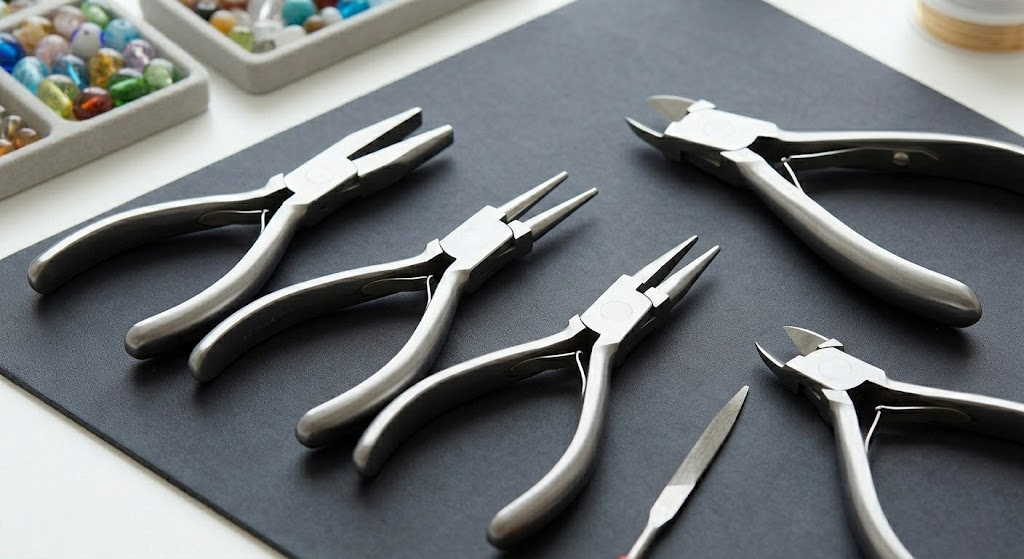
A basic toolkit for beginners must include flat-nose pliers, round-nose pliers, and high-quality wire cutters. Having the correct instruments for how to make jewelry prevents hand fatigue and ensures you do not scratch your delicate metal findings.
Why use professional-grade pliers?
Professional pliers offer smooth jaws that will not leave unsightly serrated marks on your wire or jump rings. Ergonomic grips also allow you to work for longer periods without experiencing cramping or discomfort.
- Flat-nose pliers for gripping and bending.
- Round-nose pliers for creating perfect loops.
- Chain-nose pliers for reaching tight spaces.
It gets better: High-quality pliers are a one-time investment that will last for decades if properly maintained. You will notice an immediate difference in the “feel” of the metal as you manipulate it.
What are essential specialty tools?
Beyond standard pliers, specialty tools like flush cutters and step pliers can elevate your work to a retail-ready level. These tools ensure that your cuts are invisible and your loops are mathematically identical.
- Flush cutters for clean, flat wire ends.
- Step pliers for consistent loop sizes.
- A bead mat to prevent rolling components.
Think about it: The small details, like a clean cut on a wire, are what separate a “craft” from “fine jewelry.” Investing in a dedicated cutter pays for itself in the professional look of your finished pieces.
Key TakeawayQuality tools are the most important investment a beginner can make to ensure precision and comfort.
| Tool | Essential Function | Beginner Priority | |
|---|---|---|---|
| Flat-Nose Pliers | Opening/Closing Rings | High | |
| Wire Cutters | Trimming Excess Wire | High | |
| Bead Mat | Workspace Organization | Medium |
Using the right tool for the job significantly reduces the likelihood of material waste and technical frustration.
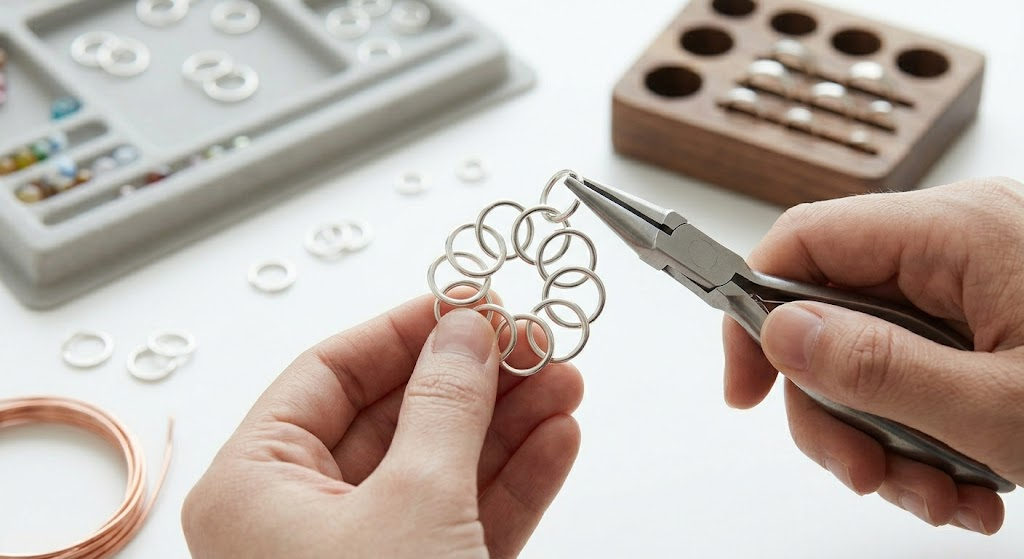
How to make jewelry using the spiral method?

The spiral method involves linking multiple jump rings together to create decorative, woven patterns that look complex but are simple to execute. Mastering how to make jewelry through this technique allows you to create sophisticated earrings and necklaces using only two pairs of pliers.
How to open jump rings correctly?
Opening jump rings requires a lateral twisting motion rather than pulling the ends apart, which preserves the ring’s circular shape. This fundamental skill is vital for anyone learning how to make jewelry with professional durability.
- Grip each side of the ring with pliers.
- Twist one side toward you and the other away.
- Never pull the ends outward.
Look: If you pull a jump ring apart, you will never get it back into a perfect circle. A distorted ring creates a weak point that can lead to your jewelry breaking.
What is the Mobius spiral technique?
The Mobius spiral is a specific weave where multiple rings are linked into a single, rotating cell to create a “flower” or “knot” effect. This is one of the most popular patterns for dangle earrings and pendant centers.
- Link three or four rings into one.
- Ensure all rings are the same size and gauge.
- Use a single larger ring to anchor the cluster.
But wait, there’s more: Once you learn the Mobius cell, you can connect them together to form a rich, heavy chain. This technique is the secret behind many high-end “artisan” necklaces found in luxury galleries.
Key TakeawayThe spiral method is a versatile technique that relies on the proper manipulation of jump rings to create intricate designs.
| Step | Action | Objective | |
|---|---|---|---|
| Preparation | Open all rings laterally | Maintain circular integrity | |
| Linking | Weave rings through center | Create the spiral pattern | |
| Closure | Snap rings back to “click” | Ensure a permanent bond |
This systematic approach guarantees that your woven pieces will be both beautiful and structurally sound.
Where to buy supplies for how to make jewelry?
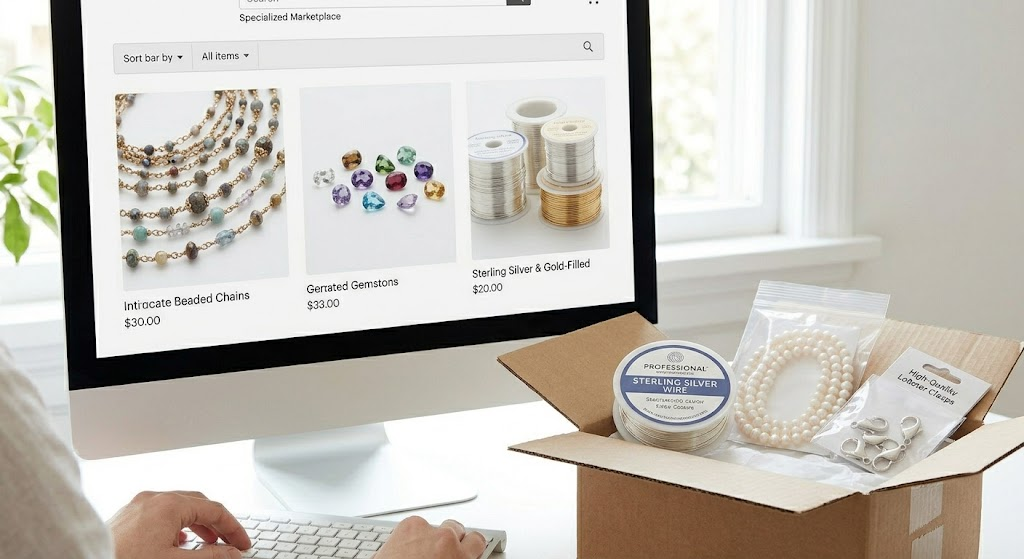
You can find high-quality jewelry supplies at specialized online marketplaces, local craft stores, or directly from metal manufacturers. Identifying reliable vendors is a major step in how to make jewelry that meets industry standards for safety and quality.
Are wholesale suppliers better for beginners?
Wholesale suppliers offer lower price points but often require a minimum order quantity that may be too large for a new hobbyist. However, they are the best source for consistent quality once you move beyond the trial phase.
- Look for bulk jump ring packages.
- Buy wire by the ounce or spool.
- Search for “destash” sales on Etsy.
Here is the kicker: Buying in bulk from the start can save you up to 50% on your material costs. This extra margin allows you to experiment more without worrying about the cost of a mistake.
What should you look for in beads?
When selecting beads, focus on natural materials and high-quality finishes that catch the light and feel substantial in the hand. Avoid plastic-coated beads that may peel or lose their color over time.
- Natural semi-precious gemstones.
- Grade-A freshwater pearls.
- Fire-polished glass for extra sparkle.
Think about it: The weight of a genuine stone bead gives your jewelry a “premium” feel that plastic simply cannot replicate. Your customers or gift recipients will immediately notice the difference in quality.
Key TakeawaySourcing from reputable vendors ensures your jewelry is safe to wear and retains its value over time.
| Supplier Type | Best For | Benefit | |
|---|---|---|---|
| Etsy | Unique findings/Small lots | Accessibility | |
| Rio Grande | Precious metals/Tools | Professional Quality | |
| Local Shop | Immediate needs/Advice | Hands-on Support |
Building a diverse list of suppliers allows you to balance cost-efficiency with the need for specialized components.
How to make jewelry look professional?
A professional look is achieved through meticulous finishing, such as tumbling your metal for shine and ensuring all wire ends are filed smooth. Learning how to make jewelry involves mastering these final touches that distinguish a luxury item from a basic craft.
Should you use a jewelry tumbler?
Using a rotary tumbler with stainless steel shot is the most efficient way to work-harden your metal and give it a mirror-like finish. It also removes tiny burrs and sharp edges that could snag on clothing or irritate the skin.
- Add water and a drop of dish soap.
- Run the tumbler for 30 to 60 minutes.
- Dry pieces immediately to prevent spots.
Look: Tumbling makes your jump rings much harder and more resistant to opening under tension. It is the single best investment for anyone serious about the longevity of their designs.
Why is loop consistency important?
Consistent loops ensure that your earrings hang symmetrically and your necklace drapes properly across the collarbone. If your loops are varied in size, the entire piece will look unbalanced and poorly constructed.
- Use step pliers for identical diameters.
- Always cut your wire to the same length.
- Practice one hundred loops before your first project.
It gets better: Perfect loops are the hallmark of a master jeweler. Once you can execute them instinctively, you can tackle any advanced design with total confidence.
Key TakeawayProfessionalism in jewelry making is the result of proper metal hardening and obsessive attention to symmetry.
| Finishing Step | Tool Used | Result | |
|---|---|---|---|
| Hardening | Rotary Tumbler | Durable, stiff metal | |
| Polishing | Steel Shot/Soap | High-gloss shine | |
| Filing | Needle File | Smooth, safe wire ends |
These finishing techniques are what transform a collection of parts into a cohesive, high-value piece of art.
How to make jewelry for a startup business?
Starting a business requires you to move from making “one-off” pieces to creating a cohesive collection with a clear brand identity. When you transition your knowledge of how to make jewelry into a commercial venture, efficiency and presentation become your top priorities.
How to price your handmade jewelry?
You must account for the cost of materials, your hourly labor rate, and overhead expenses like shipping and marketing. Many beginners fail because they undercharge for their time, essentially working for free.
- Materials cost x 3 (for wholesale/retail).
- Set a fixed hourly rate for your labor.
- Include a small percentage for tools.
But wait, there’s more: Proper pricing allows you to reinvest in better equipment and higher-quality materials. If you price too low, you will struggle to grow your business beyond a basic hobby.
Where is the best place to sell?
Etsy is the most common platform for handmade jewelry, but local craft fairs and trunk shows allow for valuable face-to-face interaction. Building a direct-to-consumer website is the ultimate goal for long-term brand control.
- Etsy for global reach and SEO.
- Instagram for visual brand building.
- Local boutiques for wholesale accounts.
Think about it: Selling in person gives you immediate feedback on which designs people are drawn to. Use this data to refine your collection and focus on your most profitable pieces.
Key TakeawayA successful jewelry business relies on accurate pricing and a multi-channel sales strategy to reach customers.
| Business Goal | Action Item | Success Metric | |
|---|---|---|---|
| Brand Awareness | Social Media Posts | Engagement Rate | |
| Sales Growth | Open Online Shop | Monthly Revenue | |
| Customer Loyalty | Email Newsletter | Repeat Purchase Rate |
Integrating business logic with your creative process is the key to achieving long-term sustainability as a jeweler.
What is the best way to learn how to make jewelry?
The most effective way to learn is through a combination of structured video courses and hands-on practice with inexpensive materials. Following experts who teach how to make jewelry prevents you from developing bad habits that could damage your tools or waste metal.
Are video tutorials better than books?
Video tutorials allow you to see the exact hand movements and tool angles required for complex maneuvers. However, technical books are invaluable for looking up wire gauges and metal properties while you are working.
- YouTube for free, quick project ideas.
- Paid courses for comprehensive techniques.
- Reference books for metal charts.
Look: Watching a pro open a jump ring ten times is better than reading a description of it once. Visual learning bridges the gap between theory and practical application.
Why use “practice” wire?
Using copper or aluminum wire allows you to master techniques without the stress of wasting expensive sterling silver or gold. You should treat your practice sessions as a laboratory where you are free to make mistakes.
- Copper wire is soft and easy to manipulate.
- Aluminum is lightweight and very affordable.
- Move to silver only when your loops are perfect.
It gets better: Practice wire allows you to experiment with wild new designs without financial risk. Some of your best work may come from “mistakes” made with inexpensive copper.
Key TakeawayA structured learning path combining visual guidance and low-risk practice is the fastest way to mastery.
| Learning Source | Best Feature | Cost | |
|---|---|---|---|
| YouTube | Unlimited Variety | Free | |
| Online Course | Structured Path | Moderate | |
| Technical Book | Bench Reference | Low |
Diversifying your learning resources ensures that you have both the inspiration and the technical data needed to succeed.
How to make jewelry gifts for clients?
Corporate or client gifts should focus on minimalist, timeless designs that utilize high-quality materials to convey a sense of prestige. When learning how to make jewelry for a professional audience, simplicity is often more effective than bold, avant-garde styles.
What are the best universal designs?
Stick to designs that do not require specific sizing, such as adjustable necklaces or classic drop earrings. This ensures that your gift will be functional for the recipient regardless of their personal measurements.
- Single-stone pendant necklaces.
- Minimalist bar earrings.
- Simple chain bracelets with extenders.
Think about it: A gift that doesn’t fit is a wasted opportunity. By choosing adjustable or universal designs, you guarantee that your client will actually wear and enjoy your work.
How to add a personal touch?
Personalization can be achieved through birthstones, initial charms, or custom metal stamping. These small additions show the client that you have put genuine thought into their specific gift.
- Use a birthstone bead as an accent.
- Stamp a single initial on a small disc.
- Choose a metal color they frequently wear.
Here is the kicker: A personalized gift creates a much stronger emotional connection than a generic store-bought item. Your client will remember your brand every time they put on their custom piece.
Key TakeawayClient jewelry gifts should prioritize high-quality materials, universal fit, and subtle personalization.
| Gift Item | Customization Idea | Client Impact | |
|---|---|---|---|
| Necklace | Initial Charm | High | |
| Earrings | Favorite Color Gem | Medium | |
| Bracelet | Birthstone Accent | High |
Focusing on these three elements ensures your handmade gifts are received with professional appreciation and personal delight.
How to make jewelry packaging that sells?
The unboxing experience is just as important as the jewelry itself, requiring high-quality boxes that protect and showcase your work. The final phase of learning how to make jewelry is understanding how to present it in a way that justifies a premium price point.
Why use custom jewelry boxes?
Custom boxes with your logo create an immediate sense of brand authority and professionalism that generic packaging lacks. They transform a simple purchase into a memorable event for your customer.
- Reinforces brand identity.
- Increases the perceived value.
- Provides a secure storage solution.
But wait, there’s more: Professional packaging also protects your jewelry from being crushed or tangled during shipping. A broken piece of jewelry upon arrival is the fastest way to lose a customer’s trust.
How to choose the right box inserts?
Inserts should be selected based on the specific type of jewelry you are selling to ensure the piece stays centered and beautiful during transit. Velvet, foam, and specialized “C-rings” are the industry standards for high-end presentation.
- Foam with slits for earrings.
- Velvet pillows for bracelets and watches.
- Hook-and-pocket inserts for necklaces.
Think about it: When a customer opens a box and sees a necklace neatly displayed rather than tangled in a corner, they feel they have received a luxury product. The insert is the “frame” for your wearable masterpiece.
Key TakeawayPremium, branded packaging is essential for protecting your work and elevating your brand in the eyes of the consumer.
| Packaging Element | Purpose | Brand Effect | |
|---|---|---|---|
| Custom Box | Branding/Protection | Professional | |
| Soft Insert | Display/Security | Luxury | |
| Logo Stamping | Identity/Recognition | Exclusive |
Investing in high-quality packaging is the final touch that ensures your handmade jewelry is treated with the respect it deserves.
Conclusion: Your Journey to Crafting Excellence
Learning how to make jewelry for beginners is a transformative process that turns raw wire and stones into meaningful, wearable art. We have explored the essential tools like wide-nose pliers, the foundational spiral method for jump ring weaves, and the critical importance of professional finishing and packaging. While starting a creative venture can feel daunting, focusing on one technique at a time—like the Mobius spiral or the perfect wire loop—builds a foundation that will serve you for years to come.
At YiXin Packaging, we understand that your creations deserve to be showcased in the finest light. We can help you elevate your new brand with custom-designed jewelry boxes that delight your customers and protect your masterpieces. From emerging hobbyists to established luxury retailers, our team is dedicated to providing the high-quality packaging solutions you need to succeed.
The path from beginner to master is paved with practice, patience, and the right presentation. Contact us today to see how we can help you build your jewelry brand’s vision from the box up.
Frequently Asked Questions (FAQ)
1. Can I start making jewelry with just one pair of pliers?No, you almost always need at least two pairs of pliers to effectively open and close jump rings or manipulate wire without distorting it. Having two flat-nose pliers is the bare minimum for most techniques.
2. What’s the best metal for a beginner to practice with?Copper is the best choice because it is very affordable, soft, and behaves similarly to sterling silver. It allows you to make mistakes and learn hand-eye coordination without the high cost of precious metals.
3. Can I sell my jewelry if I’m still a beginner?Yes, as long as your pieces are structurally sound and use quality materials that won’t tarnish or cause irritation. Many successful jewelers started selling simple, well-made designs like pearl drops or basic beaded bracelets.
4. What’s the best way to keep my jewelry from tarnishing?The most effective method is storing finished pieces in small, airtight plastic bags. For extra protection, you can add anti-tarnish strips or use high-quality packaging that keeps the metal away from excessive humidity.
5. Can I learn everything I need from the internet?Yes, platforms like YouTube and specialized online courses provide excellent visual training for almost every technique. However, supplementing videos with a good technical reference book is helpful for looking up precise measurements and material properties.