
To place a necklace in a box properly, you must secure the chain through designated slits or over a padded insert to ensure the pendant remains centered and the metal stays untangled. Nothing frustrates a customer more than receiving a beautiful gift only to spend twenty minutes untying stubborn knots. This common packaging failure diminishes your brand’s perceived value and creates a negative first impression. By following this professional guide on how to put necklace in jewelry box , you can transform a simple delivery into a high-end unboxing experience that protects your inventory and delights your clients.
Why learn how to put necklace in jewelry box properly?
Learning the correct technique ensures that your jewelry remains secure, professional, and visually appealing during transit or storage. Mastering how to put necklace in jewelry box allows you to maintain the “V-shape” or “Heart-shape” drape that naturally guides the buyer’s eye toward the focal pendant.
Does presentation impact your brand value?
The way you present your jewelry serves as a silent ambassador for your craftsmanship and attention to detail. When you consider the customer’s perspective, the unboxing moment is the peak of their emotional connection with the purchase.
- Premium aesthetics justify higher price points.
- Consistent packaging builds recognizable brand identity.
- Professionalism reduces the likelihood of product returns.
Here is the kicker: If the necklace arrives in a heap at the bottom of the box, you are signaling that the piece isn’t worth protecting. You want your customers to feel the luxury from the second they lift the lid.
Can you prevent structural damage and chain knots?
Using the right placement techniques prevents the “snake effect” where a chain slides and creates micro-scratches on polished surfaces. By securing the clasp and tensioning the chain, you eliminate the friction that causes long-term wear.
- Fastening clasps prevents links from interlocking.
- Taut chains avoid the dreaded “birds-nest” knot.
- Soft linings buffer the metal against rigid box walls.
Think about it: Have you ever struggled with a knot so tight it required a needle to untangle? You can spare your customers this frustration by implementing simple tensioning methods.
Key Takeaway
| Feature | Strategic Benefit | |
|---|---|---|
| Visual Draping | Enhances pendant focus | |
| Tensioning | Prevents chain knots | |
| Soft Linings | Eliminates micro-scratches |
Professional placement is a low-cost investment that yields high-value customer satisfaction and product longevity.
How to put necklace in jewelry box after cleaning?
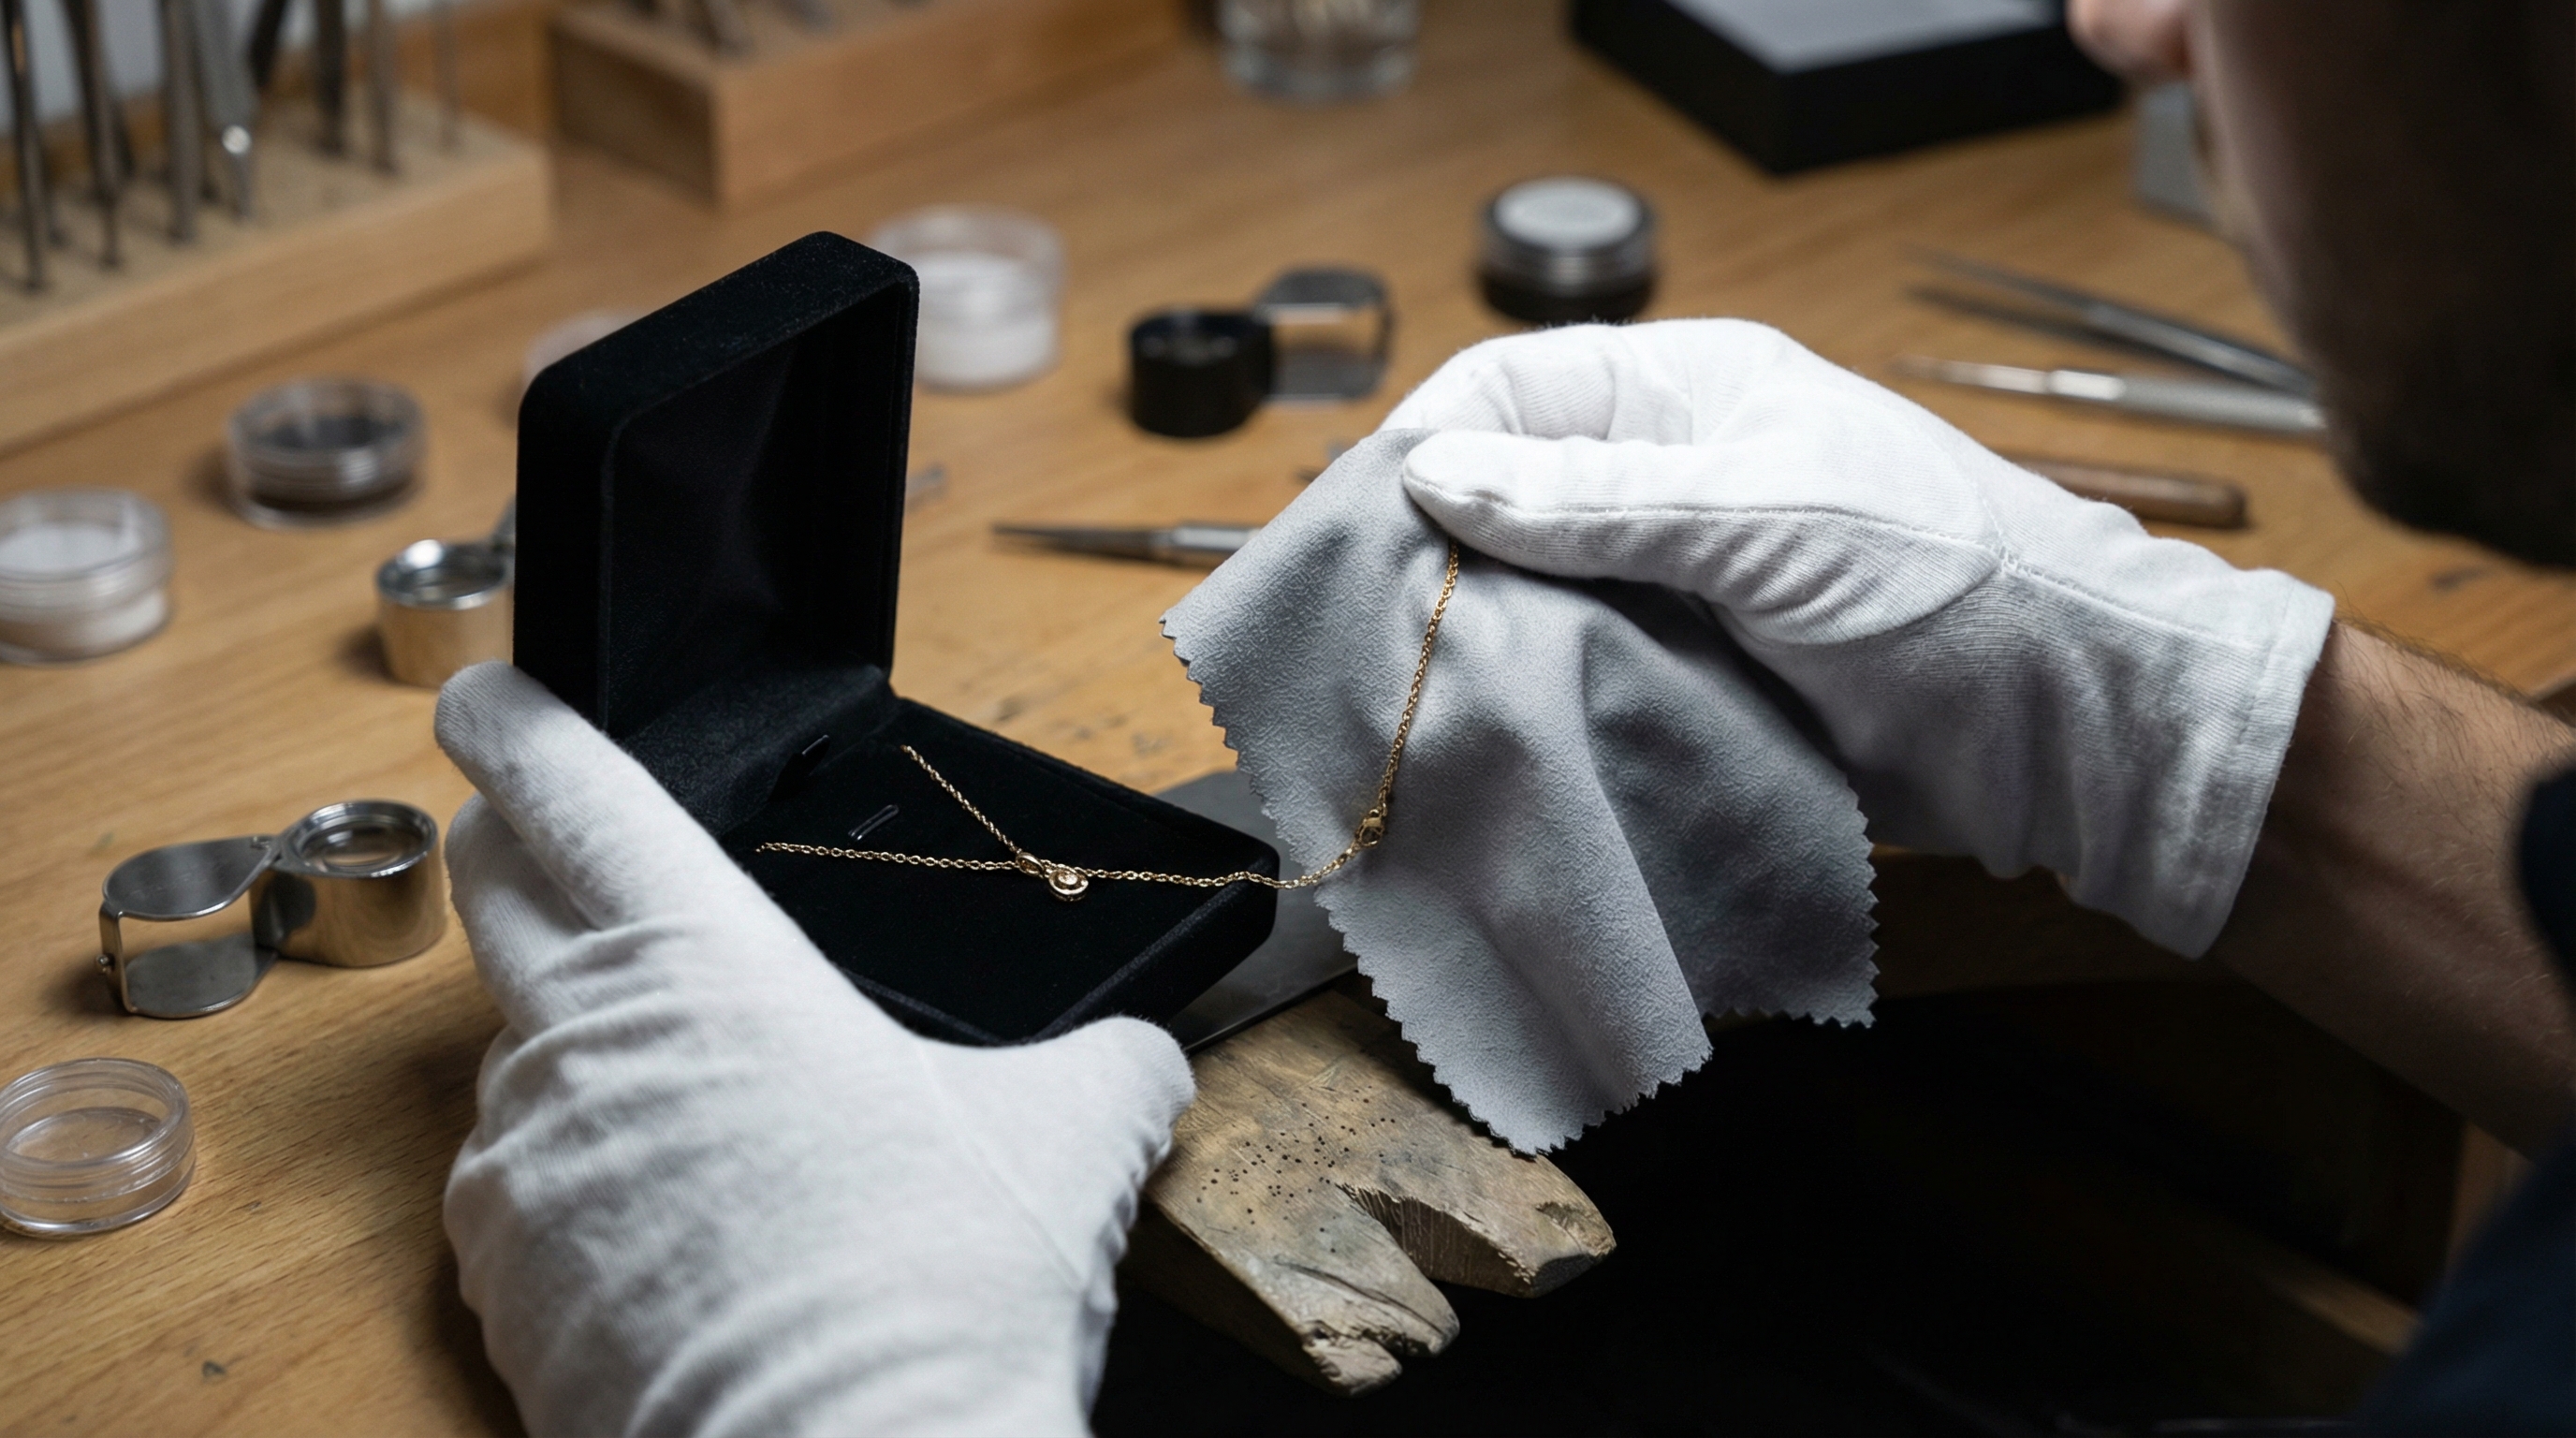
After cleaning, you must use a microfiber cloth to remove fingerprints before carefully laying the chain into its secure housing. Understanding how to put necklace in jewelry box post-cleaning is vital because any residual oils or moisture can lead to tarnishing while the box is sealed.
Should you polish metals for a fingerprint-free shine?
Yes, a final polish is the difference between a “used” look and a “showroom” finish for your luxury items. You should handle the jewelry with soft cotton gloves to ensure the metal remains pristine after you have finished the cleaning process.
- Use lint-free microfiber cloths for high-shine finishes.
- Focus on the pendant’s face and the clasp area.
- Ensure the metal is completely dry to prevent oxidation.
But wait, there’s more: When you present a sparkling piece, you show the customer that you value their investment as much as they do. It creates a “wow” factor that is hard to replicate.
Is fastening the clasp necessary for stability?
Fastening the clasp is an essential step that prevents the chain from sliding out of its designated slots or notches. If you leave the chain open, the loose ends will inevitably find each other and create a mess during movement.
- Closures keep the chain length consistent on both sides.
- Fastened clasps act as an anchor point for the insert.
- Security is increased when the chain forms a closed loop.
The best part? You will find that a fastened necklace is much easier to manipulate when you are trying to center the pendant perfectly. It gives you more control over the entire arrangement.
Key Takeaway
| Step | Purpose | |
|---|---|---|
| Final Polish | Removes oils and dust | |
| Moisture Check | Prevents metal tarnish | |
| Clasp Fastening | Anchors the necklace |
Cleanliness and security are the two pillars of professional jewelry presentation that ensure long-term metal health.
How to put necklace in jewelry box with foam inserts?
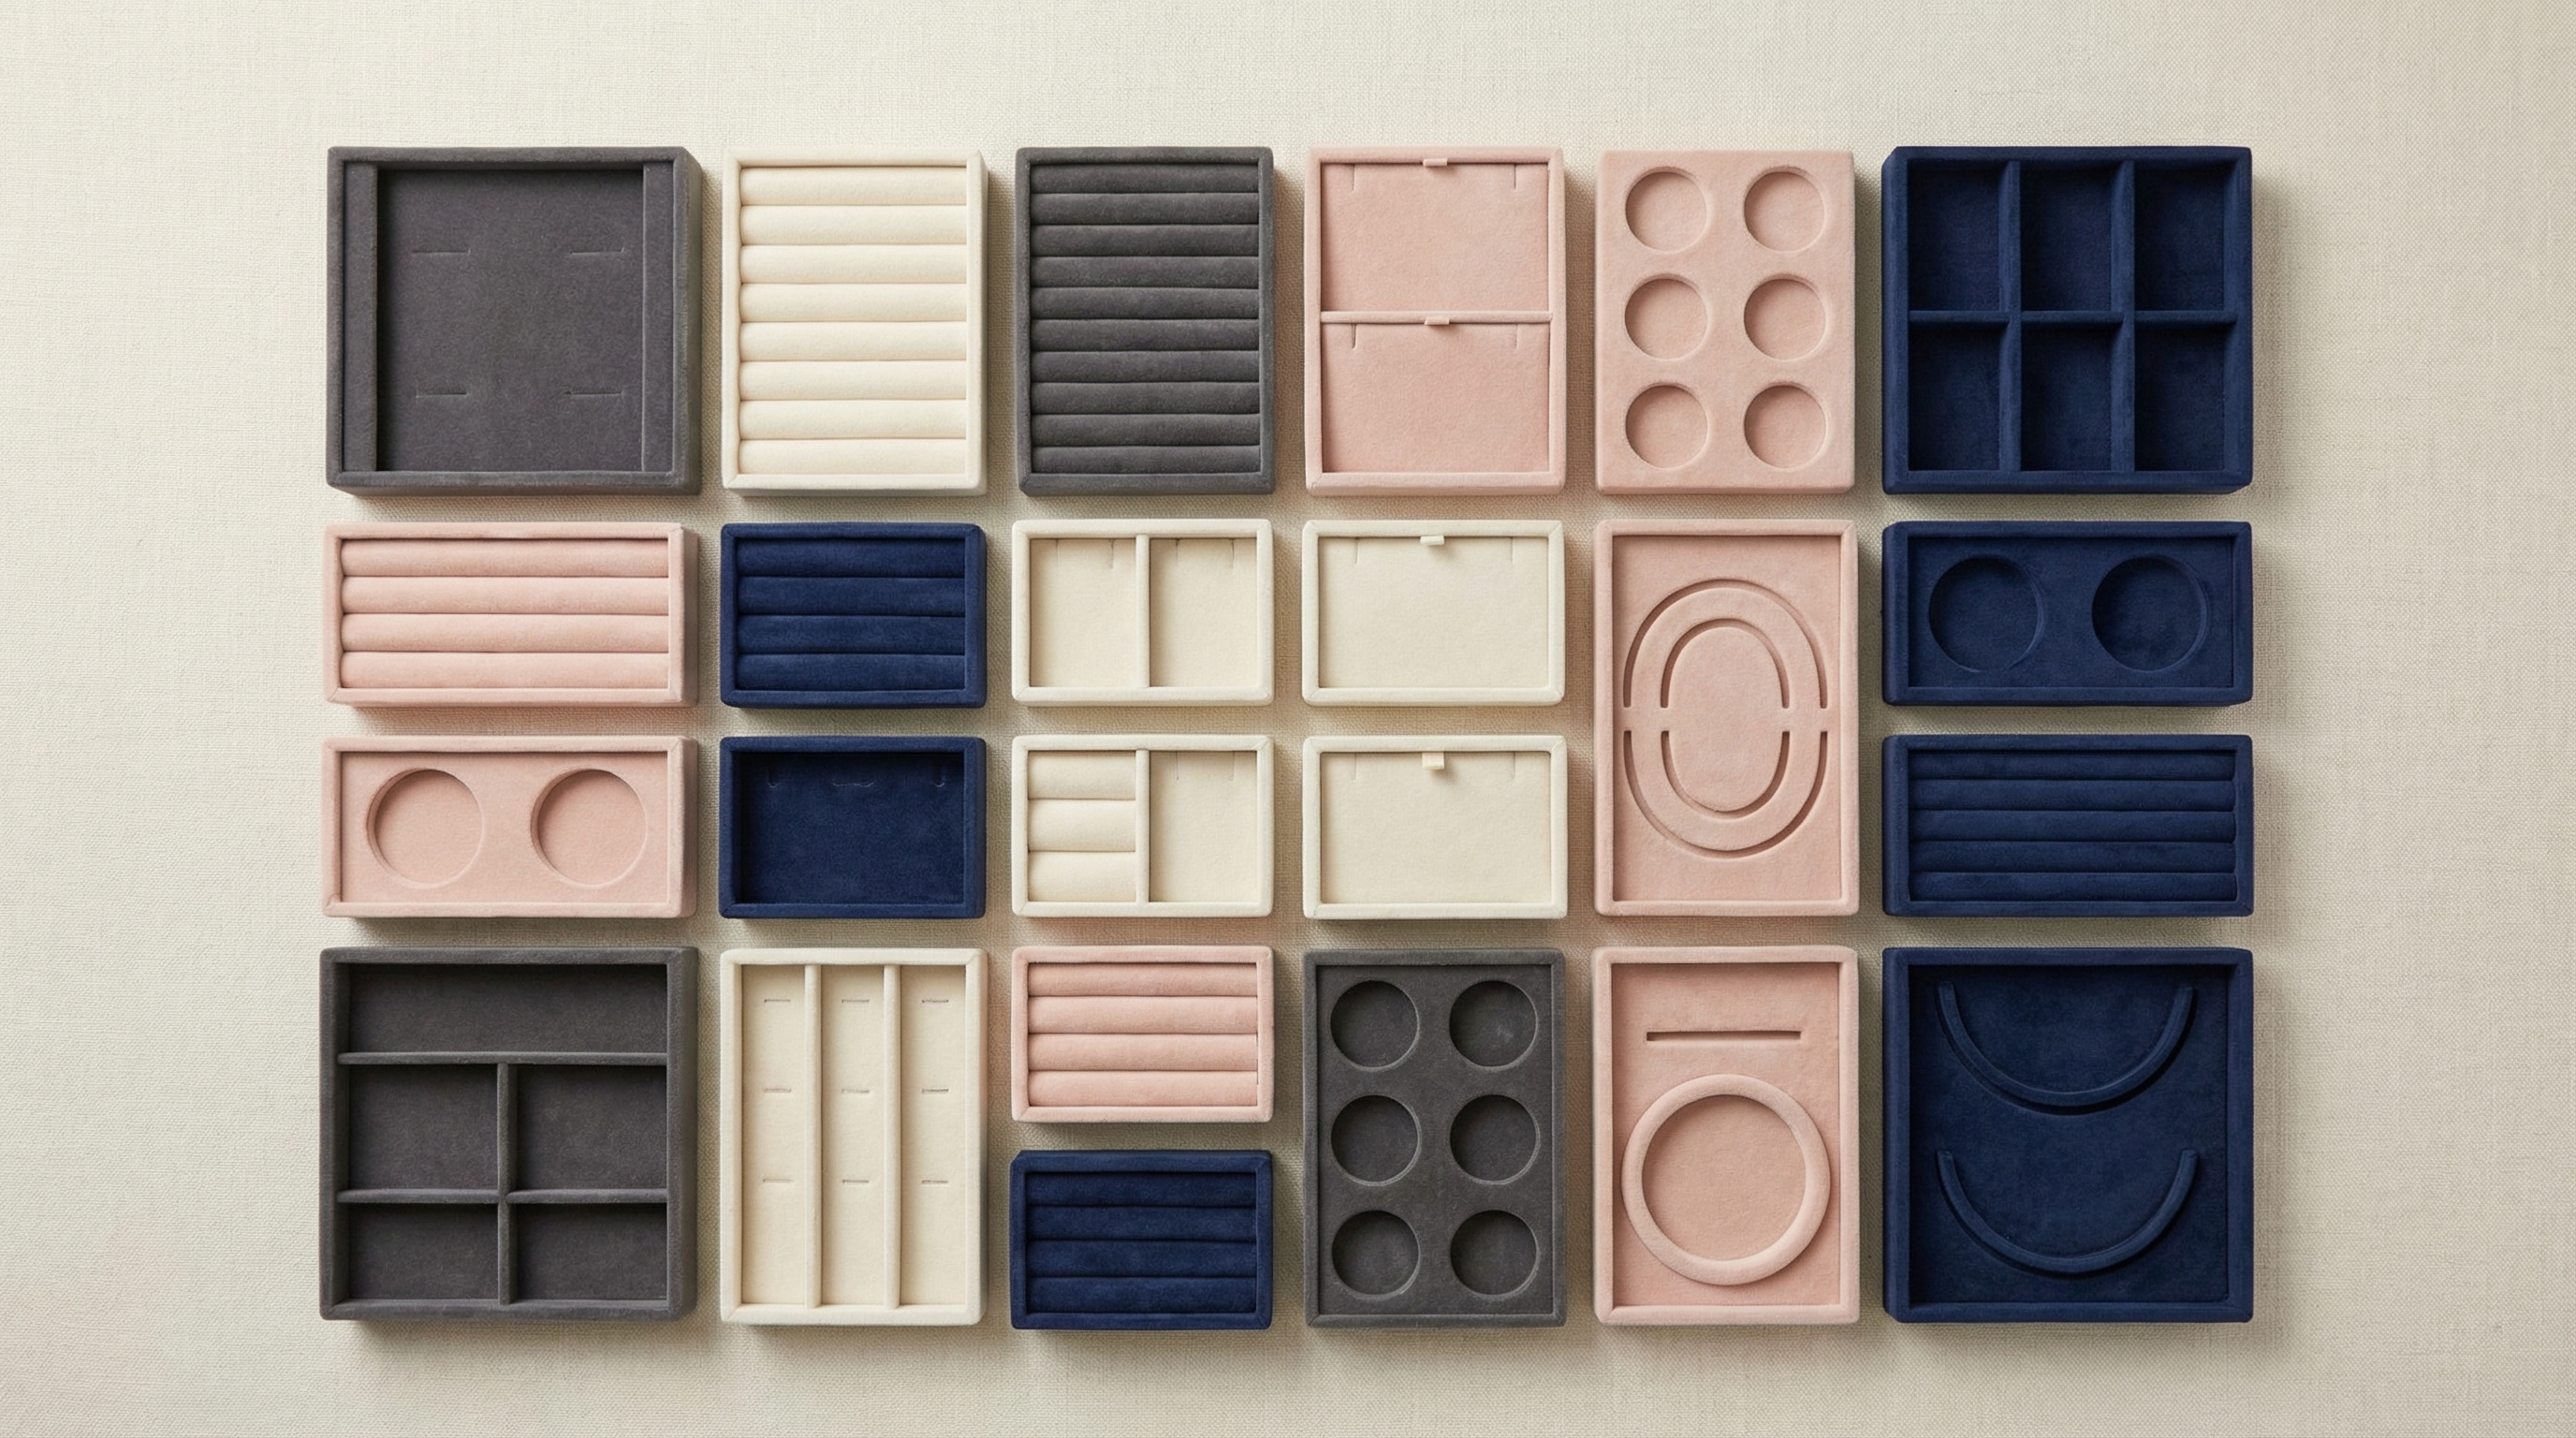
To use foam inserts, you should press the chain into the pre-cut vertical or “H” slots to keep the necklace from shifting. Mastering how to put necklace in jewelry box using foam ensures a modern, clean look that provides excellent shock absorption during transit.
Why choose high-density foam for support?
High-density foam provides the structural integrity needed to hold heavier necklaces without sagging or losing its shape over time. You should look for foam with a velvet or flocking top to provide a soft contact point for delicate chains.
- Dense foam resists compression from heavy pendants.
- Velvet topping adds a layer of luxury and friction.
- Custom colors can contrast with the jewelry’s metal.
Believe it or not: The right foam can make a silver chain pop against a black background, creating a visual depth that flat cardboard cannot achieve. You are building a stage for your product.
How do you utilize pre-cut slots for chain widths?
You must select an insert with slot widths that match your chain’s gauge to ensure a snug fit that prevents side-to-side movement. If the slots are too wide, the necklace will rattle; if too narrow, you might damage the delicate links.
- Match slot depth to the thickness of the chain.
- Use multiple slots for multi-strand necklaces.
- Ensure the “V” angle of the slots aligns with the pendant.
Here is the kicker: When you push the chain into the foam, you are creating a custom fit that looks tailored to that specific piece of jewelry. It feels high-end and intentional.
Key Takeaway
| Foam Attribute | Branding Advantage | |
|---|---|---|
| High Density | Prevents sagging/shifting | |
| Velvet Flocking | Scuff protection | |
| Pre-cut Slots | Tailored professional fit |
Utilizing foam inserts provides a balance of structural security and aesthetic elegance for any jewelry type.
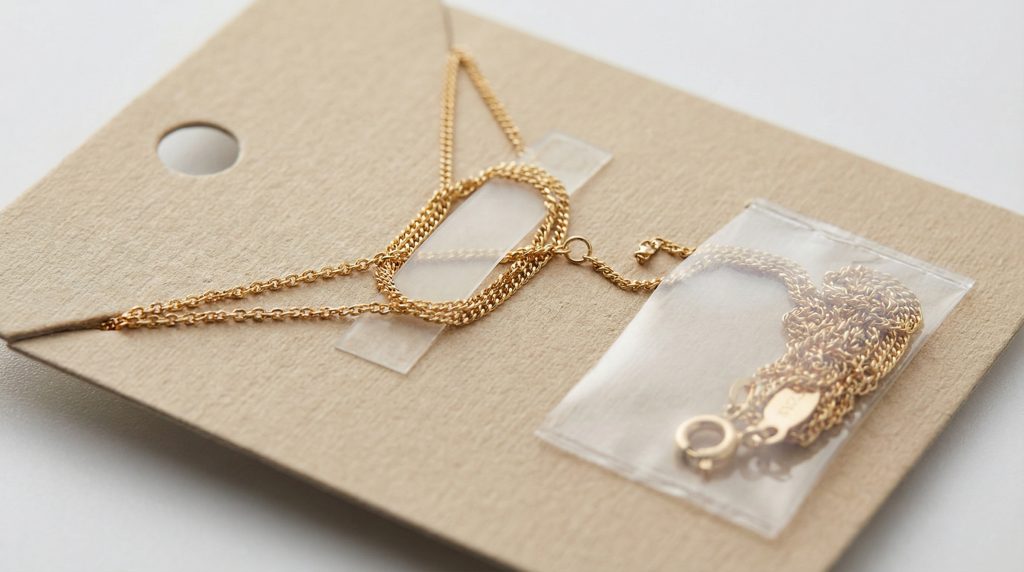
How to put necklace in jewelry box using card slits?
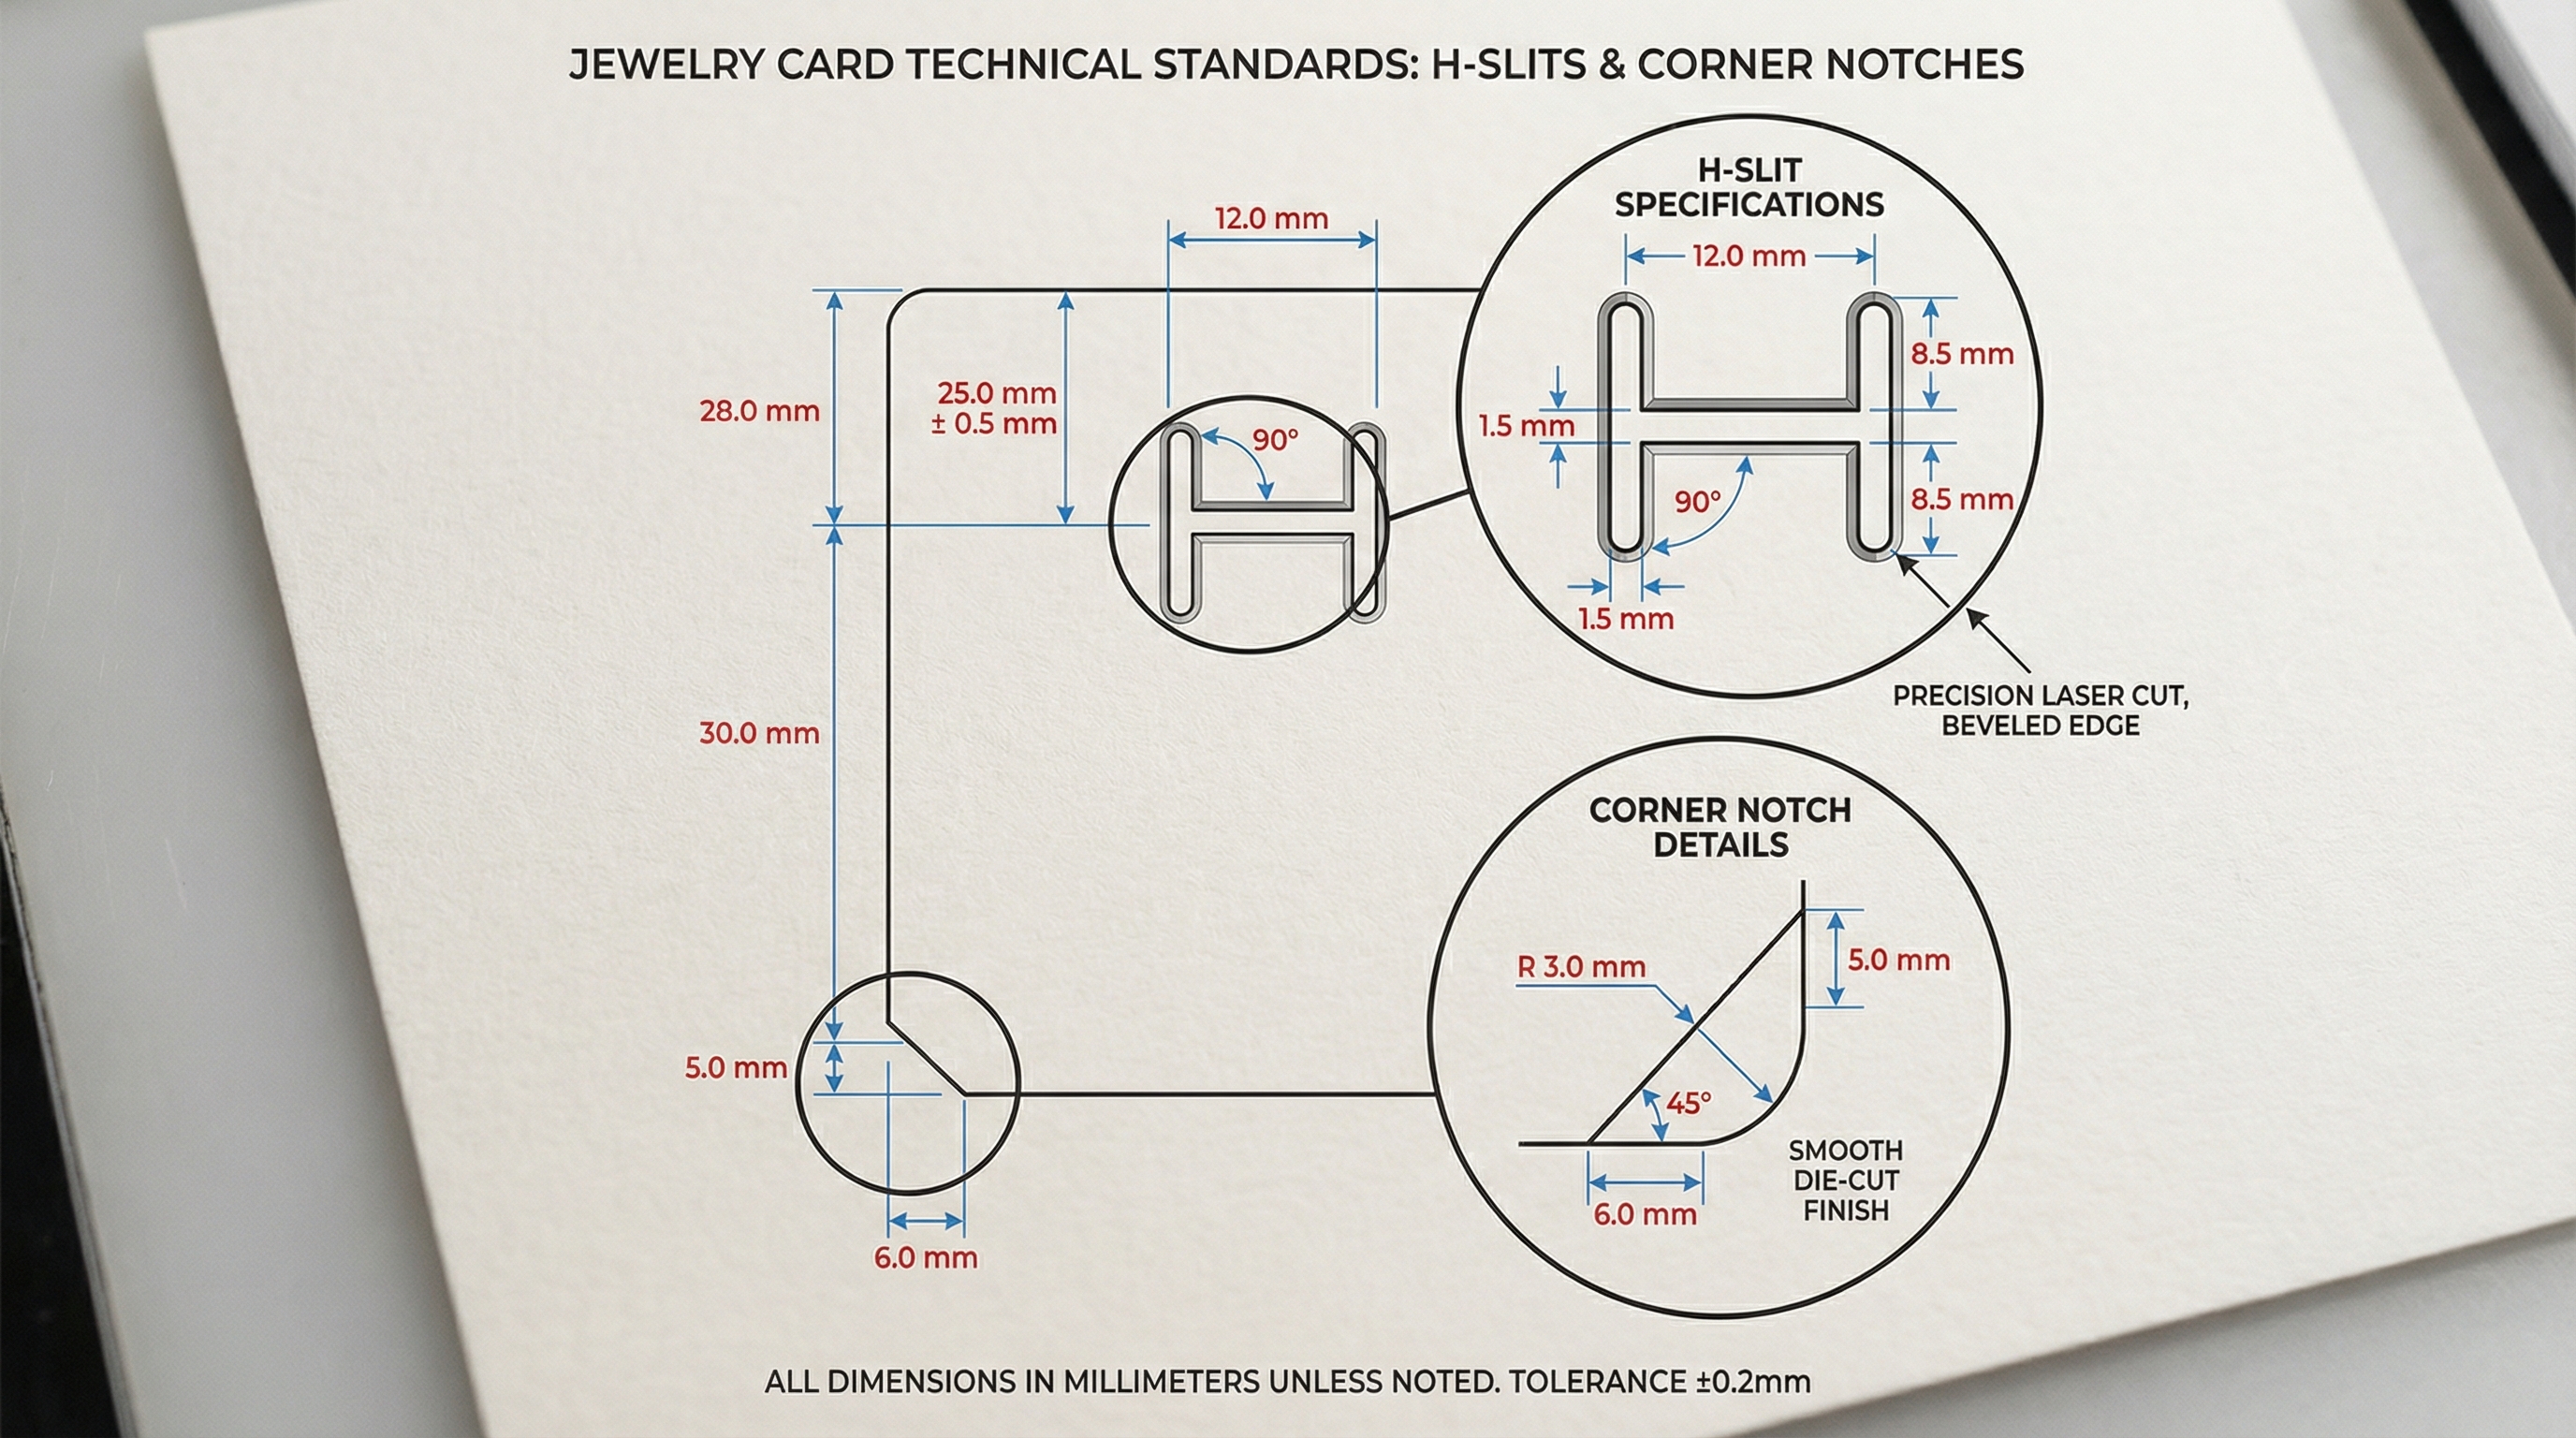
Using card slits involves sliding the chain into precision-cut notches at the top or sides of a rigid backing card. When learning how to put necklace in jewelry box with cards, the goal is to create enough tension to hold the piece flat against the card surface.
How do you create professional H-slits?
Professional H-slits are created by making two vertical cuts connected by a horizontal bar, allowing the chain to be tucked securely behind a paper flap. You should ensure the cuts are clean and about 1.5mm to 2mm deep to accommodate standard chain sizes.
- Use a sharp die-cutter or craft knife for clean edges.
- Center the “H” pattern relative to the card’s width.
- Ensure the flaps are flexible enough to hold the chain.
Think about it: Do you want your necklace to look like it was packaged in a factory or a boutique? Precision-cut slits provide that “boutique” feel that customers love.
What are the techniques for secure corner notches?
Diagonal corner notches are ideal for longer chains where you want to wrap the excess metal around the back of the card. You should cut the notches at a 45-degree angle to provide the most secure grip on the moving chain.
- Angle the notches toward the center of the card.
- Smooth the die-cut finish to prevent snagging.
- Maintain a consistent distance from the card edge.
The best part? By wrapping the chain through corner notches, you keep the front of the display clean and focused entirely on the pendant and the upper drape.
Key Takeaway
| Card Feature | Technical Purpose | |
|---|---|---|
| H-Slits | Direct chain anchoring | |
| Corner Notches | Secure diagonal wrapping | |
| Tensioning | Keeps chain flat/neat |
Precision card slits offer a versatile and cost-effective way to present jewelry with a high-end, structured appearance.
How to put necklace in jewelry box to prevent tangles?
To prevent tangles, you must loop the excess chain behind the insert card and secure it with tape or a small pouch. Our team at how to put necklace in jewelry box recommends the “back-looping” method to ensure the chain stays taut and doesn’t bounce during shipping.
How do you keep the chain taut behind the card?
You can keep the chain taut by pulling the excess length through the top slits and securing it to the back of the insert using low-tack jewelry tape. This ensures that the front of the necklace stays perfectly positioned even if the box is turned upside down.
- Pull the chain until the front drape is firm.
- Use acid-free tape to avoid leaving residue.
- Fold long chains into a neat “Z” pattern on the back.
But wait, there’s more: If you hate knots, you will love this method. It completely eliminates the ability for the chain to move and intertwine with itself while in the box.
Should you use acid-free tissue paper for long chains?
For exceptionally long chains that cannot be fully secured behind a card, you should wrap the excess in acid-free tissue paper before tucking it into the box cavity. This adds a layer of soft protection that prevents the metal from rubbing against itself and tangling.
- Fold tissue paper into a small, flat packet.
- Place the packet underneath the main insert.
- Use neutral colors to maintain the luxury aesthetic.
Believe it or not: This extra step of using tissue paper signals to the customer that you have gone above and beyond to protect their delicate purchase. It’s a small detail with a big impact.
Key Takeaway
| Prevention Tool | Anti-Tangle Function | |
|---|---|---|
| Back-Looping | Eliminates chain slack | |
| Low-Tack Tape | Anchors chain to card | |
| Tissue Packing | Buffers excess length |
Preventing tangles is about controlling every inch of the chain so that it has zero freedom to move during transit.
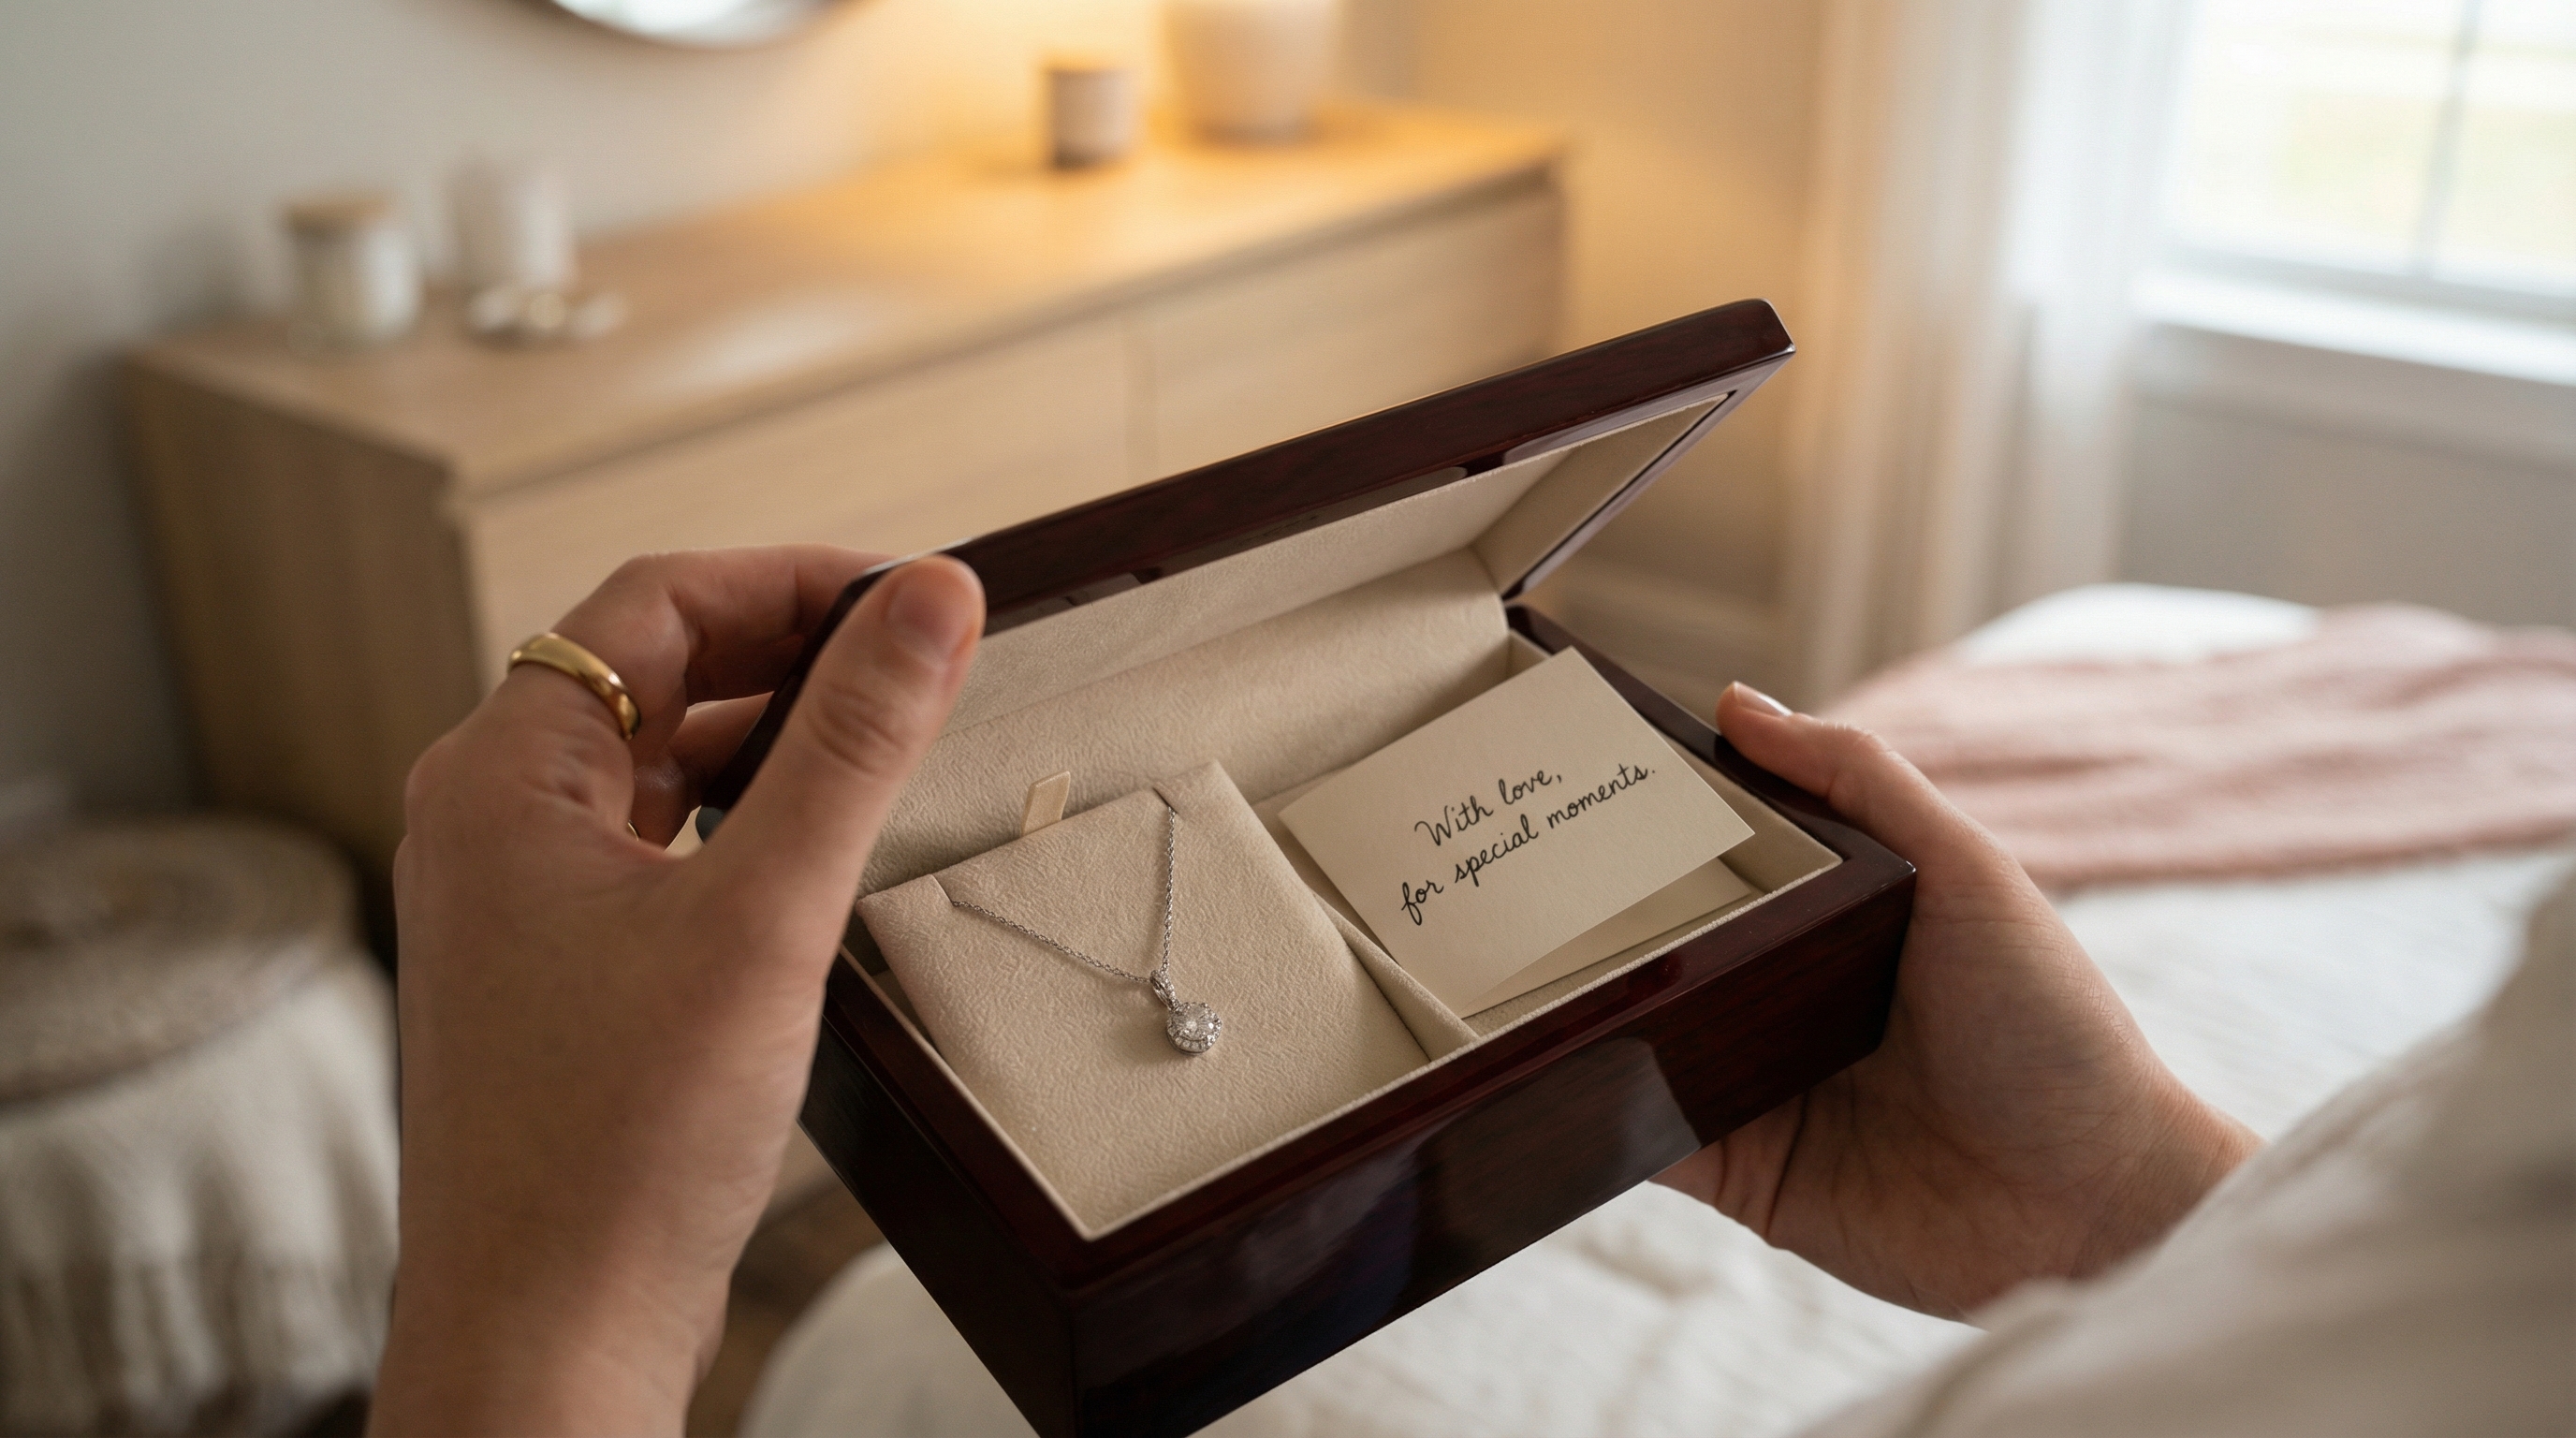
How to put necklace in jewelry box for pendants?
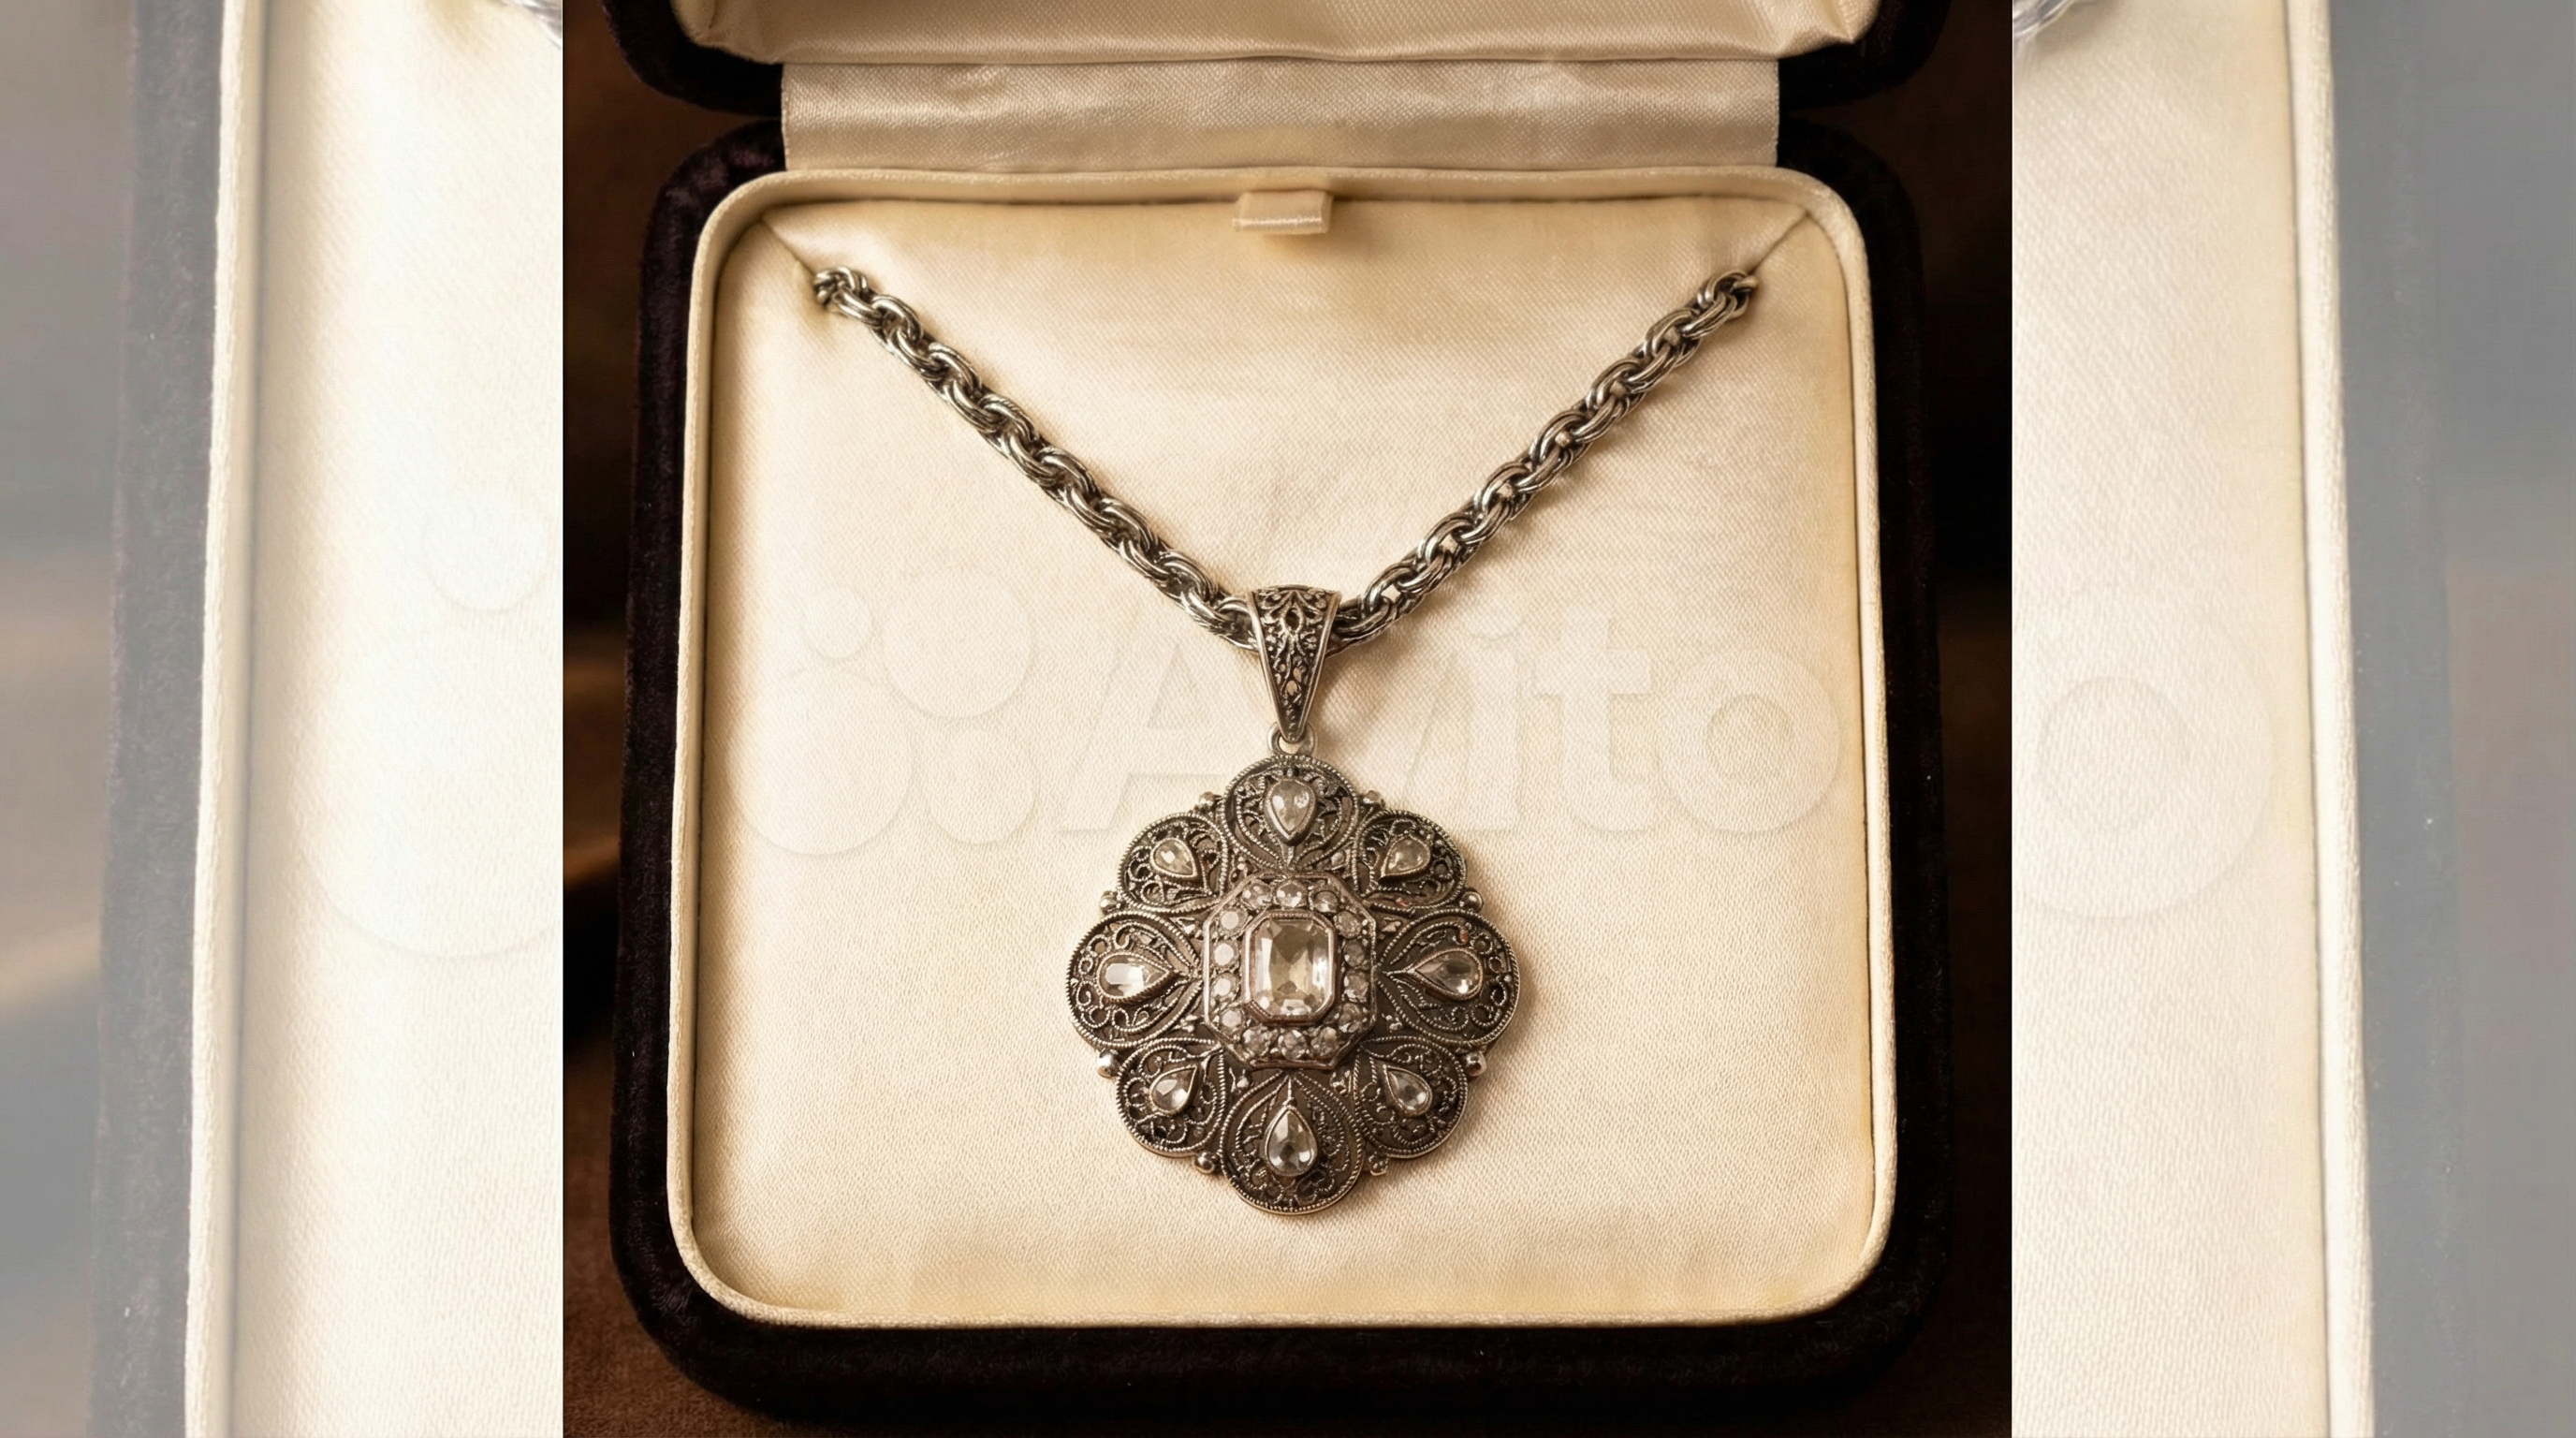
For pendants, you must ensure the focal piece is centered in the box and slightly angled upward for the best visual impact. Understanding how to put necklace in jewelry box for pendants involves managing the weight of the charm so it doesn’t drag the chain down.
How do you center the focal piece for balance?
You should find the exact center of your insert card or foam and place the pendant there to create a symmetrical, pleasing layout. Use the “V-shape” drape technique to frame the pendant and draw the customer’s eyes directly to the center of the box.
- Measure the horizontal center of the box.
- Adjust the chain length on each side to be equal.
- Use the natural weight of the pendant to pull the chain.
The best part? When you achieve perfect symmetry, the entire gift feels more harmonious and expensive. It shows you took the time to get the details right.
Can you secure heavy or oversized charms with padding?
Yes, you can secure heavy charms by placing a small piece of foam or a jewelry pad directly underneath the pendant to prevent it from swinging. If the charm is oversized, you may need to use a box with a deeper cavity to accommodate the height without crushing the piece.
- Use double-sided jewelry dots for extra security.
- Select deep-cavity boxes for 3D pendants.
- Ensure the padding color matches the box lining.
Here is the kicker: A heavy pendant that stays in place during shipping is a sign of high-quality packaging design. You don’t want the charm to act like a wrecking ball inside the box.
Key Takeaway
| Pendant Strategy | Impact | |
|---|---|---|
| V-Shape Draping | Guides visual focus | |
| Centering | Creates symmetry | |
| Support Padding | Prevents charm movement |
Pendant presentation requires a combination of visual framing and physical support to ensure the focal point remains the star of the show.
How to put necklace in jewelry box for safe shipping?
For safe shipping, you should conduct the “shake test” and add extra padding if you hear any movement inside the box. Learning how to put necklace in jewelry box for the mail requires a focus on internal stabilization and external impact resistance.
Should you layer cotton pads to prevent movement?
You should place a thin cotton-filled pad or a piece of foam over the top of the necklace before closing the lid to fill any empty space. This “sandwich” technique keeps the jewelry pressed firmly against the bottom insert, preventing it from jumping out of its slots.
- Layer foam above and below the jewelry card.
- Ensure the padding doesn’t snag on the metal.
- Use enough pressure so the contents are immobile.
But wait, there’s more: If you can shake the box and hear a “clinking” sound, you need more padding. The silence of a well-packed box is the sound of safety.
Why select rigid outer mailers for protection?
Rigid outer mailers provide a second line of defense against the crushing forces of postal sorting machines. You should choose corrugated cardboard mailers that fit your jewelry box snugly to prevent the internal box from sliding around.
- Use bubble mailers for lightweight items.
- Opt for corrugated boxes for premium shipments.
- Fill voids with eco-friendly packing peanuts.
Think about it: The jewelry box is the presentation, but the outer mailer is the armor. You need both to ensure your product arrives in mint condition.
Key Takeaway
| Shipping Layer | Security Role | |
|---|---|---|
| Internal Padding | Prevents item shifting | |
| Shake Test | Validates stability | |
| Rigid Mailer | Absorbs external impact |
Safe shipping is achieved by eliminating all internal movement and providing a durable outer shell for the journey.
How to put necklace in jewelry box for display?
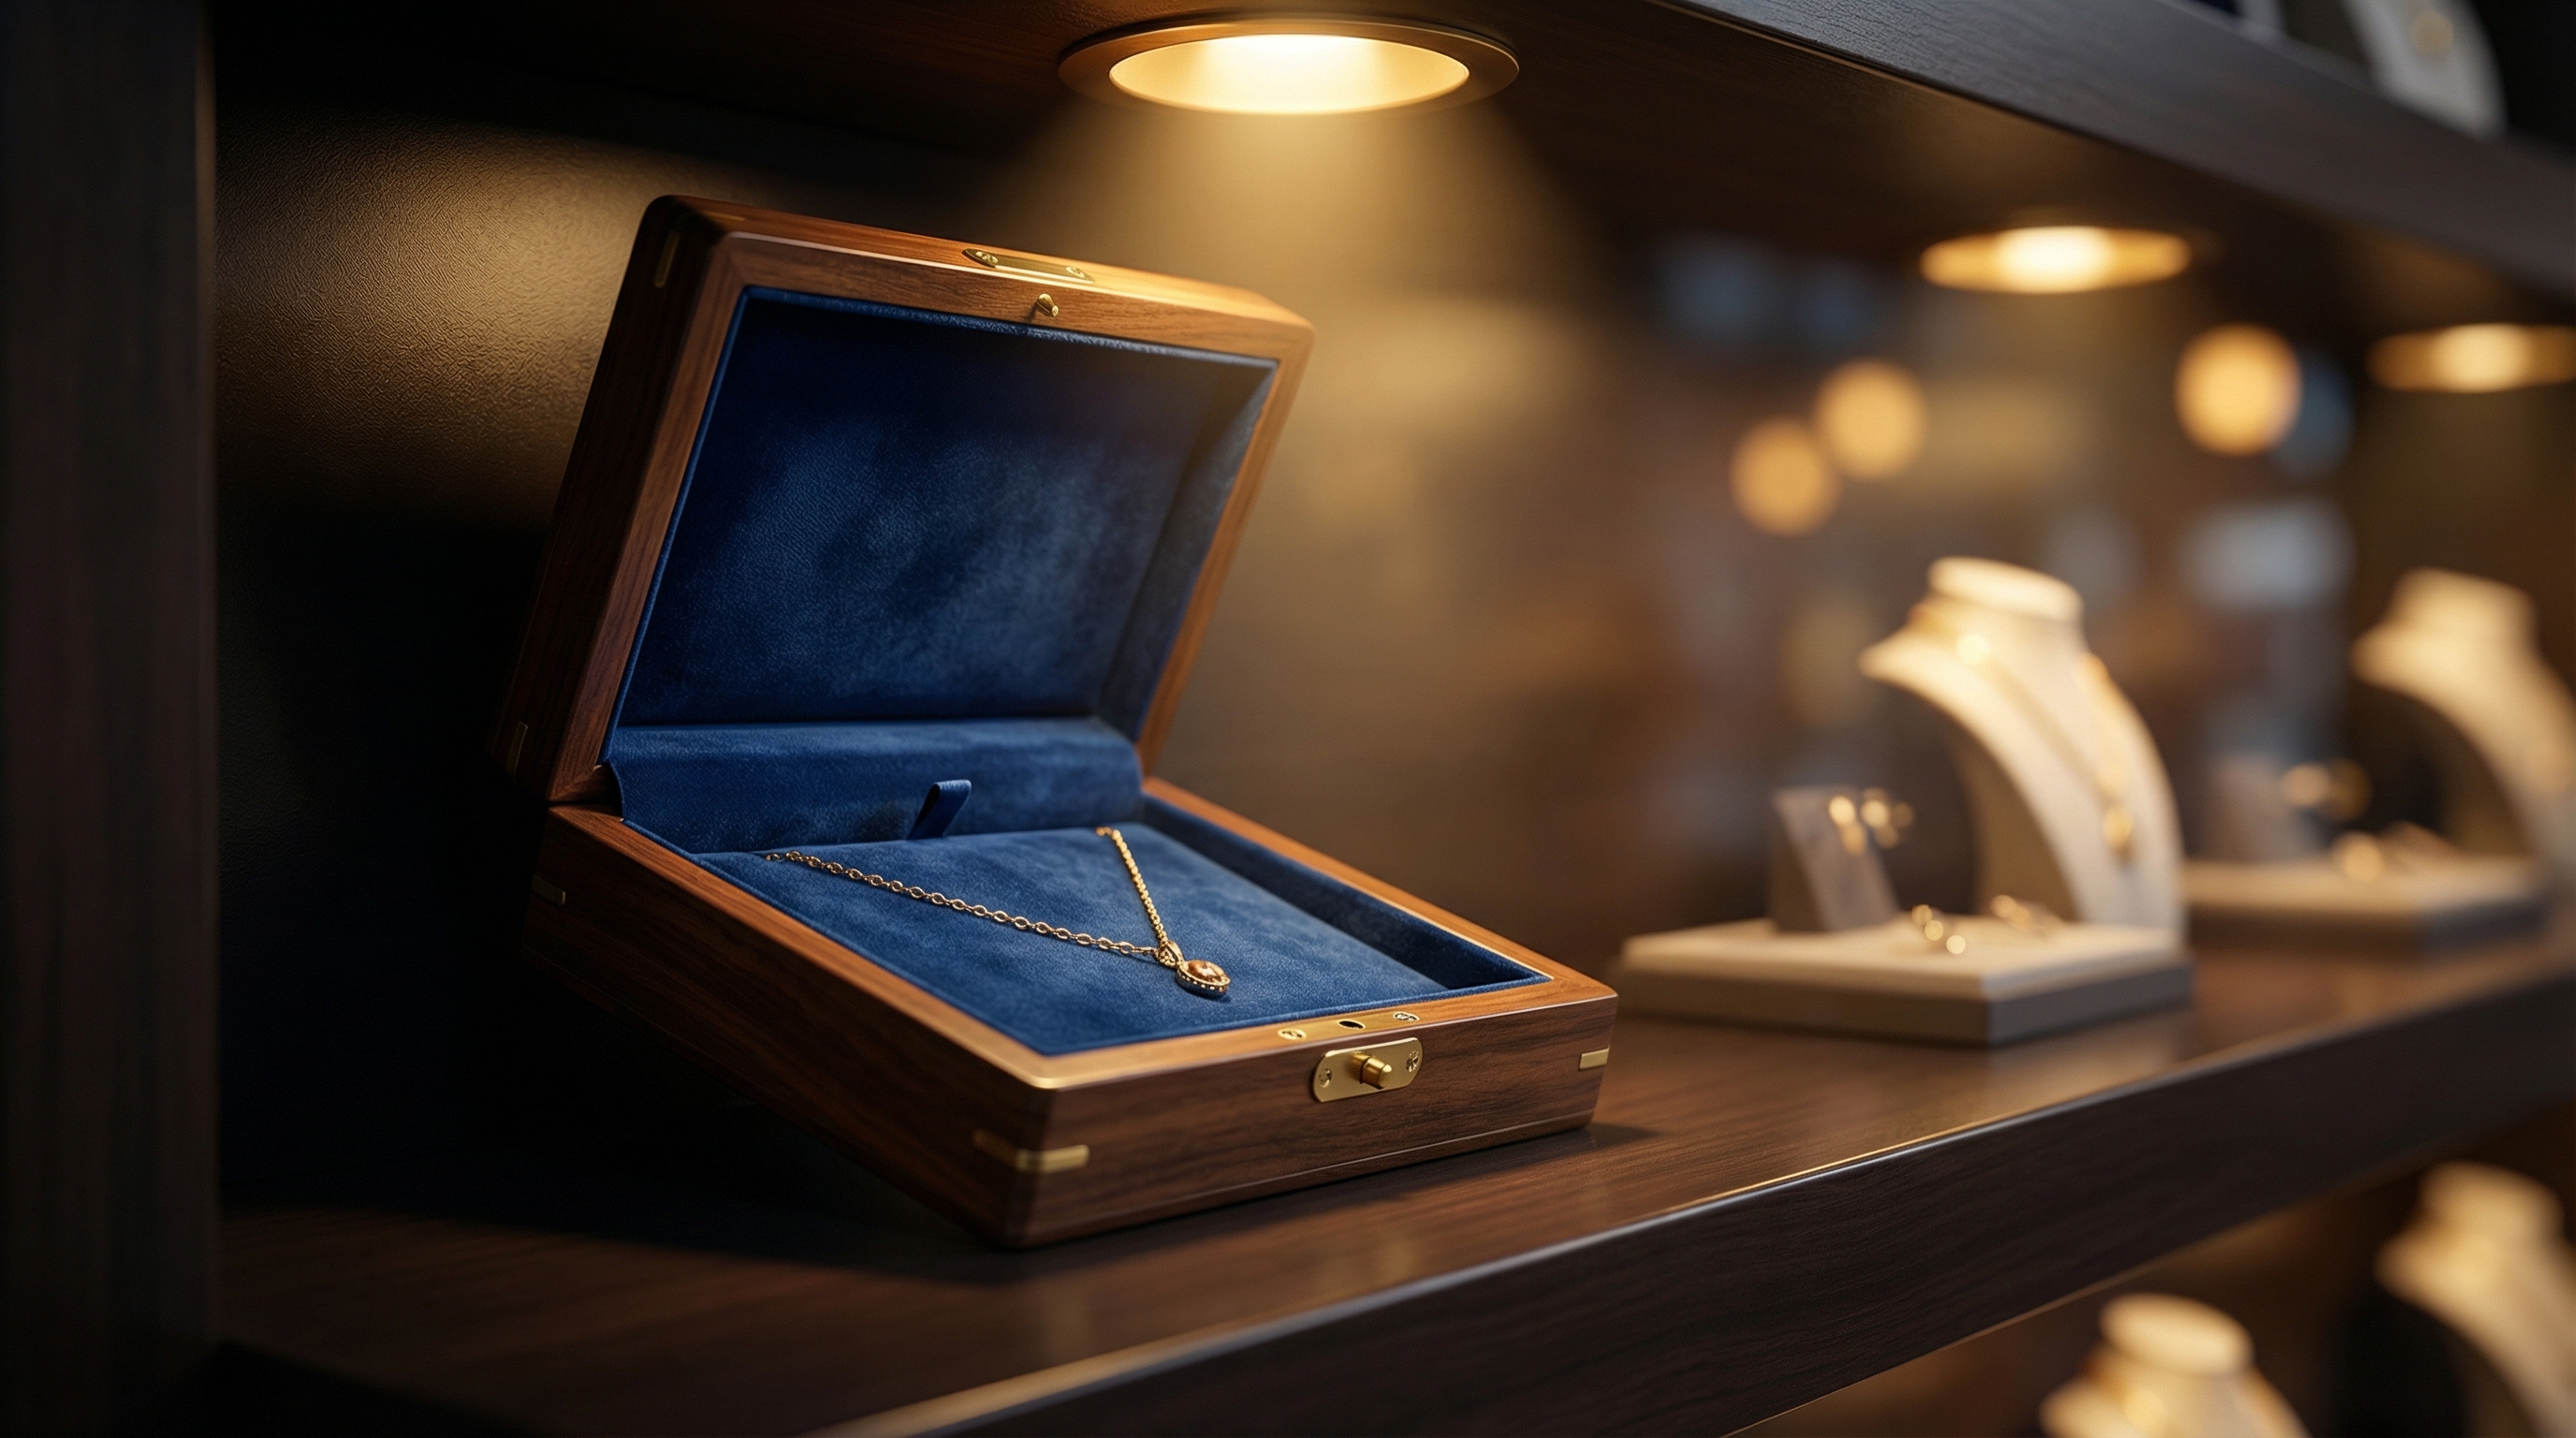
For display, you should angle the insert at 45 degrees to capture the overhead lighting and minimize shadows on the metal. How to put necklace in jewelry box for a retail environment is all about creating a captivating visual that entices a purchase.
How do you angle the insert for optimal light?
You can angle the insert by using a built-in stand or by propping the card against the back of the box lid. This positioning allows you to highlight the sparkle of gemstones and the luster of polished gold or silver.
- Use “kickstand” style jewelry cards.
- Align the box toward the strongest light source.
- Avoid flat-lay positioning which can look dull.
Believe it or not: A 15-degree tilt can increase the “fire” of a diamond by reflecting light more efficiently into the viewer’s eyes. You are literally making the jewelry shine.
Should you select lining colors that highlight the metal?
Yes, you should choose a lining color that provides a strong contrast to your necklace—such as black for silver or white for gold. The right color choice makes the jewelry appear more vibrant and easier for the customer to see from a distance.
- Use deep blues or blacks for light metals.
- Opt for creams or whites for dark gemstones.
- Consider brand colors for a cohesive retail look.
The best part? When the colors are balanced, the jewelry looks like it is floating in the box. It creates a professional, high-end museum quality to your display.
Key Takeaway
| Display Element | Visual Effect | |
|---|---|---|
| 45-Degree Angle | Maximizes light reflection | |
| High Contrast Lining | Enhances metal visibility | |
| Proper Lighting | Highlights gemstone fire |
Effective display packaging uses light and color to create an emotional connection with the customer before they even touch the piece.
How to put necklace in jewelry box with accessories?
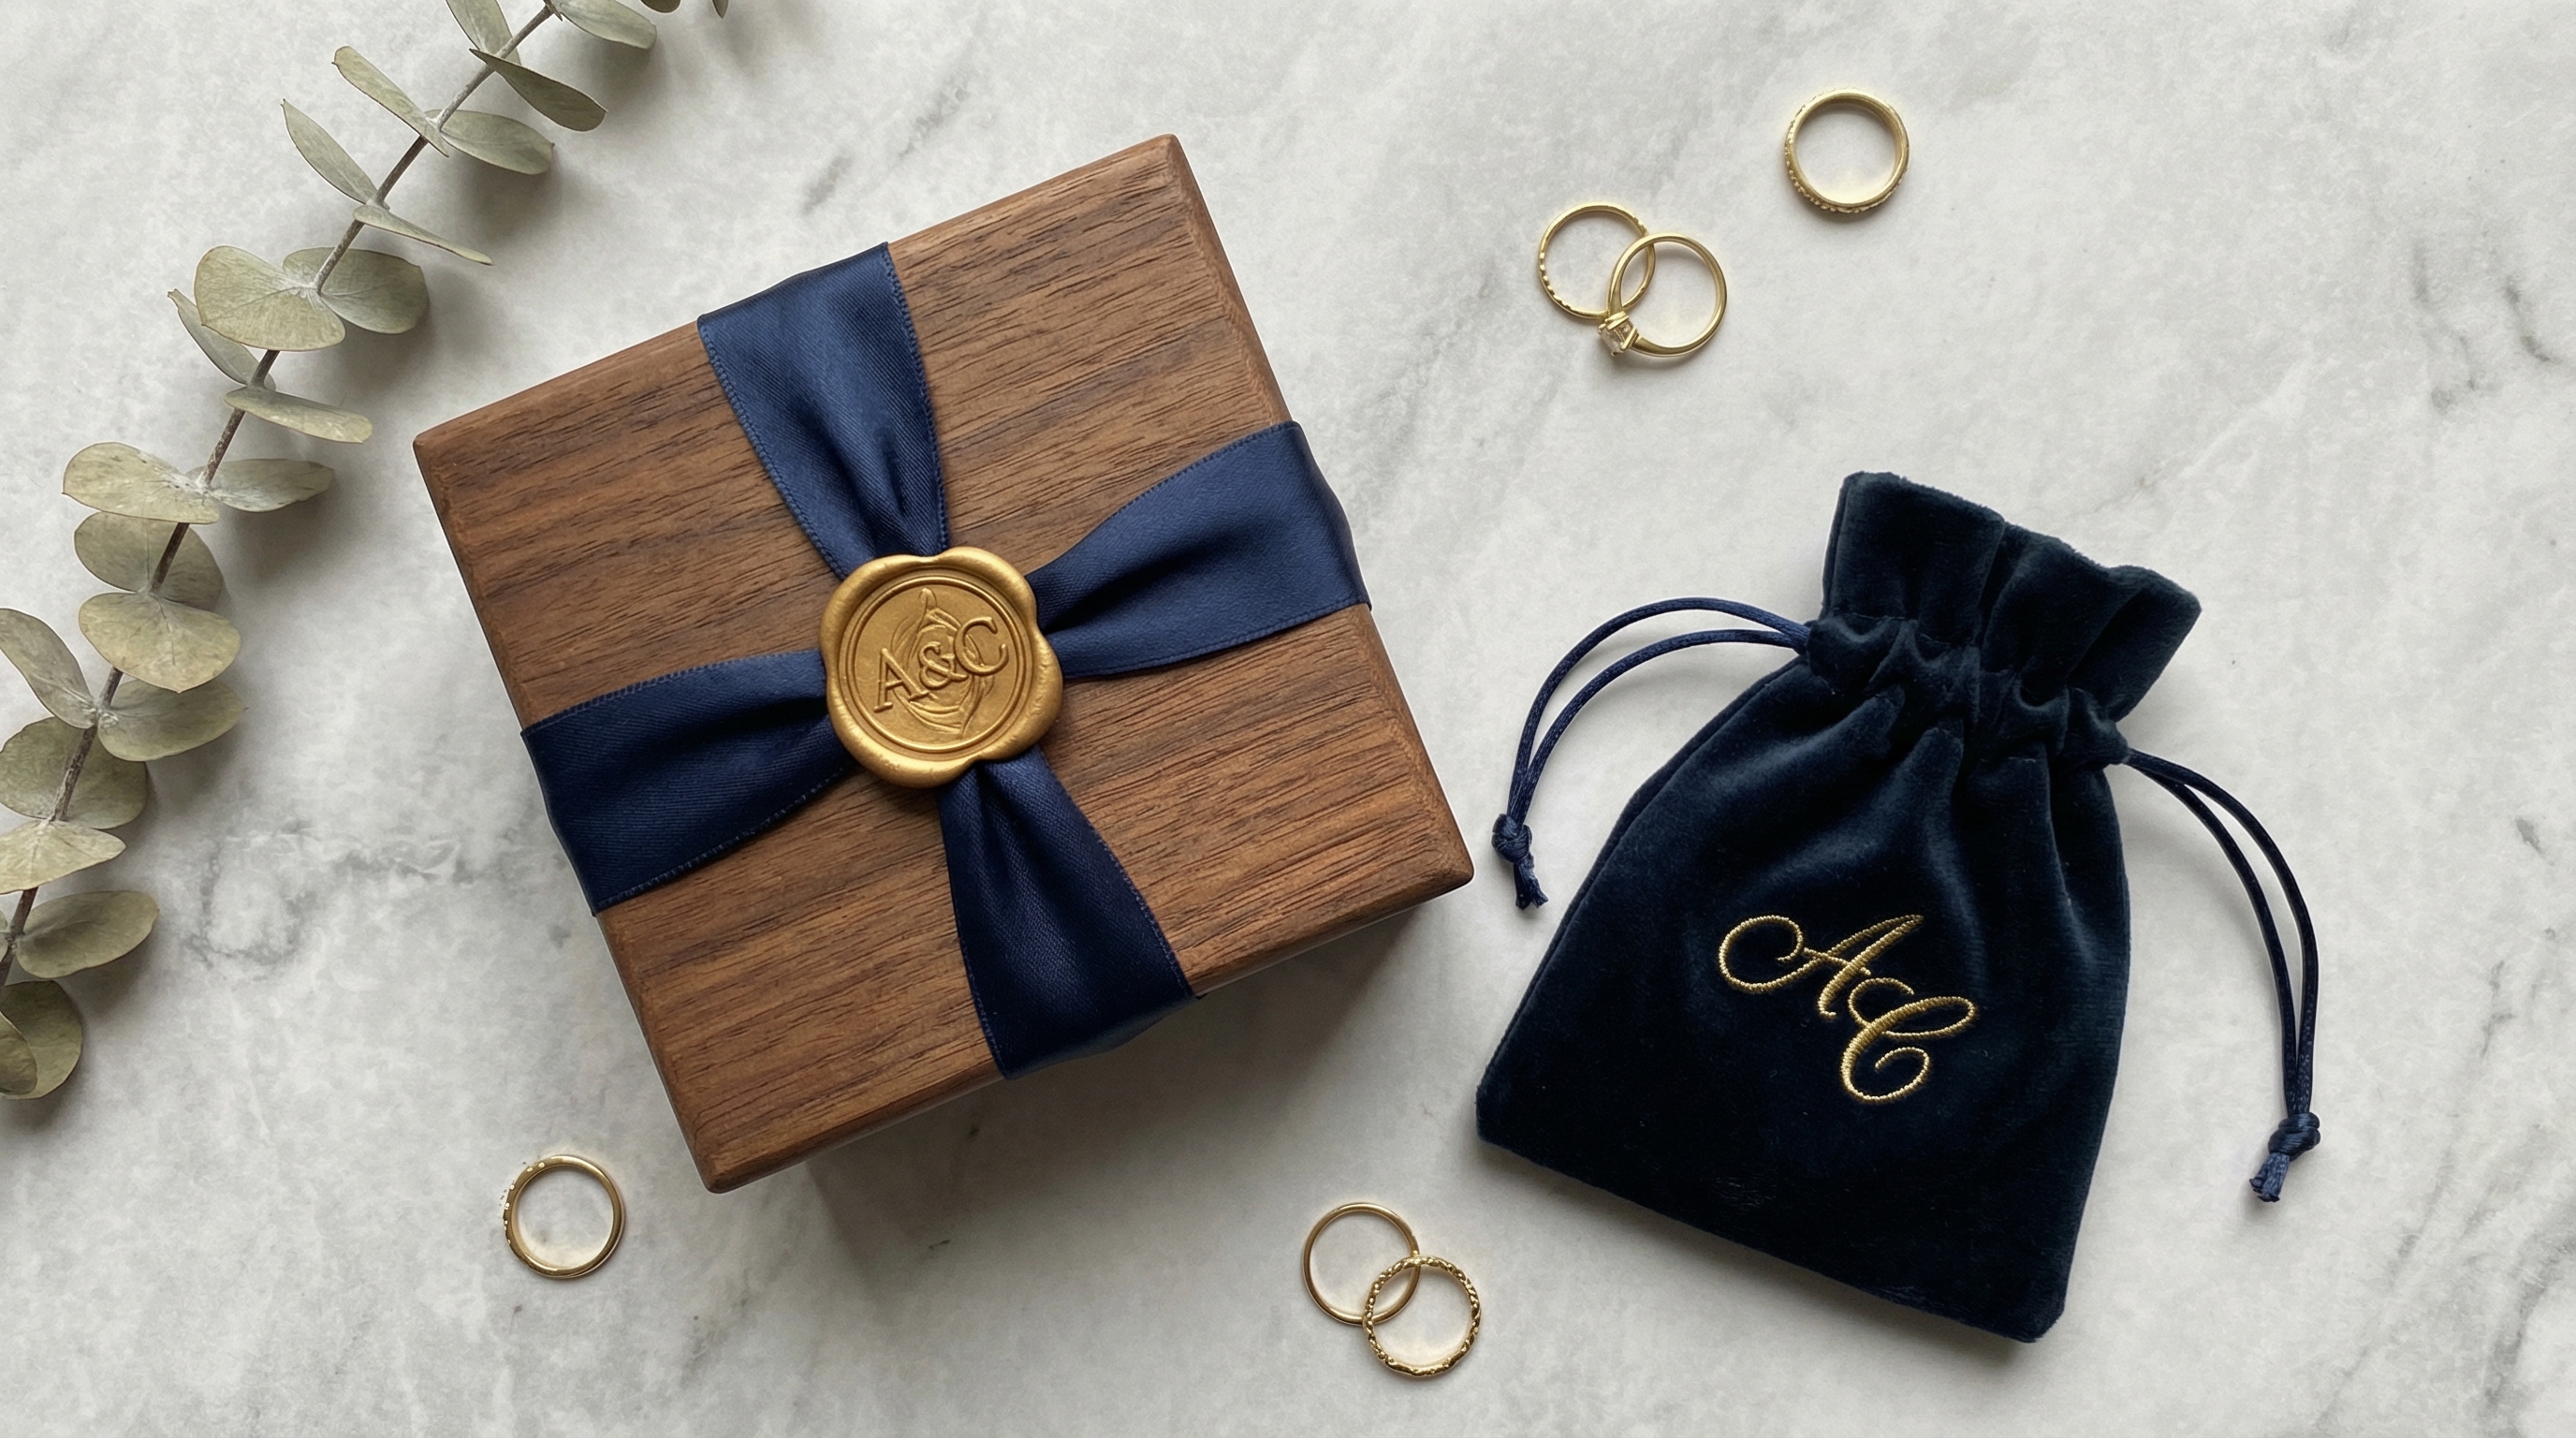
With accessories, you should place ribbons and pouches on top of the main insert to create a layered unboxing journey. When considering how to put necklace in jewelry box , adding branded elements like wax seals or custom ribbons elevates the entire package to a gift-ready status.
Can you add custom branded ribbons and wax seals?
You can wrap a satin ribbon around the exterior of the box and secure it with a wax seal for a classic, sophisticated look. This extra layer of branding ensures that the customer feels they are receiving something truly special and handcrafted.
- Choose ribbon colors that match your brand palette.
- Use a personalized wax seal with your logo.
- Tie a clean, symmetrical bow for the best effect.
Here is the kicker: A wax seal acts as a security feature and a luxury hallmark. It tells the customer that the package has been personally inspected and approved by your brand.
Why pair boxed jewelry with luxury velvet pouches?
Pairing a box with a velvet pouch gives the customer a secondary storage option for travel or daily use. You should place the pouch at the bottom of the box or neatly folded on top of the jewelry to add a tactile, soft element to the unboxing.
- Pouches provide value beyond the initial purchase.
- Velvet material protects the box from internal scuffs.
- Embroidered logos on pouches increase brand recall.
But wait, there’s more: When a customer sees a pouch, they see a brand that cares about the long-term life of the jewelry. It’s a functional gift that keeps your brand in their pocket.
Key Takeaway
| Accessory | Brand Value | |
|---|---|---|
| Satin Ribbon | Gift-ready aesthetics | |
| Wax Seal | Authenticity & Security | |
| Velvet Pouch | Functional secondary storage |
Accessories transform standard packaging into a comprehensive brand experience that justifies a premium price tag.
How to put necklace in jewelry box for luxury gifting?
For luxury gifting, you must perform a final inspection to ensure the necklace is perfectly aligned and the personalized note is visible. Mastering how to put necklace in jewelry box for gifts is the final step in securing a lifelong customer relationship.
Why do a final inspection of the unboxing experience?
A final inspection ensures that no dust, stray threads, or fingerprints have compromised the presentation before the lid is closed for the last time. You should view the package through the eyes of the recipient to ensure every detail is flawless.
- Check the alignment of the pendant one last time.
- Remove any lint using a soft brush.
- Ensure all accessories are neatly arranged.
Think about it: You only get one chance to make a first impression. That final ten-second check can save a million-dollar reputation.
Should you include personalized notes and care instructions?
Yes, including a handwritten note and a care card adds a human touch that mass-market retailers cannot replicate. You should place these items in a small envelope on top of the jewelry so they are the first things the customer sees.
- Handwritten notes build deep customer loyalty.
- Care instructions reduce “damaged” item claims.
- QR codes can link to styling videos or reviews.
The best part? When a customer reads a personal note, they feel a connection to the maker. You are no longer just a vendor; you are their jeweler.
Key Takeaway
| Gift Detail | Customer Sentiment | |
|---|---|---|
| Perfect Alignment | Perceived quality & care | |
| Personalized Note | Emotional connection | |
| Care Instructions | Product longevity & trust |
Luxury gifting is an art form that combines technical precision with personal touches to create an unforgettable brand moment.
Summary of Packaging Best Practices
Successfully presenting a necklace involves more than just dropping it into a box; it requires careful cleaning, strategic tensioning to prevent tangles, and the use of high-quality inserts like foam or cards. By following these steps, you eliminate the frustration of knots and damage, ensuring your jewelry arrives in showroom condition. From the “shake test” for shipping to the final “V-shape” drape for display, every detail counts toward building your brand’s reputation for excellence.
Ready to elevate your brand’s presentation? For the highest quality custom packaging and expert guidance, contact us today to find the perfect solution for your collection.
Our vision is to provide world-class jewelry packaging that protects your craftsmanship and empowers your brand to shine in every unboxing moment.
Frequently Asked Questions
Can I use tissue paper for long-term jewelry storage?Briefly, yes, provided it is acid-free. Standard tissue paper can contain sulfur or acidic compounds that react with silver and gold, leading to rapid tarnishing over time.
What’s the best box for heavy gemstone pendants?You should opt for a rigid box with high-density foam inserts. Heavy pendants require the structural support of dense foam to prevent the “sagging” effect that occurs with thinner cardboard or cotton-filled boxes.
How do I prevent the ‘snake effect’ in transit?The solution is anchoring the clasp and tensioning the chain. By securing the excess chain behind the insert card with low-tack tape, you remove the slack that allows the metal to slide and scratch.
Can I layer multiple necklaces in a single box?Generally, this is not recommended for shipping. Layering multiple chains increases the risk of friction-induced scratches and complex knots; it is always safer to use separate compartments or individual boxes.
What’s the ideal slit depth for jewelry cards?The standard depth is between 1.5mm and 2mm. This depth is sufficient to hold most delicate and medium-gauge chains securely without making the card fragile or difficult to load.ngles and damage.