To understand how to make a homemade jewelry box , you simply need to combine an unfinished wooden box with a custom resin marbled top and vibrant interior paints. Your necklaces are likely tangled in a messy pile, damaging delicate chains and making your morning routine a nightmare. This disorder doesn’t just waste your time; it physically damages your precious accessories through friction and knotting. By building your own high-quality container, you solve the organization crisis while adding a professional, artistic touch to your bedroom decor.
How do you start making a DIY jewelry box?

Learning how to make a homemade jewelry box starts with choosing a high-quality unfinished wooden box that features a recessed lid. This specific structure is vital because it acts as a natural “frame” for the liquid resin you will pour later. You should clear a flat, dust-free workspace to ensure the finish remains smooth and professional.
How to choose the right box?
Look: Selecting the foundation is the most important step for a successful outcome.
- Choose wood with a smooth, even grain.
- Ensure the lid has a recessed center area.
- Check the hinges for long-term durability.
- Pick a size that fits your vanity perfectly.
Why is the workspace important?
The best part? A clean environment prevents airborne particles from ruining your resin finish before it sets.
- Use a level surface for even curing.
- Cover the table with plastic protective sheets.
- Keep pets and fans away from the area.
- Work in a well-ventilated, room-temperature space.
| Preparation Step | Expected Outcome | |
|---|---|---|
| Box Selection | Provides the structural frame for resin | |
| Surface Leveling | Ensures the lid doesn’t cure at an angle | |
| Dust Control | Maintains a glass-like finish on top |
Key Takeaway: Success depends heavily on the initial preparation of your environment and materials. Choosing a recessed lid is non-negotiable for this specific resin technique to prevent messy overflows.
A properly prepared workspace reduces the risk of project failure by nearly half.
What supplies are needed for this project?

Gathering the right materials for how to make a homemade jewelry box ensures you do not have to stop mid-process. You will need unfinished wood, resin, various paints, and high-quality brushes to achieve a professional look. Having these on hand allows for a seamless transition between the painting and pouring stages.
What are the essential paints?
Here is the deal: The colors you choose will define the personality of your custom storage piece.
- Use vintage wash for the outer wood grain.
- Pick acrylic craft paints for resin tinting.
- Select contrasting colors for the box interior.
- Ensure all paints are high-quality and water-based.
Which resin tools are required?
Think about it: Mixing resin requires precision and specific tools to avoid sticky messes or curing issues.
- Use disposable plastic measuring cups for accuracy.
- Have plenty of wood stir sticks ready.
- Keep a clear adhesive for sealing edges.
- Use a heat gun or torch for bubbles.
| Supply Category | Specific Item Needed | |
|---|---|---|
| Base Material | Unfinished wood box | |
| Finishing | EnviroTex Lite High Gloss Resin | |
| Coloring | Vintage Wash and Craft Paints |
Key Takeaway: Investing in a high-gloss resin finish transforms a simple wood craft into a luxury-style accessory. Proper measuring tools are the absolute secret to a resin that cures rock-hard without tacky spots.
High-quality supplies directly correlate to the longevity and professional appearance of the final box.
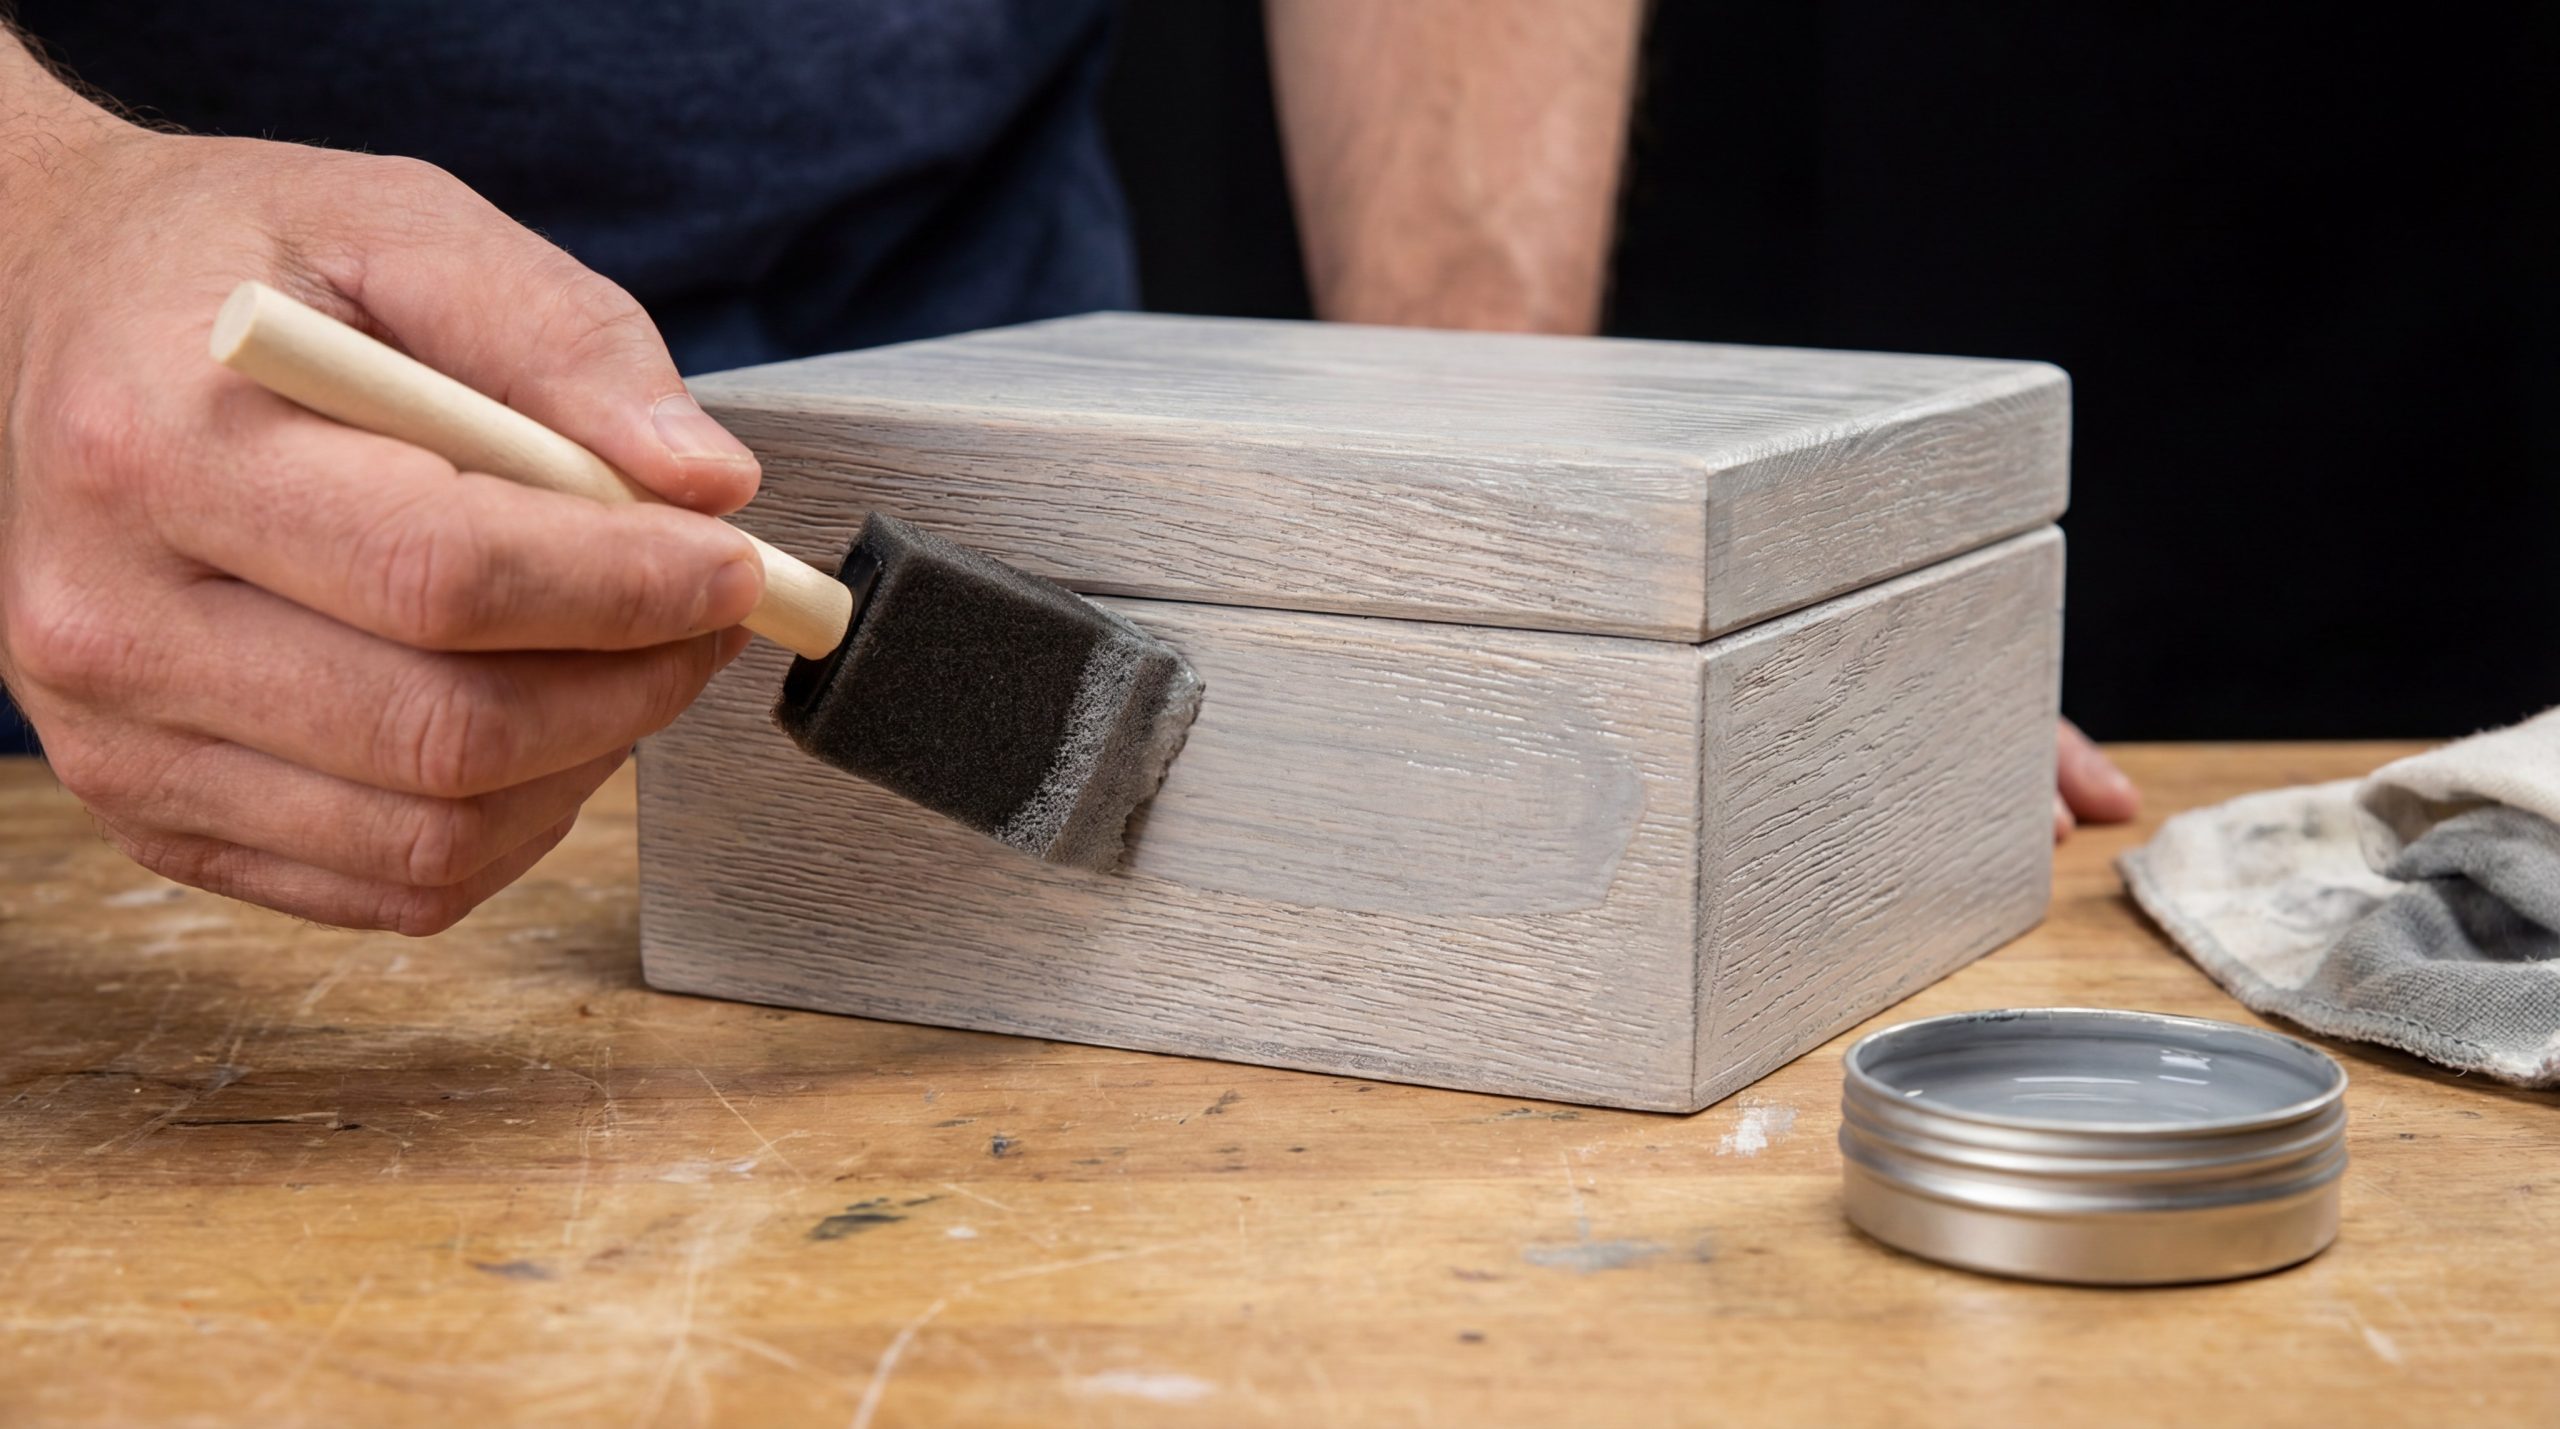
How do you paint and seal the wooden base?

You can master how to make a homemade jewelry box by starting with a thorough coat of paint and a secure seal on the lid. Applying a vintage wash allows the natural wood beauty to shine through while adding a sophisticated pop of color. Sealing the recessed edges is a critical step that prevents resin from leaking into the lower sections of the box.
How to apply the vintage wash?
Wait, there is more: This staining technique provides a rustic yet refined look that traditional opaque paint cannot match.
- Brush the wash onto the wood surface.
- Let it sit for one minute only.
- Wipe away the excess with a clean rag.
- Repeat for the hidden interior sections.
Why is sealing the lid vital?
It gets better: A clear adhesive acts as a dam to keep your liquid resin exactly where it belongs.
- Apply adhesive to all inner lid corners.
- Let it dry completely before pouring resin.
- Check for tiny gaps in the wood grain.
- Use a thin bead for a professional look.
| Sealing Stage | Action Required | |
|---|---|---|
| Painting | Apply wash and wipe for grain effect | |
| Corner Sealing | Use clear adhesive on lid junctions | |
| Drying | Wait for all layers to be non-tacky |
Key Takeaway: The sealing process is the insurance policy for your project, preventing expensive resin spills. A vintage wash offers a more professional boutique look than standard acrylic paint by highlighting natural wood textures.
Precision in the sealing phase ensures that the later resin pour is contained and successful.
How do you mix resin for a glossy finish?

Understanding the mixing ratio is the core of how to make a homemade jewelry box that lasts for years. You must mix equal parts of the resin and hardener to trigger the chemical reaction necessary for curing. Skipping or rushing this step will result in a sticky, tacky lid that never fully hardens or shines.
What is the correct mixing ratio?
Check this out: Most high-gloss resins use a simple one-to-one ratio that is easy to manage even for beginners.
- Pour equal amounts of part A and B.
- Stir slowly to minimize trapped air bubbles.
- Scrape the sides of the cup often.
- Mix for at least two full minutes.
How to prepare the color cups?
You might be wondering: Separate small portions of resin allow you to create the individual colors for your marble design.
- Pour half-tablespoons into small cups.
- Add only one drop of paint per cup.
- Mix thoroughly with a clean stir stick.
- Keep a large portion of clear resin aside.
| Mixing Phase | Technical Requirement | |
|---|---|---|
| Component Ratio | 1:1 Resin to Hardener | |
| Stirring Time | Minimum of 120 seconds | |
| Tinting | 1 drop of paint per small batch |
Key Takeaway: Slow and steady stirring prevents the introduction of excessive air bubbles into the chemical mixture. Always keep some resin clear to act as the base for your colorful drizzles and swirls.
Accurate chemical ratios are the only way to ensure the structural integrity of the resin top.
How do you create a beautiful marbled effect?

The artistic highlight of how to make a homemade jewelry box is the moment you pour and swirl your colors. You start by flooding the recessed lid with clear resin and then drizzling your tinted portions randomly across the surface. This technique allows the colors to suspend and move organically, mimicking the look of expensive natural stone.
How to pour the clear base?
Look: A smooth clear base ensures the colored resin flows easily to every corner of the lid.
- Pour the clear resin into the center.
- Use a stick to push it to the edges.
- Ensure the coverage is thin and even.
- Don’t overfill the recessed area too early.
How to swirl the colors?
The best part? You can get completely creative with how you drag your stir stick through the pigments.
- Drizzle colors in random lines or dots.
- Use a clean stick for the swirling.
- Move in figure-eight or circular patterns.
- Stop before the colors blend too much.
| Marbling Step | Creative Action | |
|---|---|---|
| Clear Pour | Creates the liquid “canvas” | |
| Drizzling | Adds the pigment “paint” | |
| Swirling | Defines the unique marble veins |
Key Takeaway: Less is more when swirling; over-mixing will turn your beautiful marble into a muddy, solid color. The clear resin base is essential for achieving the floating visual effect seen in professional pieces.
Artistic control during the swirling process makes every handmade box a one-of-a-kind original.
How do you remove bubbles for a clear top?
A professional result for how to make a homemade jewelry box requires a crystal-clear surface without tiny trapped air pockets. After you have finished your marbling, you will notice small bubbles rising to the surface of the resin. Removing these promptly is the difference between a high-end look and a basic craft project.
Which tools remove bubbles?
Here is the deal: Heat is the most effective way to pop surface bubbles without disturbing the marble pattern.
- Use a small butane craft torch.
- Wave a heat gun over the surface.
- Keep the heat source moving constantly.
- Exhale gently over small areas if needed.
How to protect the curing resin?
Think about it: The resin takes several hours to cure, and during this time, it is a magnet for dust.
- Cover the box with a cardboard lid.
- Place it in a low-traffic room.
- Ensure the surface remains perfectly flat.
- Let it sit for at least 24 hours.
| Finishing Task | Tool or Method | |
|---|---|---|
| Bubble Removal | Heat gun or butane torch | |
| Surface Protection | Upside-down cardboard box | |
| Curing Time | 24 hours (minimum) |
Key Takeaway: Protecting the box while it dries is just as important as the resin pour itself. Using a cover prevents frustrating debris like pet hair from becoming permanently embedded in your final art piece.
Thermal intervention is the industry standard for achieving a flawless, glass-like resin finish.
What are the best tips for resin success?
You can improve how to make a homemade jewelry box by following advanced tips learned from professional resin artists. Small adjustments in temperature and timing can significantly affect how the resin flows and sets. These refinements ensure that your first attempt looks like it came from a high-end retail store.
How does temperature affect resin?
Wait, there is more: Working in a room that is too cold will make the resin thick and difficult to mix.
- Aim for a room temp of 75°F.
- Warm the resin bottles in water first.
- Avoid high humidity during the process.
- Keep the box away from cold drafts.
Can you fix minor mistakes?
It gets better: If you find a stray hair or dust after it has cured, you can often sand and re-pour.
- Sand the imperfection with fine grit.
- Wipe away all sanding dust carefully.
- Apply a thin, clear top coat of resin.
- This restores the glossy, smooth finish.
| Expert Tip | Reasoning | |
|---|---|---|
| Bottle Warming | Reduces viscosity for easier mixing | |
| Sanding/Re-pour | Fixes surface debris or deep scratches | |
| Thin Top Coat | Adds extra depth and shine to colors |
Key Takeaway: Environmental factors like heat and humidity play a massive role in how resin behaves chemically. Don’t panic if a mistake happens; resin is remarkably forgiving with the sand and re-pour method.
Technical environmental control separates hobbyist results from professional-grade manufacturing quality.
How do you organize your new jewelry box?
Once you learn how to make a homemade jewelry box , the final step is optimizing the interior for your collection. A beautiful box is only useful if it prevents the very tangles and damage you sought to avoid. Strategic placement of inserts and dividers will keep your rings, necklaces, and earrings in pristine condition.
What inserts should you use?
You might be wondering: Soft linings are essential for protecting delicate metals from scratching against the wood.
- Add velvet or felt to the bottom.
- Use foam ring rolls for extra security.
- Install small hooks for various necklaces.
- Place anti-tarnish strips inside the box.
How to arrange different pieces?
Look: Separating different metal types can help prevent chemical reactions and tarnishing over time.
- Keep gold and silver in separate slots.
- Hang chains to prevent messy knotting.
- Use small dishes for stud earrings.
- Store heavy watches on soft pillows.
| Organization Tool | Benefit for Jewelry | |
|---|---|---|
| Velvet Lining | Prevents surface scratches on soft gold | |
| Necklace Hooks | Eliminates tangles in fine chains | |
| Foam Inserts | Keeps rings upright and easy to see |
Key Takeaway: Interior customization is what makes a jewelry box functional rather than just decorative. Using soft materials like velvet is the best way to preserve the luster and value of your pieces.
Thoughtful interior design extends the life of jewelry by preventing mechanical wear and chemical tarnishing.
Are there other jewelry crafts you can try?
Expanding your knowledge of how to make a homemade jewelry box often leads to creating the jewelry that goes inside. There are several beginner-friendly crafts that use similar materials like resin and paint to create stunning accessories. Building a cohesive collection of handmade goods is a rewarding way to express your personal style.
Can you make resin jewelry?
The best part? The leftover resin from your box project is perfect for making matching earrings or pendants.
- Use silicone molds for various shapes.
- Embed glitter or dried flowers inside.
- Add the same paint colors for sets.
- Use UV resin for much faster results.
What other organizers can you build?
Here is the deal: Your organization journey doesn’t have to stop at a single box; you can scale these ideas.
- Build a wall-mounted necklace rack.
- Create a tiered earring display board.
- Decorate a mirror with jewelry hooks.
- Repurpose T-shirts into soft bracelets.
| Related Craft | Materials Needed | |
|---|---|---|
| Resin Pendants | Molds, resin, and jump rings | |
| Wall Displays | Wood slats and decorative hooks | |
| Fabric Jewelry | Recycled textiles and fabric glue |
Key Takeaway: Crafting is a gateway to a fully customized lifestyle where every accessory has a unique story. Using leftover resin for matching jewelry ensures you never waste expensive materials from your box project.
Cross-domain crafting maximizes resource utility and creates a consistent aesthetic across your personal collection.
Frequently Asked Questions
Learning how to make a homemade jewelry box often brings up specific questions about durability and customization. These answers provide the clarity you need to start your project with confidence and achieve the best possible results.
Can I use any type of paint with resin?Yes, but you should only use highly concentrated acrylics or alcohol inks in very small amounts. Adding too much water-based paint can interfere with the chemical curing process, resulting in a sticky finish that never fully sets.
What’s the best way to clean my resin box?A microfiber cloth and mild soapy water are the safest tools for maintaining the glossy shine. Avoid harsh chemicals or abrasive scrubbers, as these can scratch the surface and permanently dull the marbled effect.
Can I add photos to the lid before pouring?Absolutely, but you must seal the photo with a clear glue or decoupage medium first. If you don’t seal the paper, the resin will soak into the fibers and make the image look greasy or translucent.
What if my resin is still sticky after 24 hours?It usually means the ratio was incorrect or the mixing was insufficient to start the reaction. In this case, you may need to scrape off the tacky layer or pour a fresh, correctly mixed layer over it.
Can I make a larger version of this box?Yes, you can scale this project up to any size as long as you have enough resin to cover the recessed lid. Larger projects may require pouring in multiple stages to manage heat and air bubbles more effectively.
Contact us today to explore professional solutions if you are ready to transition from DIY projects to high-volume brand packaging. At YiXin Packaging, we believe that every piece of jewelry deserves a home that reflects its value and beauty. Our vision is to empower creators and brands with premium, custom-engineered containers that create an unforgettable unboxing experience for every customer. Let’s elevate your brand together.