You clean felt in a jewelry box by using a soft-bristled brush or a lint roller to remove surface debris, while persistent stains require dabbing with a cloth dampened in a mixture of cool water and mild detergent. A neglected interior often accumulates skin oils and dust that can eventually scratch your delicate gold and silver pieces. If your current container is beyond saving, learning how to make a jewelry box out of wood allows you to create a high-quality, customized sanctuary for your collection. By building your own, you ensure every square inch of the lining is pristine and perfectly fitted to protect your most valuable assets.
Why learn how to make a jewelry box out of wood?

Learning this craft allows you to create bespoke storage that meets your specific organizational needs while mastering fundamental joinery techniques. Understanding [how to make a jewelry box out of wood] provides you with the freedom to choose premium hardwoods and high-grade linings that retail versions often lack. This journey transforms a simple hobby into the ability to produce heirloom-quality gifts for family and friends.
Improving your joinery skills?
Building a small box is one of the best ways to sharpen your woodworking precision. Because the scale is small, every fraction of an inch matters for the final fit and finish.
- You will practice perfect 45-degree miter cuts.
- You will learn how to manage glue squeeze-out in tight spaces.
- You will master the art of sequential grain matching.
Here is the kicker: the skills you develop on a small jewelry box translate directly to larger furniture projects.
Essential design considerations?
You must consider the scale and proportion of the box to ensure it looks elegant on a dresser. Think about the types of jewelry you own to determine if you need tall compartments for necklaces or shallow slots for rings.
But wait, there is more. You also need to plan for the lid’s weight and the internal clearance required for a sliding tray.
Key TakeawayDesigning your own box ensures that the internal layout serves your unique collection perfectly while teaching you the balance between aesthetics and structural integrity.
| Design Element | Purpose | Impact | |
|---|---|---|---|
| Wall Thickness | Structural Balance | Affects internal storage volume | |
| Grain Flow | Visual Continuity | Creates a professional, high-end look | |
| Compartment Size | Jewelry Safety | Prevents tangling and metal-on-metal scratching |
Careful planning during the design phase eliminates common assembly headaches and results in a more functional final product.
What wood is best for how to make a jewelry box out of wood?

The best woods for this project are stable, figured hardwoods like walnut, cherry, or maple because they provide durability and a beautiful finish. Selecting the right species is a critical early step in how to make a jewelry box out of wood , as the density of the timber affects how well it will hold fine hinges. You want a wood that is dry and seasoned to prevent warping after the box is completed.
Selecting figured hardwoods?
Figured wood, such as bird’s eye maple or curly walnut, adds a level of sophistication that plain lumber cannot match. These patterns catch the light and make even a simple box design look like a professional masterpiece.
- Look for consistent grain patterns across the board.
- Check for any checks or cracks that might expand.
- Ensure the moisture content is low to prevent movement.
The truth is, a small box is the perfect opportunity to use those expensive “fancy” boards you’ve been saving.
Using shop offcuts effectively?
Since jewelry boxes are relatively small, you can often build them entirely from scrap pieces left over from larger furniture builds. This makes the project highly cost-effective while still yielding a high-value item.
Believe it or not, some of the most beautiful boxes are made from the “trash” pile of a major cabinet shop.
Key TakeawayChoosing high-quality hardwood ensures your jewelry box remains stable for decades and provides a luxurious backdrop for your precious metal collection.
| Wood Type | Character | Best Use | |
|---|---|---|---|
| Walnut | Dark, Rich Grain | Luxury heirlooms and contrasting accents | |
| Cherry | Warm, Darkens with Age | Classic, traditional jewelry chests | |
| Figured Maple | Bright, Shimmering | Modern designs and interiors |
Proper material selection is the foundation of any woodworking project that is intended to last for generations.
How do hinges affect how to make a jewelry box out of wood?
Hinges dictate the minimum thickness of your box walls and determine how the lid will interact with the body. When you are figuring out [how to make a jewelry box out of wood], you must select your hinges before you mill your lumber to its final thickness. Most high-quality stop hinges or quadrant hinges require at least 7/16″ or 1/2″ of wall thickness for a secure and safe installation.
Comparing common hinge types?
Stop hinges are excellent for beginners because they hold the lid open at a 95-degree angle without extra hardware. Quadrant hinges are more decorative but require a more complex mortising process involving a drill and a chisel.
- Side rail hinges are discreet and mount directly into the side walls.
- Barrel hinges offer a hidden look but require very precise drilling.
- Butt hinges are classic and reliable for almost any box style.
Here is the deal: your hinge choice can make or break the professional feel of the opening and closing action.
Planning for screw depth?
You must ensure that the screws provided with your hinges will not poke through the back or the top of the box. Always measure the screw length against your final wall thickness during the design phase.
But that is not all you need to worry about. You also need to pre-drill every hole to avoid splitting the delicate hardwood during assembly.
Key TakeawayIntegrating hinge requirements into your initial measurements prevents structural failures and ensures the lid operates smoothly without damaging the wood.
| Hinge Type | Min Wall Thickness | Difficulty Level | |
|---|---|---|---|
| Stop Hinge | 7/16″ | Intermediate | |
| Quadrant Hinge | 1/2″ | Advanced | |
| Piano Hinge | 1/4″ | Beginner |
Selecting the right hardware early in the process ensures that your joinery remains strong and your lid stays perfectly aligned.
How to cut sides for how to make a jewelry box out of wood?
You cut the sides by marking a single long board sequentially so that the grain “wraps” around the corners for a continuous look. This technique is a hallmark of how to make a jewelry box out of wood and elevates the project from a simple crate to a fine piece of furniture. Ensuring that opposite sides are exactly the same length is the secret to a perfectly square box.
Marking for continuous grain?
To achieve a wrap-around effect, you must cut your front, side, back, and second side in order from one piece of wood. Label the inside of each piece with numbers and arrows so you don’t lose track of the sequence during glue-up.
- Start with a board at least 40 inches long for a standard box.
- Use a sharp pencil or marking knife for high precision.
- Keep your offcuts for testing your saw settings.
It gets better: when the grain matches at the corners, the joints become almost invisible to the naked eye.
Ensuring matched lengths?
If your front and back pieces differ by even a hair, your box will be out of square and the lid will never fit right. Use a stop block on your miter saw or table saw to guarantee that identical parts are truly identical.
But wait, there is more. You should always stand the matching pieces side-by-side to verify they are perfectly flush before moving to the next step.
Key TakeawayPrecision in cutting and marking ensures the box remains square and creates a visual flow that highlights the natural beauty of the timber.
| Component | Quantity | Measurement Note | |
|---|---|---|---|
| Front/Back | 2 | Must be identical to 1/128″ | |
| Left/Right Sides | 2 | Determine the depth of your box | |
| Internal Dividers | Variable | Cut after the main box is glued up |
Accurate measurement at this stage saves hours of sanding and corrective work later in the assembly process.
How to cut miters for how to make a jewelry box out of wood?
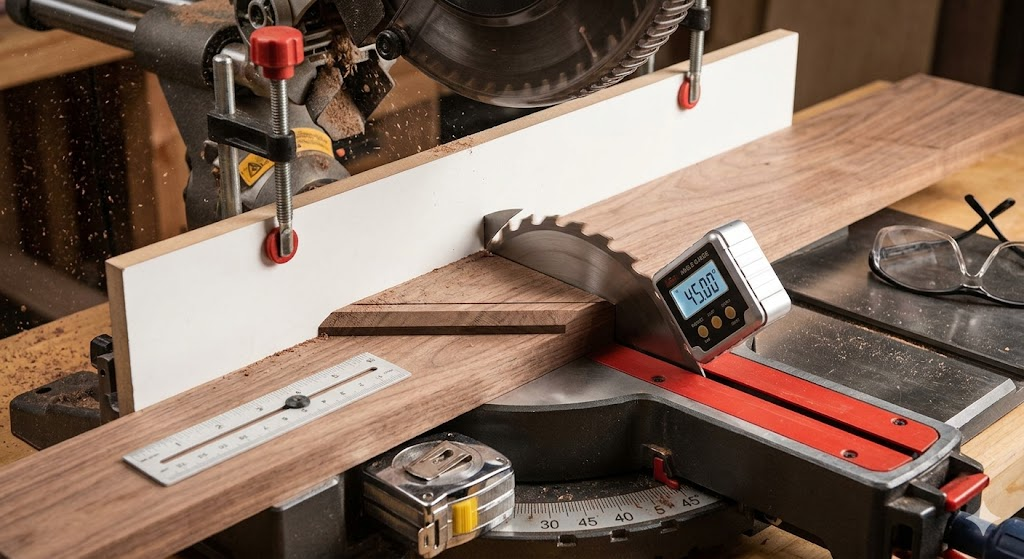
You cut miters by setting your saw to exactly 45 degrees and using a sacrificial backer board to prevent the wood fibers from tearing out. Mastery of these angled cuts is essential when learning [how to make a jewelry box out of wood] because the tight fit of a miter joint determines the strength of the box. Using a sharp, high-tooth-count blade will result in a glass-smooth surface that bonds better with glue.
Setting up a backer board?
A backer board supports the wood at the point of the cut, ensuring the exit side of the blade doesn’t splinter the delicate grain. This is especially important when working with brittle hardwoods like walnut or oak.
- Clamp the backer board firmly to your miter fence.
- Replace the board once the slot becomes too wide.
- Use scrap wood to test the angle before cutting your project pieces.
The kicker is that this simple piece of scrap wood is the difference between a amateur edge and a professional one.
Executing clean 45-degree cuts?
Ensure your saw is perfectly calibrated by cutting two pieces of scrap and checking them with a machinist’s square. Even a half-degree error will result in a visible gap that is impossible to hide with wood filler.
But here is the real secret. Always cut your pieces slightly long and “sneak up” on the final dimension with thin shavings.
Key TakeawayPerfect miters provide the structural foundation for your box and create a clean, modern aesthetic that allows the wood grain to take center stage.
| Miter Tool | Benefit | Drawback | |
|---|---|---|---|
| Miter Saw | Fast and repeatable | Requires careful calibration | |
| Table Saw Sled | Extremely accurate | Takes time to build the jig | |
| Hand Plane/Shooting Board | Best possible finish | High skill requirement |
Investing time in saw setup ensures that your corners close tightly without the need for excessive clamping pressure.
How to mill grooves for how to make a jewelry box out of wood?
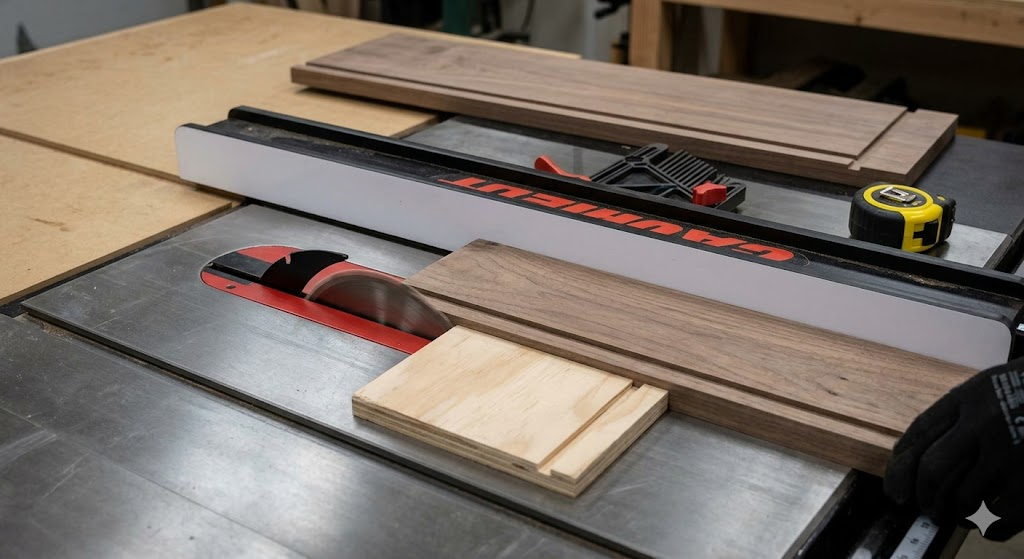
You mill grooves by using a table saw or router to cut a channel about 1/4″ from the bottom edge of each side piece. This channel is a vital part of how to make a jewelry box out of wood , as it holds the bottom panel in place without the need for nails or screws. The depth of the groove should be roughly half the thickness of your wood to maintain structural integrity.
Table saw setup for bottoms?
Set your blade height to 1/4″ and adjust the fence so the groove is consistently positioned on all four sides. It is best to make two passes, adjusting the fence slightly between them, to achieve a width that perfectly matches your bottom panel material.
- Always use a featherboard to keep the wood tight against the fence.
- Run a test piece of scrap through first to verify the fit.
- Ensure the groove is deep enough to allow for wood expansion.
Here is something to consider: if the groove is too tight, the bottom panel can actually crack your box as the seasons change.
Sizing the bottom panel?
Measure the distance between the bottom of the grooves and subtract about 1/16″ to give the panel “room to breathe.” If you are using a solid wood bottom, this clearance is mandatory to prevent the miter joints from blowing apart during humid months.
But wait, there is more. You can use 1/4″ MDF or plywood for the bottom since it will eventually be covered in felt anyway.
Key TakeawayProperly milled grooves allow the box bottom to float freely, which protects the joinery from the natural movement of the wood.
| Groove Dimension | Recommendation | Purpose | |
|---|---|---|---|
| Height from Bottom | 1/4″ | Leaves enough meat for the joint | |
| Depth of Cut | 1/4″ | Provides secure seating for the panel | |
| Width of Groove | Match panel thickness | Prevents rattling or binding |
Correct groove placement ensures that the bottom of your box is invisible from the outside while providing a flat surface for your jewelry.
How to make panels for how to make a jewelry box out of wood?
You make panels by resawing thicker lumber into thin sheets and gluing them edge-to-edge to create the width needed for the lid and bottom. This technique is used in [how to make a jewelry box out of wood] to create “book-matched” patterns where the grain reflects like a mirror across the center line. Once the panels are glued, they must be sanded flat and trimmed to fit the dimensions of your box body.
Preparing the composite bottom?
For the bottom panel, you can use a stable material like MDF or thin plywood to provide a flat, non-warping surface for the lining. Since the jewelry will sit on this, it needs to be perfectly smooth to prevent any lumps in the felt.
- Cut the panel slightly smaller than the total distance between grooves.
- Sand the edges slightly to make assembly easier.
- Ensure the panel is flat and free of any bowing.
The simple truth is that a stable bottom panel is the unsung hero of a long-lasting jewelry box.
Milling the top panel?
The top panel is the most visible part of your project, so choose your best-looking wood for this piece. If you want a “raised” look, you can mill a tongue around the edges so the center of the panel sits flush with the top of the box.
But wait, there is a catch. You must ensure the top panel is thick enough to accept the short screws used for the hinges.
Key TakeawayHigh-quality panels provide the visual “wow” factor for your box and offer a stable foundation for the interior felt lining.
| Panel Material | Pros | Cons | |
|---|---|---|---|
| Solid Hardwood | Beautiful, premium feel | Can warp or expand | |
| Plywood | Very stable, easy to use | Edges must be hidden | |
| MDF | Perfectly flat, cheap | Requires lining or veneer |
Using a mix of solid wood for the lid and stable composites for the bottom offers the best balance of beauty and durability.
How to glue up how to make a jewelry box out of wood?
You glue up the box by applying a thin layer of wood glue to the mitered faces and using a strap clamp or blue painter’s tape to pull the corners tight. The glue-up is the most stressful part of how to make a jewelry box out of wood , but a successful dry fit beforehand will eliminate most problems. You must ensure the box is perfectly square by measuring the diagonals before the glue begins to set.
Conducting a successful dry fit?
Before you open the glue bottle, assemble the entire box with the bottom panel inside to make sure every joint closes perfectly. This is your last chance to trim a panel that is too long or fix a miter that isn’t quite 45 degrees.
- Check that the grain sequence is in the correct order.
- Ensure the bottom panel isn’t “bottoming out” in the grooves.
- Make sure you have all your clamps ready and adjusted.
Here is the kicker: a dry fit is the only way to guarantee a stress-free assembly.
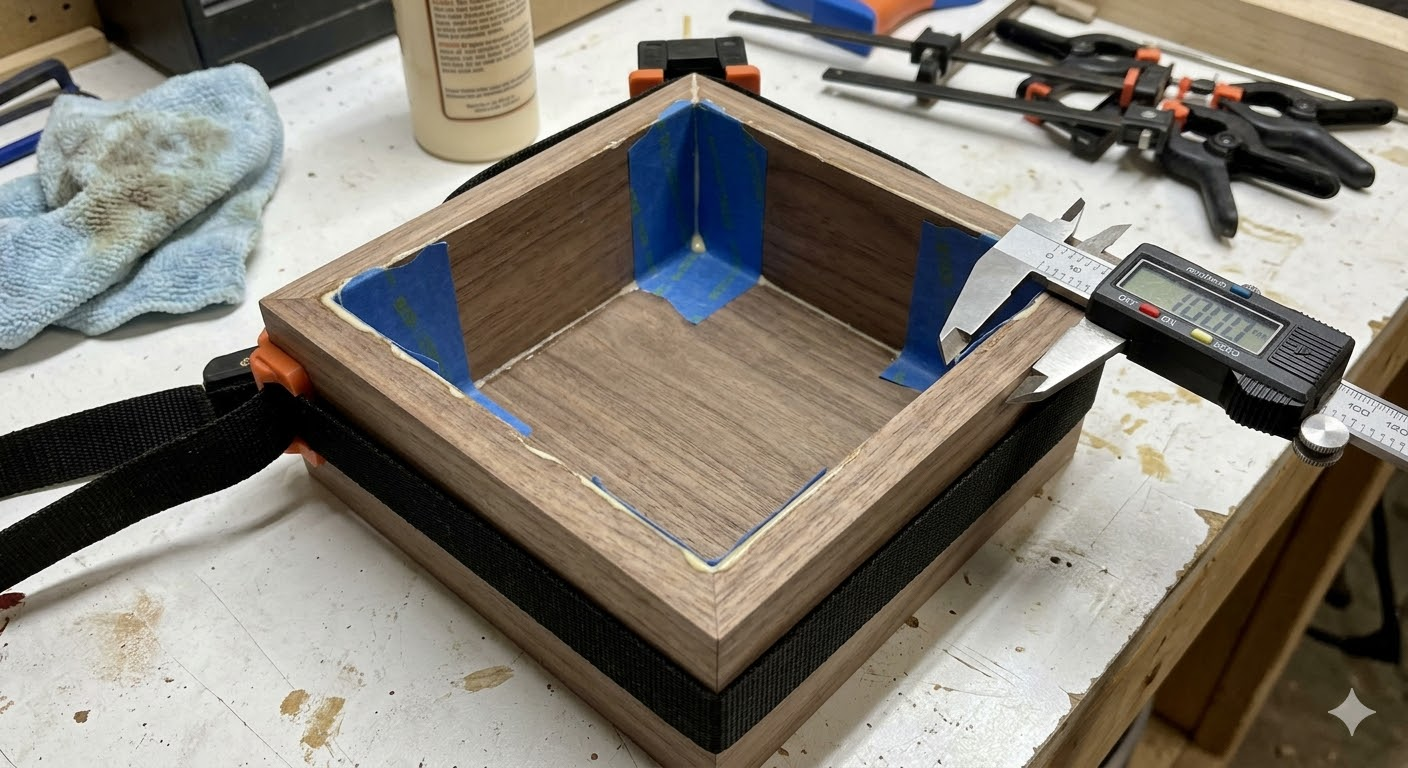
Managing glue squeeze-out?
Wiping away wet glue with a damp cloth can sometimes push the adhesive deep into the wood pores, which will ruin your finish later. Many pros prefer to let the glue dry until it is rubbery and then pop it off with a sharp chisel.
But wait, there is more. You can also apply blue tape to the inside of the corners before gluing to catch the squeeze-out entirely.
Key TakeawayA methodical glue-up ensures that your box is structurally sound, square, and free of unsightly adhesive stains that interfere with the final finish.
| Glue-Up Step | Tool Needed | Critical Goal | |
|---|---|---|---|
| Corner Alignment | Strap Clamp | Uniform pressure on all 4 miters | |
| Squaring Check | Tape Measure | Equal diagonal measurements | |
| Cleanup | Sharp Chisel | Remove dried beads without marring wood |
Taking your time during the assembly process prevents the “wonky” look that plagues many beginner woodworking projects.
How to finish how to make a jewelry box out of wood?
You finish the box by sanding through progressively finer grits of sandpaper and applying a protective coating like wipe-on poly, lacquer, or wax. The finishing stage is what truly defines [how to make a jewelry box out of wood] as an art form, as it brings out the hidden depth and shimmer in the grain. A good finish should feel smooth to the touch and provide enough protection against skin oils and household dust.
Final sanding for clarity?
Start with 120-grit sandpaper to remove any mill marks and work your way up to 220-grit for a silky surface. Always sand in the direction of the grain to avoid “pigtail” swirls that become painfully obvious once the finish is applied.
- Use a sanding block to keep your surfaces perfectly flat.
- Vacuum or wipe away all dust between every grit change.
- Check your progress by looking at the wood under a raking light.
Here is the deal: your finish will only ever be as good as your sanding job.
Applying a durable clear finish?
Wipe-on polyurethane is a favorite for jewelry boxes because it is easy to apply in thin, even coats without any specialized equipment. It provides a durable barrier that won’t yellow over time, keeping your walnut dark or your maple bright.
But here is the real secret. Use a piece of 0000 steel wool or a high-grit abrasive pad between coats to achieve a professional “piano” finish.
Key TakeawayA high-quality finish protects the wood from environmental damage and enhances the natural beauty of the timber, making the box a pleasure to use.
| Finish Type | Appearance | Protection Level | |
|---|---|---|---|
| Wipe-on Poly | Natural, Satiny | High | |
| Lacquer | High Gloss, Clear | Medium | |
| Beeswax/Oil | Matte, Organic | Low |
The right finish choice depends on whether you prefer a rugged, natural feel or a sophisticated, high-gloss display piece.
How to line how to make a jewelry box out of wood?
You line the interior by cutting felt or velvet to the exact size of your panels and adhering it with a light coat of spray adhesive. This is the final touch in learning [how to make a jewelry box out of wood], and it serves the practical purpose of cushioning your jewelry against the hard timber. For a professional look, ensure the edges of the felt are crisp and that there are no air bubbles trapped under the fabric.
Measuring felt for the interior?
The most accurate way to measure is to use the actual wooden panels as templates before you glue them into the box. If the box is already assembled, use a piece of cardstock to create a template that fits perfectly in the bottom.
- Use a rotary cutter and a straight edge for the cleanest fabric lines.
- Avoid using too much glue, as it can soak through the felt and leave hard spots.
- Choose a color that contrasts with your wood to make your jewelry pop.
But wait, there is more. You can also line the sides of the box by wrapping thin cardstock in felt and friction-fitting them into place.
Securing the fabric lining?
Spray adhesive is generally better than liquid glue because it provides an even, thin tack that won’t clump or bleed. Apply the adhesive to the back of the felt, wait for it to become tacky, and then carefully press it onto the panel starting from one edge.
Here is the kicker: a well-lined box feels significantly more expensive and luxurious than one with bare wood inside.
Key TakeawayA clean, soft lining prevents your jewelry from tarnishing or scratching while providing a professional, finished look to the interior of your project.
| Lining Material | Texture | Best For | |
|---|---|---|---|
| Wool Felt | Dense, Classic | Heavy watches and bracelets | |
| Velvet | Plush, Shimmering | Delicate rings and earrings | |
| Suede | Rugged, Modern | Men’s jewelry and EDC items |
Proper lining technique is the final step that transforms a wooden container into a functional and protective jewelry sanctuary.
Summing up the process, building your own box allows for a level of detail and care that mass-produced items simply cannot match. If you follow these steps, your jewelry will have a safe, clean, and beautiful home for years to come. For any specific questions about customizing your design or sourcing materials, feel free to contact us today . Our vision is to help you create packaging and storage solutions that are as exceptional as the jewelry they hold, combining expert craftsmanship with a passion for preservation.
Frequently Asked Questions
Can I use water to clean felt?Yes, but only sparingly. You should use a damp cloth rather than soaking the material, as excessive water can cause the felt to shrink or loosen the adhesive holding it to the wood.
What is the best way to remove pet hair from jewelry box felt?A standard lint roller or a piece of high-tack masking tape is the most effective tool. Gently press the tape onto the felt and lift it away to pull the hair out of the fibers without damaging the lining.
How do I know if the felt is high quality?High-quality felt feels dense and resists pilling when you rub it with your thumb. If the material feels thin or you can see the weave through the fibers, it likely won’t provide adequate protection for your jewelry over the long term.
Can I replace the felt if it gets too dirty?Yes, you can carefully peel out the old lining using a dull putty knife. Once the old felt is removed, sand away any residual glue from the wood before applying a fresh piece of fabric.
What is the best color for a jewelry box lining?Neutral tones like cream, grey, or midnight blue are generally best. These colors allow the sparkle of gemstones and the luster of precious metals to stand out without competing with the background.