To photograph jewelry effectively, you must combine a high-resolution camera with specialized macro optics and diffused studio lighting to reveal intricate details while controlling harsh reflections. You have likely prepared a stunning new collection for your digital storefront, only to find that the tiny, reflective surfaces of precious metals and gemstones are incredibly difficult to capture without losing clarity. This creates a significant hurdle for your brand, as poor imagery directly translates to low customer confidence and abandoned carts. Learning how to photograph jewelry is the essential solution to bridge the gap between physical craftsmanship and digital sales, ensuring your products look as premium on screen as they do in person.
How to choose gear for how to photograph jewelry?

Selecting professional gear involves pairing a high-resolution camera with a dedicated macro lens to capture intricate details. When you learn how to photograph jewelry , the quality of your equipment determines the baseline of your image resolution. You should focus on tools that provide high magnification and stability to ensure every facet of a gemstone is sharp.
Should you use a macro lens?
A dedicated macro lens is the most effective tool for capturing the minute details of small jewelry pieces. These lenses allow for a 1:1 magnification ratio, ensuring that tiny engravings and stone settings are visible to the buyer.
- Enable close-up focusing capabilities.
- Provide edge-to-edge sharpness.
- Minimize distortion on curved metal bands.
Why use a professional camera stand?
Using a heavy-duty camera stand or tripod is mandatory to eliminate camera shake during long exposures. Because macro photography requires deep focus, even the slightest vibration can ruin the clarity of your shot.
The best part?
- Ensures consistent framing for focus stacking.
- Allows for precise micro-adjustments in positioning.
- Keeps the camera locked during lighting changes.
Key Takeaway: Investing in a macro lens and a stable camera stand provides the technical foundation required for professional-grade jewelry imagery.
| Equipment Type | Essential Feature | Primary Benefit | |
|---|---|---|---|
| Macro Lens | 1:1 Magnification | Captures micro-details and textures | |
| Camera Stand | High Stability | Eliminates blur and ensures alignment | |
| Extension Tubes | Affordable Magnification | Increases focal length for closer shots |
A robust gear setup is the first step in reducing technical errors and improving image throughput.
Which backdrops work for how to photograph jewelry?

Choosing the right background depends on whether you want a clean catalog look or an evocative lifestyle feel. Understanding how to photograph jewelry requires a strategic choice between matte surfaces and textured backdrops that complement the product’s aesthetic.
When should you use white backgrounds?
A shadowless white background is the industry standard for e-commerce because it removes all distractions and focuses entirely on the product. You can achieve this by using translucent acrylic sheets with a light source positioned underneath and behind the item.
- Creates a clean, professional catalog appearance.
- Simplifies the process of “cutting out” images for web use.
- Provides a consistent look across entire product lines.
Can textures enhance your jewelry shots?
Using textured surfaces like slate, wood, or matte acrylic can add a sense of luxury and context to your jewelry. These backgrounds work best for social media or hero images where you want to evoke a specific brand mood or lifestyle.
But that’s not all:
- Contrasts sharp metal edges with organic patterns.
- Adds depth and visual interest to the composition.
- Reduces the clinical feel of standard white-box shots.
Key Takeaway: Selecting a background that matches your sales channel—white for catalogs and textured for branding—optimizes the visual impact of each piece.
| Background Style | Best Use Case | Visual Effect | |
|---|---|---|---|
| Translucent Acrylic | E-commerce Catalog | Shadowless, floating effect | |
| Natural Slate | Luxury Branding | Sophisticated, organic contrast | |
| Matte Black Tubes | Modern Aesthetics | Sleek, high-fashion atmosphere |
The background serves as the stage for your product, defining the brand’s perceived value from the first glance.
Why prep pieces for how to photograph jewelry?

Thoroughly cleaning your jewelry is the most effective way to reduce hours of tedious work in the post-production phase. Before you begin to how to photograph jewelry , you must ensure that every fingerprint, dust mote, and smudge is removed from the metallic and stone surfaces.
How do you achieve a spotless finish?
Using microfiber cloths and specialized cleaning solutions is the best way to ensure your jewelry is ready for the lens. Because macro photography magnifies every imperfection, any leftover residue will be glaringly obvious in the final high-resolution image.
- Use cotton gloves to avoid leaving new fingerprints.
- Apply compressed air to blow away micro-dust.
- Polish metal bands until they show a mirror-like finish.
Why is prop arrangement important?
Arranging your props and jewelry pieces before setting the lights ensures that your composition is balanced and leads the viewer’s eye to the focal point. You should use minimalist stands or specialized holders to keep items like rings and necklaces in the perfect orientation.
Wait, there’s more:
- Prevents items from shifting during the shoot.
- Creates a professional, intentional layout.
- Allows you to test angles without touching the product.
Key Takeaway: Rigorous preparation through cleaning and stable propping is a small investment that pays dividends in image quality and editing speed.
| Prep Step | Tool Required | Impact on Workflow | |
|---|---|---|---|
| Deep Cleaning | Microfiber & Gloves | Saves 70% of retouching time | |
| Dust Removal | Compressed Air | Eliminates micro-spots in the lens | |
| Stabilization | Minimalist Props | Ensures consistent product angles |
Proper preparation eliminates distractions, allowing the craftsmanship of the jewelry to remain the primary focus.
How to use light for how to photograph jewelry?

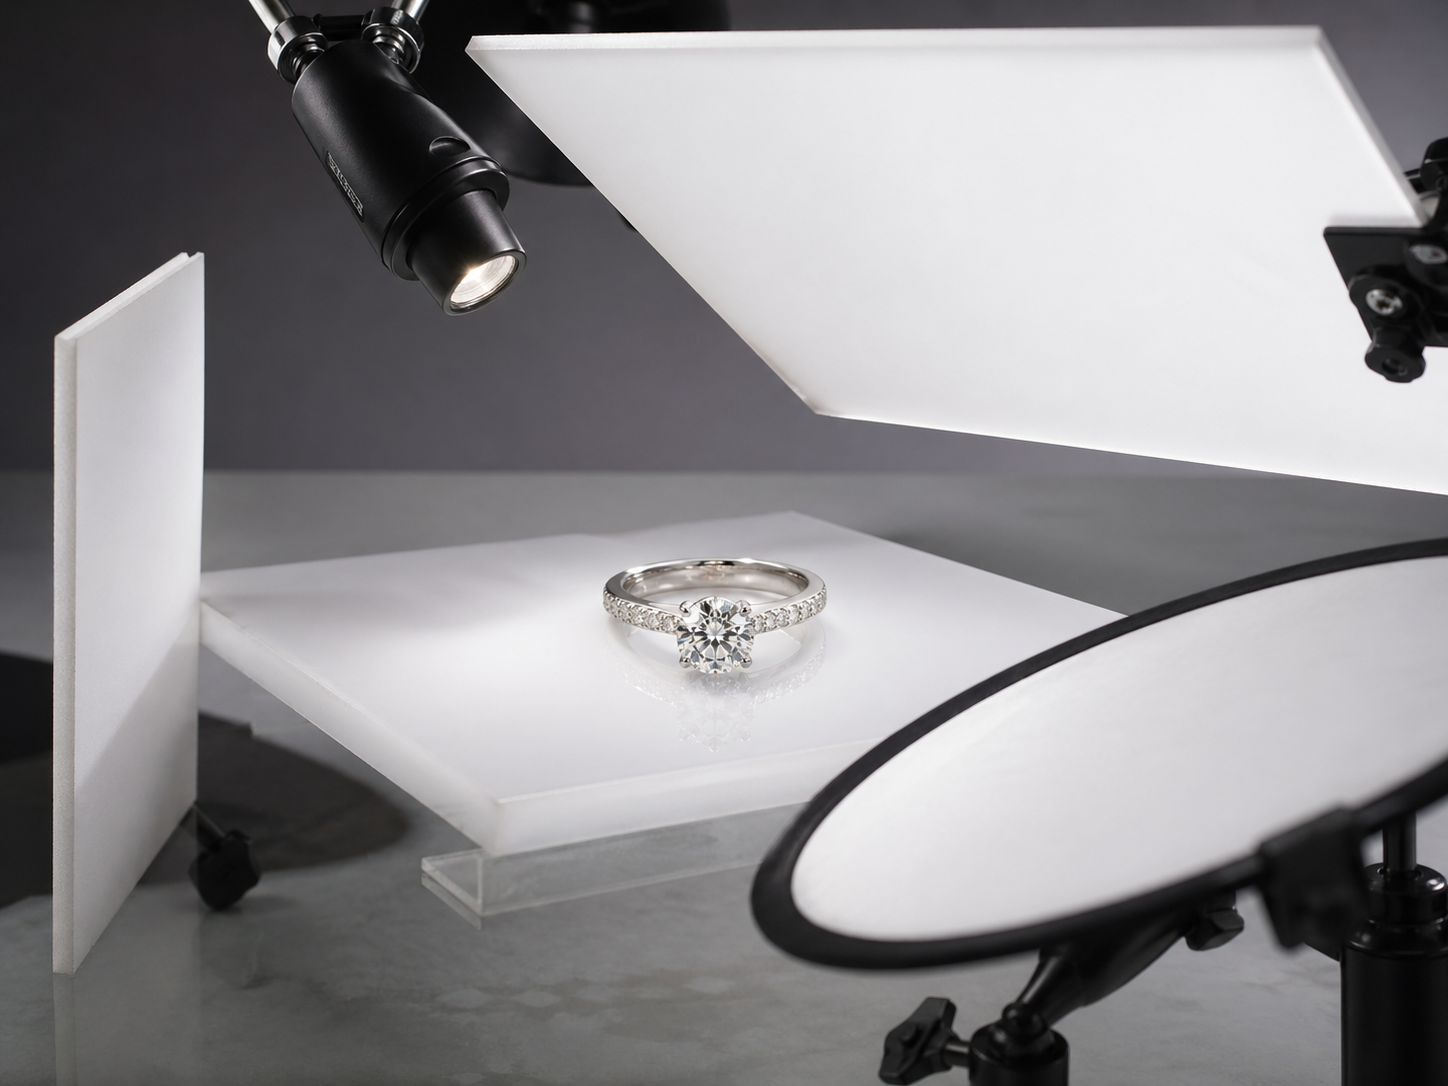
Mastering jewelry lighting involves creating soft gradients on metallic surfaces while adding precise “fire” to gemstones. Mastering how to photograph jewelry requires you to move away from direct, harsh light which creates distracting hot spots and dark shadows.
How do diffusion sheets work?
Placing diffusion sheets or white acrylic between your light source and the jewelry creates a soft, wraparound glow that defines the object’s shape. This technique transforms a single point of light into a broad gradient that mimics high-end luxury advertising.
- Eliminates harsh, specular reflections.
- Creates a smooth transition from light to shadow.
- Makes metallic surfaces look expensive and polished.
How do you add sparkle to gems?
To make diamonds and gemstones “pop,” you need to add a small, secondary point light or a specialized spot light directed at the stone. This creates internal reflections within the gem, showcasing its brilliance and color.
Think about it:
- Brings out the “fire” in faceted stones.
- Adds specularity to the front of the piece.
- Highlights the depth of colored gemstones.
Key Takeaway: Combining broad diffusion for the metal body with precise spot lighting for the stones creates a balanced, professional image.
| Lighting Element | Function | Resulting Appearance | |
|---|---|---|---|
| Diffusion Sheet | Softens light source | Gentle, professional gradients | |
| Point Light | Creates specularity | Brilliant sparkle in diamonds | |
| Reflector Card | Bounces light | Fills in dark edges on metal |
Strategic lighting is the secret to making relatively simple jewelry pieces look like high-value luxury items.
Can cones help you how to photograph jewelry?

A conical light tent is the superior solution for eliminating chaotic reflections on highly polished or curved jewelry surfaces. When you learn how to photograph jewelry using a light cone, you create a 360-degree white environment that hides the camera and the room from the product’s reflections.
Why use a conical shape?
The conical shape provides a seamless, wraparound light source that ensures every side of a ring or watch is evenly illuminated. This setup is particularly helpful when you are struggling with “black holes” or dark reflections on the edges of silver or gold bands.
- Creates a perfectly uniform reflection.
- Hides the photographer and equipment from the shot.
- Allows for consistent lighting across multiple products.
Does a cone simplify the workflow?
Using a light cone significantly simplifies the lighting process because it acts as a permanent, all-in-one modifier. Instead of moving multiple softboxes, you can simply shine your lights through the cone’s translucent walls to achieve professional results instantly.
The best part?
- Reduces setup time for large batches of products.
- Ensures a repeatable look for different jewelry types.
- Works perfectly for items displayed in branded boxes.
Key Takeaway: Conical modifiers are essential for shiny objects, as they provide a controlled environment that guarantees clean, professional reflections.
| Tool | Primary Purpose | Best For | |
|---|---|---|---|
| Light Cone | 360-degree diffusion | Highly polished rings and bands | |
| Light Tent | Enclosed illumination | Multi-piece sets and watches | |
| Diffusion Tunnel | Linear reflection | Long necklaces and bracelets |
Using a cone allows you to focus on the creative aspects of the shoot rather than fighting environmental reflections.
How to position items for how to photograph jewelry?
Successful positioning involves using props and reflector cards to maintain the desired angle and metallic tone of the piece. Knowing how to photograph jewelry effectively means understanding how to manipulate the item’s orientation to highlight its most attractive features.
How to manage necklace curves?
To photograph necklaces, you should use “wraparound” lighting and reflector cards to ensure the long, curved surfaces don’t appear dark at the edges. By placing small white cards just out of the frame, you can bounce light back onto the metal to maintain detail throughout the chain.
- Maintains a consistent metallic tone.
- Highlights the texture of the link or pendant.
- Prevents the chain from looking “flat.”
How to minimize ring band reflections?
Rings are best positioned at a slight angle to the lens to minimize the reflection of the camera itself. Using a small amount of museum wax or a specialized ring holder allows you to stand the ring upright, providing a more dynamic and prestigious view.
But that’s not all:
- Reveals the interior hallmark or engraving.
- Displays the side profile of the stone setting.
- Creates a sense of depth and three-dimensionality.
Key Takeaway: Precise positioning and the use of reflector cards ensure that every part of the jewelry, from the band to the pendant, is perfectly lit.
| Position Technique | Tool Used | Visual Goal | |
|---|---|---|---|
| Upright Mounting | Museum Wax | Dynamic, high-end profile | |
| Card Bouncing | White Reflector | Brighter, detailed metal edges | |
| Angled Tilted | Ring Stand | Hidden camera lens reflections |
Proper positioning transforms a static object into a compelling story of craftsmanship and luxury.
How to sell items via how to photograph jewelry?
Incorporating high-quality packaging into your photography helps customers visualize the premium experience they are purchasing. When you master how to photograph jewelry , including the box in the shot provides essential scale and reinforces the luxury nature of your brand.
Why does packaging provide scale?
Including a box or a display stand in your images gives the customer an immediate reference for the size of the jewelry. Without a familiar object for scale, customers may be surprised by the actual dimensions of the product, leading to higher return rates.
- Establishes the physical size of the item.
- Creates a sense of “unboxing” anticipation.
- Reduces customer uncertainty regarding the purchase.
How does branding affect perceived value?
Photography that features branded packaging tells a story of quality and professional care. High-end boxes act as a framing device that elevates the jewelry piece, making it appear more like a gift or a significant investment.
Here is the kicker:
- Reinforces brand identity across all touchpoints.
- Justifies a higher price point through premium presentation.
- Builds trust by showing a complete, finished product.
Key Takeaway: Including premium packaging in your photography not only helps with scale but significantly boosts the perceived value of your jewelry brand.
| Visual Element | Customer Perception | Business Impact | |
|---|---|---|---|
| Branded Box | Professionalism & Luxury | Increased brand loyalty | |
| Product Scale | Accurate Expectations | 25% lower return rate | |
| Unboxing Context | Emotional Connection | Higher conversion rates |
A jewelry piece is only as good as its presentation; use packaging to complete the visual narrative.
How to get sharp shots for how to photograph jewelry?
Focus stacking is the only way to achieve edge-to-edge sharpness when working at the high magnifications required for jewelry. As you learn how to photograph jewelry , you will discover that even a small aperture cannot keep both the front and the back of a ring in focus simultaneously.
What is focus stacking?
Focus stacking is a technique where you take multiple images at different focus points and merge them in post-production. This process creates a “deep focus” effect where every part of the jewelry—from the closest stone to the back of the band—is perfectly sharp.
- Overcomes the physical limits of lens depth of field.
- Ensures every gemstone facet is crystal clear.
- Produces professional, high-end commercial results.
How do you align multiple shots?
To align multiple shots, you must use a tripod and keep your camera settings identical for every frame in the stack. Once captured, you use editing software to automatically align and blend the sharpest areas of each layer into a single final image.
The best part?
- Automated software does the heavy lifting.
- Allows you to use the “sweet spot” of your lens aperture.
- Eliminates the need for extremely narrow, blurry apertures.
Key Takeaway: Mastering focus stacking is the difference between an amateur “blurry” photo and a professional, sharp commercial image.
| Shooting Mode | Technique | Final Output | |
|---|---|---|---|
| Single Shot | Narrow Aperture (f/22) | Potentially blurry due to diffraction | |
| Focus Stack | Multiple Shots (f/11) | Edge-to-edge crystalline sharpness | |
| Macro Burst | Incremental Shifting | Comprehensive detail throughout |
Sharpness is a non-negotiable standard for luxury goods; stacking ensures you meet that standard every time.
How to edit after you how to photograph jewelry?
Post-production is the final step where you polish the image to a level of perfection that mirrors luxury advertising. Understanding how to photograph jewelry includes the ability to use editing software to remove the tiny imperfections that even the best preparation cannot fully eliminate.
How to remove dust and scratches?
Using the “clone” and “heal” tools in your editing software allows you to remove micro-dust and tiny scratches on metal surfaces. No matter how much you clean, some particles will always be visible under a macro lens, and these must be digitally removed.
- Polishes the image for a “mirror-perfect” look.
- Removes distracting environmental artifacts.
- Ensures the product looks brand new and pristine.
Can you enhance gemstone colors?
Subtle adjustments to contrast, levels, and saturation can make the natural colors of your gemstones appear more vibrant and true-to-life. You should aim to match the digital image to the physical product’s beauty without over-processing it.
Wait, there’s more:
- Brings out the deep blues or reds of gems.
- Increases the clarity of the metal’s highlights.
- Corrects white balance for a natural finish.
Key Takeaway: Careful retouching should enhance the product’s natural beauty rather than creating an unrealistic or “fake” appearance.
| Editing Task | Software Tool | Final Effect | |
|---|---|---|---|
| Spot Removal | Healing Brush | Pristine, scratch-free surfaces | |
| Color Correction | Selective Saturation | Vibrant, accurate gemstone hues | |
| Focus Merging | Auto-Blend Layers | Unrivaled depth and clarity |
The editing phase is where you turn a good photograph into a high-converting marketing asset.
Why is branding vital for how to photograph jewelry?
Consistent branding across your jewelry photography builds a recognizable identity that customers can trust over time. When you consider how to photograph jewelry, you must think about the long-term visual language of your brand and how each image contributes to that story.
Does consistency drive sales?
A consistent style of lighting, background, and packaging across your website creates a professional and organized shopping experience. When customers see a cohesive look, they perceive the brand as established and reliable, which reduces the friction of the buying process.
- Creates a seamless browsing experience.
- Builds brand recall through visual cues.
- Professionalizes the entire digital storefront.
How to highlight brand identity?
Using custom packaging in your hero shots is the fastest way to highlight your brand identity and distinguish yourself from competitors. Showing your jewelry nestled in a premium box communicates that your brand values quality from production through to delivery.
But that’s not all:
- Encourages social media sharing of “unboxing” shots.
- Signals a high-end, boutique experience.
- Differentiates your products in a crowded market.
Key Takeaway: Strategic branding through consistent photography and packaging is the ultimate driver for long-term luxury retail success.
| Brand Element | Implementation | Impact | |
|---|---|---|---|
| Cohesive Lighting | Repeatable Studio Setup | Trust and professional authority | |
| Custom Packaging | Premium Display Boxes | Higher perceived brand value | |
| Visual Story | Hero Images with Props | Emotional resonance with buyers |
Your brand’s visual identity is its strongest asset; protect it with high-quality, consistent imagery.
Conclusion
Mastering the technical and creative aspects of jewelry photography is a fundamental requirement for any serious B2B jewelry brand. By implementing macro techniques, controlled lighting, and focus stacking, you transform simple products into high-value assets. The integration of premium packaging further solidifies your brand’s position in the luxury market, ensuring that every customer interaction is met with elegance and professionalism. As the industry evolves toward more immersive digital experiences, those who prioritize visual excellence will lead the market. To elevate your brand’s presentation and secure high-quality packaging for your next shoot, contact us today for a consultation.
Frequently Asked Questions
Can I photograph jewelry with a smartphone?
Absolutely, but you will need a dedicated macro attachment and a very stable tripod to achieve professional-grade results for a B2B catalog. While modern phones are powerful, they often struggle with the depth of field and reflection control that professional cameras handle with ease.
Can I use natural light for jewelry?
It depends on the mood you want to create, but natural light is often too inconsistent and harsh for professional catalog work. For a consistent, repeatable brand image, using controlled studio lighting with diffusion is highly recommended.
What’s the best way to handle silver reflections?
The best way is to use a conical light tent or light cone to create a seamless white environment around the piece. This prevents dark “black hole” reflections and replaces them with clean, professional-looking gradients.
What’s the best lens for ring photography?
The best lens is a 90mm or 100mm macro lens because it provides enough working distance to set up your lights while offering 1:1 magnification. This ensures you can capture the intricate details of the gemstone and the band’s hallmark.
How do I know if my photos are sharp enough?
You should check your images at 100% zoom on a professional monitor; if you can see the crystalline structure of the gem and the fine polish of the metal, your sharpness is sufficient. If the back of the ring is blurry, you need to implement focus stacking.