
The best way to get felt out of a jewelry box is through water saturation, which effectively dissolves the water-soluble glues typically used in vintage containers. You likely have a beautiful box that has become a liability because the lining is stained, pilling, or emitting a musty odor that threatens your inventory. It is incredibly frustrating to watch stubborn adhesive residue ruin the wood surface while you try to scrape it away manually. By following professional techniques on how to remove felt from a jewelry box, you can restore the interior to a factory-fresh state. You can discover more about maintaining your brand’s presentation in our comprehensive packaging blog .
Why is water saturation effective for felt removal?
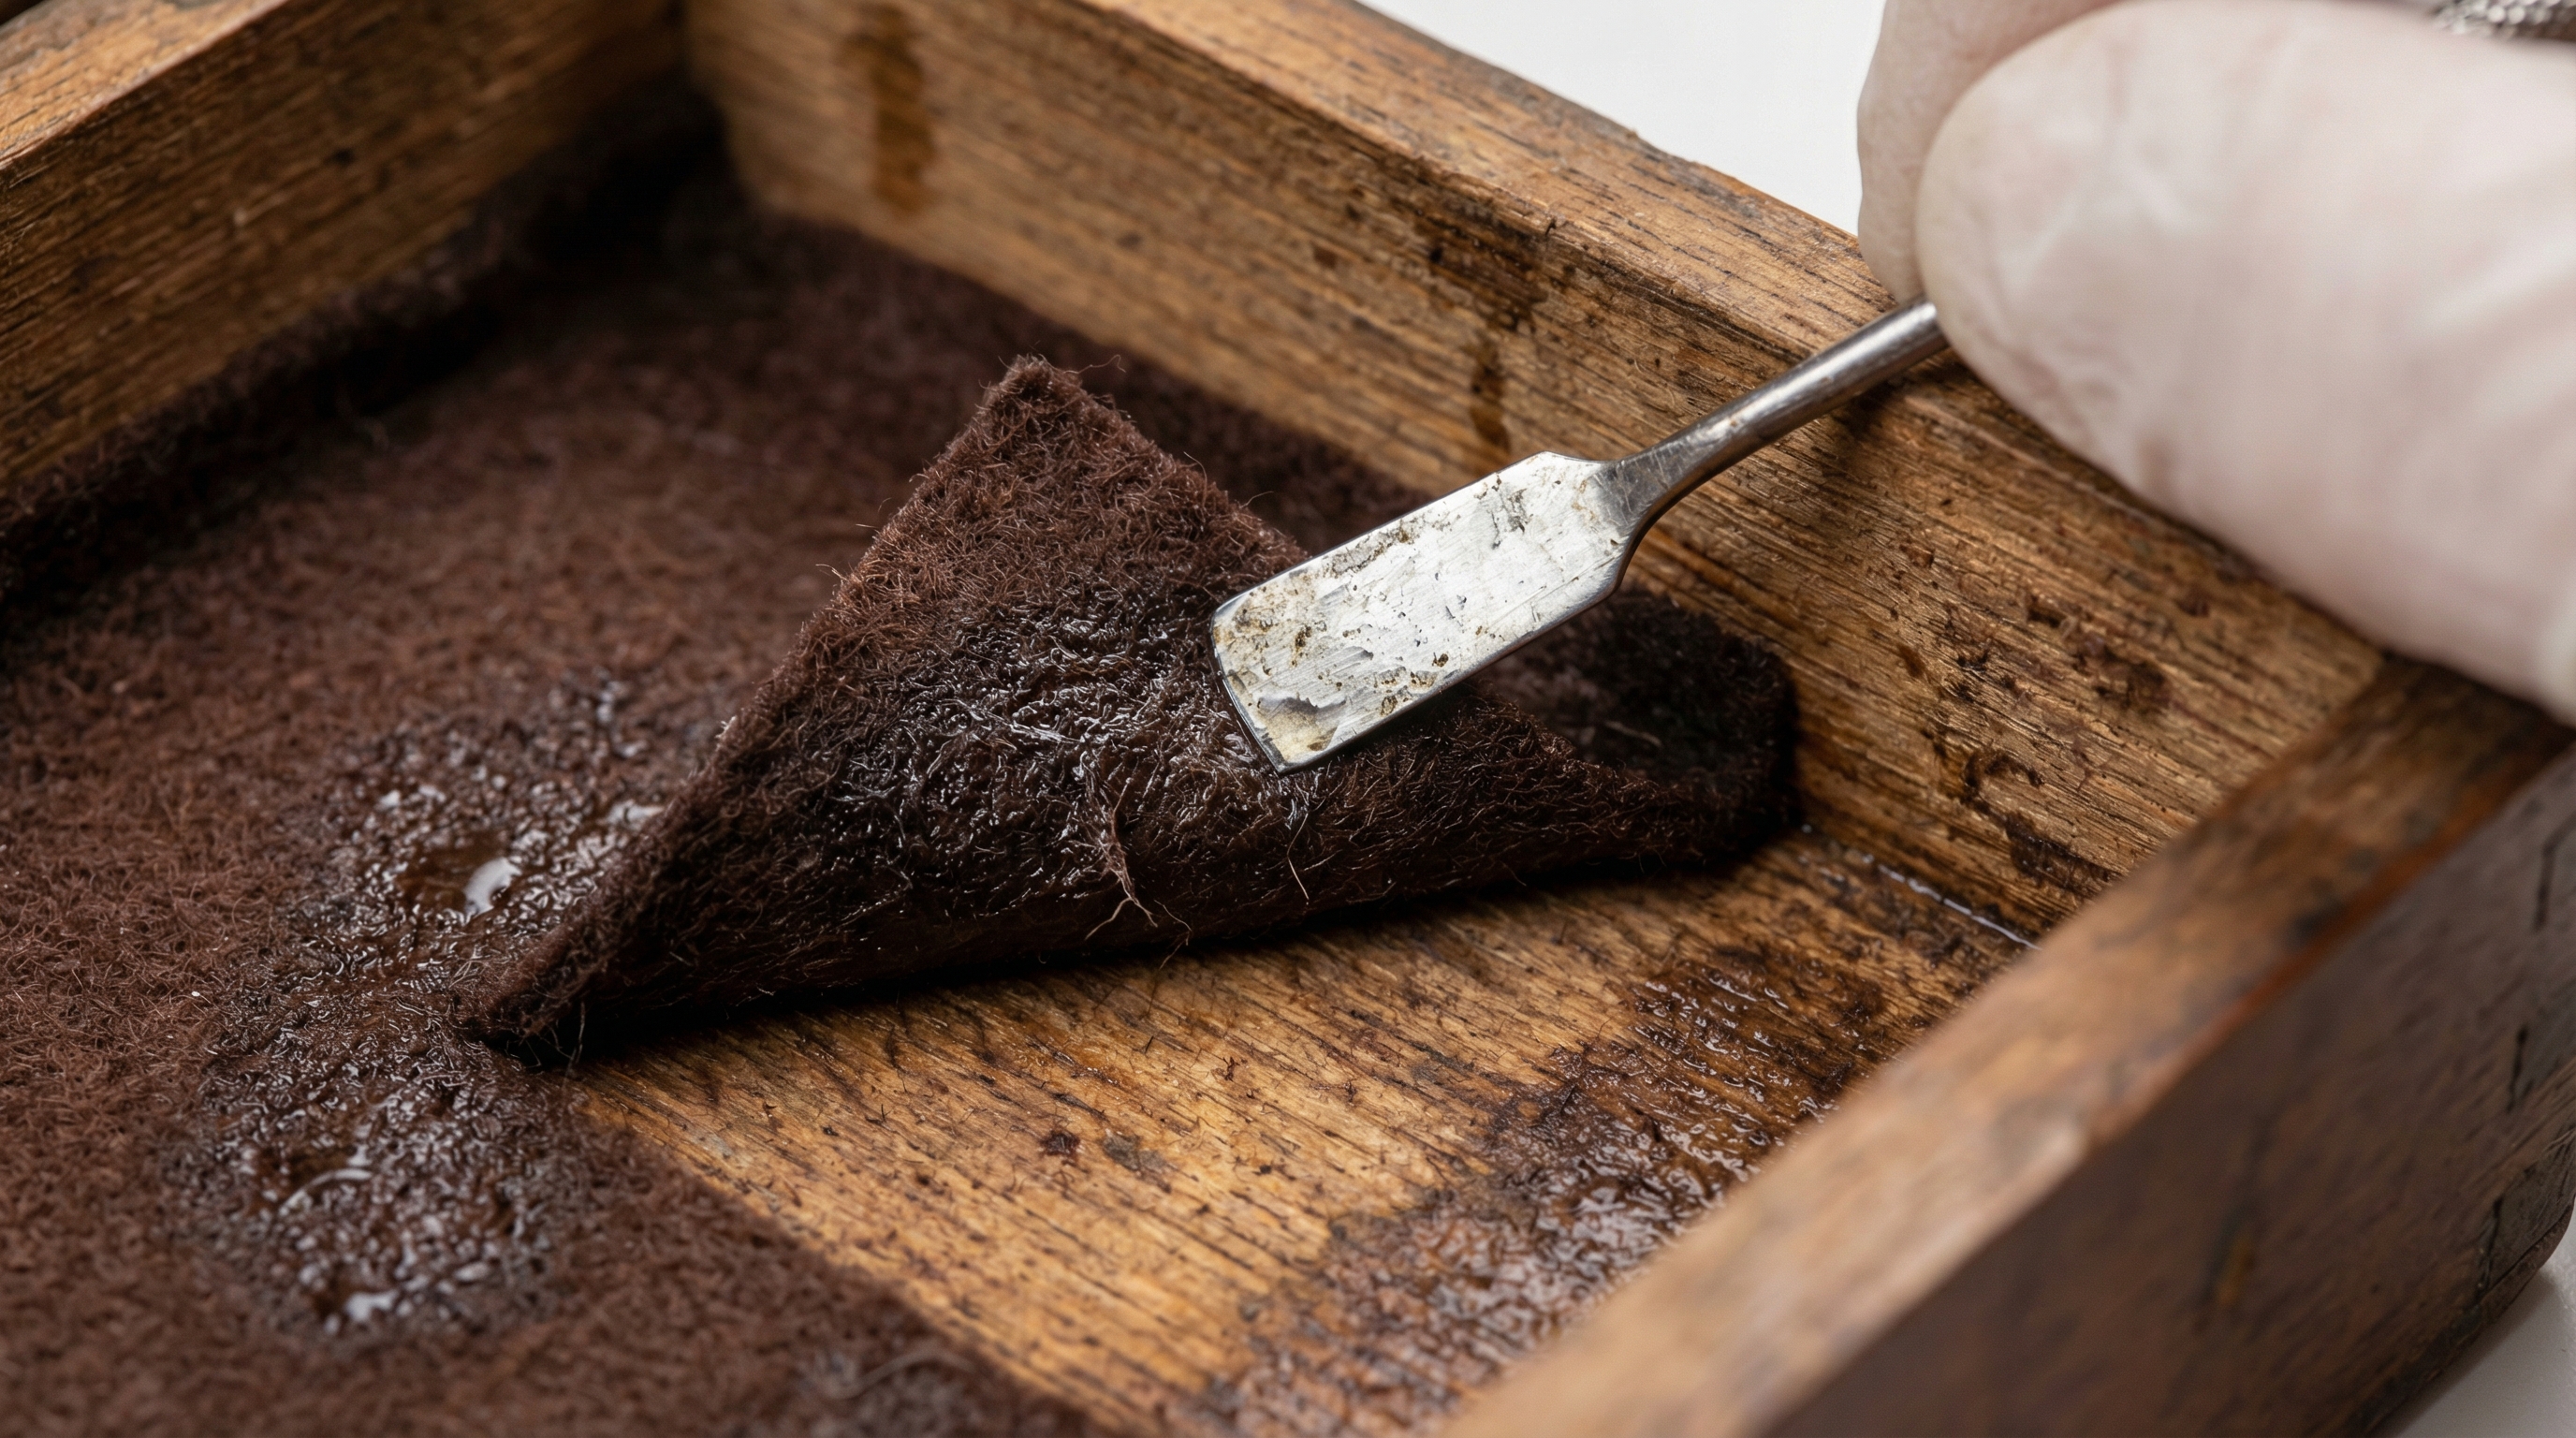
Water saturation is the gold standard because it liquifies aged animal-hide glues without damaging the underlying wood structure. When you learn how to remove felt from a jewelry box using this method, you realize it saves hours of tedious scraping. It is especially useful for vintage pieces where adhesives have become brittle and stubborn over several decades. This process allows the fabric to lift away in large, clean sheets rather than shredding into lint.
Softening the Adhesive Bond
Here’s the deal.
- Use room-temperature water for standard glues.
- Apply moisture directly to the felt surface until saturated.
- Allow the moisture to sit for three to five minutes.
- Use a flat-edge tool to test the corner’s release.
If the felt resists, simply add a small amount of warm water to accelerate the breakdown of the chemical bond. This ensures you do not gouge the wood surface while attempting to peel the material.
| Factor | Water Saturation Method | Manual Scraping Method | |
|---|---|---|---|
| Effort Level | Low – Chemical breakdown does the work | High – Requires physical force | |
| Risk to Wood | Minimal – If dried properly | High – Tool gouges are common | |
| Time Required | 10-15 Minutes | 45-60 Minutes |
The efficiency of water saturation lies in its ability to target the glue layer directly, leaving the wood substrate clean and ready for refinishing.
Key Takeaways:
- Water saturation is the fastest method for older, water-soluble adhesives.
- Patience during the soaking phase prevents damage to the box frame.
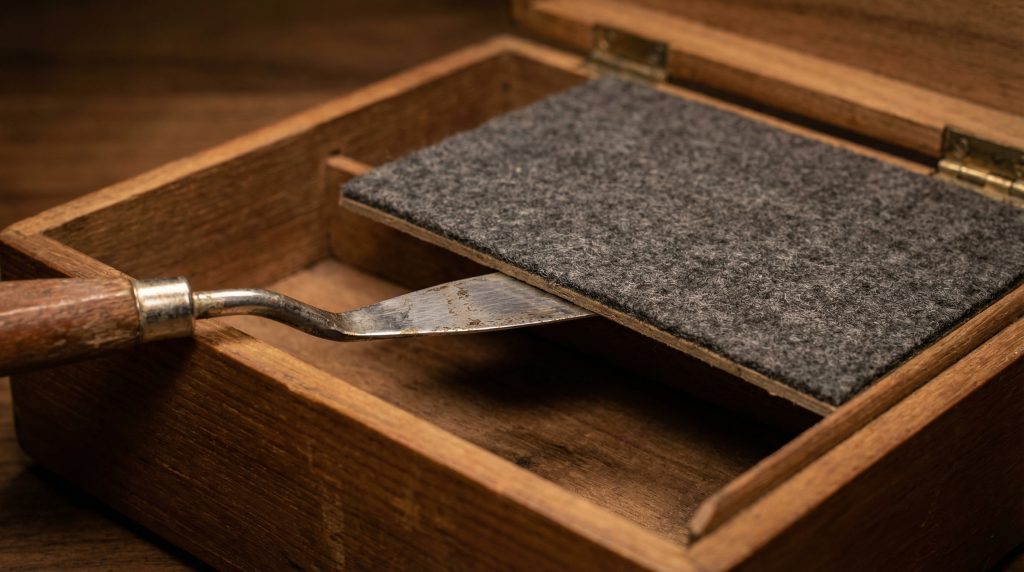
When is dry prying better for removal?
Dry prying is ideal for modern boxes using adhesive tapes or when working with delicate cardboard inserts that might warp with moisture. Understanding how to remove felt from a jewelry box without liquids is essential for protecting contemporary mixed-material designs. This prevents the “wicking” effect where water could stain the exterior fabric or wood finish. It is the preferred method for boxes that utilize removable dividers or modular tray systems.
Protecting Delicate Substrates
Let’s dive in.
- Identify if the insert is made of cardboard or plastic.
- Use a thin painter’s tool to find a loose edge.
- Slowly slide the tool under the fabric to break the tape seal.
- Save the removed pieces to use as precise cutting templates.
You should avoid dry prying if the felt is fused to the wood, as this will result in the fabric tearing. However, for lightweight boutique packaging, this is often the cleanest approach.
| Material Type | Recommended Method | Reason | |
|---|---|---|---|
| Cardboard Inserts | Dry Prying | Prevents warping and structural collapse | |
| Plastic Dividers | Dry Prying | Adhesives often peel easily from plastic | |
| Modern Tape | Dry Prying | Water does not dissolve synthetic tape |
Dry prying preserves the structural integrity of non-wood components, making it the safest choice for contemporary B2B packaging solutions.
Key Takeaways:
- Use dry prying for cardboard-based interiors to avoid water damage.
- Intact dry pieces serve as the perfect templates for new lining.
How do cleaning methods compare?
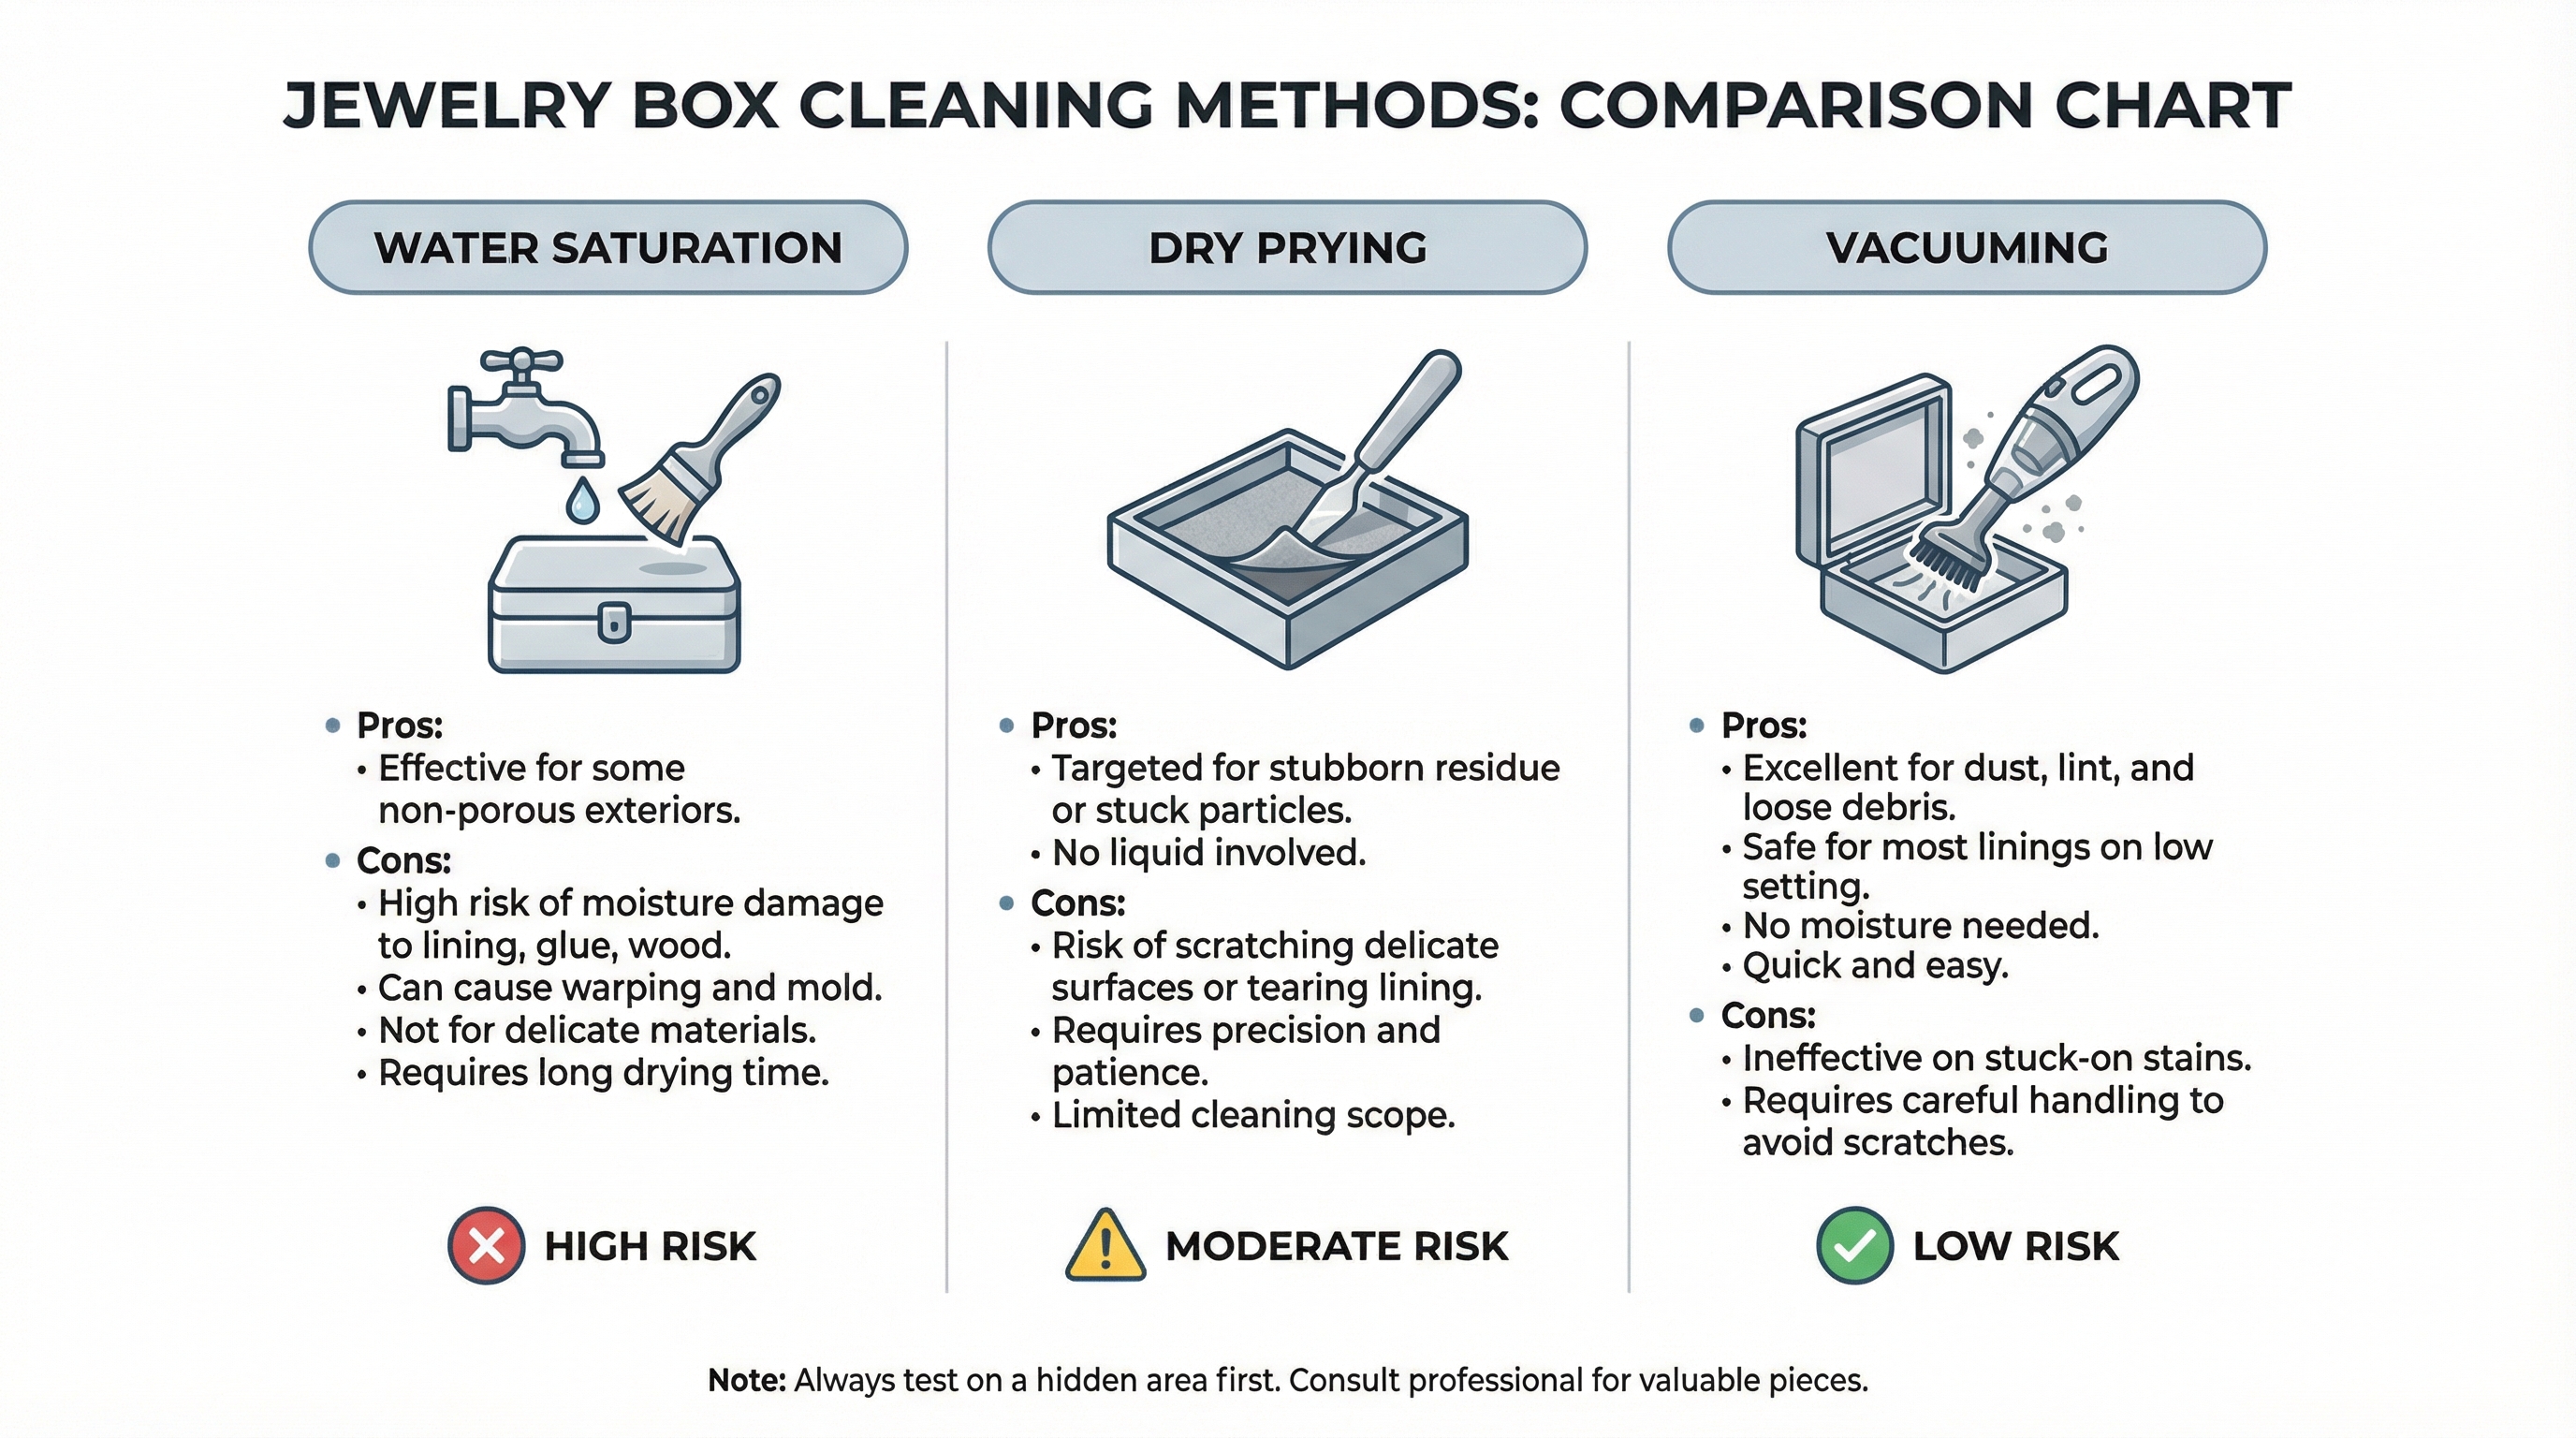
Comparing cleaning methods helps you determine whether a full strip-down or a simple surface refresh is the most cost-effective path. Before you commit to how to remove felt from a jewelry box, assess if the current material provides adequate protection for your high-value inventory. For many B2B clients, maintaining the existing lining is often the first step in quality control. Simple dusting can often extend the life of a box by several years.
Selecting the Right Technique
Why does this matter?
- Vacuuming is best for dust and loose particulates.
- Spot cleaning handles minor cosmetic stains from oils.
- Steam cleaning can refresh fibers but risks glue failure.
- Full removal is necessary for odors or deep chemical stains.
If the fabric is pilling or thinning, cleaning will not restore its protective properties. In these cases, removal and replacement are the only ways to guarantee jewelry safety.
| Method | Best For | Risk Level | |
|---|---|---|---|
| Vacuuming | Routine maintenance | Very Low | |
| Spot Cleaning | Minor cosmetic stains | Moderate – Can cause ring marks | |
| Full Removal | Odors and structural damage | Moderate – Requires relining skill |
Choosing the appropriate method based on the current state of the felt ensures you don’t over-invest in a restoration that could have been a simple cleaning task.
Key Takeaways:
- Always attempt non-invasive cleaning before resorting to full removal.
- Professional results depend on accurately matching the method to the damage type.
Can you use specialized tools for the job?
Utilizing painter’s tools or dental picks allows for precision when extracting material from tight corners or ornate moldings. If you are struggling with how to remove felt from a jewelry box , these tools provide the leverage needed without gouging the wood. Professional restorers often keep a variety of flat-edge tools to handle different adhesive thicknesses. Having the right kit prevents the frustration of accidental slips and surface scratches.
Precision Corner Extraction
Think about it.
- Dental picks reach under the tightest corner folds.
- Painter’s tools provide a wide surface for even prying.
- Small pliers help pull the fabric away once an edge is lifted.
- Soft-bristle brushes remove any remaining dry adhesive dust.
You want to avoid using kitchen knives or sharp screwdrivers, as these often have edges that can easily bite into the wood grain. Specialty tools distribute pressure more evenly across the surface.
| Tool Name | Specific Function | Advantage | |
|---|---|---|---|
| Painter’s Tool | Lifting large flat areas | Even pressure distribution | |
| Dental Pick | Digging out corner adhesive | Reaches inaccessible spots | |
| Needle-nose Pliers | Pulling stubborn fabric bits | Superior grip for small pieces |
Investing in a few inexpensive specialty tools transforms a difficult task into a precise, professional restoration process.
Key Takeaways:
- Avoid common household knives to prevent permanent wood damage.
- Use flat-edge tools to maintain a smooth surface for the next lining.
How to maintain felt without full removal?
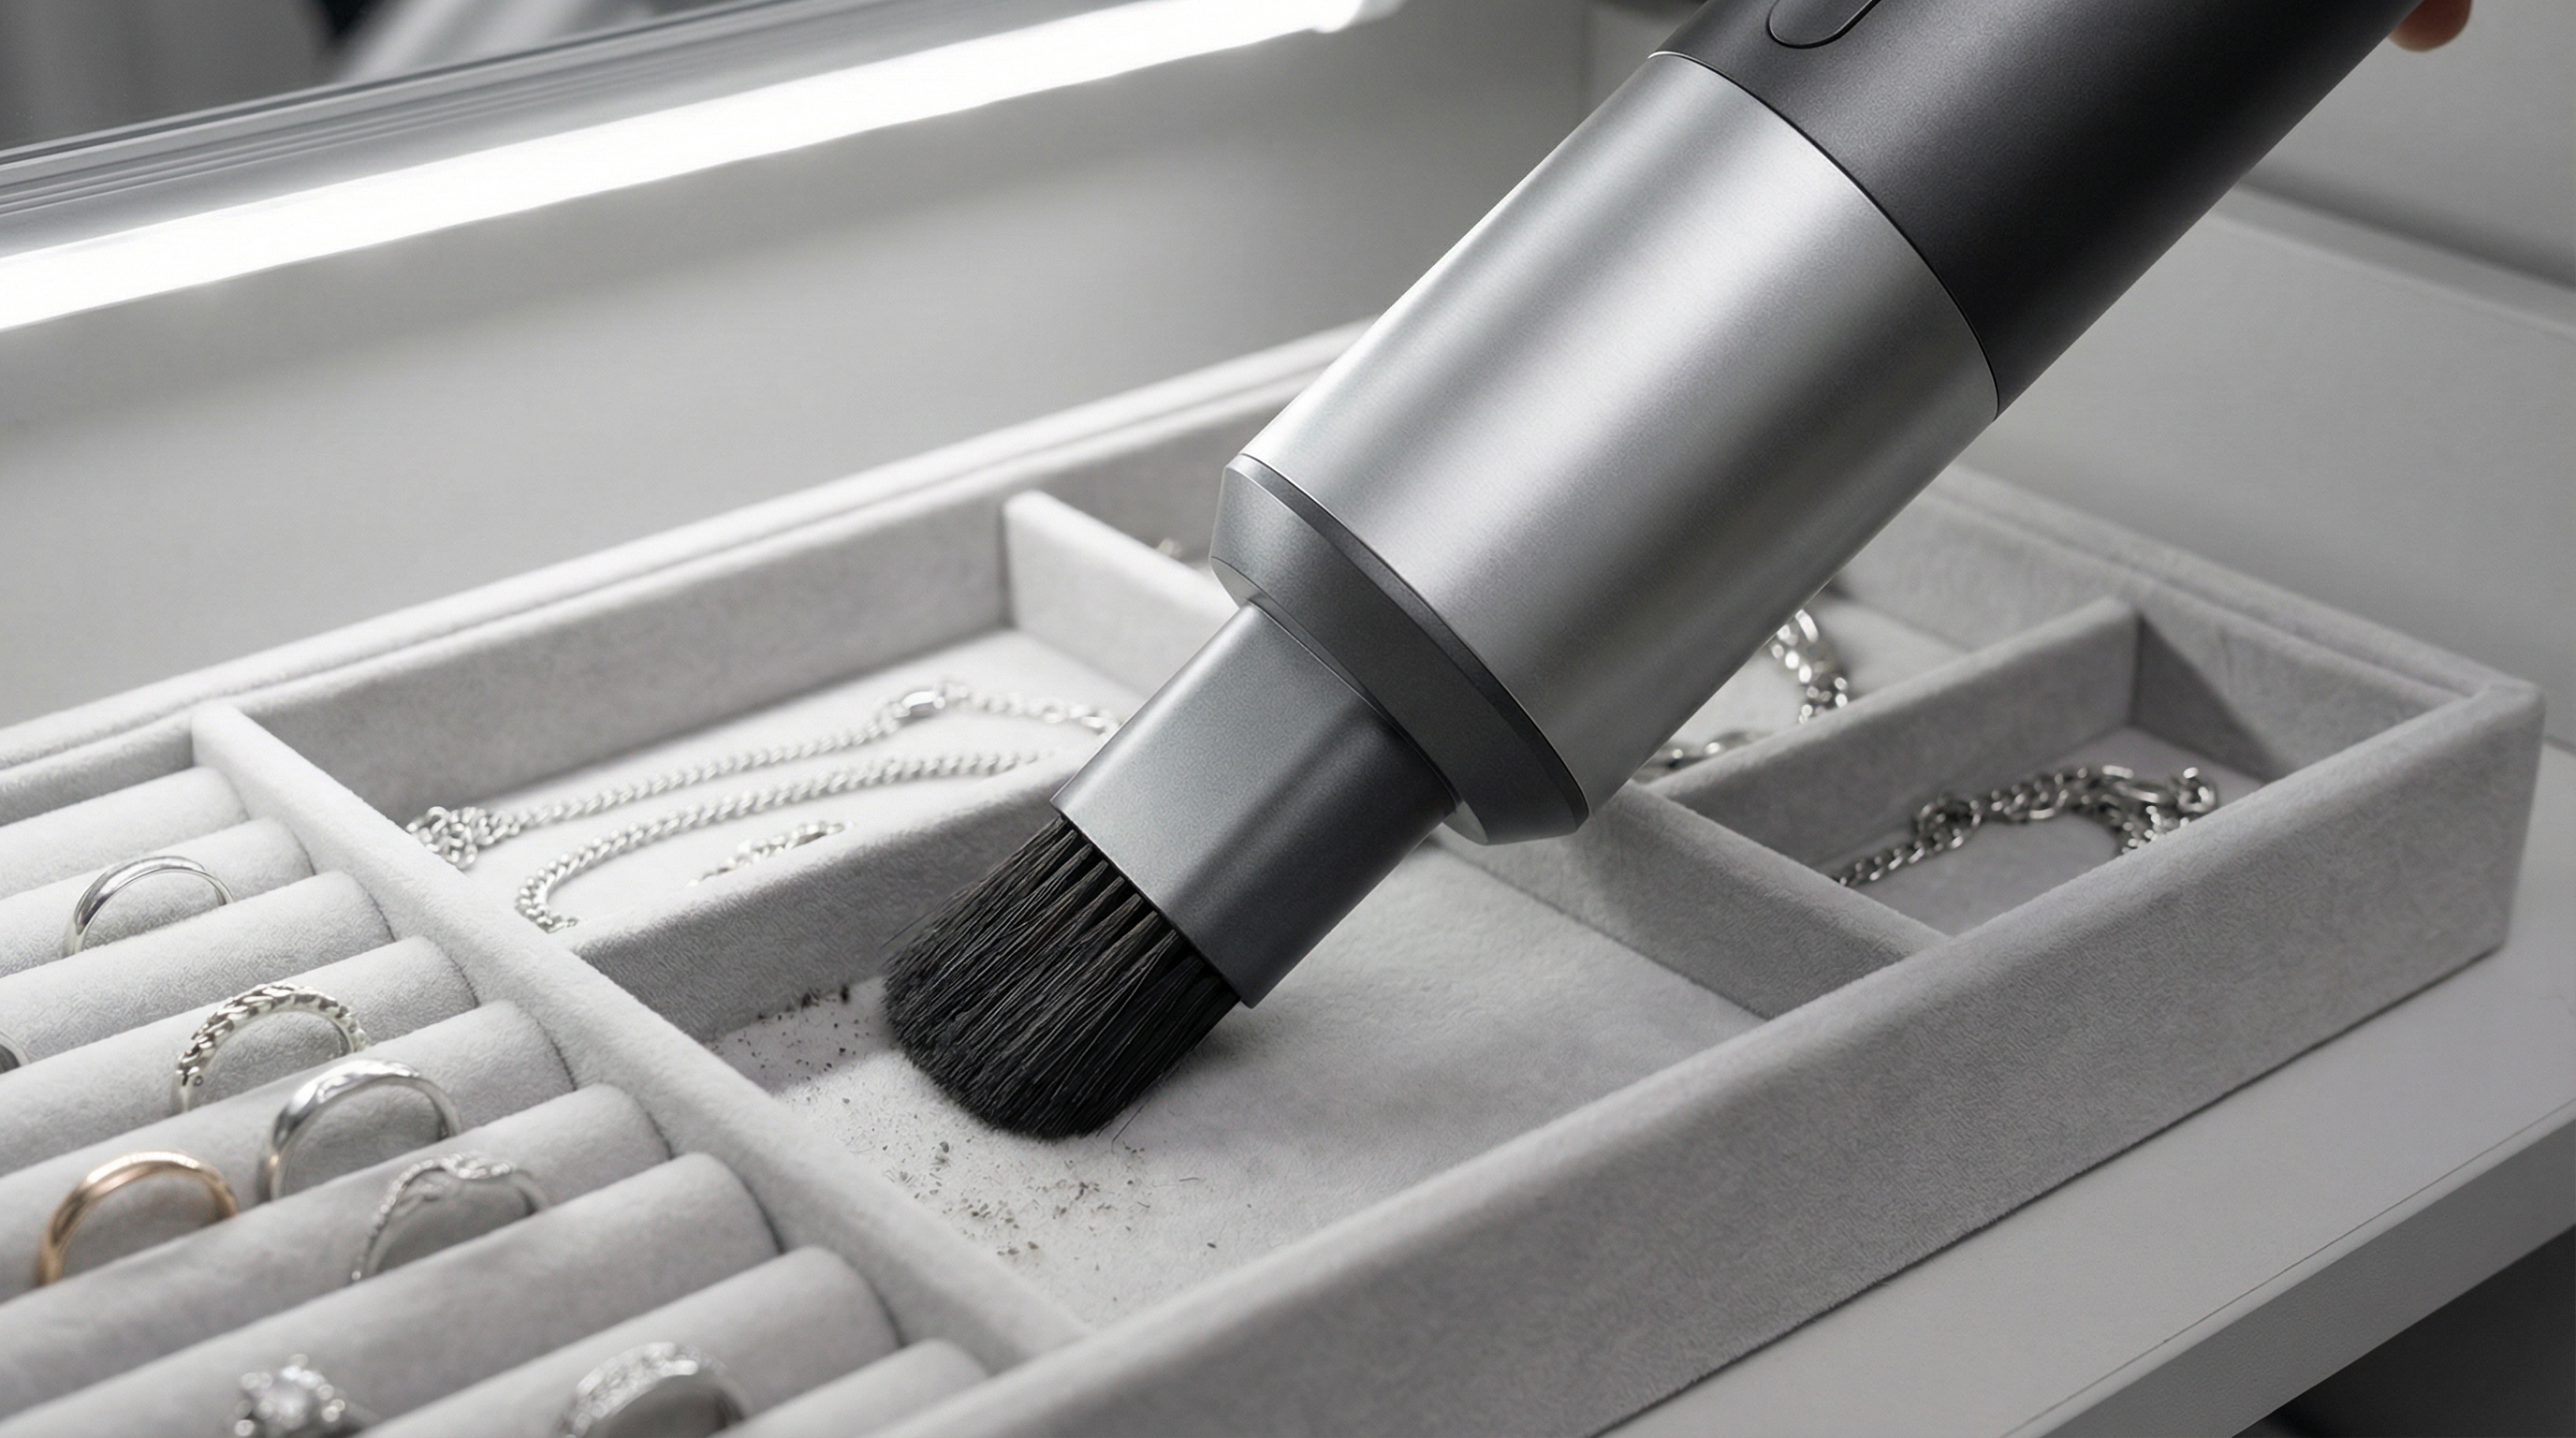
Maintenance is often a better alternative to removal when the structural integrity of the felt remains intact and clean. You should only research how to remove felt from a jewelry box if the fibers are matted or the odor has become unmanageable. Regular vacuuming with a soft brush attachment prevents the buildup of abrasive dust that can scratch polished metal surfaces. This proactive approach keeps your packaging looking premium for the end consumer.
Routine Surface Care
It gets better.
- Use a low-suction handheld vacuum twice a month.
- Employ a lint roller for pet hair or fibers.
- Dab small stains immediately with a damp microfiber cloth.
- Avoid placing the box in direct sunlight to prevent fading.
If you maintain the felt properly, it acts as a permanent buffer against moisture and tarnish for your gold and silver pieces. Consistency in care reduces the long-term cost of packaging replacement.
| Care Action | Frequency | Primary Benefit | |
|---|---|---|---|
| Dusting | Weekly | Prevents abrasive grit buildup | |
| Vacuuming | Monthly | Deep cleans the fiber base | |
| Odor Check | Quarterly | Identifies humidity issues early |
Proactive maintenance is the most cost-effective way to preserve the luxury unboxing experience for your jewelry brand.
Key Takeaways:
- Low-suction vacuuming is the safest way to remove harmful dust particles.
- Preventing damage is significantly cheaper than a full interior restoration.
What should you do with damaged vintage boxes?
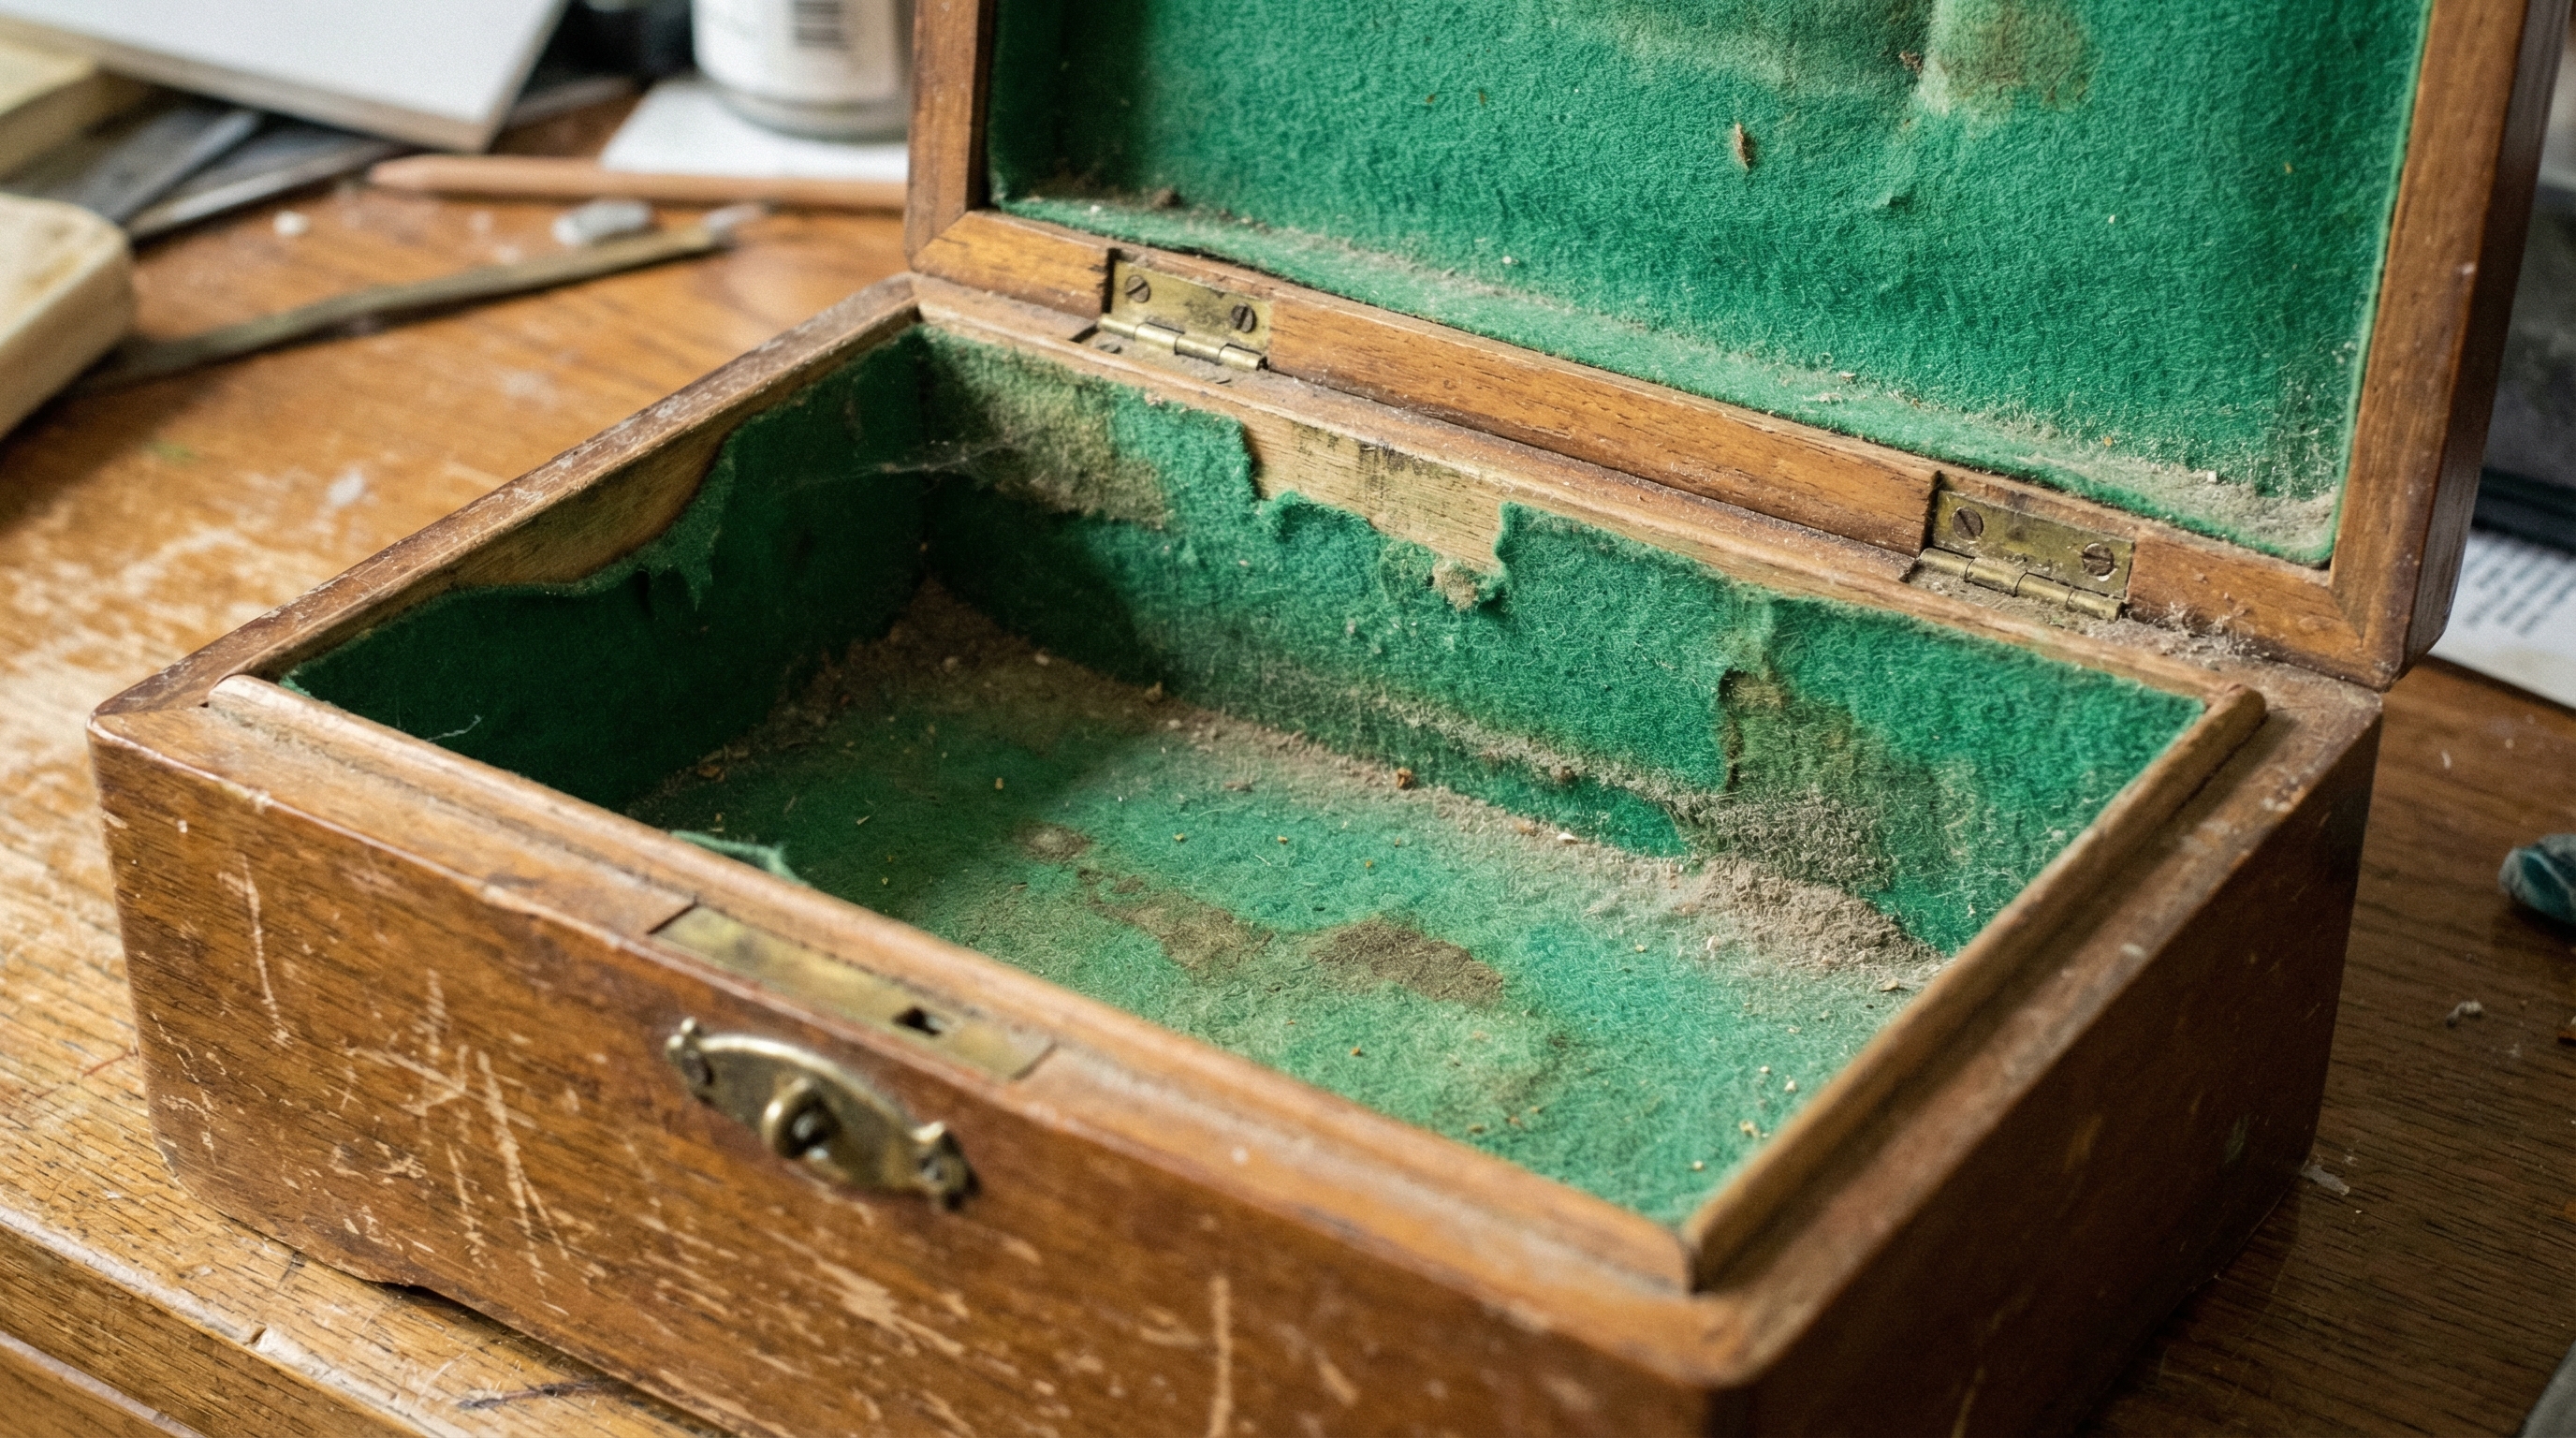
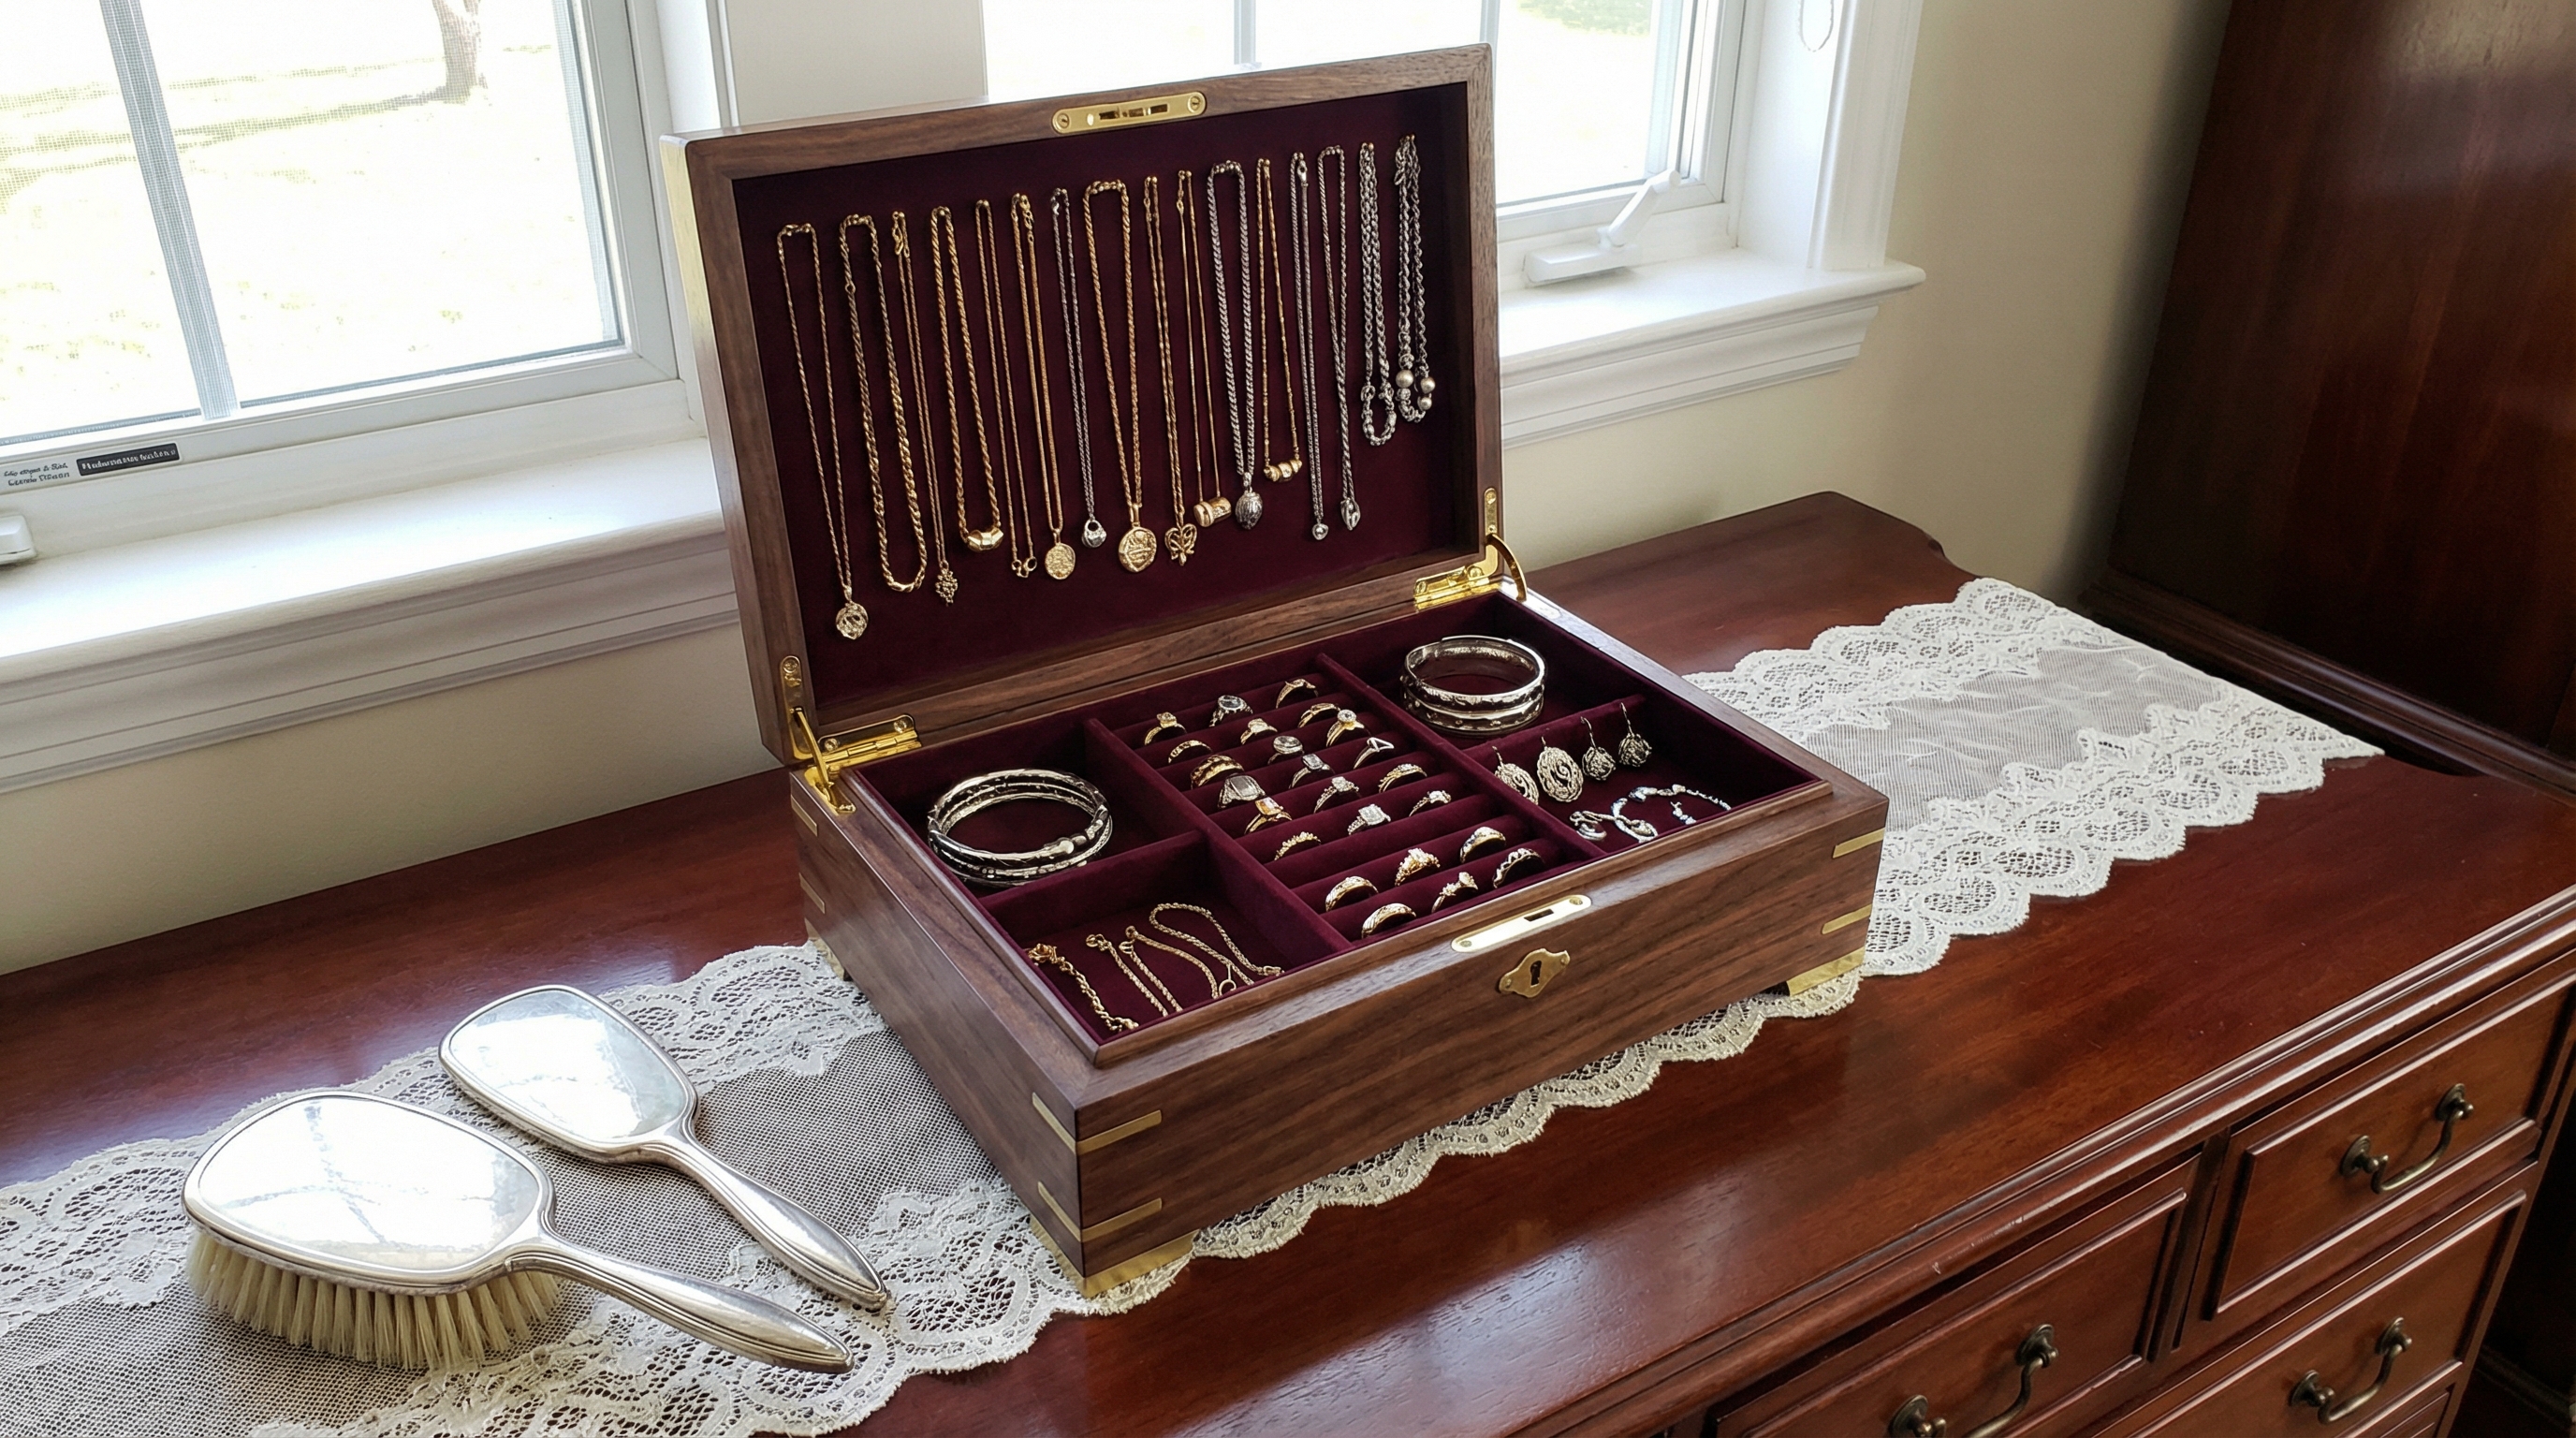
Vintage boxes often require a total interior overhaul due to decades of humidity and chemical exposure from old jewelry cleaners. Learning how to remove felt from a jewelry box allows you to restore these heirlooms to their original luxury status. Stripping the interior often reveals beautiful wood grain that can be refinished before new lining is applied. This process is essential for businesses dealing in estate jewelry or antique restoration.
Assessing Structural Damage
Bottom line?
- Check the corners for wood rot or mold growth.
- Inspect the hinges for rust that may have stained the felt.
- Look for deep oil stains that have seeped into the wood.
- Test the lid’s seal to ensure no moisture is entering.
You may find that once the felt is removed, the wood requires a light sanding and sealing to prevent odors from returning. This structural preparation is what separates a amateur fix from a professional restoration.
| Sign of Damage | Required Action | Priority | |
|---|---|---|---|
| Musty Odor | Strip felt and seal wood | High | |
| Fraying Edges | Partial or full relining | Moderate | |
| Faded Color | Cosmetic replacement only | Low |
Restoring a vintage box’s interior not only protects the jewelry but significantly increases the resale value of the packaging itself.
Key Takeaways:
- Vintage boxes almost always require a full strip-down for hygiene reasons.
- Sealing the wood after removal prevents the return of old, trapped odors.
Does water damage the jewelry box frame?
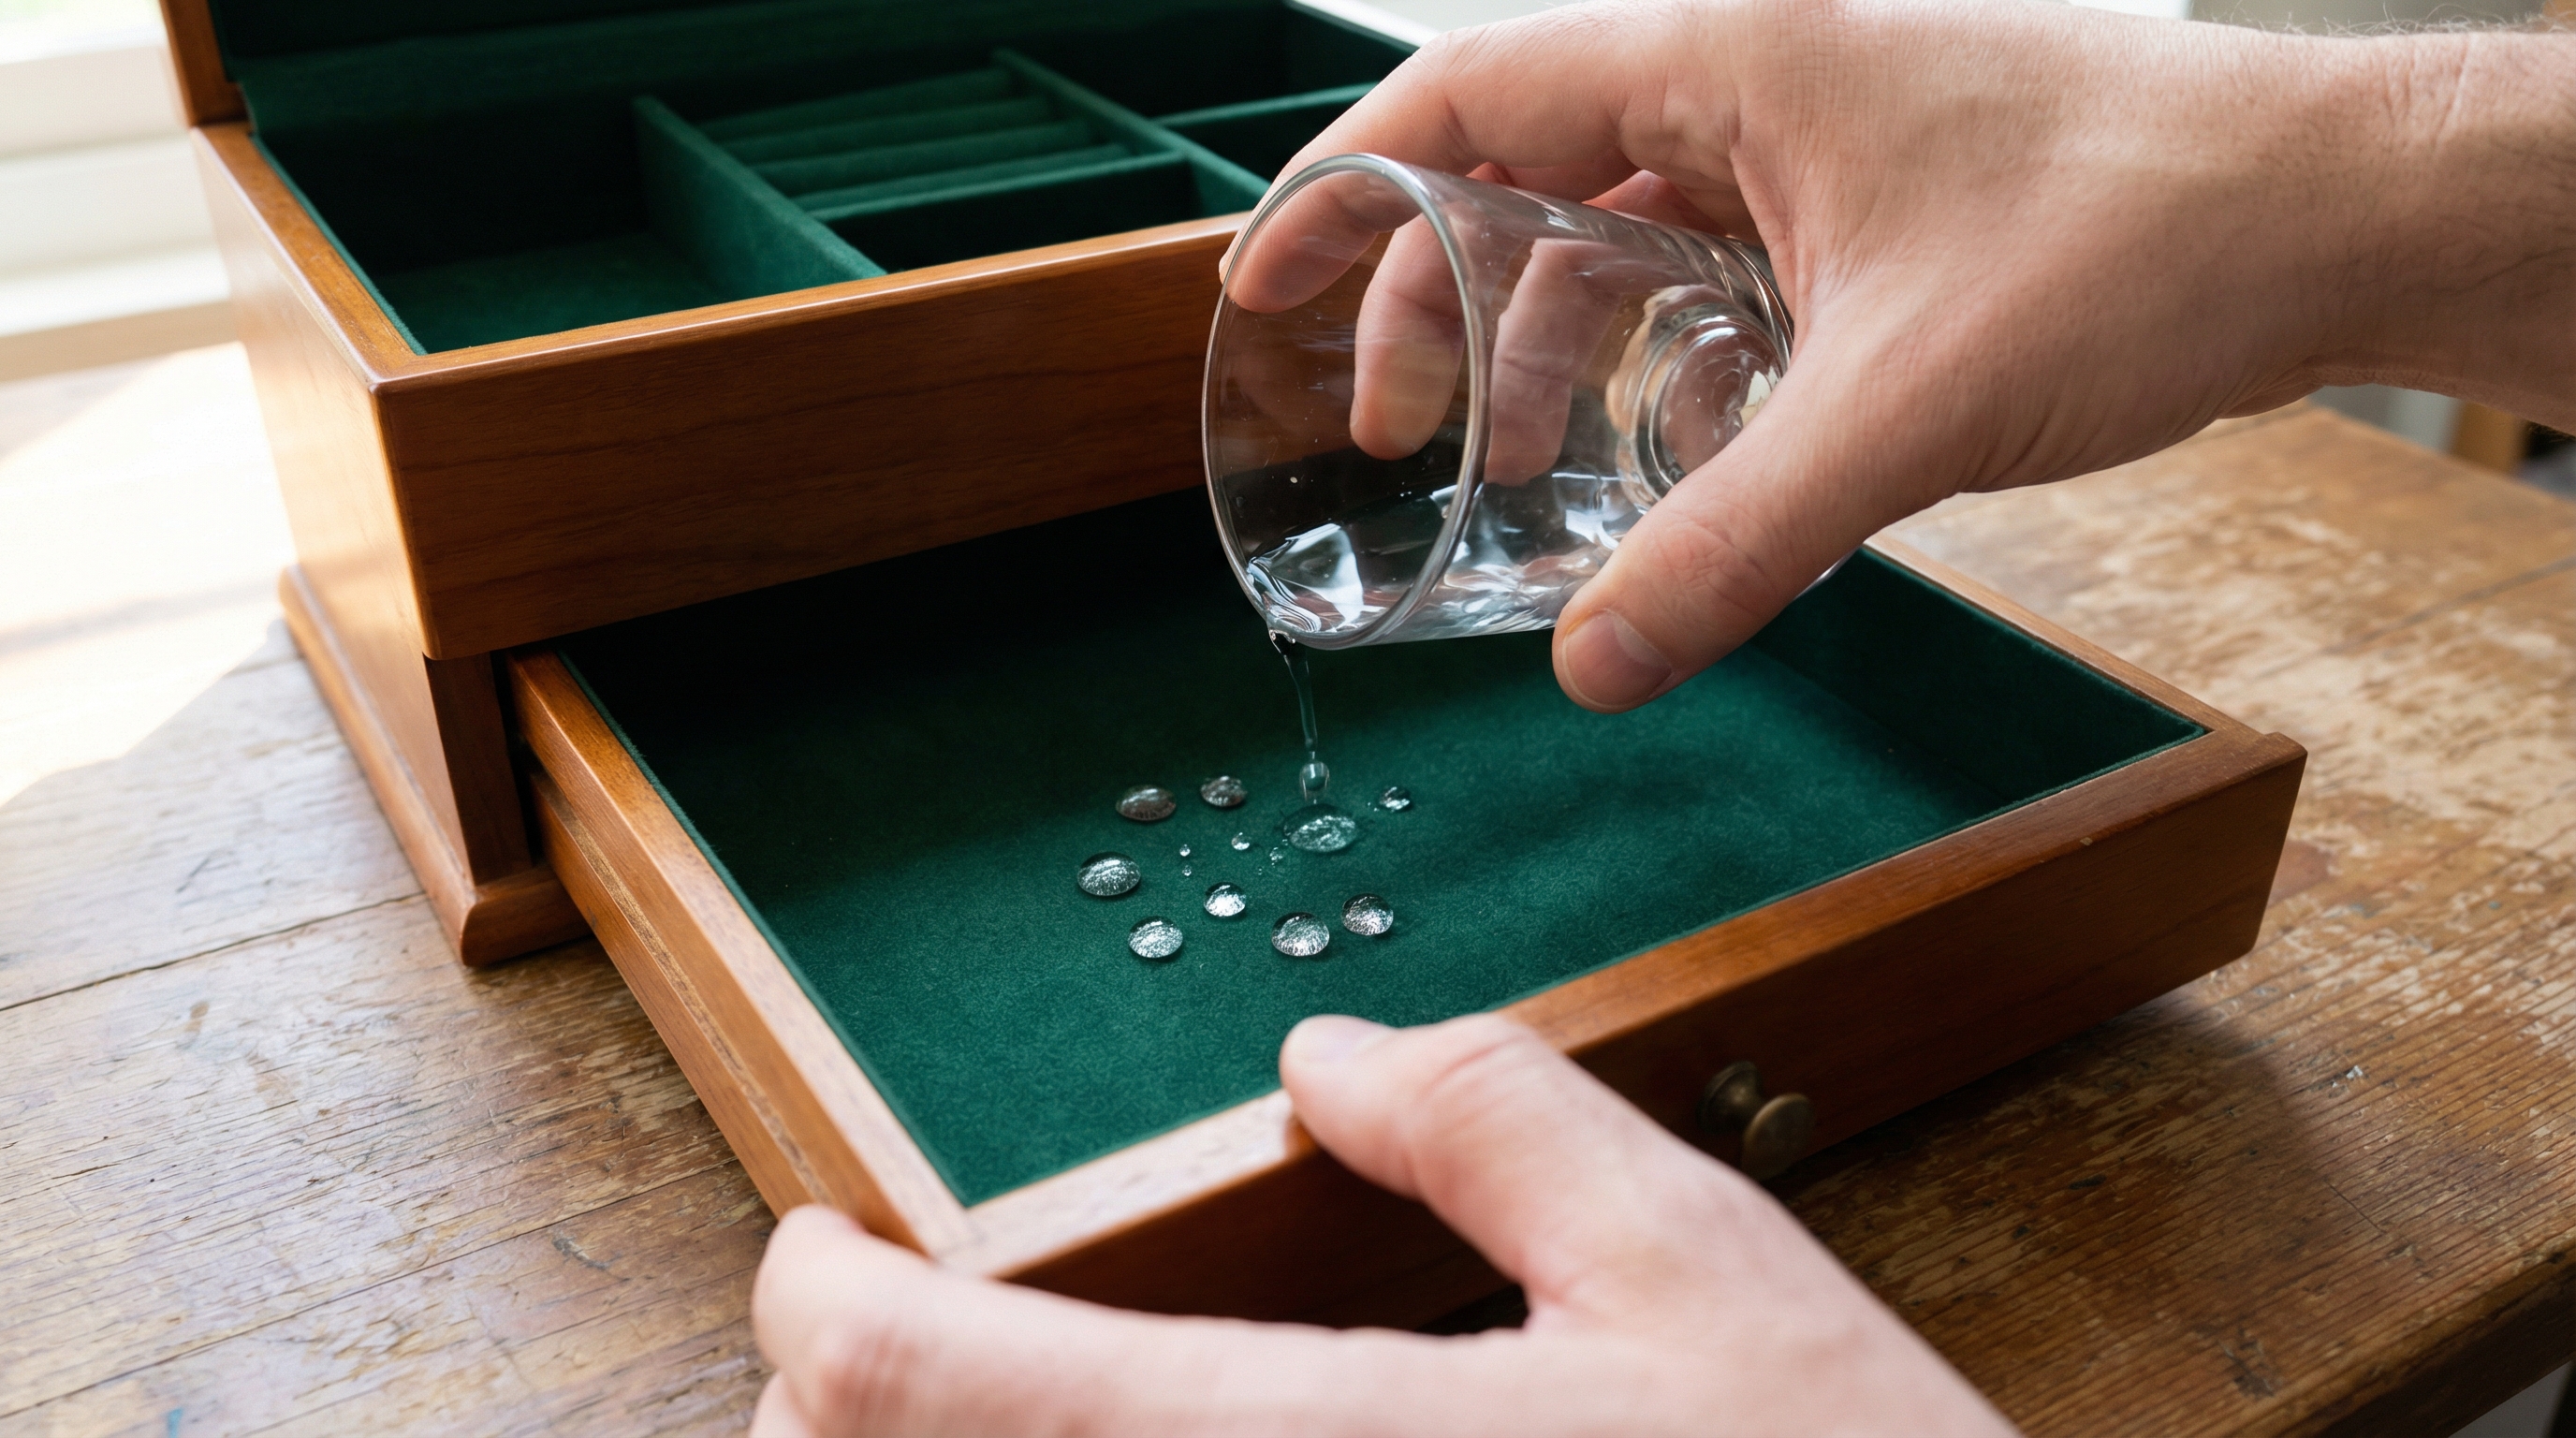
While water is effective for removal, excessive moisture can cause thin wooden veneers to warp or lift from the frame. You must be cautious regarding how to remove felt from a jewelry box when the exterior is made of moisture-sensitive materials. Using a damp sponge rather than pouring water directly into the box can mitigate the risk of permanent structural damage. Controlled application is the key to a successful, damage-free removal process.
Moisture Management Strategies
Here is the secret.
- Work in small sections to limit total water exposure.
- Use a dry towel to immediately wipe any spills on the exterior.
- Allow the box to air dry in a shaded, well-ventilated area.
- Never use a hairdryer, as heat can crack the wood.
If you notice the wood beginning to swell, stop the process immediately and allow it to dry completely before continuing. This vigilance ensures the box remains functional and attractive throughout the restoration.
| Wood Type | Water Tolerance | Recommendation | |
|---|---|---|---|
| Solid Hardwood | High | Safe for saturation method | |
| Plywood/Veneer | Low | Use damp sponge method only | |
| MDF/Composite | Very Low | Stick to dry prying methods |
Matching your water application technique to the material of the box frame is critical for preventing permanent warping or delamination.
Key Takeaways:
- Veneers are highly susceptible to moisture-induced lifting.
- Natural air drying is the only safe way to remove moisture from wood.
How to cut new materials for relining?
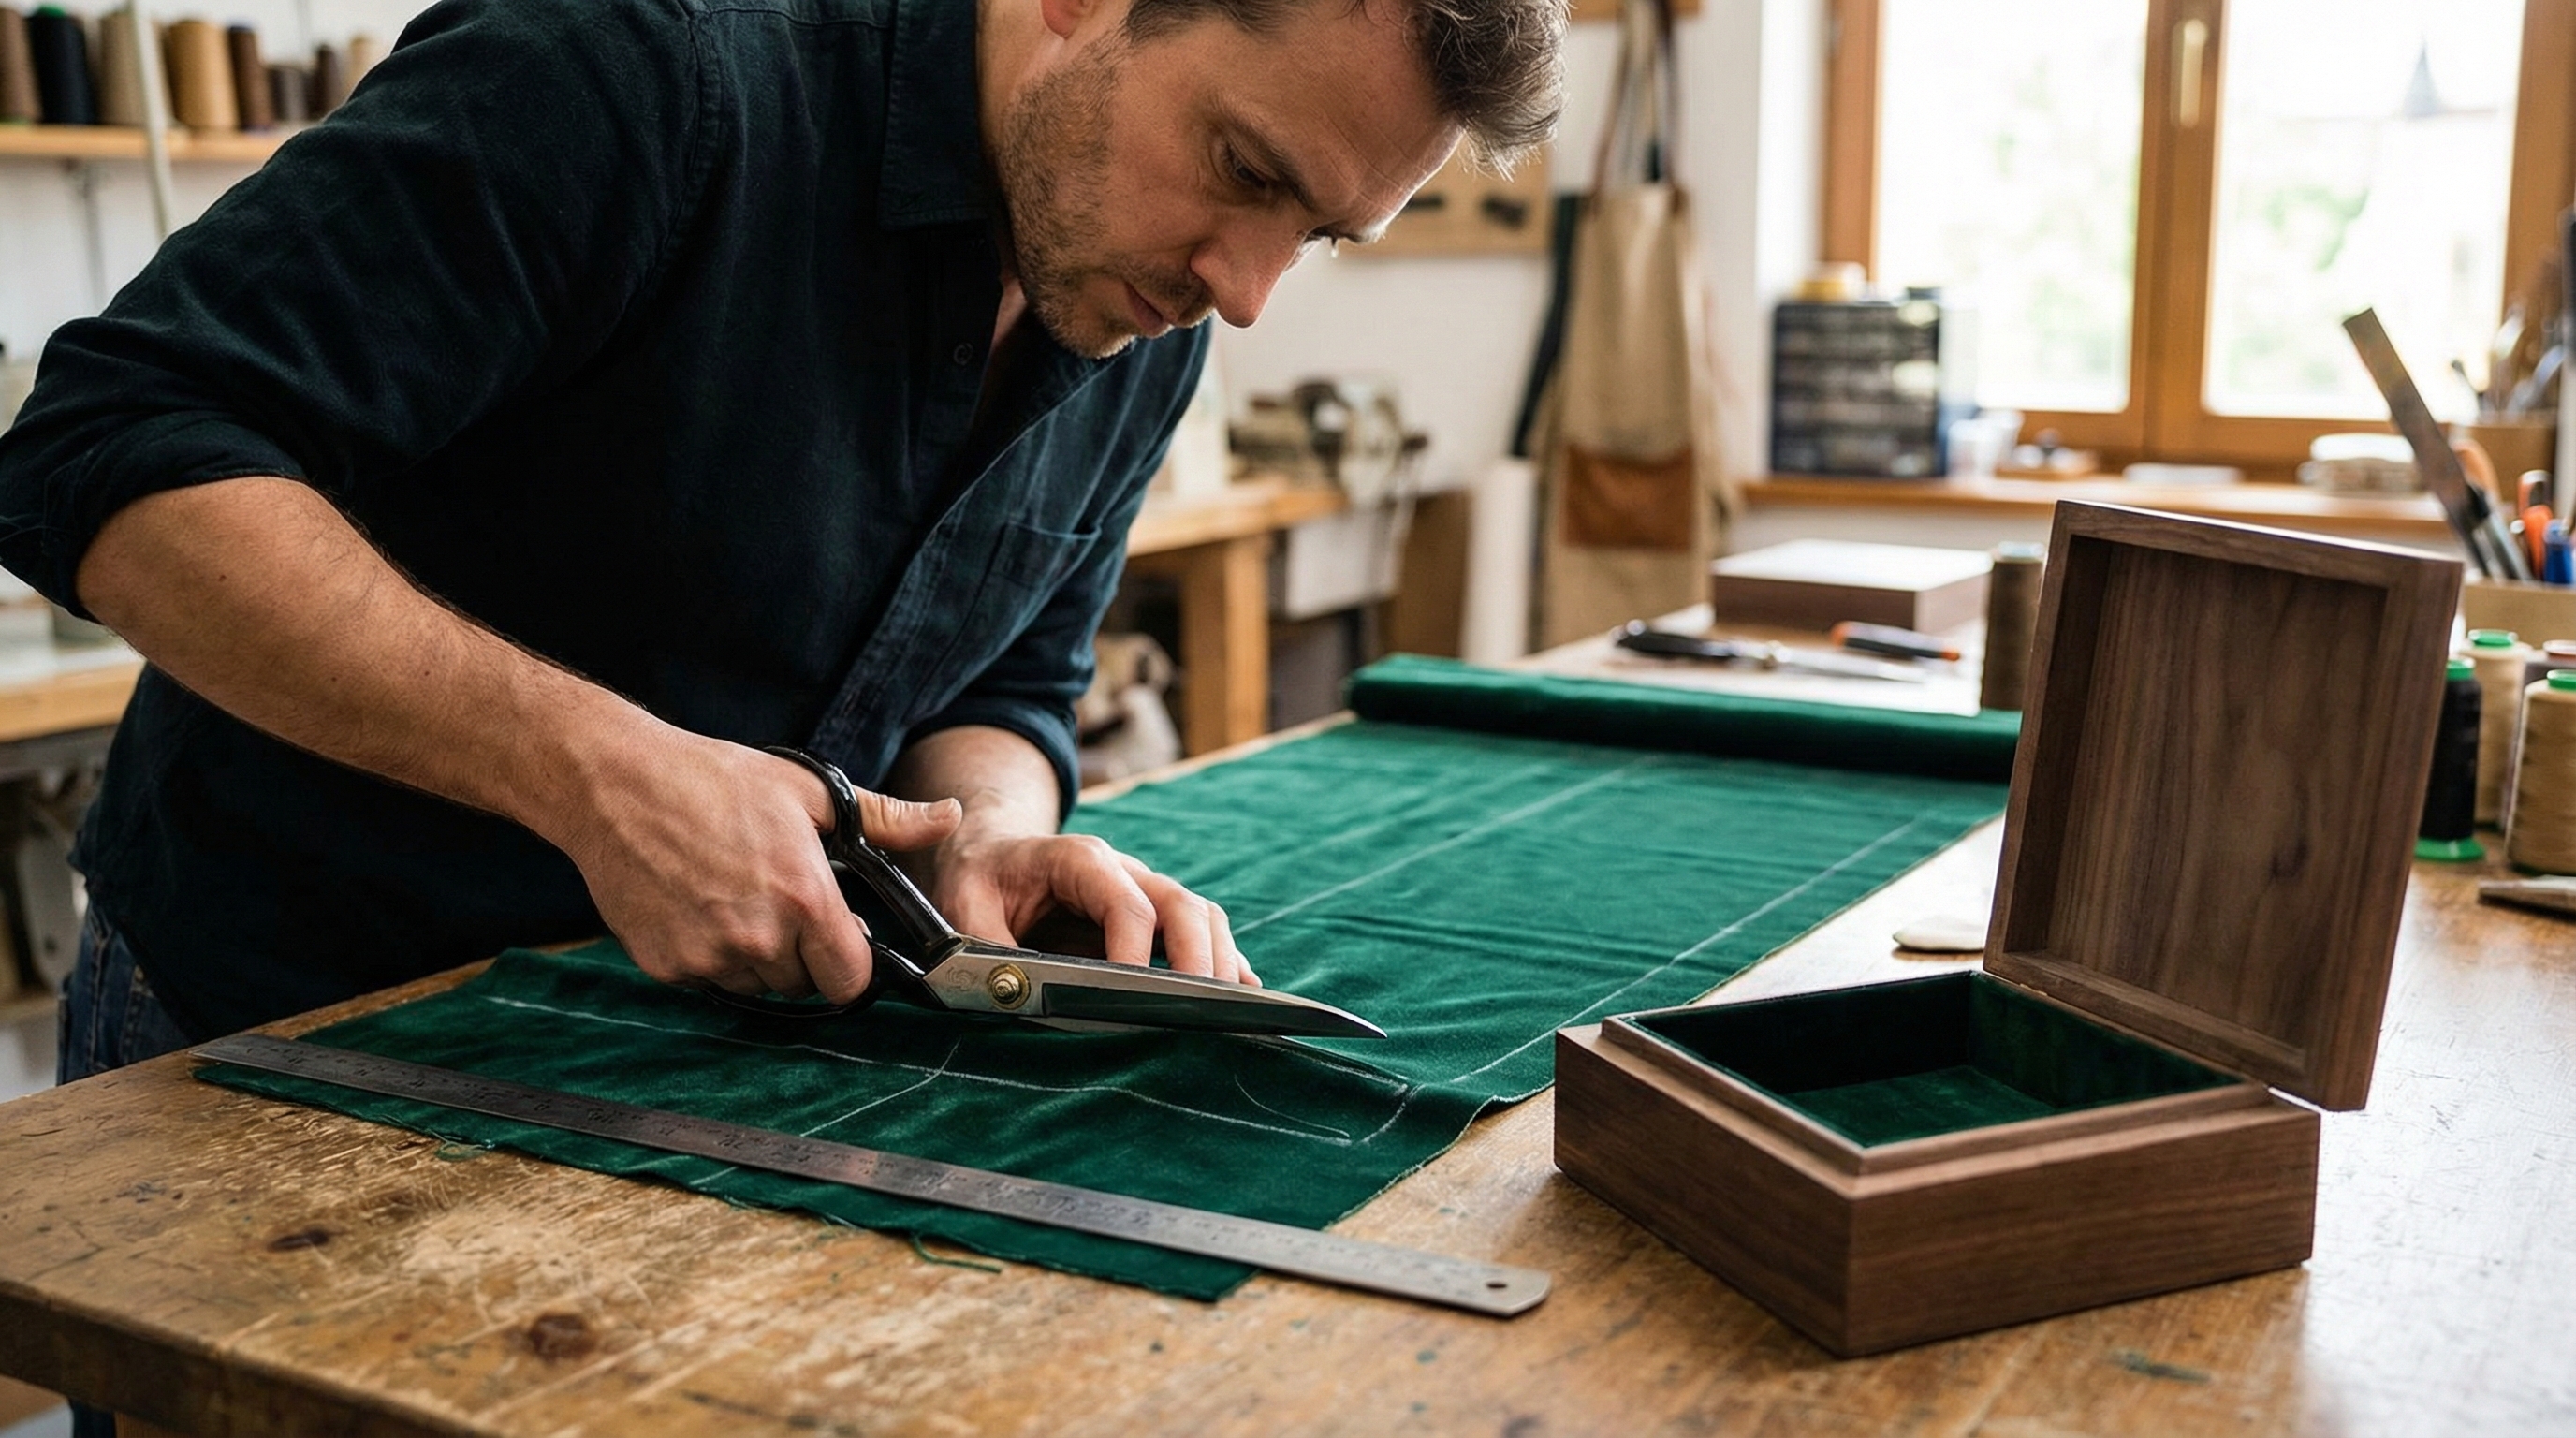
Precise cutting is the difference between a DIY appearance and a professional-grade finish that adds value to your brand. Once you master how to remove felt from a jewelry box , the next challenge is creating templates for the replacement fabric. Using the old pieces as “skeletons” ensures that your new wool felt fits every compartment with factory precision. This stage requires high-quality cutting tools and a steady hand.
Creating Perfect Templates
Ready to start?
- Use a sharp rotary cutter or fabric shears.
- Trace the old lining onto thin cardboard first.
- Leave a 1/8-inch allowance for folding over edges.
- Test the fit of the cardboard before cutting the final felt.
You should always cut your pieces slightly larger rather than smaller, as you can trim excess, but you cannot fix a gap. A perfect fit is essential for the seamless look expected in luxury jewelry packaging.
| Cutting Tool | Best For | Finish Quality | |
|---|---|---|---|
| Rotary Cutter | Long, straight lines | Professional / Clean | |
| Fabric Shears | Detailed corner work | High / Precise | |
| Utility Knife | Trimming after installation | Moderate / Rough |
Using templates and professional-grade cutting tools ensures your relined box meets the highest aesthetic standards for your clients.
Key Takeaways:
- Always use the old lining as a template to save measurement time.
- A 1/8-inch allowance is necessary for creating clean, tucked seams.
What is the best way to line ring holders?
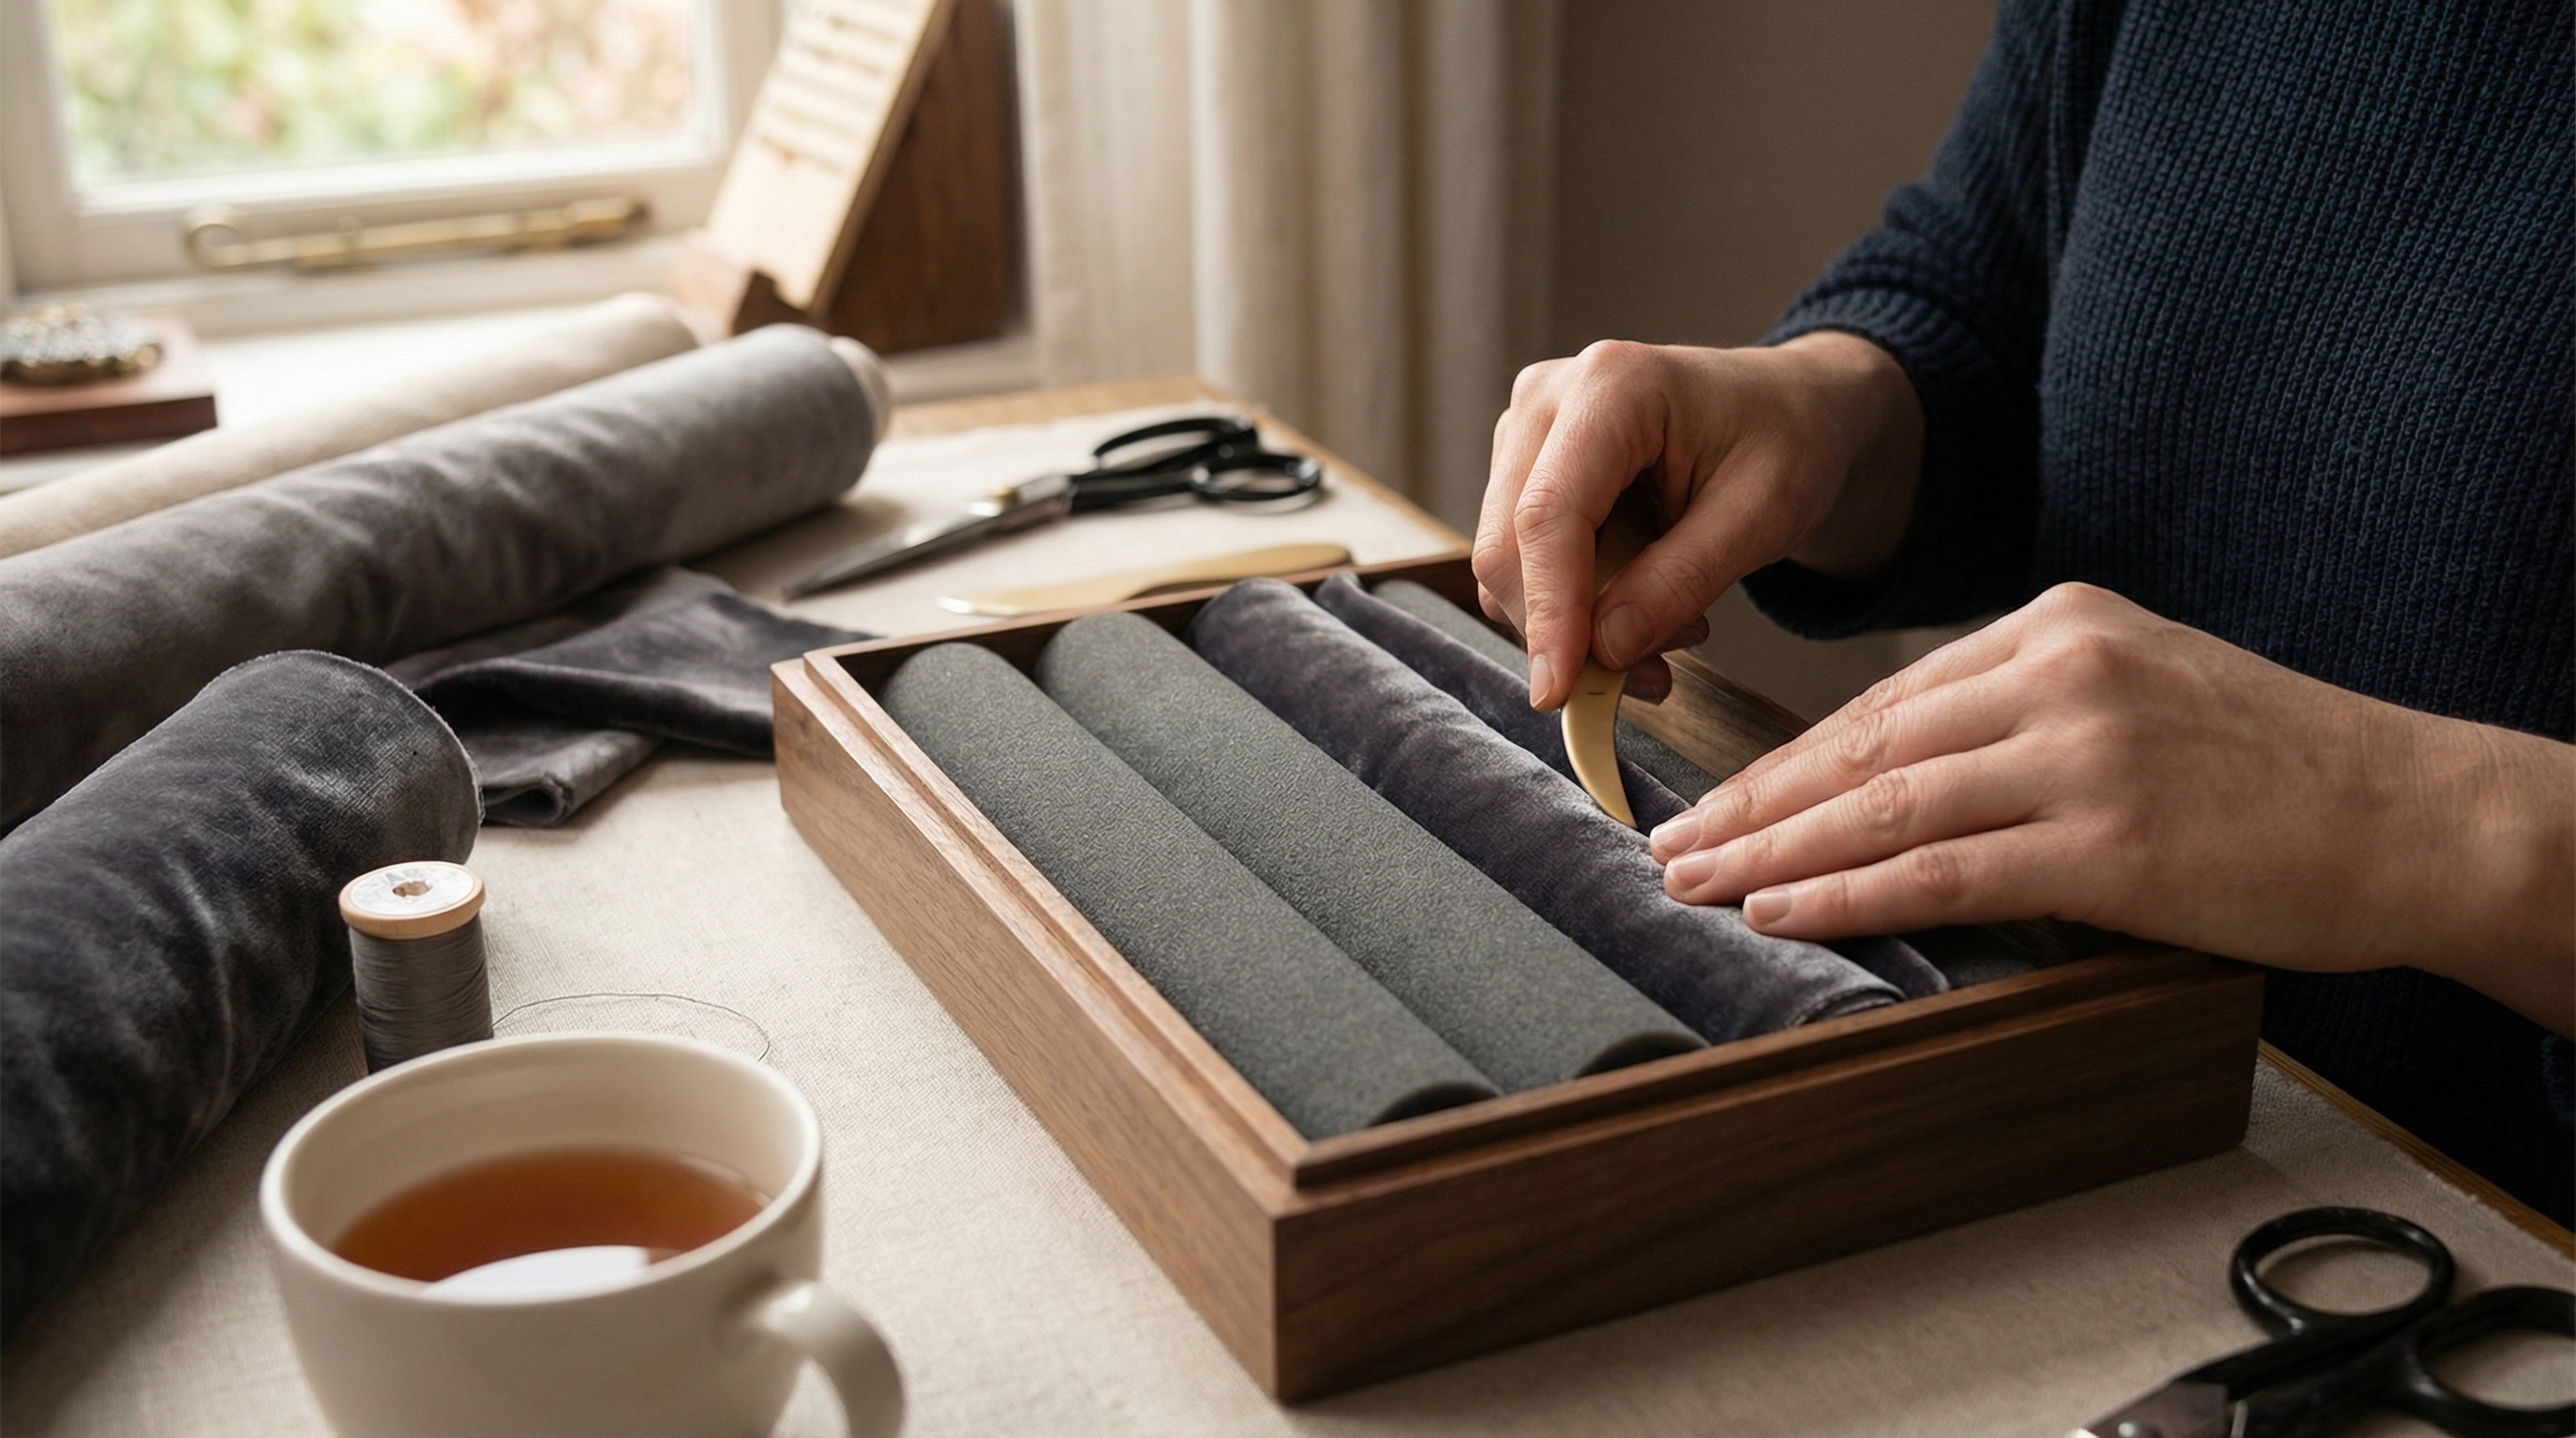
Ring holders require a flexible core, such as foam rolls, to provide the necessary tension for holding varied band sizes. If you have already completed the process of how to remove felt from a jewelry box, focus on wrapping these cores tightly without visible seams. High-quality velvet or wool felt provides the friction needed to keep rings upright during transit or display. This component is often the most used part of the box and requires durable assembly.
Wrapping Foam Core Inserts
You might wonder.
- Remove internal wires from foam hair curlers for the core.
- Apply a thin layer of spray adhesive to the foam.
- Roll the felt tightly around the core with a small overlap.
- Position the seam on the bottom of the holder for invisibility.
If you use too much glue, it will bleed through the felt and create hard spots that could scratch jewelry. A light, even application of adhesive is the secret to a professional feel.
| Component | Recommended Material | Function | |
|---|---|---|---|
| Core | High-density foam rolls | Provides tension for rings | |
| Lining | Plush wool felt or velvet | Non-abrasive protection | |
| Adhesive | Light spray glue | Bonds without bleed-through |
Properly constructed ring holders provide both a luxurious aesthetic and the functional security necessary for high-end retail displays.
Key Takeaways:
- Position all fabric seams at the bottom to maintain a premium look.
- Foam cores must be wrapped tightly to ensure consistent ring tension.
How to ensure a professional restoration finish?
A professional finish involves hidden seams, mitered corners, and the use of anti-tarnish fabrics to protect the contents long-term. After you figure out how to remove felt from a jewelry box , the final installation of the new lining defines the piece’s retail appeal. Our clients often find that a restored interior significantly boosts the perceived value of their jewelry packaging. It transforms a discarded container into a premium brand asset.
Final Inspection and QC
The result?
- Check that all corners are flush and free of gaps.
- Ensure the lid closes smoothly without catching on the lining.
- Inspect for any glue residue on the visible fabric surface.
- Verify that the anti-tarnish properties of the new felt are active.
You want to provide an unboxing experience that feels intentional and high-quality. Taking the time for a final QC check ensures that your craftsmanship reflects the value of the jewelry stored inside.
| Inspection Point | Standard | Fail Criteria | |
|---|---|---|---|
| Corner Alignment | 100% Flush | Visible wood or gaps | |
| Lid Function | Smooth Closure | Resistance or uneven seal | |
| Fabric Surface | Clean and lint-free | Glue spots or pilling |
A meticulous final inspection guarantees that your restoration work meets professional B2B standards and delights the end-user.
Key Takeaways:
- Mitered corners are essential for a professional, high-end finish.
- Anti-tarnish fabrics add functional value that retail customers appreciate.
FAQ
1. Can I use a hair dryer to dry the box after soaking the felt?No, you should not use artificial heat. Excessive heat can warp the wood or cause the exterior finish to crack; natural air drying is the safest method.
2. What’s the best way to remove sticky glue residue after the felt is gone?Dabbing with a small amount of coconut oil or rubbing alcohol is usually effective. This breaks down the chemical bond of the remaining adhesive without harming the wood grain.
3. How do I know if the glue in my box is water-soluble?Apply a drop of water to a corner. If the glue becomes tacky or soft within a minute, it is likely an older, water-soluble hide glue.
4. Is velvet better than felt for relining a professional box?Yes, velvet generally offers a more luxurious look and feel. However, wool felt is often preferred for its superior anti-tarnish properties and durability in high-traffic retail environments.
5. Can I reuse the old felt pieces as templates if they are torn?Yes, even torn pieces can be taped back together to create a rough template. It is much easier than starting from scratch with a tape measure.
Conclusion
Restoring a jewelry box by removing old felt is a precise process that preserves the beauty and function of high-quality packaging. Whether you utilize water saturation for aged adhesives or dry prying for modern inserts, the goal is to create a clean, protective environment for precious items. At YiXin Packaging, we believe that the interior of a jewelry box should be just as exquisite as the exterior, acting as a testament to your brand’s commitment to quality. To upgrade your brand’s presentation with factory-direct solutions, please contact us today for a free quote on custom jewelry boxes. We are dedicated to turning complex packaging needs into tangible brand assets that delight your customers worldwide.